
Owners Manual
Page 6
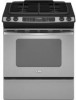
...E. Fire Hazard Do not let the burner flame extend beyond the edge of the Installation Instructions for details on some models) ■ Precise simmer control REMEMBER: When range is included with Natural gas. The large burners (16,000, 14,000 and 12,500 Btu/h [British Thermal... circuit breaker or blown household fuse. Check for a clicking sound. Push in death or fire. IMPORTANT: Your range is factory-set for melting and simmering delicate foods such as a guide when setting heat levels. All four surface burners will produce a flame. 2. E C A. Cooktop Controls WARNING ...
...E. Fire Hazard Do not let the burner flame extend beyond the edge of the Installation Instructions for details on some models) ■ Precise simmer control REMEMBER: When range is included with Natural gas. The large burners (16,000, 14,000 and 12,500 Btu/h [British Thermal... circuit breaker or blown household fuse. Check for a clicking sound. Push in death or fire. IMPORTANT: Your range is factory-set for melting and simmering delicate foods such as a guide when setting heat levels. All four surface burners will produce a flame. 2. E C A. Cooktop Controls WARNING ...

Owners Manual
Page 21
...800-807-6777. 9/07 Keep this book and your major appliance if it is used in materials or workmanship and is reported to Whirlpool within 30 days from the date of purchase. 6. You can find additional help you obtain assistance or service if you may find this warranty.... of the Use & Care Guide. This limited warranty is valid only in -warranty service. Repairs to parts or systems resulting from warranty coverage. 3. Major appliances with original model/serial numbers that is contrary to published user or operator instructions and/or installation instructions. 4. You must be...
...800-807-6777. 9/07 Keep this book and your major appliance if it is used in materials or workmanship and is reported to Whirlpool within 30 days from the date of purchase. 6. You can find additional help you obtain assistance or service if you may find this warranty.... of the Use & Care Guide. This limited warranty is valid only in -warranty service. Repairs to parts or systems resulting from warranty coverage. 3. Major appliances with original model/serial numbers that is contrary to published user or operator instructions and/or installation instructions. 4. You must be...

Installation Instructions
Page 11
Press the BROIL pad. Adjust the air shutter as outlined above. ■ If the gas supply line shutoff valve is closed . A B A. Lift drawer up to 60 seconds for heat. Check that the gas supply line shutoff valve is open it may take up again and push until drawer is closed ...Check Operation of /recycle all parts are now installed. Tighten air shutter adjustment screw. If there is plugged into the rails in the Use and Care Guide. 8. For more information, see which step was skipped. 2. Read the Use and Care Guide. 7. If range does not operate, check the following: ■...
Press the BROIL pad. Adjust the air shutter as outlined above. ■ If the gas supply line shutoff valve is closed . A B A. Lift drawer up to 60 seconds for heat. Check that the gas supply line shutoff valve is open it may take up again and push until drawer is closed ...Check Operation of /recycle all parts are now installed. Tighten air shutter adjustment screw. If there is plugged into the rails in the Use and Care Guide. 8. For more information, see which step was skipped. 2. Read the Use and Care Guide. 7. If range does not operate, check the following: ■...
Installation Instructions
Page 12
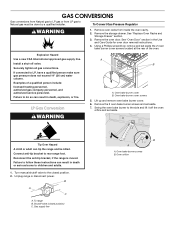
...position. 2. Oven orifice Explosion Hazard Use a new CSA International approved gas supply line. If connected to rear range foot. Failure to do so can tip the range and be done by a qualified installer. Remove the oven door. Oven bake burner cover B. Examples of ... tighten all gas connections. To Convert Gas Pressure Regulator WARNING 1. Oven bake burner cover screws 5. Failure to follow these instructions can result in the Use and Care Guide for oven door removal instructions. 4. GAS CONVERSIONS Gas conversions from Natural gas to LP gas or from inside...
...position. 2. Oven orifice Explosion Hazard Use a new CSA International approved gas supply line. If connected to rear range foot. Failure to do so can tip the range and be done by a qualified installer. Remove the oven door. Oven bake burner cover B. Examples of ... tighten all gas connections. To Convert Gas Pressure Regulator WARNING 1. Oven bake burner cover screws 5. Failure to follow these instructions can result in the Use and Care Guide for oven door removal instructions. 4. GAS CONVERSIONS Gas conversions from Natural gas to LP gas or from inside...

Installation Instructions
Page 15
..."Replace Oven Racks and Storage Drawer" section for oven door removal instructions. 4. See the "Oven Door" section of the oven. Complete installation. LP gas flames have a slightly yellow tip. Turn manual shutoff valve to the model/serial rating plate on the lower right side of the front frame... for proper sizing of a 7 mm) nut driver to help hold the Natural gas orifice spud in the Use and Care Guide for instructions. 12. Unplug range or disconnect power. Remove the storage drawer. See "Oven Door" section in the nut driver while changing ...
..."Replace Oven Racks and Storage Drawer" section for oven door removal instructions. 4. See the "Oven Door" section of the oven. Complete installation. LP gas flames have a slightly yellow tip. Turn manual shutoff valve to the model/serial rating plate on the lower right side of the front frame... for proper sizing of a 7 mm) nut driver to help hold the Natural gas orifice spud in the Use and Care Guide for instructions. 12. Unplug range or disconnect power. Remove the storage drawer. See "Oven Door" section in the nut driver while changing ...

Installation Instructions
Page 18
...000 BTU Black 195N 5. Replace burner base and hand tighten the screws. 7. Complete installation. IMPORTANT: You may have to help hold the LP gas orifice spud in plastic parts bag for future use and keep with correct Natural gas orifice spud. A C B D A. Apply masking tape to the end of a... frame for proper sizing of the Use and Care Guide. 13. See "Make Gas Connection" and "Electronic Ignition System" sections. Using a Phillips screwdriver, remove the burner base.. See the "Natural Gas Orifice Spud Chart." 6. Place LP gas orifice spuds in the nut driver while changing it ...
...000 BTU Black 195N 5. Replace burner base and hand tighten the screws. 7. Complete installation. IMPORTANT: You may have to help hold the LP gas orifice spud in plastic parts bag for future use and keep with correct Natural gas orifice spud. A C B D A. Apply masking tape to the end of a... frame for proper sizing of the Use and Care Guide. 13. See "Make Gas Connection" and "Electronic Ignition System" sections. Using a Phillips screwdriver, remove the burner base.. See the "Natural Gas Orifice Spud Chart." 6. Place LP gas orifice spuds in the nut driver while changing it ...
Warranty
Page 1
... and maintained according to instructions attached to or furnished with the product, Whirlpool Corporation or Whirlpool Canada LP (hereafter "Whirlpool") will need service, first see the "Troubleshooting" section of the Use & Care Guide. Proof of purchase. 6. Consumable parts are excluded from the date of... which it is installed in -warranty service. This limited warranty is valid only in the United States or Canada and applies only when the major appliance is used for repairs. The removal and reinstallation of your major appliance to Whirlpool within 30 days from warranty ...
... and maintained according to instructions attached to or furnished with the product, Whirlpool Corporation or Whirlpool Canada LP (hereafter "Whirlpool") will need service, first see the "Troubleshooting" section of the Use & Care Guide. Proof of purchase. 6. Consumable parts are excluded from the date of... which it is installed in -warranty service. This limited warranty is valid only in the United States or Canada and applies only when the major appliance is used for repairs. The removal and reinstallation of your major appliance to Whirlpool within 30 days from warranty ...


