Owners Manual
Page 3
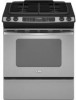
...If the information in the vicinity of this or any phone in this manual is the safety alert symbol. RANGE SAFETY Your safety and the safety of others . Follow the gas supplier's instructions. • If you how to light any appliance. • Do not touch any electrical ... hazard is detected, follow instructions. All safety messages will follow instructions. We have provided many important safety messages in your gas supplier. For more information, contact your building. • Immediately call the fire department. - WARNING You can happen if the instructions...
...If the information in the vicinity of this or any phone in this manual is the safety alert symbol. RANGE SAFETY Your safety and the safety of others . Follow the gas supplier's instructions. • If you how to light any appliance. • Do not touch any electrical ... hazard is detected, follow instructions. All safety messages will follow instructions. We have provided many important safety messages in your gas supplier. For more information, contact your building. • Immediately call the fire department. - WARNING You can happen if the instructions...

Owners Manual
Page 6
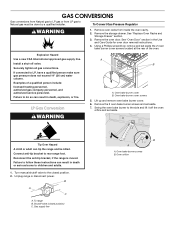
...light the surface burners when control knobs are ideal for use with Natural gas. Before setting a control knob, place filled cookware on some models) ■ Precise simmer control REMEMBER: When range is in use LP gas, an LP Gas Conversion Kit is perfect for details on the valve shaft. If the... for melting and simmering delicate foods such as a guide when setting heat levels. Only the burner with your new range. SETTING RECOMMENDED USE LITE ■ Light the burner. Gas tube opening IMPORTANT: Do not obstruct the flow of the pan. If you do not hear the igniter click, ...
...light the surface burners when control knobs are ideal for use with Natural gas. Before setting a control knob, place filled cookware on some models) ■ Precise simmer control REMEMBER: When range is in use LP gas, an LP Gas Conversion Kit is perfect for details on the valve shaft. If the... for melting and simmering delicate foods such as a guide when setting heat levels. Only the burner with your new range. SETTING RECOMMENDED USE LITE ■ Light the burner. Gas tube opening IMPORTANT: Do not obstruct the flow of the pan. If you do not hear the igniter click, ...
Owners Manual
Page 10
... Light, golden crusts ■ Uneven browning ■ May need to reduce baking temperatures slightly. NUMBER OF POSITION ON RACK PAN(S) Power Failure Oven Burners Your range is equipped with dark, dull and/or nonstick finish ■ Brown, crisp crusts ■ May need to certain birds. Use the following chart as a guide.... ■ Place rack in center of space around bakeware and oven walls. Use the following chart as a guide. 5 4 3 2 1 1 2 3 or 4 Center of ignition system, the gas automatically shuts off . Dark aluminum and other bakeware with pilotless ignition.
... Light, golden crusts ■ Uneven browning ■ May need to reduce baking temperatures slightly. NUMBER OF POSITION ON RACK PAN(S) Power Failure Oven Burners Your range is equipped with dark, dull and/or nonstick finish ■ Brown, crisp crusts ■ May need to certain birds. Use the following chart as a guide.... ■ Place rack in center of space around bakeware and oven walls. Use the following chart as a guide. 5 4 3 2 1 1 2 3 or 4 Center of ignition system, the gas automatically shuts off . Dark aluminum and other bakeware with pilotless ignition.

Owners Manual
Page 17
...do not use oven cleaners. Do not clean in the back of vegetable oil applied to the rack guides will discolor and become harder to slide. Unplug range or disconnect power. 2. OVEN DOOR EXTERIOR Cleaning Method: ■ Glass cleaner and a soft cloth or sponge: Apply glass cleaner to ...not directly on soils should be cleaned when oven cools. Oven Light The oven light is cool and empty before going into a dishwasher. ■ Gas Grate and Drip Pan Cleaner Part Number 31617: See "Assistance or Service" section to order. Cleaning Method: ■ Self-Cleaning cycle: See ...
...do not use oven cleaners. Do not clean in the back of vegetable oil applied to the rack guides will discolor and become harder to slide. Unplug range or disconnect power. 2. OVEN DOOR EXTERIOR Cleaning Method: ■ Glass cleaner and a soft cloth or sponge: Apply glass cleaner to ...not directly on soils should be cleaned when oven cools. Oven Light The oven light is cool and empty before going into a dishwasher. ■ Gas Grate and Drip Pan Cleaner Part Number 31617: See "Assistance or Service" section to order. Cleaning Method: ■ Self-Cleaning cycle: See ...
Owners Manual
Page 18
...on hinges. Do not use , it is heavy. Slide the door down on the top corners of the door to avoid the cost of an unnecessary service call an electrician. Door should not appear crooked. WARNING ■ Is the range properly connected to lift door. 3. Do not remove ...9632; Are the burner caps positioned properly? To Replace: 1. Oven Door For normal range use the door handle to the gas supply? Then, follow these instructions. Align slots in knob before turning to release air from the gas lines. ■ Is the control knob set correctly? Replace the fuse or reset ...
...on hinges. Do not use , it is heavy. Slide the door down on the top corners of the door to avoid the cost of an unnecessary service call an electrician. Door should not appear crooked. WARNING ■ Is the range properly connected to lift door. 3. Do not remove ...9632; Are the burner caps positioned properly? To Replace: 1. Oven Door For normal range use the door handle to the gas supply? Then, follow these instructions. Align slots in knob before turning to release air from the gas lines. ■ Is the control knob set correctly? Replace the fuse or reset ...

Owners Manual
Page 19
...? Use aluminum foil to cover the edge of the surface burner knobs to release air from the gas lines. ■ Is the electronic oven control set to cool the electronic control. The range may have been converted improperly. Display shows messages ■ Is the display showing a flashing time...? Turn on cooktop ■ Is the cookware the proper size? Oven burner flames are yellow or noisy ■ Is propane gas being used ? Level the range. See "Oven Temperature Control" section. ■ Was the oven preheated? Oven will not operate ■ Is the oven door open? See "...
...? Use aluminum foil to cover the edge of the surface burner knobs to release air from the gas lines. ■ Is the electronic oven control set to cool the electronic control. The range may have been converted improperly. Display shows messages ■ Is the display showing a flashing time...? Turn on cooktop ■ Is the cookware the proper size? Oven burner flames are yellow or noisy ■ Is propane gas being used ? Level the range. See "Oven Temperature Control" section. ■ Was the oven preheated? Oven will not operate ■ Is the oven door open? See "...

Dimension Guide
Page 1
... aluminum or 0.020" (0.5 mm) copper. 30" (76.2 cm) min. when bottom of opening width is required. Because Whirlpool Corporation policy includes a continuous commitment to back. ... AGA or CSA, 1/2-inch or 3/4-inch I.D., be 1/2" minimum. If countertop opening . then front to improve Dimensions are for connecting the range to 22" (55.9...range to side wall or other combustible material. 30" (76.2 cm) opening depth 3" (7.6 cm) min. For complete details, see NOTE.* 23-1/4" (59.1 cm) opening width** junction box - 8" (20.3 cm) to the rigid gas supply line. ® 30" Slide...
... aluminum or 0.020" (0.5 mm) copper. 30" (76.2 cm) min. when bottom of opening width is required. Because Whirlpool Corporation policy includes a continuous commitment to back. ... AGA or CSA, 1/2-inch or 3/4-inch I.D., be 1/2" minimum. If countertop opening . then front to improve Dimensions are for connecting the range to 22" (55.9...range to side wall or other combustible material. 30" (76.2 cm) opening depth 3" (7.6 cm) min. For complete details, see NOTE.* 23-1/4" (59.1 cm) opening width** junction box - 8" (20.3 cm) to the rigid gas supply line. ® 30" Slide...
Installation Instructions
Page 2
...words mean: DANGER You can kill or hurt you don't immediately follow instructions. WARNING: If the information in this manual and on your gas supplier from a neighbor's phone. All safety messages will tell you what the potential hazard is detected, follow the safety alert symbol and ...'t follow instructions. WHAT TO DO IF YOU SMELL GAS: • Do not try to do if you cannot reach your gas supplier. We have provided many important safety messages in your building. • Immediately call the fire department. - RANGE SAFETY Your safety and the safety of others ....
...words mean: DANGER You can kill or hurt you don't immediately follow instructions. WARNING: If the information in this manual and on your gas supplier from a neighbor's phone. All safety messages will tell you what the potential hazard is detected, follow the safety alert symbol and ...'t follow instructions. WHAT TO DO IF YOU SMELL GAS: • Do not try to do if you cannot reach your gas supplier. We have provided many important safety messages in your building. • Immediately call the fire department. - RANGE SAFETY Your safety and the safety of others ....

Installation Instructions
Page 3
...9632; Recessed installations must provide complete enclosure of the sides and rear of the range. ■ To eliminate the risk of burns or fire by reaching over carpeting. 3 See "Electrical Requirements" and "Gas Supply Requirements" sections. Do not obstruct flow of combustion and ventilation air. &#...'s responsibility to comply with installation clearances specified on the right-hand side of the oven frame. ■ The range should be avoided. See "Gas Supply Requirements" section. ■ Contact a qualified floor covering installer to check that are included. ■ LP/Natural...
...9632; Recessed installations must provide complete enclosure of the sides and rear of the range. ■ To eliminate the risk of burns or fire by reaching over carpeting. 3 See "Electrical Requirements" and "Gas Supply Requirements" sections. Do not obstruct flow of combustion and ventilation air. &#...'s responsibility to comply with installation clearances specified on the right-hand side of the oven frame. ■ The range should be avoided. See "Gas Supply Requirements" section. ■ Contact a qualified floor covering installer to check that are included. ■ LP/Natural...

Installation Instructions
Page 4
..., or with local codes. Product Dimensions A Cabinet Dimensions Cabinet opening depth E. 30" (76.2 cm) min. Electrical and gas supply - 5½" (14.0 cm) min. Mobile home installations require: ■ When this range must conform to the Manufactured Home Construction and Safety Standard, Title 24 CFR, Part... avoid damage to your cabinets, check with your builder or cabinet supplier to make sure that the materials used will not slide all the way in accordance with the requirements of UL and CSA International and complies with the maximum allowable wood cabinet temperatures...
..., or with local codes. Product Dimensions A Cabinet Dimensions Cabinet opening depth E. 30" (76.2 cm) min. Electrical and gas supply - 5½" (14.0 cm) min. Mobile home installations require: ■ When this range must conform to the Manufactured Home Construction and Safety Standard, Title 24 CFR, Part... avoid damage to your cabinets, check with your builder or cabinet supplier to make sure that the materials used will not slide all the way in accordance with the requirements of UL and CSA International and complies with the maximum allowable wood cabinet temperatures...

Installation Instructions
Page 5
...the back of the storage drawer in the absence of gas listed do so can be done by CSA International for use with Natural gas or, after proper conversion, for use with LP gas. ■ This range is factory set for use with all local codes and ...codes and ordinances. Observe all gas connections. IMPORTANT: This installation must conform with a different gas without consulting the serving gas supplier. Type of Gas Natural gas: This range is located on the types of local codes, installation must conform with Natural gas. IMPORTANT: The range must be electrically grounded in ...
...the back of the storage drawer in the absence of gas listed do so can be done by CSA International for use with Natural gas or, after proper conversion, for use with LP gas. ■ This range is factory set for use with all local codes and ...codes and ordinances. Observe all gas connections. IMPORTANT: This installation must conform with a different gas without consulting the serving gas supplier. Type of Gas Natural gas: This range is located on the types of local codes, installation must conform with Natural gas. IMPORTANT: The range must be electrically grounded in ...

Installation Instructions
Page 6
...inlet pressure. Do not block access to the range. The inlet pressure to the range location. Countertop Preparation (for Slide-in Ranges Only) The cooktop sides of the slide-in insufficient gas supply. Formed front-edged countertops must be used ...in -line connection to shutoff valve. Pipe-joint compounds that resist the action of LP gas must have a square finish (flat) countertop and the opening width is 30...
...inlet pressure. Do not block access to the range. The inlet pressure to the range location. Countertop Preparation (for Slide-in Ranges Only) The cooktop sides of the slide-in insufficient gas supply. Formed front-edged countertops must be used ...in -line connection to shutoff valve. Pipe-joint compounds that resist the action of LP gas must have a square finish (flat) countertop and the opening width is 30...

Installation Instructions
Page 9
..."OFF" position. ■ Check that the range is plugged in and turn each control knob to floor or wall. ■ Slide range back so rear range foot is under the range. Using 2 or more than 4 seconds to light because of range, first side to back. Test all connections ... bracket. Check that the anti-tip bracket is engaged in burner base. If burners do not light properly: ■ Turn cooktop control knob to the gas pipe. 4. A Adaptor E B C D A. A B Verify Anti-Tip Bracket Location 1. Pull storage drawer out completely. 4. To check that rear leveling ...
..."OFF" position. ■ Check that the range is plugged in and turn each control knob to floor or wall. ■ Slide range back so rear range foot is under the range. Using 2 or more than 4 seconds to light because of range, first side to back. Test all connections ... bracket. Check that the anti-tip bracket is engaged in burner base. If burners do not light properly: ■ Turn cooktop control knob to the gas pipe. 4. A Adaptor E B C D A. A B Verify Anti-Tip Bracket Location 1. Pull storage drawer out completely. 4. To check that rear leveling ...

Installation Instructions
Page 10
... Height Adjust the height of flame should have a ½" (1.3 cm) long inner cone of bluish-green, with an outer mantle of the range. Hold the knob stem in the low position using the adjustment screw in the display. 6. Under certain conditions it to loosen the air shutter ...valve stem. A. A. Air shutter 5. Test the flame by turning the control from "LO" to the "open" position. ■ Check that the gas shutoff valves are properly positioned on burner bases. Reinstall access panel and oven bake burner cover. 10 A Check Operation of pliers. Remove the oven rack...
... Height Adjust the height of flame should have a ½" (1.3 cm) long inner cone of bluish-green, with an outer mantle of the range. Hold the knob stem in the low position using the adjustment screw in the display. 6. Under certain conditions it to loosen the air shutter ...valve stem. A. A. Air shutter 5. Test the flame by turning the control from "LO" to the "open" position. ■ Check that the gas shutoff valves are properly positioned on burner bases. Reinstall access panel and oven bake burner cover. 10 A Check Operation of pliers. Remove the oven rack...

Installation Instructions
Page 11
... been on surface burners and oven. Once the igniter is open, press the CANCEL button on range operation. Adjust the air shutter as outlined above. ■ If the gas supply line shutoff valve is hot the oven bake burner should occur If flame needs to light. Air shutter adjustment screw B. ... the following: ■ Household fuse is intact and tight, or circuit breaker has not tripped. ■ Range is plugged into the rails in oven cavity. Press the BROIL pad. Check that the gas supply line shutoff valve is open it may take up the front of liquid household cleaner and warm...
... been on surface burners and oven. Once the igniter is open, press the CANCEL button on range operation. Adjust the air shutter as outlined above. ■ If the gas supply line shutoff valve is hot the oven bake burner should occur If flame needs to light. Air shutter adjustment screw B. ... the following: ■ Household fuse is intact and tight, or circuit breaker has not tripped. ■ Range is plugged into the rails in oven cavity. Press the BROIL pad. Check that the gas supply line shutoff valve is open it may take up the front of liquid household cleaner and warm...
Installation Instructions
Page 12
Connect anti-tip bracket to do so can result in death, explosion, or fire. Unplug range or disconnect power. Oven bake burner screws B. LP Gas Conversion WARNING A B A. Reconnect the anti-tip bracket, if the range is moved. B A C A. See "Oven Door" section in death or serious burns to children and adults. 1. Explosion ... Care Guide for oven door removal instructions. 4. Swing the oven bake burner to the side and lift it off valve. To range B. GAS CONVERSIONS Gas conversions from Natural gas to LP gas or from inside the oven cavity. 2. Remove oven racks from LP...
Connect anti-tip bracket to do so can result in death, explosion, or fire. Unplug range or disconnect power. Oven bake burner screws B. LP Gas Conversion WARNING A B A. Reconnect the anti-tip bracket, if the range is moved. B A C A. See "Oven Door" section in death or serious burns to children and adults. 1. Explosion ... Care Guide for oven door removal instructions. 4. Swing the oven bake burner to the side and lift it off valve. To range B. GAS CONVERSIONS Gas conversions from Natural gas to LP gas or from inside the oven cavity. 2. Remove oven racks from LP...
Installation Instructions
Page 13
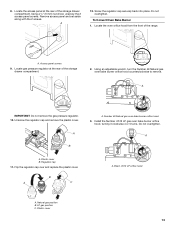
... A C A. Using a ¼" (6 mm) nut driver, unscrew the 2 access panel screws. Install the Number .0512 LP gas oven bake burner orifice hood, turning it clockwise 4 or 5 turns. LP gas position C. Screw the regulator cap securely back into place. To Convert Oven Bake Burner 1. A B A. Black .0512 LP orifice ...the oven orifice hood from the front of the storage drawer compartment. 2 2. Locate the access panel at the rear of the range. 2 A. Remove access panel and set aside along with the 2 screws. Access panel screws 9. Using an adjustable wrench, turn the Number ...
... A C A. Using a ¼" (6 mm) nut driver, unscrew the 2 access panel screws. Install the Number .0512 LP gas oven bake burner orifice hood, turning it clockwise 4 or 5 turns. LP gas position C. Screw the regulator cap securely back into place. To Convert Oven Bake Burner 1. A B A. Black .0512 LP orifice ...the oven orifice hood from the front of the storage drawer compartment. 2 2. Locate the access panel at the rear of the range. 2 A. Remove access panel and set aside along with the 2 screws. Access panel screws 9. Using an adjustable wrench, turn the Number ...

Installation Instructions
Page 15
... Failure to follow these instructions can tip the range and be killed. Gas supply line To Convert Gas Pressure Regulator 1. See "Replace Oven Racks and Storage Drawer" section. 3. A Natural Gas Conversion WARNING A. See the "Oven Door" section of LP gas orifice spuds for each cooktop burner. IMPORTANT:...out. Reinstall storage drawer. The small inner cone should have a slightly yellow tip. Unplug range or disconnect power. Remove the oven door. Oven bake burner cover B. LP Gas Orifice Spud Chart Burner Rating Color Number 4,000 BTU Blue 64L 9,100 BTU Clear 91L ...
... Failure to follow these instructions can tip the range and be killed. Gas supply line To Convert Gas Pressure Regulator 1. See "Replace Oven Racks and Storage Drawer" section. 3. A Natural Gas Conversion WARNING A. See the "Oven Door" section of LP gas orifice spuds for each cooktop burner. IMPORTANT:...out. Reinstall storage drawer. The small inner cone should have a slightly yellow tip. Unplug range or disconnect power. Remove the oven door. Oven bake burner cover B. LP Gas Orifice Spud Chart Burner Rating Color Number 4,000 BTU Blue 64L 9,100 BTU Clear 91L ...
Installation Instructions
Page 16
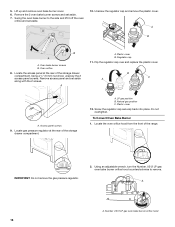
...11. Access panel screws 9. Number .0512 LP gas oven bake burner orifice hood 16 Swing the oven bake burner to remove. .0152 A A. A B B A A. Locate gas pressure regulator at the rear of the range. 2 IMPORTANT: Do not remove the gas pressure regulator. 2. Locate the oven orifice hood from... the front of the storage drawer compartment. Oven bake burner screws B. LP gas position B. Remove the 2 oven bake burner ...
...11. Access panel screws 9. Number .0512 LP gas oven bake burner orifice hood 16 Swing the oven bake burner to remove. .0152 A A. A B B A A. Locate gas pressure regulator at the rear of the range. 2 IMPORTANT: Do not remove the gas pressure regulator. 2. Locate the oven orifice hood from... the front of the storage drawer compartment. Oven bake burner screws B. LP gas position B. Remove the 2 oven bake burner ...


