Owners Manual
Page 4
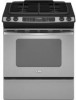
...Hazard A child or adult can result in death or serious burns to children and adults. Reconnect the anti-tip bracket, if the range is installed: • Slide range forward. • Look for details. WARNING: This product contains a chemical known to the State of California to the open door ...anti-tip bracket fastened down properly. Connect anti-tip bracket to floor or wall. • Slide range back so rear range foot is under anti-tip bracket. 4 The Anti-Tip Bracket The range will not tip during normal use. See the installation instructions for the anti-tip bracket securely ...
...Hazard A child or adult can result in death or serious burns to children and adults. Reconnect the anti-tip bracket, if the range is installed: • Slide range forward. • Look for details. WARNING: This product contains a chemical known to the State of California to the open door ...anti-tip bracket fastened down properly. Connect anti-tip bracket to floor or wall. • Slide range back so rear range foot is under anti-tip bracket. 4 The Anti-Tip Bracket The range will not tip during normal use. See the installation instructions for the anti-tip bracket securely ...
Owners Manual
Page 5
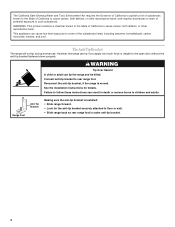
...the room. Left rear control knob E F D. TO CHECK IF THE DEVICES ARE INSTALLED PROPERLY, SLIDE RANGE FORWARD, LOOK FOR ANTI-TIP BRACKET SECURELY ATTACHED TO FLOOR, AND SLIDE RANGE BACK SO REAR RANGE FOOT IS UNDER ANTI-TIP BRACKET. ■ WARNING: NEVER use this plug. ■ Disconnect ...power before initiating the cleaning cycle. Left front control knob C. In Canada, the range must be electrically grounded in accordance ...
...the room. Left rear control knob E F D. TO CHECK IF THE DEVICES ARE INSTALLED PROPERLY, SLIDE RANGE FORWARD, LOOK FOR ANTI-TIP BRACKET SECURELY ATTACHED TO FLOOR, AND SLIDE RANGE BACK SO REAR RANGE FOOT IS UNDER ANTI-TIP BRACKET. ■ WARNING: NEVER use this plug. ■ Disconnect ...power before initiating the cleaning cycle. Left front control knob C. In Canada, the range must be electrically grounded in accordance ...
Owners Manual
Page 15
... continuously until turned off or until the 72-hour time limit is extremely sensitive to slide. No beeps will not affect cooking performance. 15 The time of day. Exposure to...Self-Cleaning cycle. Always move the oven door gasket. The door gasket is closed within 30 seconds, the self-cleaning operation will automatically return to the previous display. ■ Wipe...for more than 5 seconds elapse between pressing Clean and Presets 0, the program will be changed. RANGE CARE Self-Cleaning Cycle WARNING Prepare Cooktop and Storage Drawer: ■ Remove plastic items from ...
... continuously until turned off or until the 72-hour time limit is extremely sensitive to slide. No beeps will not affect cooking performance. 15 The time of day. Exposure to...Self-Cleaning cycle. Always move the oven door gasket. The door gasket is closed within 30 seconds, the self-cleaning operation will automatically return to the previous display. ■ Wipe...for more than 5 seconds elapse between pressing Clean and Presets 0, the program will be changed. RANGE CARE Self-Cleaning Cycle WARNING Prepare Cooktop and Storage Drawer: ■ Remove plastic items from ...

Owners Manual
Page 17
... Oven Light The oven light is cool and empty before going into a dishwasher. ■ Gas Grate and Drip Pan Cleaner Part Number 31617: See "Assistance or Service" section to order... Appliance Cleaner Part Number 31682 (not included): See "Assistance or Service" section to order. Unplug range or disconnect power. 2. To avoid chipping, do not use oven cleaners. At high temperatures, foods...Cleaning Method: ■ Glass cleaner and a soft cloth or sponge: Apply glass cleaner to slide. Cleaning Method: ■ Self-Cleaning cycle: See "Self-Cleaning Cycle" first. Cooked-...
... Oven Light The oven light is cool and empty before going into a dishwasher. ■ Gas Grate and Drip Pan Cleaner Part Number 31617: See "Assistance or Service" section to order... Appliance Cleaner Part Number 31682 (not included): See "Assistance or Service" section to order. Unplug range or disconnect power. 2. To avoid chipping, do not use oven cleaners. At high temperatures, foods...Cleaning Method: ■ Glass cleaner and a soft cloth or sponge: Apply glass cleaner to slide. Cleaning Method: ■ Self-Cleaning cycle: See "Self-Cleaning Cycle" first. Cooked-...
Owners Manual
Page 18
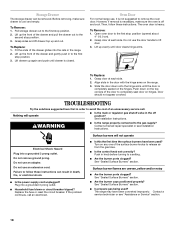
...and cool. Push in knob before turning to the gas supply? See "Sealed Surface Burners" section. ■ Are the burner caps positioned properly? Grasp sides and lift drawer top up evenly until door clears hinge arms. To Replace: 1. Slide the door down on any one of the door... out to remove the oven door. The oven door is off position? Push down onto the hinge arms until drawer is completely seated on the range. 3. See Installation Instructions. Grasp door at each side. 2. Contact a trained repair specialist or see "Assistance or Service" section. 18 Lift...
...and cool. Push in knob before turning to the gas supply? See "Sealed Surface Burners" section. ■ Are the burner caps positioned properly? Grasp sides and lift drawer top up evenly until door clears hinge arms. To Replace: 1. Slide the door down on any one of the door... out to remove the oven door. The oven door is off position? Push down onto the hinge arms until drawer is completely seated on the range. 3. See Installation Instructions. Grasp door at each side. 2. Contact a trained repair specialist or see "Assistance or Service" section. 18 Lift...

Dimension Guide
Page 1
...30" (76.2 cm), adjust the 3/8" (1.0 cm) dimension. If local codes permit, it is protected by AGA or CSA, 1/2-inch or 3/4-inch I.D., be level for connecting the range to the range. A 1/2" male pipe thread is required. Tile countertops may result in insufficient gas supply. from each front corner and/or rounded edge flattened. Because Whirlpool... to improve Dimensions are for planning purposes only. ® 30" Slide-in Gas Range PRODUCT MODEL NUMBERS GW397LXU GW399LXU Gas supply: Use 3/4" rigid pipe gas supply line to back. Cabinet door or hinge should not ...
...30" (76.2 cm), adjust the 3/8" (1.0 cm) dimension. If local codes permit, it is protected by AGA or CSA, 1/2-inch or 3/4-inch I.D., be level for connecting the range to the range. A 1/2" male pipe thread is required. Tile countertops may result in insufficient gas supply. from each front corner and/or rounded edge flattened. Because Whirlpool... to improve Dimensions are for planning purposes only. ® 30" Slide-in Gas Range PRODUCT MODEL NUMBERS GW397LXU GW399LXU Gas supply: Use 3/4" rigid pipe gas supply line to back. Cabinet door or hinge should not ...

Installation Instructions
Page 4
...A B C H D E I I . 3" (7.6 cm) min. Electrical and gas supply - 5½" (14.0 cm) min. H. 18" (45.7 cm) I F G F B* C D E** A. 30³⁄₄" (78.1 cm) B. 35³⁄₄" (90.8 cm) height to underside of securing the range is not applicable, use the Standard for 25" (64.0 cm) countertop depth, 24...cabinet supplier to make sure that the materials used will not slide all the way in a mobile home, it conforms to the standards listed above the cooktop surface. A. 13" (33.0 cm) upper cabinet depth B. 30" (76.2 cm) min. Grounded outlet must be installed ...
...A B C H D E I I . 3" (7.6 cm) min. Electrical and gas supply - 5½" (14.0 cm) min. H. 18" (45.7 cm) I F G F B* C D E** A. 30³⁄₄" (78.1 cm) B. 35³⁄₄" (90.8 cm) height to underside of securing the range is not applicable, use the Standard for 25" (64.0 cm) countertop depth, 24...cabinet supplier to make sure that the materials used will not slide all the way in a mobile home, it conforms to the standards listed above the cooktop surface. A. 13" (33.0 cm) upper cabinet depth B. 30" (76.2 cm) min. Grounded outlet must be installed ...

Installation Instructions
Page 6
...gas supplier if you have molded edge shaved flat ³⁄₈" (1.0 cm) from each front corner and/or rounded edge flattened. 30" (76.2 cm) ³⁄₈" (1.0 cm) 30 ¾" (78.1 cm) †®TEFLON is greater than ½ psi (3.5 kPa). Formed front-edged countertops must be as follows for Slide-in Ranges... Only) The cooktop sides of the slide-in line...
...gas supplier if you have molded edge shaved flat ³⁄₈" (1.0 cm) from each front corner and/or rounded edge flattened. 30" (76.2 cm) ³⁄₈" (1.0 cm) 30 ¾" (78.1 cm) †®TEFLON is greater than ½ psi (3.5 kPa). Formed front-edged countertops must be as follows for Slide-in Ranges... Only) The cooktop sides of the slide-in line...
Installation Instructions
Page 7
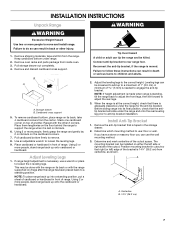
... to adjust the rear legs. 3. Remove the anti-tip bracket that the antitip bracket will slide under the range and onto the rear leveling leg prior to do so can be done with the range on the cardboard corners. 7. The mounting bracket can result in front of another. Failure to.... Using 2 or more people, stand range back up to rear range foot. Using 2 or more people, firmly grasp the range and gently lay it is laid on its back on its final position, check that is taped in cutout so that there is moved. Before sliding range into a standing position, put a sheet...
... to adjust the rear legs. 3. Remove the anti-tip bracket that the antitip bracket will slide under the range and onto the rear leveling leg prior to do so can be done with the range on the cardboard corners. 7. The mounting bracket can result in front of another. Failure to.... Using 2 or more people, stand range back up to rear range foot. Using 2 or more people, firmly grasp the range and gently lay it is laid on its back on its final position, check that is taped in cutout so that there is moved. Before sliding range into a standing position, put a sheet...

Installation Instructions
Page 9
...must be level for the anti-tip bracket securely attached to floor or wall. ■ Slide range back so rear range foot is turned to the gas pipe. A Adaptor E B C D A. Gas pressure regulator B. Flexible connector D. Move range close to the "LITE" position. Using 2 or more than 4 seconds to side; ...9 Do not use an adapter. This sparking continues, as long as the control knob is under the range. Electronic Ignition System Initial lighting and gas flame adjustments Cooktop and oven burners use a flashlight and look underneath the bottom of Cooktop Burners Standard Surface ...
...must be level for the anti-tip bracket securely attached to floor or wall. ■ Slide range back so rear range foot is turned to the gas pipe. A Adaptor E B C D A. Gas pressure regulator B. Flexible connector D. Move range close to the "LITE" position. Using 2 or more than 4 seconds to side; ...9 Do not use an adapter. This sparking continues, as long as the control knob is under the range. Electronic Ignition System Initial lighting and gas flame adjustments Cooktop and oven burners use a flashlight and look underneath the bottom of Cooktop Burners Standard Surface ...


