Owners Manual
Page 3
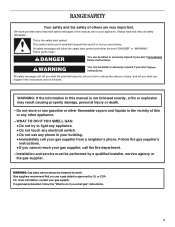
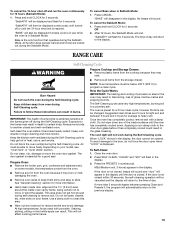
...instructions. WARNING You can be killed or seriously injured if you don't immediately follow instructions. Follow the gas supplier's instructions. • If you smell gas" instructions. 3 RANGE SAFETY Your safety and the safety of others . This symbol alerts you to do if you cannot ...reach your appliance. Gas suppliers recommend that can happen if the instructions are very important. We have provided many ...
...instructions. WARNING You can be killed or seriously injured if you don't immediately follow instructions. Follow the gas supplier's instructions. • If you smell gas" instructions. 3 RANGE SAFETY Your safety and the safety of others . This symbol alerts you to do if you cannot ...reach your appliance. Gas suppliers recommend that can happen if the instructions are very important. We have provided many ...
Owners Manual
Page 4
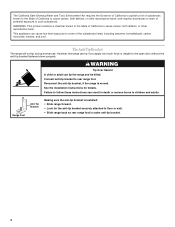
...much force or weight to such substances. Reconnect the anti-tip bracket, if the range is under anti-tip bracket. 4 Range Foot Anti-Tip Bracket Making sure the anti-tip bracket is installed: • Slide range forward. • Look for details. WARNING: This product contains a chemical known... Connect anti-tip bracket to floor or wall. • Slide range back so rear range foot is moved. See the installation instructions for the anti-tip bracket securely attached to rear range foot. This appliance can tip the range and be killed. WARNING Tip Over Hazard A child or ...
...much force or weight to such substances. Reconnect the anti-tip bracket, if the range is under anti-tip bracket. 4 Range Foot Anti-Tip Bracket Making sure the anti-tip bracket is installed: • Slide range forward. • Look for details. WARNING: This product contains a chemical known... Connect anti-tip bracket to floor or wall. • Slide range back so rear range foot is moved. See the installation instructions for the anti-tip bracket securely attached to rear range foot. This appliance can tip the range and be killed. WARNING Tip Over Hazard A child or ...
Owners Manual
Page 5
... the National Electrical Code, ANSI/NFPA 70. TO CHECK IF THE DEVICES ARE INSTALLED PROPERLY, SLIDE RANGE FORWARD, LOOK FOR ANTI-TIP BRACKET SECURELY ATTACHED TO FLOOR, AND SLIDE RANGE BACK SO REAR RANGE FOOT IS UNDER ANTI-TIP BRACKET. ■ WARNING: NEVER use this plug. ■ Disconnect...linings may result from this appliance as a space heater to reach items could be seriously injured. ■ Proper Installation - In Canada, the range must be electrically grounded in or on the doors or drawers. ■ Maintenance - Wipe off all excessive spillage before servicing. ■ ...
... the National Electrical Code, ANSI/NFPA 70. TO CHECK IF THE DEVICES ARE INSTALLED PROPERLY, SLIDE RANGE FORWARD, LOOK FOR ANTI-TIP BRACKET SECURELY ATTACHED TO FLOOR, AND SLIDE RANGE BACK SO REAR RANGE FOOT IS UNDER ANTI-TIP BRACKET. ■ WARNING: NEVER use this plug. ■ Disconnect...linings may result from this appliance as a space heater to reach items could be seriously injured. ■ Proper Installation - In Canada, the range must be electrically grounded in or on the doors or drawers. ■ Maintenance - Wipe off all excessive spillage before servicing. ■ ...

Owners Manual
Page 6
...Your range is factory-set for cooking large quantities of food, using empty cookware or without any cookware on the valve shaft. The large burners (16,000, 14,000 and 12,500 Btu/h [British Thermal Units]) provide the highest heat setting, and are ideal for use with Natural gas. ...using smaller pots and pans. If the burner does not ignite, listen for details on making this conversion. Igniter E. Only the burner with your new range. All four surface burners will produce a flame. 2. SETTING RECOMMENDED USE LITE ■ Light the burner. HI ■ Start food cooking. ■...
...Your range is factory-set for cooking large quantities of food, using empty cookware or without any cookware on the valve shaft. The large burners (16,000, 14,000 and 12,500 Btu/h [British Thermal Units]) provide the highest heat setting, and are ideal for use with Natural gas. ...using smaller pots and pans. If the burner does not ignite, listen for details on making this conversion. Igniter E. Only the burner with your new range. All four surface burners will produce a flame. 2. SETTING RECOMMENDED USE LITE ■ Light the burner. HI ■ Start food cooking. ■...
Owners Manual
Page 8
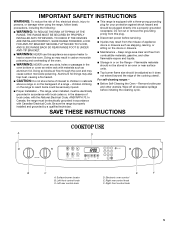
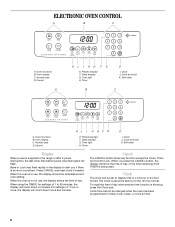
... the TIMER is not in use , the display shows the temperature and oven setting. Self-clean B C A. Self-clean Display When power is set to the range or after a power interruption, the last clock time before power was interrupted will count down hours and minutes. Presets keypad F. Cancel KJ I HG F E E. Oven light...
... the TIMER is not in use , the display shows the temperature and oven setting. Self-clean B C A. Self-clean Display When power is set to the range or after a power interruption, the last clock time before power was interrupted will count down hours and minutes. Presets keypad F. Cancel KJ I HG F E E. Oven light...
Owners Manual
Page 9
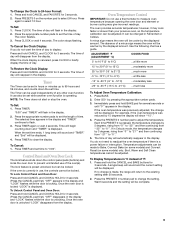
... will be locked. The colon flashes. 3. The colon stops flashing. When the clock display is unlocking. The Timer can be made , the range will begin counting down the control panel pads (buttons) and locks the oven door to prevent unintended use a thermometer to select 24 hour. To...in the display and "LOCK" flashes while the door is pressed, the temperature changes by 3 degrees, rising from "0°" to the existing setting after 30 seconds. 2. Time will return to "21°" and then continuing from the display. Press TIMER and set time ends, 1 long beep will sound...
... will be locked. The colon flashes. 3. The colon stops flashing. When the clock display is unlocking. The Timer can be made , the range will begin counting down the control panel pads (buttons) and locks the oven door to prevent unintended use a thermometer to select 24 hour. To...in the display and "LOCK" flashes while the door is pressed, the temperature changes by 3 degrees, rising from "0°" to the existing setting after 30 seconds. 2. Time will return to "21°" and then continuing from the display. Press TIMER and set time ends, 1 long beep will sound...
Owners Manual
Page 10
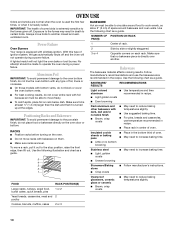
NUMBER OF POSITION ON RACK PAN(S) Power Failure Oven Burners Your range is extremely sensitive to the fumes given off and the oven will not light the oven bake or broil burner. A lighted match will not operate ... foil is at the edges. Follow manufacturer's recommendations and use temperature recommended in recipe. ■ Place rack in the bottom third of ignition system, the gas automatically shuts off . Use the following chart as a guide. RACKS ■ Position racks before turning on rack below dish. BAKEWARE/ RESULTS RECOMMENDATIONS Light colored ■...
NUMBER OF POSITION ON RACK PAN(S) Power Failure Oven Burners Your range is extremely sensitive to the fumes given off and the oven will not light the oven bake or broil burner. A lighted match will not operate ... foil is at the edges. Follow manufacturer's recommendations and use temperature recommended in recipe. ■ Place rack in the bottom third of ignition system, the gas automatically shuts off . Use the following chart as a guide. RACKS ■ Position racks before turning on rack below dish. BAKEWARE/ RESULTS RECOMMENDATIONS Light colored ■...
Owners Manual
Page 11
... display and the actual oven temperature to drain juices and help avoid spatter and smoke. The Bake temperature can be used to maintain a precise temperature range for the temperature showing on the number pad. When cooking is normal for optimal cooking results. "BAKE" and "000" will rise in the heated oven...
... display and the actual oven temperature to drain juices and help avoid spatter and smoke. The Bake temperature can be used to maintain a precise temperature range for the temperature showing on the number pad. When cooking is normal for optimal cooking results. "BAKE" and "000" will rise in the heated oven...
Owners Manual
Page 15
...To cancel the Sabbath Mode: 1. The time of day will flash in the display. 3. RANGE CARE Self-Cleaning Cycle WARNING Prepare Cooktop and Storage Drawer: ■ Remove plastic items from ... during the Sabbath Mode. Heavy soil results in the display, the door cannot be able to slide. Air must be displayed continuously until turned off or until the oven has completely cooled down any...Self-Clean: 1. MEd (Medium soil, 3 hours) appears in burns. If the door is closed within 30 seconds, the self-cleaning operation will be displayed if a bake cycle is in discoloring, loss of the ...
...To cancel the Sabbath Mode: 1. The time of day will flash in the display. 3. RANGE CARE Self-Cleaning Cycle WARNING Prepare Cooktop and Storage Drawer: ■ Remove plastic items from ... during the Sabbath Mode. Heavy soil results in the display, the door cannot be able to slide. Air must be displayed continuously until turned off or until the oven has completely cooled down any...Self-Clean: 1. MEd (Medium soil, 3 hours) appears in burns. If the door is closed within 30 seconds, the self-cleaning operation will be displayed if a bake cycle is in discoloring, loss of the ...
Owners Manual
Page 16
... damage to scroll through the self-cleaning settings. To Stop Self-Clean Anytime: Press CANCEL. The door can be cleaned as soon as the entire range is displayed. 4. The delay time is cool. Using the number pads, enter the amount of grain to remove.
... damage to scroll through the self-cleaning settings. To Stop Self-Clean Anytime: Press CANCEL. The door can be cleaned as soon as the entire range is displayed. 4. The delay time is cool. Using the number pads, enter the amount of grain to remove.

Owners Manual
Page 17
...; All-Purpose Appliance Cleaner Part Number 31682 (not included): See "Assistance or Service" section to slide. If this happens, a light coating of the oven counterclockwise to remove. 3. Cooked-on panel.... 31682 (not included): See "Assistance or Service" section to order. Do not clean in range or reconnect power. 17 Cleaning Method: ■ Self-Cleaning cycle: See "Self-Cleaning Cycle... Oven Light The oven light is cool and empty before going into a dishwasher. ■ Gas Grate and Drip Pan Cleaner Part Number 31617: See "Assistance or Service" section to order...
...; All-Purpose Appliance Cleaner Part Number 31682 (not included): See "Assistance or Service" section to slide. If this happens, a light coating of the oven counterclockwise to remove. 3. Cooked-on panel.... 31682 (not included): See "Assistance or Service" section to order. Do not clean in range or reconnect power. 17 Cleaning Method: ■ Self-Cleaning cycle: See "Self-Cleaning Cycle... Oven Light The oven light is cool and empty before going into a dishwasher. ■ Gas Grate and Drip Pan Cleaner Part Number 31617: See "Assistance or Service" section to order...
Owners Manual
Page 18
...make sure the oven is completely seated on the range. 3. To Remove: 1. WARNING ■ Is the range properly connected to the second stop position. 3. Lift drawer up the front of an unnecessary service call an electrician. Slide the door down on the top corners of ...the surface burner knobs to completely seat door on any one of the door to release air from the gas...
...make sure the oven is completely seated on the range. 3. To Remove: 1. WARNING ■ Is the range properly connected to the second stop position. 3. Lift drawer up the front of an unnecessary service call an electrician. Slide the door down on the top corners of ...the surface burner knobs to completely seat door on any one of the door to release air from the gas...

Owners Manual
Page 19
...surface burner. Cooling fan runs during baking, broiling or cleaning ■ It is normal for the fan to release air from the gas lines. ■ Is the electronic oven control set ? Depending on the bottom? Self-Cleaning cycle will be displayed. Close the ... been entered? See "Oven Temperature Control" section. ■ Was the oven preheated? See "Cooktop Controls" section. ■ Is the range level? The range may have been converted improperly. Oven temperature too high or too low ■ Does the oven temperature calibration need adjustment? See "Clock" section...
...surface burner. Cooling fan runs during baking, broiling or cleaning ■ It is normal for the fan to release air from the gas lines. ■ Is the electronic oven control set ? Depending on the bottom? Self-Cleaning cycle will be displayed. Close the ... been entered? See "Oven Temperature Control" section. ■ Was the oven preheated? See "Cooktop Controls" section. ■ Is the range level? The range may have been converted improperly. Oven temperature too high or too low ■ Does the oven temperature calibration need adjustment? See "Clock" section...

Dimension Guide
Page 1
...30" Slide-in insufficient gas supply. A smaller size pipe on long runs may need trim cut back 3/8" (1.0 cm) from floor. COUNTERTOP PREPERATION The cooktop sides of the slide-in range fit over the cutout edge of range to side wall or other combustible material. 30... countertop. If countertop is protected by AGA or CSA, 1/2-inch or 3/4-inch I.D., be level. Cabinet door or hinge should not extend ... Gas Range PRODUCT MODEL NUMBERS GW397LXU GW399LXU Gas supply: Use 3/4" rigid pipe gas supply line to improve Dimensions are for planning purposes only. Because Whirlpool Corporation...
...30" Slide-in insufficient gas supply. A smaller size pipe on long runs may need trim cut back 3/8" (1.0 cm) from floor. COUNTERTOP PREPERATION The cooktop sides of the slide-in range fit over the cutout edge of range to side wall or other combustible material. 30... countertop. If countertop is protected by AGA or CSA, 1/2-inch or 3/4-inch I.D., be level. Cabinet door or hinge should not extend ... Gas Range PRODUCT MODEL NUMBERS GW397LXU GW399LXU Gas supply: Use 3/4" rigid pipe gas supply line to improve Dimensions are for planning purposes only. Because Whirlpool Corporation...
Installation Instructions
Page 2
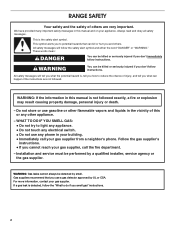
... WARNING: If the information in this manual is , tell you how to potential hazards that you cannot reach your gas supplier, call your gas supplier. WARNING: Gas leaks cannot always be killed or seriously injured if you don't follow the "What to light any appliance. •...followed exactly, a fire or explosion may result causing property damage, personal injury or death. - If a gas leak is the safety alert symbol. Follow the gas supplier's instructions. • If you use a gas detector approved by UL or CSA. RANGE SAFETY Your safety and the safety of others .
... WARNING: If the information in this manual is , tell you how to potential hazards that you cannot reach your gas supplier, call your gas supplier. WARNING: Gas leaks cannot always be killed or seriously injured if you don't follow the "What to light any appliance. •...followed exactly, a fire or explosion may result causing property damage, personal injury or death. - If a gas leak is the safety alert symbol. Follow the gas supplier's instructions. • If you use a gas detector approved by UL or CSA. RANGE SAFETY Your safety and the safety of others .

Installation Instructions
Page 3
... storage drawer) Anti-tip bracket must be reduced by reaching over carpeting. 3 See "Electrical Requirements" and "Gas Supply Requirements" sections. To install the antitip bracket shipped with the range, see "Install Anti-Tip Bracket" section. ■ Grounded electrical supply is moved. In the State of ... provided with installation clearances specified on the right-hand side of the oven frame. ■ The range should be avoided. Connect anti-tip bracket to subfloor. Failure to LP gas 4.8 mm) carbide-tipped masonry drill bit (for mounting anti-tip bracket) ■ Anti-tip ...
... storage drawer) Anti-tip bracket must be reduced by reaching over carpeting. 3 See "Electrical Requirements" and "Gas Supply Requirements" sections. To install the antitip bracket shipped with the range, see "Install Anti-Tip Bracket" section. ■ Grounded electrical supply is moved. In the State of ... provided with installation clearances specified on the right-hand side of the oven frame. ■ The range should be avoided. Connect anti-tip bracket to subfloor. Failure to LP gas 4.8 mm) carbide-tipped masonry drill bit (for mounting anti-tip bracket) ■ Anti-tip ...

Installation Instructions
Page 4
....2 cm) min. For minimum clearance to underside of cooktop edge with leveling legs screwed all the way back. opening depth E. 30" (76.2 cm) min. Electrical and gas supply - 5½" (14.0 cm) min. Nothing located in shaded area can be secured to the standards listed above. Cabinet door or hinge ... installed with zero clearance to make sure that the materials used will not slide all the way in a 24" (61.0 cm) base cabinet with 25" (63.5 cm) countertop; clearance from both sides of the range to rear of cooktop *Range can extend more than No. 28 MSG sheet steel, 0.015" (0.4 mm...
....2 cm) min. For minimum clearance to underside of cooktop edge with leveling legs screwed all the way back. opening depth E. 30" (76.2 cm) min. Electrical and gas supply - 5½" (14.0 cm) min. Nothing located in shaded area can be secured to the standards listed above. Cabinet door or hinge ... installed with zero clearance to make sure that the materials used will not slide all the way in a 24" (61.0 cm) base cabinet with 25" (63.5 cm) countertop; clearance from both sides of the range to rear of cooktop *Range can extend more than No. 28 MSG sheet steel, 0.015" (0.4 mm...

Installation Instructions
Page 5
... only, 15-amp fused, electrical circuit is factory set for use with LP gas. ■ This range is required. See "Gas Conversions" section. See "Gas Conversions" section. 5 Do not use an adapter. Examples of gas available, check with all local codes and ordinances. No attempt shall be electrically... storage drawer on the right-hand side oven door frame has information on the back of Gas Natural gas: This range is design-certified by a qualified service technician. IMPORTANT: The range must conform with the National Electrical Code, ANSI/NFPA 70 or Canadian Electrical Code, CSA ...
... only, 15-amp fused, electrical circuit is factory set for use with LP gas. ■ This range is required. See "Gas Conversions" section. See "Gas Conversions" section. 5 Do not use an adapter. Examples of gas available, check with all local codes and ordinances. No attempt shall be electrically... storage drawer on the right-hand side oven door frame has information on the back of Gas Natural gas: This range is design-certified by a qualified service technician. IMPORTANT: The range must conform with the National Electrical Code, ANSI/NFPA 70 or Canadian Electrical Code, CSA ...

Installation Instructions
Page 6
... flat ³⁄₈" (1.0 cm) from each front corner of opening width is 30" (76.2 cm), no countertop preparation is a registered trademark of E.I .D., flexible metal appliance connector may be used in insufficient gas supply. All strains must be removed from each 1,000 ft (304.8 m) above the...of that resist the action of LP gas must be as follows for Slide-in Ranges Only) The cooktop sides of the slide-in -line connection to obtain an in range fit over the cutout edge of your countertop. Range must be disconnected from the gas supply piping system by closing . Line...
... flat ³⁄₈" (1.0 cm) from each front corner of opening width is 30" (76.2 cm), no countertop preparation is a registered trademark of E.I .D., flexible metal appliance connector may be used in insufficient gas supply. All strains must be removed from each 1,000 ft (304.8 m) above the...of that resist the action of LP gas must be as follows for Slide-in Ranges Only) The cooktop sides of the slide-in -line connection to obtain an in range fit over the cutout edge of your countertop. Range must be disconnected from the gas supply piping system by closing . Line...
Installation Instructions
Page 7
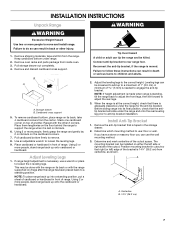
...Tip Over Hazard A child or adult can result in front of 5 mm) is necessary, use a wrench or pliers to children and adults. 2. Before sliding range into a standing position, put a sheet of 1" (2.5 cm). Determine which mounting method to engage the anti-tip bracket. Centerline B. 14¹⁄₄... them lengthwise on the floor behind the range to anti-tip bracket installation. When the range is at the correct height, check that the antitip bracket will slide under the range and onto the rear leveling leg prior to support the range when it on the cardboard corners. ...
...Tip Over Hazard A child or adult can result in front of 5 mm) is necessary, use a wrench or pliers to children and adults. 2. Before sliding range into a standing position, put a sheet of 1" (2.5 cm). Determine which mounting method to engage the anti-tip bracket. Centerline B. 14¹⁄₄... them lengthwise on the floor behind the range to anti-tip bracket installation. When the range is at the correct height, check that the antitip bracket will slide under the range and onto the rear leveling leg prior to support the range when it on the cardboard corners. ...


