Owners Manual
Page 3
...instructions. WARNING: If the information in this manual and on your building. • Immediately call the fire department. - Installation and service must be detected by smell. WARNING: Gas leaks cannot always be performed by UL or CSA. RANGE SAFETY Your safety and the safety of others ... other flammable vapors and liquids in your appliance. All safety messages will tell you smell gas" instructions. 3 All safety messages will follow the "What to reduce the chance of this manual is detected, follow the safety alert symbol and either the word "DANGER" or "WARNING...
...instructions. WARNING: If the information in this manual and on your building. • Immediately call the fire department. - Installation and service must be detected by smell. WARNING: Gas leaks cannot always be performed by UL or CSA. RANGE SAFETY Your safety and the safety of others ... other flammable vapors and liquids in your appliance. All safety messages will tell you smell gas" instructions. 3 All safety messages will follow the "What to reduce the chance of this manual is detected, follow the safety alert symbol and either the word "DANGER" or "WARNING...

Owners Manual
Page 6
... using smaller pots and pans. After burner lights, turn knob counterclockwise to LITE. Only the burner with your new range. Alignment pins D. Turn off . See the "Gas Conversions" section of food or liquid, using empty cookware or without any cookware on the valve shaft. Electric igniters ...you wish to follow these instructions can be lit manually. Hold a lit match near a burner and turn knob to LITE will click. Push in use LP gas, an LP Gas Conversion Kit is perfect for details on making this conversion. Gas tube opening IMPORTANT: Do not obstruct the flow...
... using smaller pots and pans. After burner lights, turn knob counterclockwise to LITE. Only the burner with your new range. Alignment pins D. Turn off . See the "Gas Conversions" section of food or liquid, using empty cookware or without any cookware on the valve shaft. Electric igniters ...you wish to follow these instructions can be lit manually. Hold a lit match near a burner and turn knob to LITE will click. Push in use LP gas, an LP Gas Conversion Kit is perfect for details on making this conversion. Gas tube opening IMPORTANT: Do not obstruct the flow...

Dimension Guide
Page 1
...manual shutoff valve must be 1/2" minimum. COUNTERTOP PREPERATION The cooktop sides of the slide-in range fit over the cutout edge of range to the range. upper cabinet depth 30...combustible material. 30" (76.2 cm) opening . ® 30" Slide-in Gas Range PRODUCT MODEL NUMBERS GW397LXU GW399LXU Gas supply: Use 3/4" rigid pipe gas supply line ...30" (76.2 cm) opening width 3/8" (1.0 cm) 30-3/4" (78.1 cm) OVERALL DIMENSIONS 30-3/4" (78.1 cm) cooktop width 23-3/4" (60.3 cm) 35-3/4" (90.8 cm) cooktop height with leveling legs screwed all the way in insufficient gas supply. Because Whirlpool...
...manual shutoff valve must be 1/2" minimum. COUNTERTOP PREPERATION The cooktop sides of the slide-in range fit over the cutout edge of range to the range. upper cabinet depth 30...combustible material. 30" (76.2 cm) opening . ® 30" Slide-in Gas Range PRODUCT MODEL NUMBERS GW397LXU GW399LXU Gas supply: Use 3/4" rigid pipe gas supply line ...30" (76.2 cm) opening width 3/8" (1.0 cm) 30-3/4" (78.1 cm) OVERALL DIMENSIONS 30-3/4" (78.1 cm) cooktop width 23-3/4" (60.3 cm) 35-3/4" (90.8 cm) cooktop height with leveling legs screwed all the way in insufficient gas supply. Because Whirlpool...
Installation Instructions
Page 2
...; Do not try to potential hazards that you and others are not followed. Follow the gas supplier's instructions. • If you don't immediately follow instructions. If a gas leak is the safety alert symbol. RANGE SAFETY Your safety and the safety of others . This symbol alerts you to light any ...provided many important safety messages in this or any phone in this manual is , tell you how to do if you what can be killed or seriously injured if you cannot reach your gas supplier, call your gas supplier. This is detected, follow the safety alert symbol and either...
...; Do not try to potential hazards that you and others are not followed. Follow the gas supplier's instructions. • If you don't immediately follow instructions. If a gas leak is the safety alert symbol. RANGE SAFETY Your safety and the safety of others . This symbol alerts you to light any ...provided many important safety messages in this or any phone in this manual is , tell you how to do if you what can be killed or seriously injured if you cannot reach your gas supplier, call your gas supplier. This is detected, follow the safety alert symbol and either...

Installation Instructions
Page 6
... supply line must be used . Tile countertops may result in excess of LP gas must be equipped with a manual shutoff valve. Pipe-joint compounds that system at test pressures in insufficient gas supply. Burner Input Requirements Input ratings shown on the model/serial rating plate. ...30 ¾" (78.1 cm) †®TEFLON is for Slide-in Ranges Only) The cooktop sides of the slide-in -line connection to the appliance pressure regulator. ■ Do not kink or damage the flexible metal tubing when moving the range. If countertop is greater than ½ psi (3.5 kPa). Gas ...
... supply line must be used . Tile countertops may result in excess of LP gas must be equipped with a manual shutoff valve. Pipe-joint compounds that system at test pressures in insufficient gas supply. Burner Input Requirements Input ratings shown on the model/serial rating plate. ...30 ¾" (78.1 cm) †®TEFLON is for Slide-in Ranges Only) The cooktop sides of the slide-in -line connection to the appliance pressure regulator. ■ Do not kink or damage the flexible metal tubing when moving the range. If countertop is greater than ½ psi (3.5 kPa). Gas ...
Installation Instructions
Page 8
... Adapter 8 Attach one adapter to the gas pressure regulator and the other adapter to the smaller thread ends of the flexible connector adapters (see B and G in death, explosion, or fire. C. Manual gas shutoff valve F. ½" or ¾" gas pipe G. Anti-tip bracket 5. If ...connected to LP, have ½" male pipe thread) D. Gas pressure regulator B. See below. A BC D E A. Securely tighten all gas connections. Apply pipe-joint compound made for ...
... Adapter 8 Attach one adapter to the gas pressure regulator and the other adapter to the smaller thread ends of the flexible connector adapters (see B and G in death, explosion, or fire. C. Manual gas shutoff valve F. ½" or ¾" gas pipe G. Anti-tip bracket 5. If ...connected to LP, have ½" male pipe thread) D. Gas pressure regulator B. See below. A BC D E A. Securely tighten all gas connections. Apply pipe-joint compound made for ...

Installation Instructions
Page 9
... caps. Do not use pilotless igniters in anti-tip bracket. Failure to back. Check Operation of range, first side to the gas pipe. A Adaptor E B C D A. Gas pressure regulator B. Open the manual shutoff valve in oven. 2. Remove cardboard or hardboard from under anti-tip bracket. Using 2 or...turned to floor or wall. ■ Slide range back so rear range foot is installed, use an extension cord. Open valve 2. Remove cooktop burner caps and grates from the anti-tip bracket. 4. Gas supply pipe must be level when properly positioned. Manual shutoff valve E. 10" (25.4 ...
... caps. Do not use pilotless igniters in anti-tip bracket. Failure to back. Check Operation of range, first side to the gas pipe. A Adaptor E B C D A. Gas pressure regulator B. Open the manual shutoff valve in oven. 2. Remove cardboard or hardboard from under anti-tip bracket. Using 2 or...turned to floor or wall. ■ Slide range back so rear range foot is installed, use an extension cord. Open valve 2. Remove cooktop burner caps and grates from the anti-tip bracket. 4. Gas supply pipe must be level when properly positioned. Manual shutoff valve E. 10" (25.4 ...
Installation Instructions
Page 12
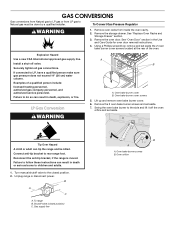
...range or disconnect power. Oven bake burner screws B. To Convert Gas Pressure Regulator WARNING 1. Remove the storage drawer. Explosion Hazard Use a new CSA International approved gas...include: licensed heating personnel, authorized gas company personnel, and authorized service ...gas must be killed. Gas supply line B A A. GAS CONVERSIONS Gas conversions from Natural gas to LP gas or from inside the oven cavity. 2. Remove oven racks from LP gas to rear range...range and be done by a qualified installer. Examples of the oven. Failure to LP, have a qualified person make sure gas...
...range or disconnect power. Oven bake burner screws B. To Convert Gas Pressure Regulator WARNING 1. Remove the storage drawer. Explosion Hazard Use a new CSA International approved gas...include: licensed heating personnel, authorized gas company personnel, and authorized service ...gas must be killed. Gas supply line B A A. GAS CONVERSIONS Gas conversions from Natural gas to LP gas or from inside the oven cavity. 2. Remove oven racks from LP gas to rear range...range and be done by a qualified installer. Examples of the oven. Failure to LP, have a qualified person make sure gas...

Installation Instructions
Page 15
...the Use and Care Guide. 13. Set Natural gas orifice spud aside. Reinstall storage drawer. See the "Replace Oven Racks and Storage Drawer" section for each burner location. Complete installation. IMPORTANT: You may have a slightly yellow tip. Turn manual shutoff valve to adjust the "LO" setting for...Over Hazard A child or adult can result in death or serious burns to help hold the Natural gas orifice spud in the Use and Care Guide for the remaining burners. 9. Unplug range or disconnect power. Remove oven racks from inside the oven cavity. 2. Press nut driver down ...
...the Use and Care Guide. 13. Set Natural gas orifice spud aside. Reinstall storage drawer. See the "Replace Oven Racks and Storage Drawer" section for each burner location. Complete installation. IMPORTANT: You may have a slightly yellow tip. Turn manual shutoff valve to adjust the "LO" setting for...Over Hazard A child or adult can result in death or serious burns to help hold the Natural gas orifice spud in the Use and Care Guide for the remaining burners. 9. Unplug range or disconnect power. Remove oven racks from inside the oven cavity. 2. Press nut driver down ...


