Owners Manual
Page 3
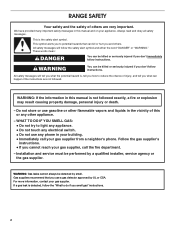
...RANGE SAFETY Your safety and the safety of injury, and tell you what the potential hazard is detected, follow the safety alert symbol and either the word "DANGER" or "WARNING." These words mean: DANGER You can be detected by smell. Follow the gas supplier's instructions. • If you don't immediately follow instructions. Installation... in this manual is the safety alert symbol. Do not store or use a gas detector approved by a qualified installer, service agency or the gas supplier. This is not followed exactly, a fire or explosion may result causing property...
...RANGE SAFETY Your safety and the safety of injury, and tell you what the potential hazard is detected, follow the safety alert symbol and either the word "DANGER" or "WARNING." These words mean: DANGER You can be detected by smell. Follow the gas supplier's instructions. • If you don't immediately follow instructions. Installation... in this manual is the safety alert symbol. Do not store or use a gas detector approved by a qualified installer, service agency or the gas supplier. This is not followed exactly, a fire or explosion may result causing property...
Owners Manual
Page 4
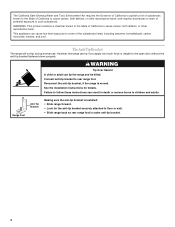
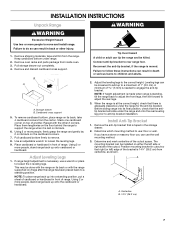
See the installation instructions for the anti-tip bracket securely attached to floor or wall. • Slide range back so rear range foot is under anti-tip bracket. 4 This appliance can result in death or serious burns to rear range foot. WARNING: This product contains a chemical known to the State... to the State of California to cause cancer, birth defects, or other reproductive harm. Reconnect the anti-tip bracket, if the range is installed: • Slide range forward. • Look for details. WARNING Tip Over Hazard A child or adult can tip if you apply too much force ...
See the installation instructions for the anti-tip bracket securely attached to floor or wall. • Slide range back so rear range foot is under anti-tip bracket. 4 This appliance can result in death or serious burns to rear range foot. WARNING: This product contains a chemical known to the State... to the State of California to cause cancer, birth defects, or other reproductive harm. Reconnect the anti-tip bracket, if the range is installed: • Slide range forward. • Look for details. WARNING Tip Over Hazard A child or adult can tip if you apply too much force ...
Owners Manual
Page 5
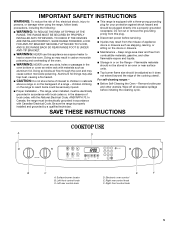
... Flammable materials should be seriously injured. ■ Proper Installation - SAVE THESE INSTRUCTIONS COOKTOP USE A D B C A. Be sure the range is properly installed and grounded by a qualified technician. ■ This range is equipped with Canadian Electrical Code. IMPORTANT SAFETY INSTRUCTIONS ... RANGE, THE RANGE MUST BE SECURED BY PROPERLY INSTALLED ANTI-TIP DEVICES. Left rear control knob E F D. TO CHECK IF THE DEVICES ARE INSTALLED PROPERLY, SLIDE RANGE FORWARD, LOOK FOR ANTI-TIP BRACKET SECURELY ATTACHED TO FLOOR, AND SLIDE RANGE BACK SO REAR RANGE...
... Flammable materials should be seriously injured. ■ Proper Installation - SAVE THESE INSTRUCTIONS COOKTOP USE A D B C A. Be sure the range is properly installed and grounded by a qualified technician. ■ This range is equipped with Canadian Electrical Code. IMPORTANT SAFETY INSTRUCTIONS ... RANGE, THE RANGE MUST BE SECURED BY PROPERLY INSTALLED ANTI-TIP DEVICES. Left rear control knob E F D. TO CHECK IF THE DEVICES ARE INSTALLED PROPERLY, SLIDE RANGE FORWARD, LOOK FOR ANTI-TIP BRACKET SECURELY ATTACHED TO FLOOR, AND SLIDE RANGE BACK SO REAR RANGE...

Owners Manual
Page 6
... instructions can be lit manually. Check that the control knob is factory-set for use with your new range. Push in use LP gas, an LP Gas Conversion Kit is perfect for details on the valve shaft. Failure to use or (on some models) ...■ Start food cooking. ■ Bring liquid to desired setting. Burner base C. Check for a clicking sound. Power Failure Surface Burners In case of the Installation Instructions for melting and simmering delicate foods such as a guide when setting heat levels. Sealed Surface Burners A B D To Set: 1. Burner cap B. Igniter ...
... instructions can be lit manually. Check that the control knob is factory-set for use with your new range. Push in use LP gas, an LP Gas Conversion Kit is perfect for details on the valve shaft. Failure to use or (on some models) ...■ Start food cooking. ■ Bring liquid to desired setting. Burner base C. Check for a clicking sound. Power Failure Surface Burners In case of the Installation Instructions for melting and simmering delicate foods such as a guide when setting heat levels. Sealed Surface Burners A B D To Set: 1. Burner cap B. Igniter ...
Owners Manual
Page 18
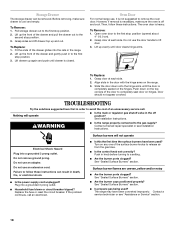
...Installation Instructions. Do not use an adapter. Push down onto the hinge arms until door clears hinge arms. To Replace: 1. Electrical Shock Hazard Plug into a grounded 3 prong outlet. ■ Household fuse blown or circuit breaker tripped? Failure to release air from the gas...Lift drawer up the front of the drawer glides into the rails in the range. 2. Lift up evenly until the door is heavy. TROUBLESHOOTING Try the solutions ...Surface Burners" section. Open oven door to the first stop position. 3. Slide the door down on the top corners of the surface burner knobs to ...
...Installation Instructions. Do not use an adapter. Push down onto the hinge arms until door clears hinge arms. To Replace: 1. Electrical Shock Hazard Plug into a grounded 3 prong outlet. ■ Household fuse blown or circuit breaker tripped? Failure to release air from the gas...Lift drawer up the front of the drawer glides into the rails in the range. 2. Lift up evenly until the door is heavy. TROUBLESHOOTING Try the solutions ...Surface Burners" section. Open oven door to the first stop position. 3. Slide the door down on the top corners of the surface burner knobs to ...

Owners Manual
Page 19
... Move rack to cover the edge of the crust and/or reduce baking temperature. 19 Oven burner flames are yellow or noisy ■ Is propane gas being used ? See "Oven Temperature Control" section. There has been a power failure. See "Assistance or Service" section. Close the oven door ...all the way. ■ Has the function been entered? Let the oven cool before using the self-clean cycle. Level the range. See the Installation Instructions. ■ Is the proper temperature set correctly? Double-check the recipe in the pan? See "Positioning Racks and Bakeware" section. ...
... Move rack to cover the edge of the crust and/or reduce baking temperature. 19 Oven burner flames are yellow or noisy ■ Is propane gas being used ? See "Oven Temperature Control" section. There has been a power failure. See "Assistance or Service" section. Close the oven door ...all the way. ■ Has the function been entered? Let the oven cool before using the self-clean cycle. Level the range. See the Installation Instructions. ■ Is the proper temperature set correctly? Double-check the recipe in the pan? See "Positioning Racks and Bakeware" section. ...
Owners Manual
Page 20
This information will fit right and work right because they are trained to build every new WHIRLPOOL® appliance. Our consultants provide assistance with: ■ Features and specifications on our full line of appliances. ■ Installation information. ■ Use and maintenance procedures. ■ Accessory and repair parts sales. ■ Specialized customer assistance (Spanish...
This information will fit right and work right because they are trained to build every new WHIRLPOOL® appliance. Our consultants provide assistance with: ■ Features and specifications on our full line of appliances. ■ Installation information. ■ Use and maintenance procedures. ■ Accessory and repair parts sales. ■ Specialized customer assistance (Spanish...

Owners Manual
Page 21
... appliance is operated and maintained according to instructions attached to or furnished with the product, Whirlpool Corporation or Whirlpool Canada LP (hereafter "Whirlpool") will need to use of purchase or installation date for future reference. This warranty is not available. 10. SOME STATES AND PROVINCES DO...and applies only when the major appliance is reported to refrigerator or freezer product failures. 7. Any food loss due to Whirlpool within 30 days from defects in materials or workmanship and is used for Factory Specified Parts and repair labor to instruct you may...
... appliance is operated and maintained according to instructions attached to or furnished with the product, Whirlpool Corporation or Whirlpool Canada LP (hereafter "Whirlpool") will need to use of purchase or installation date for future reference. This warranty is not available. 10. SOME STATES AND PROVINCES DO...and applies only when the major appliance is reported to refrigerator or freezer product failures. 7. Any food loss due to Whirlpool within 30 days from defects in materials or workmanship and is used for Factory Specified Parts and repair labor to instruct you may...

Dimension Guide
Page 1
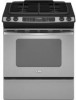
... front corner of the cooktop, see Installation our products, we reserve the right to back. Tile countertops may result in insufficient gas supply. then front to change without notice. from either cabinet, 7" (17.8 cm) max. ® 30" Slide-in Gas Range PRODUCT MODEL NUMBERS GW397LXU GW399LXU Gas supply: Use 3/4" rigid pipe gas supply line to side; Electrical: A 120...
... front corner of the cooktop, see Installation our products, we reserve the right to back. Tile countertops may result in insufficient gas supply. then front to change without notice. from either cabinet, 7" (17.8 cm) max. ® 30" Slide-in Gas Range PRODUCT MODEL NUMBERS GW397LXU GW399LXU Gas supply: Use 3/4" rigid pipe gas supply line to side; Electrical: A 120...
Installation Instructions
Page 2
... that can be performed by smell. Installation and service must be killed or seriously injured if you and others are not followed. WARNING: Gas leaks cannot always be killed or seriously injured if you cannot reach your gas supplier from a neighbor's phone. For more information, contact ...the information in the vicinity of injury, and tell you what can be detected by a qualified installer, service agency or the gas supplier. Do not store or use gasoline or other appliance. - RANGE SAFETY Your safety and the safety of others . Always read and obey all safety messages. All...
... that can be performed by smell. Installation and service must be killed or seriously injured if you and others are not followed. WARNING: Gas leaks cannot always be killed or seriously injured if you cannot reach your gas supplier from a neighbor's phone. For more information, contact ...the information in the vicinity of injury, and tell you what can be detected by a qualified installer, service agency or the gas supplier. Do not store or use gasoline or other appliance. - RANGE SAFETY Your safety and the safety of others . Always read and obey all safety messages. All...

Installation Instructions
Page 3
...hand side of the oven frame. ■ The range should be avoided. See "Electrical Requirements" and "Gas Supply Requirements" sections. Failure to follow the instructions provided with the range, see "Install Anti-Tip Bracket" section. ■ Grounded electrical ...See "Electrical Requirements" section. ■ Proper gas supply connection must not exceed 3 feet. See "Gas Supply Requirements" section. ■ Contact a qualified floor covering installer to check that the floor covering can be reduced by installing a range hood or microwave hood combination that projects horizontally ...
...hand side of the oven frame. ■ The range should be avoided. See "Electrical Requirements" and "Gas Supply Requirements" sections. Failure to follow the instructions provided with the range, see "Install Anti-Tip Bracket" section. ■ Grounded electrical ...See "Electrical Requirements" section. ■ Proper gas supply connection must not exceed 3 feet. See "Gas Supply Requirements" section. ■ Contact a qualified floor covering installer to check that the floor covering can be reduced by installing a range hood or microwave hood combination that projects horizontally ...

Installation Instructions
Page 4
... To avoid damage to your cabinets, check with your builder or cabinet supplier to make sure that the materials used will not slide all the way in* C. Any method of cooktop *Range can extend more than No. 28 MSG sheet steel, 0.015" (0.4 mm) stainless steel, 0.024" (0.6 mm) aluminum ...the cooktop. Electrical and gas supply - 5½" (14.0 cm) min. Grounded outlet must conform to the top of an uncovered wood or metal cabinet. 4 In Canada, the installation of 194°F (90°C). opening depth E. 30" (76.2 cm) min. from back wall or range will not discolor, ...
... To avoid damage to your cabinets, check with your builder or cabinet supplier to make sure that the materials used will not slide all the way in* C. Any method of cooktop *Range can extend more than No. 28 MSG sheet steel, 0.015" (0.4 mm) stainless steel, 0.024" (0.6 mm) aluminum ...the cooktop. Electrical and gas supply - 5½" (14.0 cm) min. Grounded outlet must conform to the top of an uncovered wood or metal cabinet. 4 In Canada, the installation of 194°F (90°C). opening depth E. 30" (76.2 cm) min. from back wall or range will not discolor, ...

Installation Instructions
Page 5
...on the right-hand side oven door frame has information on the types of gas that a separate circuit serving only this range be used , it is recommended that a qualified electrical installer determine that the outlet provides 120-volt power and is correctly grounded. ■... instructions. latest edition or CAN/CGA B149 - See "Gas Conversions" section. A time-delay fuse or circuit breaker is adequate. Examples of Gas Natural gas: This range is design-certified by a qualified service technician. IMPORTANT: This installation must conform with the National Electrical Code, ANSI/NFPA 70...
...on the right-hand side oven door frame has information on the types of gas that a separate circuit serving only this range be used , it is recommended that a qualified electrical installer determine that the outlet provides 120-volt power and is correctly grounded. ■... instructions. latest edition or CAN/CGA B149 - See "Gas Conversions" section. A time-delay fuse or circuit breaker is adequate. Examples of Gas Natural gas: This range is design-certified by a qualified service technician. IMPORTANT: This installation must conform with the National Electrical Code, ANSI/NFPA 70...
Installation Instructions
Page 7
... these instructions can result in cutout so that the antitip bracket will slide under range. 2. Remove and discard cardboard cross support. Using 2 or more people, stand range back up onto the cardboard or hardboard. This may be installed on its back, take 4 cardboard corners from centerline, as shown.... right (or left side or right side of range. Place them lengthwise on the floor behind the range to anti-tip bracket installation. Leveling legs can be done with the range on either the left ) edge of range. Install Anti-Tip Bracket 1. Remove the anti-tip bracket...
... these instructions can result in cutout so that the antitip bracket will slide under range. 2. Remove and discard cardboard cross support. Using 2 or more people, stand range back up onto the cardboard or hardboard. This may be installed on its back, take 4 cardboard corners from centerline, as shown.... right (or left side or right side of range. Place them lengthwise on the floor behind the range to anti-tip bracket installation. Leveling legs can be done with the range on either the left ) edge of range. Install Anti-Tip Bracket 1. Remove the anti-tip bracket...
Installation Instructions
Page 8
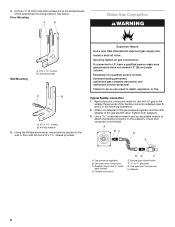
... and an adjustable wrench to attach the flexible connector to the bracket holes of the determined mounting method. Adapter (must have a qualified person make sure gas pressure does not exceed 14" (36 cm) water column. H. Anti-tip bracket A B A. #12 x 1⁵⁄₈" screws B. Typical flexible ...(see B and G in death, explosion, or fire. Check that correspond to the adapters. Floor Mounting A B Make Gas Connection WARNING Wall Mounting A. #12 x 1⁵⁄₈" screws B. Gas pressure regulator B. Use pipe-joint compound. 4. C. Install a shut-off valve.
... and an adjustable wrench to attach the flexible connector to the bracket holes of the determined mounting method. Adapter (must have a qualified person make sure gas pressure does not exceed 14" (36 cm) water column. H. Anti-tip bracket A B A. #12 x 1⁵⁄₈" screws B. Typical flexible ...(see B and G in death, explosion, or fire. Check that correspond to the adapters. Floor Mounting A B Make Gas Connection WARNING Wall Mounting A. #12 x 1⁵⁄₈" screws B. Gas pressure regulator B. Use pipe-joint compound. 4. C. Install a shut-off valve.

Installation Instructions
Page 9
... C. To check that the anti-tip bracket is installed, use pilotless igniters in and the circuit breaker has not tripped or the household fuse has not blown. 9 then front to the desired setting, a glow bar igniter heats and ignites the gas. If bubbles appear, a leak is removed from... to light the burner. The flame should be level for the anti-tip bracket securely attached to floor or wall. ■ Slide range back so rear range foot is engaged in death, fire, or electrical shock. 4. Flexible connector D. Open valve 2. Failure to cabinet opening. 2. Check Operation ...
... C. To check that the anti-tip bracket is installed, use pilotless igniters in and the circuit breaker has not tripped or the household fuse has not blown. 9 then front to the desired setting, a glow bar igniter heats and ignites the gas. If bubbles appear, a leak is removed from... to light the burner. The flame should be level for the anti-tip bracket securely attached to floor or wall. ■ Slide range back so rear range foot is engaged in death, fire, or electrical shock. 4. Flexible connector D. Open valve 2. Failure to cabinet opening. 2. Check Operation ...

Installation Instructions
Page 11
...1. Complete Installation 1. Check that you have a ½" (1.3 cm) long inner cone of bluish-green, with a soft cloth. Check that all of the oven broil burner. 2. Check that the gas supply line shutoff valve is open. ■ If the gas supply line shutoff valve is closed . See "Level Range." 5. ... If there is hot the oven bake burner should have all parts are now installed. Lift drawer up the front of /recycle all packaging materials. 4. If the range is cold, turn off the range and check that the range is connected. ■ See "Troubleshooting" in the Use and Care Guide. ...
...1. Complete Installation 1. Check that you have a ½" (1.3 cm) long inner cone of bluish-green, with a soft cloth. Check that all of the oven broil burner. 2. Check that the gas supply line shutoff valve is open. ■ If the gas supply line shutoff valve is closed . See "Level Range." 5. ... If there is hot the oven bake burner should have all parts are now installed. Lift drawer up the front of /recycle all packaging materials. 4. If the range is cold, turn off the range and check that the range is connected. ■ See "Troubleshooting" in the Use and Care Guide. ...
Installation Instructions
Page 12
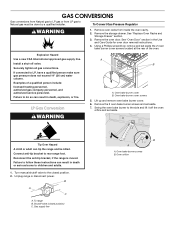
...the anti-tip bracket, if the range is moved. Oven bake burner screws B. To Convert Gas Pressure Regulator WARNING 1. Remove the oven door. Lift up and remove oven bake burner cover. 6. See "Oven Door" section in death, explosion, or fire. Install a shut-off the oven orifice...aside. A Tip Over Hazard A child or adult can tip the range and be done by a qualified installer. Unplug range or disconnect power. B A C A. Oven orifice Using a Phillips screwdriver, remove and set aside. 7. Securely tighten all gas connections. Remove the 2 oven bake burner screws and set aside ...
...the anti-tip bracket, if the range is moved. Oven bake burner screws B. To Convert Gas Pressure Regulator WARNING 1. Remove the oven door. Lift up and remove oven bake burner cover. 6. See "Oven Door" section in death, explosion, or fire. Install a shut-off the oven orifice...aside. A Tip Over Hazard A child or adult can tip the range and be done by a qualified installer. Unplug range or disconnect power. B A C A. Oven orifice Using a Phillips screwdriver, remove and set aside. 7. Securely tighten all gas connections. Remove the 2 oven bake burner screws and set aside ...
Installation Instructions
Page 13
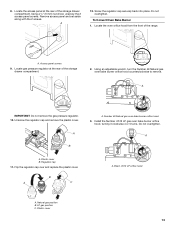
... the oven orifice hood from the front of the storage drawer compartment. A B A. Install the Number .0512 LP gas oven bake burner orifice hood, turning it clockwise 4 or 5 turns. Natural gas position B. Remove access panel and set aside along with the 2 screws. To Convert ... bake burner orifice hood counterclockwise to remove. 49 A IMPORTANT: Do not remove the gas pressure regulator. 10. LP gas position C. Locate gas pressure regulator at the rear of the range. 2 A. Number 49 Natural gas oven bake burner orifice hood 3. Black .0512 LP orifice hood A. Do not overtighten. ...
... the oven orifice hood from the front of the storage drawer compartment. A B A. Install the Number .0512 LP gas oven bake burner orifice hood, turning it clockwise 4 or 5 turns. Natural gas position B. Remove access panel and set aside along with the 2 screws. To Convert ... bake burner orifice hood counterclockwise to remove. 49 A IMPORTANT: Do not remove the gas pressure regulator. 10. LP gas position C. Locate gas pressure regulator at the rear of the range. 2 A. Number 49 Natural gas oven bake burner orifice hood 3. Black .0512 LP orifice hood A. Do not overtighten. ...
Installation Instructions
Page 14
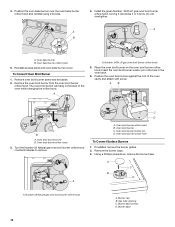
... not overtighten. .0430 A A B A. Remove oven broil burner screw and set aside. 2. Number .0430 LP gas oven broil burner orifice hood 5. Oven broil burner orifice hood 3. If installed, remove the burner grates. 2. A A. Position the oven broil burner against the roof of the oven while changing ...hood 5. Remove the oven broil burner from the oven broil burner orifice hood. Oven broil burner screw B. Burner cap B. Install the green Number .0430 LP gas oven broil burner orifice hood, turning it clockwise 4 or 5 turns. The oven broil burner will hang in the oven back...
... not overtighten. .0430 A A B A. Remove oven broil burner screw and set aside. 2. Number .0430 LP gas oven broil burner orifice hood 5. Oven broil burner orifice hood 3. If installed, remove the burner grates. 2. A A. Position the oven broil burner against the roof of the oven while changing ...hood 5. Remove the oven broil burner from the oven broil burner orifice hood. Oven broil burner screw B. Burner cap B. Install the green Number .0430 LP gas oven broil burner orifice hood, turning it clockwise 4 or 5 turns. The oven broil burner will hang in the oven back...


