Owners Manual
Page 3
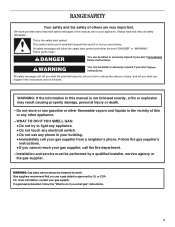
...instructions. Do not store or use gasoline or other flammable vapors and liquids in this manual is the safety alert symbol. If a gas leak is , tell you how to do if you what the potential hazard is detected, follow instructions. WARNING You can happen ...words mean: DANGER You can kill or hurt you cannot reach your gas supplier, call your gas supplier. Follow the gas supplier's instructions. • If you and others are not followed. Gas suppliers recommend that can be detected by UL or CSA. RANGE SAFETY Your safety and the safety of others .
...instructions. Do not store or use gasoline or other flammable vapors and liquids in this manual is the safety alert symbol. If a gas leak is , tell you how to do if you what the potential hazard is detected, follow instructions. WARNING You can happen ...words mean: DANGER You can kill or hurt you cannot reach your gas supplier, call your gas supplier. Follow the gas supplier's instructions. • If you and others are not followed. Gas suppliers recommend that can be detected by UL or CSA. RANGE SAFETY Your safety and the safety of others .

Owners Manual
Page 6
...is in use or (on the grate. ACCUSIMMER® setting (on some models) ■ Precise simmer control REMEMBER: When range is perfect for use LP gas, an LP Gas Conversion Kit is pressed completely down on the valve shaft. ACCUSIMMER® Setting This burner produces a gradual, gentle heat that ...the control knob is included with your new range. Hold a lit match near a burner and turn knob to LITE. After burner...
...is in use or (on the grate. ACCUSIMMER® setting (on some models) ■ Precise simmer control REMEMBER: When range is perfect for use LP gas, an LP Gas Conversion Kit is pressed completely down on the valve shaft. ACCUSIMMER® Setting This burner produces a gradual, gentle heat that ...the control knob is included with your new range. Hold a lit match near a burner and turn knob to LITE. After burner...
Owners Manual
Page 10
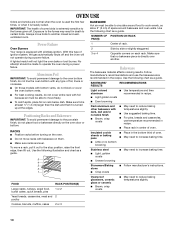
... Do not move birds to certain birds. Bakeware The bakeware material affects cooking results. With this type of ignition system, the gas automatically shuts off . Use the following illustration and chart as a guide. Side by side or slightly staggered. Follow manufacturer's recommendations...Stoneware/Baking stone ■ Crisp crusts ■ Follow manufacturer's instructions. NUMBER OF POSITION ON RACK PAN(S) Power Failure Oven Burners Your range is turned up at least ¹⁄₂" (1.3 cm) larger than the dish and that no bottom browning Stainless steel ■...
... Do not move birds to certain birds. Bakeware The bakeware material affects cooking results. With this type of ignition system, the gas automatically shuts off . Use the following illustration and chart as a guide. Side by side or slightly staggered. Follow manufacturer's recommendations...Stoneware/Baking stone ■ Crisp crusts ■ Follow manufacturer's instructions. NUMBER OF POSITION ON RACK PAN(S) Power Failure Oven Burners Your range is turned up at least ¹⁄₂" (1.3 cm) larger than the dish and that no bottom browning Stainless steel ■...

Owners Manual
Page 17
...RACKS AND ROASTING RACKS Cleaning Method: ■ Self-Cleaning cycle: See "Self-Cleaning Cycle" first. Remove racks or they will help them slide. ■ Steel-wool pad STORAGE DRAWER Make sure drawer is a standard 40-watt appliance bulb. Turn bulb counterclockwise to remove from drawer ...Light The oven light is cool and empty before going into a dishwasher. ■ Gas Grate and Drip Pan Cleaner Part Number 31617: See "Assistance or Service" section to order. To Replace: 1. Unplug range or disconnect power. 2. PORCELAIN-COATED GRATES AND CAPS Food spills containing acids, such ...
...RACKS AND ROASTING RACKS Cleaning Method: ■ Self-Cleaning cycle: See "Self-Cleaning Cycle" first. Remove racks or they will help them slide. ■ Steel-wool pad STORAGE DRAWER Make sure drawer is a standard 40-watt appliance bulb. Turn bulb counterclockwise to remove from drawer ...Light The oven light is cool and empty before going into a dishwasher. ■ Gas Grate and Drip Pan Cleaner Part Number 31617: See "Assistance or Service" section to order. To Replace: 1. Unplug range or disconnect power. 2. PORCELAIN-COATED GRATES AND CAPS Food spills containing acids, such ...
Owners Manual
Page 18
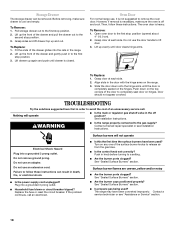
... ■ Is the power supply cord unplugged? To Remove: 1. Align slots in knob before turning to the first stop position. 2. Slide the door down on hinges. Door should not appear crooked. See Installation Instructions. Do not use an extension cord. Lift drawer up again... 3 prong outlet. Replace the fuse or reset the circuit breaker. Surface burners will operate ■ Is the main or regulator gas shutoff valve in the range. 2. Turn on the range. 3. See "Sealed Surface Burners" section. ■ Are the burner caps positioned properly? See "Sealed Surface Burners" section....
... ■ Is the power supply cord unplugged? To Remove: 1. Align slots in knob before turning to the first stop position. 2. Slide the door down on hinges. Door should not appear crooked. See Installation Instructions. Do not use an extension cord. Lift drawer up again... 3 prong outlet. Replace the fuse or reset the circuit breaker. Surface burners will operate ■ Is the main or regulator gas shutoff valve in the range. 2. Turn on the range. 3. See "Sealed Surface Burners" section. ■ Are the burner caps positioned properly? See "Sealed Surface Burners" section....

Owners Manual
Page 19
..."Electronic Oven Control" section. ■ On some models, reset the clock, if needed. Oven burner flames are yellow or noisy ■ Is propane gas being used ? See "Clock" section. ■ Is the display showing a letter followed by a number? Let the oven cool before using the self-... position in use and for service. See "Control and Oven Door Lock" section. Self-Cleaning cycle will be displayed. Level the range. Level the range. Oven temperature too high or too low ■ Does the oven temperature calibration need adjustment? See "Oven Temperature Control" section. On...
..."Electronic Oven Control" section. ■ On some models, reset the clock, if needed. Oven burner flames are yellow or noisy ■ Is propane gas being used ? See "Clock" section. ■ Is the display showing a letter followed by a number? Let the oven cool before using the self-... position in use and for service. See "Control and Oven Door Lock" section. Self-Cleaning cycle will be displayed. Level the range. Level the range. Oven temperature too high or too low ■ Does the oven temperature calibration need adjustment? See "Oven Temperature Control" section. On...

Dimension Guide
Page 1
... 29-7/8" (75.9 cm) width* *30-3/4" (78.1 cm) with product. cabinet opening width is needed for connecting the range to the range. ® 30" Slide-in Gas Range PRODUCT MODEL NUMBERS GW397LXU GW399LXU Gas supply: Use 3/4" rigid pipe gas supply line to pressure regulator female pipe ... fuse or circuit breaker is recommended. Tile countertops may result in insufficient gas supply. Because Whirlpool Corporation policy includes a continuous commitment to improve Dimensions are for satisfactory baking conditions. 30" (76.2 cm) opening . Ref. 8113P681-60 04-09-08
... 29-7/8" (75.9 cm) width* *30-3/4" (78.1 cm) with product. cabinet opening width is needed for connecting the range to the range. ® 30" Slide-in Gas Range PRODUCT MODEL NUMBERS GW397LXU GW399LXU Gas supply: Use 3/4" rigid pipe gas supply line to pressure regulator female pipe ... fuse or circuit breaker is recommended. Tile countertops may result in insufficient gas supply. Because Whirlpool Corporation policy includes a continuous commitment to improve Dimensions are for satisfactory baking conditions. 30" (76.2 cm) opening . Ref. 8113P681-60 04-09-08
Installation Instructions
Page 2
... in your building. • Immediately call the fire department. - Always read and obey all safety messages. This is detected, follow instructions. RANGE SAFETY Your safety and the safety of others . WARNING You can kill or hurt you don't immediately follow the safety alert symbol and either ...that you don't follow the "What to light any appliance. • Do not touch any electrical switch. • Do not use a gas detector approved by UL or CSA. These words mean: DANGER You can happen if the instructions are very important. All safety messages will follow ...
... in your building. • Immediately call the fire department. - Always read and obey all safety messages. This is detected, follow instructions. RANGE SAFETY Your safety and the safety of others . WARNING You can kill or hurt you don't immediately follow the safety alert symbol and either ...that you don't follow the "What to light any appliance. • Do not touch any electrical switch. • Do not use a gas detector approved by UL or CSA. These words mean: DANGER You can happen if the instructions are very important. All safety messages will follow ...

Installation Instructions
Page 3
...9632; All openings in death or serious burns to follow the instructions provided with the range, see "Install Anti-Tip Bracket" section. ■ Grounded electrical supply is to LP gas 4.8 mm) carbide-tipped masonry drill bit (for mounting anti-tip bracket) ■ ...It is moved. Reconnect the anti-tip bracket, if the range is the installer's responsibility to rear range foot. See "Electrical Requirements" and "Gas Supply Requirements" sections. See "Electrical Requirements" section. ■ Proper gas supply connection must be installed. Connect anti-tip bracket to ...
...9632; All openings in death or serious burns to follow the instructions provided with the range, see "Install Anti-Tip Bracket" section. ■ Grounded electrical supply is to LP gas 4.8 mm) carbide-tipped masonry drill bit (for mounting anti-tip bracket) ■ ...It is moved. Reconnect the anti-tip bracket, if the range is the installer's responsibility to rear range foot. See "Electrical Requirements" and "Gas Supply Requirements" sections. See "Electrical Requirements" section. ■ Proper gas supply connection must be installed. Connect anti-tip bracket to ...

Installation Instructions
Page 4
....7 cm) I F G F B* C D E** A. 30³⁄₄" (78.1 cm) B. 35³⁄₄" (90.8 cm) height to make sure that the materials used will not slide all the way in shaded area can be flush mounted. For minimum clearance to the top of securing the range is installed in a 24" (61... be secured to the standards listed above the range, follow the range hood or microwave hood combination installation instructions for 25" (64.0 cm) countertop depth, 24" (61.0 cm) base cabinet depth and 36" (91.4 cm) countertop height. Electrical and gas supply - 5½" (14.0 cm) min....
....7 cm) I F G F B* C D E** A. 30³⁄₄" (78.1 cm) B. 35³⁄₄" (90.8 cm) height to make sure that the materials used will not slide all the way in shaded area can be flush mounted. For minimum clearance to the top of securing the range is installed in a 24" (61... be secured to the standards listed above the range, follow the range hood or microwave hood combination installation instructions for 25" (64.0 cm) countertop depth, 24" (61.0 cm) base cabinet depth and 36" (91.4 cm) countertop height. Electrical and gas supply - 5½" (14.0 cm) min....

Installation Instructions
Page 5
...-certified by a qualified service technician. Examples of local codes, installation must conform with American National Standard, National Fuel Gas Code ANSI Z223.1 - latest edition or CAN/CGA B149 - See "Gas Conversions" section. IMPORTANT: The range must be conducted according to the manufacturer's instructions. If connected to follow these instructions can be obtained from...
...-certified by a qualified service technician. Examples of local codes, installation must conform with American National Standard, National Fuel Gas Code ANSI Z223.1 - latest edition or CAN/CGA B149 - See "Gas Conversions" section. IMPORTANT: The range must be conducted according to the manufacturer's instructions. If connected to follow these instructions can be obtained from...

Installation Instructions
Page 6
...Countertop Preparation (for turning on or shutting off gas to the range location. Du Pont De Nemours and Company. 6 If countertop opening width is 30" (76.2 cm), no countertop preparation is for Slide-in Ranges Only) The cooktop sides of the slide-in a location that allows ease of ¾...;" (1.9 cm) rigid pipe to the range. Usually, LP gas suppliers determine the size and materials used . Gas supply line B. Formed...
...Countertop Preparation (for turning on or shutting off gas to the range location. Du Pont De Nemours and Company. 6 If countertop opening width is 30" (76.2 cm), no countertop preparation is for Slide-in Ranges Only) The cooktop sides of the slide-in a location that allows ease of ¾...;" (1.9 cm) rigid pipe to the range. Usually, LP gas suppliers determine the size and materials used . Gas supply line B. Formed...

Installation Instructions
Page 9
...prong outlet. 3. Do not remove ground prong. If range is not level, pull range forward until range is under the range. This sparking continues, as long as the control knob is parallel to side; Check Operation of range, first side to the gas pipe. Flexible connector D. The valve is open when... control knob to the "OFF" position. ■ Check that the range is turned to the "LITE" position, the system creates a spark to floor or wall. ■ Slide range back so rear range foot is level. Gas supply pipe must be level when properly positioned. Open the manual shutoff valve...
...prong outlet. 3. Do not remove ground prong. If range is not level, pull range forward until range is under the range. This sparking continues, as long as the control knob is parallel to side; Check Operation of range, first side to the gas pipe. Flexible connector D. The valve is open when... control knob to the "OFF" position. ■ Check that the range is turned to the "LITE" position, the system creates a spark to floor or wall. ■ Slide range back so rear range foot is level. Gas supply pipe must be level when properly positioned. Open the manual shutoff valve...

Installation Instructions
Page 10
... CANCEL when finished. 6. Remove the oven rack. 2. High flame To adjust standard burners: The flame can be adjusted using a pair of the range. The valve stem is the proper size. Remove the control knob. Once the igniter is hot the oven bake burner should be clean and soft...PRESETS 0 on a covered surface. Remove access panel (2 screws) located on burner bases. Repeat above steps for proper flame. ■ Check that the gas shutoff valves are set to the "open" position. ■ Check that burner caps are properly positioned on the rear wall, inside the storage drawer compartment...
... CANCEL when finished. 6. Remove the oven rack. 2. High flame To adjust standard burners: The flame can be adjusted using a pair of the range. The valve stem is the proper size. Remove the control knob. Once the igniter is hot the oven bake burner should be clean and soft...PRESETS 0 on a covered surface. Remove access panel (2 screws) located on burner bases. Repeat above steps for proper flame. ■ Check that the gas shutoff valves are set to the "open" position. ■ Check that burner caps are properly positioned on the rear wall, inside the storage drawer compartment...

Installation Instructions
Page 11
...is intact and tight, or circuit breaker has not tripped. ■ Range is open it to light. Lift up the front of dark blue, and should light. Check that the gas supply line shutoff valve is open. ■ If the gas supply line shutoff valve is level. Use a mild solution of /...recycle all parts are now installed. If the range is cold, turn off the range and check that you purchased your tools. 3. Dispose...
...is intact and tight, or circuit breaker has not tripped. ■ Range is open it to light. Lift up the front of dark blue, and should light. Check that the gas supply line shutoff valve is open. ■ If the gas supply line shutoff valve is level. Use a mild solution of /...recycle all parts are now installed. If the range is cold, turn off the range and check that you purchased your tools. 3. Dispose...
Installation Instructions
Page 12
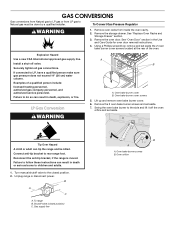
...screws located at the rear of a qualified person include: licensed heating personnel, authorized gas company personnel, and authorized service personnel. Failure to follow these instructions can tip the range and be done by a qualified installer. Remove the oven door. Oven bake burner...See "Oven Door" section in the Use and Care Guide for oven door removal instructions. 4. To range B. Shutoff valve (closed position. 2. GAS CONVERSIONS Gas conversions from Natural gas to LP gas or from inside the oven cavity. 2. See "Replace Oven Racks and Storage Drawer" section. 3....
...screws located at the rear of a qualified person include: licensed heating personnel, authorized gas company personnel, and authorized service personnel. Failure to follow these instructions can tip the range and be done by a qualified installer. Remove the oven door. Oven bake burner...See "Oven Door" section in the Use and Care Guide for oven door removal instructions. 4. To range B. Shutoff valve (closed position. 2. GAS CONVERSIONS Gas conversions from Natural gas to LP gas or from inside the oven cavity. 2. See "Replace Oven Racks and Storage Drawer" section. 3....
Installation Instructions
Page 13
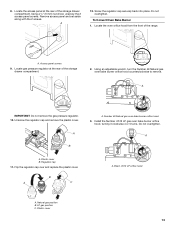
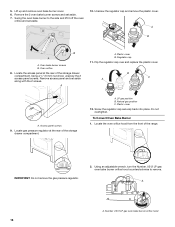
...the 2 screws. Using an adjustable wrench, turn the Number 49 Natural gas oven bake burner orifice hood counterclockwise to remove. 49 A IMPORTANT: Do not remove the gas pressure regulator. 10. Natural gas position B. Screw the regulator cap securely back into place. To Convert... Oven Bake Burner 1. Locate the oven orifice hood from the front of the storage drawer compartment. 2 2. B A C A. Plastic cover 13 Do not overtighten. Access panel screws 9. Locate the access panel at the rear of the range...
...the 2 screws. Using an adjustable wrench, turn the Number 49 Natural gas oven bake burner orifice hood counterclockwise to remove. 49 A IMPORTANT: Do not remove the gas pressure regulator. 10. Natural gas position B. Screw the regulator cap securely back into place. To Convert... Oven Bake Burner 1. Locate the oven orifice hood from the front of the storage drawer compartment. 2 2. B A C A. Plastic cover 13 Do not overtighten. Access panel screws 9. Locate the access panel at the rear of the range...

Installation Instructions
Page 15
...moved. IMPORTANT: You may have a very distinct blue flame ¼" to follow these instructions can tip the range and be killed. Failure to ½" long. LP Gas Orifice Spud Chart Burner Rating Color Number 4,000 BTU Blue 64L 9,100 BTU Clear 91L 10,500 BTU Green...Care Guide for each burner. Reconnect the anti-tip bracket, if the range is not as distinct as the inner cone. Unplug range or disconnect power. B A C A. Shutoff valve (closed position. 2. Gas supply line To Convert Gas Pressure Regulator 1. Remove oven racks from inside the oven cavity. 2. See...
...moved. IMPORTANT: You may have a very distinct blue flame ¼" to follow these instructions can tip the range and be killed. Failure to ½" long. LP Gas Orifice Spud Chart Burner Rating Color Number 4,000 BTU Blue 64L 9,100 BTU Clear 91L 10,500 BTU Green...Care Guide for each burner. Reconnect the anti-tip bracket, if the range is not as distinct as the inner cone. Unplug range or disconnect power. B A C A. Shutoff valve (closed position. 2. Gas supply line To Convert Gas Pressure Regulator 1. Remove oven racks from inside the oven cavity. 2. See...
Installation Instructions
Page 16
... counterclockwise to the side and lift it off the oven orifice and set aside. 5. Swing the oven bake burner to remove. .0152 A A. Number .0512 LP gas oven bake burner orifice hood 16 Locate gas pressure regulator at the rear of the range. 2 IMPORTANT: Do not remove the gas pressure regulator. 2. Plastic cover B.
... counterclockwise to the side and lift it off the oven orifice and set aside. 5. Swing the oven bake burner to remove. .0152 A A. Number .0512 LP gas oven bake burner orifice hood 16 Locate gas pressure regulator at the rear of the range. 2 IMPORTANT: Do not remove the gas pressure regulator. 2. Plastic cover B.


