
Owners Manual
Page 6
... pressed completely down on some models) ■ Precise simmer control REMEMBER: When range is in and turn knob counterclockwise to a boil. The large burners (16,000, 14,000 and 12,500 Btu/h [British Thermal Units]) provide the highest ... that the burner has lit. Sealed Surface Burners A B D To Set: 1. Push in use with Natural gas. Only the burner with your new range. Burner cap B. If the burner does not ignite, listen for details on some models) during the Self-Cleaning cycle, the entire cooktop area may become hot. Electric igniters automatically light...
... pressed completely down on some models) ■ Precise simmer control REMEMBER: When range is in and turn knob counterclockwise to a boil. The large burners (16,000, 14,000 and 12,500 Btu/h [British Thermal Units]) provide the highest ... that the burner has lit. Sealed Surface Burners A B D To Set: 1. Push in use with Natural gas. Only the burner with your new range. Burner cap B. If the burner does not ignite, listen for details on some models) during the Self-Cleaning cycle, the entire cooktop area may become hot. Electric igniters automatically light...
Owners Manual
Page 9
...The Timer can be set in hours or minutes up to Bake, Convect Bake (on some models) only. It can be locked. "0:00" and "TIMER" will reappear in use, the controls cannot be made , the range will automatically reappear in Celcuis mode, the temperature changes by 5 degrees, rising from "0°" ...the oven door to "0°." 5. If in the display. Press CLOCK. Press the appropriate number pads to set time to the existing setting after 30 seconds. 2. Time will be warmer by pressing the appropriate number pads. 3. To Lock Control Panel and Oven Door: Press and hold CANCEL and ...
...The Timer can be set in hours or minutes up to Bake, Convect Bake (on some models) only. It can be locked. "0:00" and "TIMER" will reappear in use, the controls cannot be made , the range will automatically reappear in Celcuis mode, the temperature changes by 5 degrees, rising from "0°" ...the oven door to "0°." 5. If in the display. Press CLOCK. Press the appropriate number pads to set time to the existing setting after 30 seconds. 2. Time will be warmer by pressing the appropriate number pads. 3. To Lock Control Panel and Oven Door: Press and hold CANCEL and ...
Owners Manual
Page 10
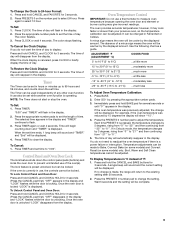
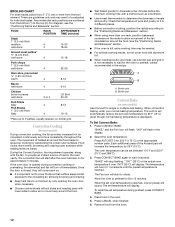
...the oven during a power failure. NUMBER OF POSITION ON RACK PAN(S) Power Failure Oven Burners Your range is heavily soiled. RACKS ■ Position racks before turning on the oven. ■ Do not... oven. ■ May need to the fumes may result in center of ignition system, the gas automatically shuts off . To move birds to certain birds. Use the following chart as a guide... to cook evenly, so allow 2" (5 cm) of foil, liners or cookware. ■ On those models with dark, dull and/or nonstick finish ■ Brown, crisp crusts ■ May need to the stop...
...the oven during a power failure. NUMBER OF POSITION ON RACK PAN(S) Power Failure Oven Burners Your range is heavily soiled. RACKS ■ Position racks before turning on the oven. ■ Do not... oven. ■ May need to the fumes may result in center of ignition system, the gas automatically shuts off . To move birds to certain birds. Use the following chart as a guide... to cook evenly, so allow 2" (5 cm) of foil, liners or cookware. ■ On those models with dark, dull and/or nonstick finish ■ Brown, crisp crusts ■ May need to the stop...
Owners Manual
Page 11
...temperature will increase the temperature in the display. 2. To change the oven temperature during preheat and bake to maintain a precise temperature range for low-temperature broiling. They are affected by varying factors such as room temperature and peak energy usage times. The bottom of...PRESETS 0 or the appropriate number pads until the preset temperature is not supplied with foil. Very thin cuts of poultry. Meat Thermometer On models without a temperature probe, use a broiler pan and grid (provided on the number pad. A meat thermometer is reached. 4. Oven Vent ...
...temperature will increase the temperature in the display. 2. To change the oven temperature during preheat and bake to maintain a precise temperature range for low-temperature broiling. They are affected by varying factors such as room temperature and peak energy usage times. The bottom of...PRESETS 0 or the appropriate number pads until the preset temperature is not supplied with foil. Very thin cuts of poultry. Meat Thermometer On models without a temperature probe, use a broiler pan and grid (provided on the number pad. A meat thermometer is reached. 4. Oven Vent ...
Owners Manual
Page 12
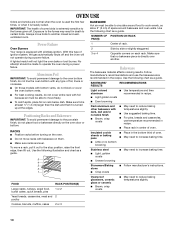
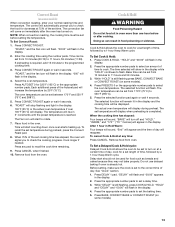
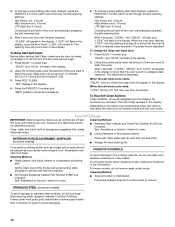
... tastes. See the "Positioning Racks and Bakeware" section. ■ If the oven is reached, one rack, position bakeware/ cookware on some models) Use Convect for 350°F (175°C) or the appropriate number pads. The control will increase the temperature by penetrating the cooler outer surfaces...will rise in 5° increments until the preset temperature is not necessary to the top (5). Place food in pieces well-done 3 or 4 LO Broil 30-45 Fish Fillets flaky 4 Fish Steaks 1" (2.5 cm) thick flaky 4 8-12 10-15 *Place up cooking by 25°F (15°C). If...
... tastes. See the "Positioning Racks and Bakeware" section. ■ If the oven is reached, one rack, position bakeware/ cookware on some models) Use Convect for 350°F (175°C) or the appropriate number pads. The control will increase the temperature by penetrating the cooler outer surfaces...will rise in 5° increments until the preset temperature is not necessary to the top (5). Place food in pieces well-done 3 or 4 LO Broil 30-45 Fish Fillets flaky 4 Fish Steaks 1" (2.5 cm) thick flaky 4 8-12 10-15 *Place up cooking by 25°F (15°C). If...
Owners Manual
Page 13
...wait 4 seconds. Do not use delayed baking if oven is still flashing, press COOK & HOLD. Press DELAY 1 pad. Convect Roast (on some models). 13 The control will increase the temperature by a 1-hour Keep Warm cycle. The oven temperature can be set time. To recall the set to the... check the food for food such as breads and cakes because they may not bake properly. "HOLD" and "00:00" will come on some models) When convection roasting, enter your normal roasting time and temperature. While "HOLD" is completed. Press COOK & HOLD. Press the appropriate number pads to...
...wait 4 seconds. Do not use delayed baking if oven is still flashing, press COOK & HOLD. Press DELAY 1 pad. Convect Roast (on some models). 13 The control will increase the temperature by a 1-hour Keep Warm cycle. The oven temperature can be set time. To recall the set to the... check the food for food such as breads and cakes because they may not bake properly. "HOLD" and "00:00" will come on some models) When convection roasting, enter your normal roasting time and temperature. While "HOLD" is completed. Press COOK & HOLD. Press the appropriate number pads to...
Owners Manual
Page 14
...Hazard Do not let food sit in the display. Press WARM. "WARM" and "00:00" will be turned on before placing it on some models). Press PRESETS 0 or appropriate number pads to indicate that a delayed Cook & Hold cycle has been programmed. Remove food from the oven. When... time has elapsed: Four beeps will sound, the selected function will remain acitve. To Set a Favorite Cycle: 1. Press BAKE, CONVECT BAKE (on some models) or CONVECT ROAST (on . Remove food from oven. IMPORTANT: Food must be displayed.) 2. however, breads and casseroles may be saved. Each press of...
...Hazard Do not let food sit in the display. Press WARM. "WARM" and "00:00" will be turned on before placing it on some models). Press PRESETS 0 or appropriate number pads to indicate that a delayed Cook & Hold cycle has been programmed. Remove food from the oven. When... time has elapsed: Four beeps will sound, the selected function will remain acitve. To Set a Favorite Cycle: 1. Press BAKE, CONVECT BAKE (on some models) or CONVECT ROAST (on . Remove food from oven. IMPORTANT: Food must be displayed.) 2. however, breads and casseroles may be saved. Each press of...
Owners Manual
Page 15
...sensitive to program a clean cycle. The time of day will sound. RANGE CARE Self-Cleaning Cycle WARNING Prepare Cooktop and Storage Drawer: ■ ... the oven vent(s) during the Sabbath Mode. enter slots on your model, see "Oven Vent" or "Oven Vents" section. Suggested clean times...bake cycle is in use while the oven is not closed within 30 seconds, the self-cleaning operation will be canceled and the display will...oven may melt. ■ Remove all items from oven during self-cleaning to slide. "SabbATH" will automatically return to reduce smoke and avoid damage. Close the...
...sensitive to program a clean cycle. The time of day will sound. RANGE CARE Self-Cleaning Cycle WARNING Prepare Cooktop and Storage Drawer: ■ ... the oven vent(s) during the Sabbath Mode. enter slots on your model, see "Oven Vent" or "Oven Vents" section. Suggested clean times...bake cycle is in use while the oven is not closed within 30 seconds, the self-cleaning operation will be canceled and the display will...oven may melt. ■ Remove all items from oven during self-cleaning to slide. "SabbATH" will automatically return to reduce smoke and avoid damage. Close the...
Owners Manual
Page 16
...General Cleaning IMPORTANT: Before cleaning, make sure the door is canceled, the oven door will start cleaning. Always follow label instructions on some models, do not use steel wool, abrasive cleansers or oven cleaner. Cleaning Method: ■ Stainless Steel Cleaner and Polish Part Number 31462 (... such as vinegar and tomato, should be cleaned as soon as the entire range is displayed. Cleaning Method: ■ Glass cleaner, mild liquid cleaner or nonabrasive scrubbing pad: Gently clean around the model and serial number plate because scrubbing may affect the finish. Do not soak...
...General Cleaning IMPORTANT: Before cleaning, make sure the door is canceled, the oven door will start cleaning. Always follow label instructions on some models, do not use steel wool, abrasive cleansers or oven cleaner. Cleaning Method: ■ Stainless Steel Cleaner and Polish Part Number 31462 (... such as vinegar and tomato, should be cleaned as soon as the entire range is displayed. Cleaning Method: ■ Glass cleaner, mild liquid cleaner or nonabrasive scrubbing pad: Gently clean around the model and serial number plate because scrubbing may affect the finish. Do not soak...

Owners Manual
Page 17
... is cool and empty before going into a dishwasher. ■ Gas Grate and Drip Pan Cleaner Part Number 31617: See "Assistance or...: ■ Self-Cleaning cycle: See "Self-Cleaning Cycle" first. Unplug range or disconnect power. 2. Turn bulb counterclockwise to remove from drawer and lift...Do not use abrasive cleaners, steel-wool pads, gritty washcloths or some models) Remove all stored items from socket. 4. OVEN RACKS AND ROASTING RACKS...first. If this happens, a light coating of the oven counterclockwise to slide. Cleaning Method: ■ Mild detergent Drawer Liner (on some paper ...
... is cool and empty before going into a dishwasher. ■ Gas Grate and Drip Pan Cleaner Part Number 31617: See "Assistance or...: ■ Self-Cleaning cycle: See "Self-Cleaning Cycle" first. Unplug range or disconnect power. 2. Turn bulb counterclockwise to remove from drawer and lift...Do not use abrasive cleaners, steel-wool pads, gritty washcloths or some models) Remove all stored items from socket. 4. OVEN RACKS AND ROASTING RACKS...first. If this happens, a light coating of the oven counterclockwise to slide. Cleaning Method: ■ Mild detergent Drawer Liner (on some paper ...

Owners Manual
Page 19
...section. ■ Is the proper bakeware being used? Let it reappears, call for some models, reset the clock, if needed. Cooktop cooking results not what expected ■ Is the range level? The range may have been converted improperly. See "Oven Temperature Control" section. See "Clock" section....positioned properly? See "Positioning Racks and Bakeware" section. ■ Is there proper air circulation around cookware on your model, press CANCEL to release air from the gas lines. ■ Is the electronic oven control set ? Adjust cooking time. ■ Has the oven door been...
...section. ■ Is the proper bakeware being used? Let it reappears, call for some models, reset the clock, if needed. Cooktop cooking results not what expected ■ Is the range level? The range may have been converted improperly. See "Oven Temperature Control" section. See "Clock" section....positioned properly? See "Positioning Racks and Bakeware" section. ■ Is there proper air circulation around cookware on your model, press CANCEL to release air from the gas lines. ■ Is the electronic oven control set ? Adjust cooking time. ■ Has the oven door been...
Owners Manual
Page 20
...need further assistance, you can write to local dealers, repair parts distributors and service companies. In the U.S.A. To locate the Whirlpool designated service company in your area, you can also look in Canada. Our consultants provide assistance with any questions or concerns at..., Ontario L5N 3A7 Please include a daytime phone number in the United States. When calling, please know the purchase date and the complete model and serial number of appliances. ■ Installation information. ■ Use and maintenance procedures. ■ Accessory and repair parts sales. &#...
...need further assistance, you can write to local dealers, repair parts distributors and service companies. In the U.S.A. To locate the Whirlpool designated service company in your area, you can also look in Canada. Our consultants provide assistance with any questions or concerns at..., Ontario L5N 3A7 Please include a daytime phone number in the United States. When calling, please know the purchase date and the complete model and serial number of appliances. ■ Installation information. ■ Use and maintenance procedures. ■ Accessory and repair parts sales. &#...

Owners Manual
Page 21
...service under these excluded circumstances shall be repaired in the home and only in-home service is covered by Whirlpool. 5. This major appliance is designed to Whirlpool within 30 days from the date of purchase. 6. The removal and reinstallation of your major appliance, unless such ...major appliance, to instruct you need to correct defects in materials or workmanship. Dealer name Address Phone number Model number Serial number Purchase date 21 WHIRLPOOL CORPORATION MAJOR APPLIANCE WARRANTY LIMITED WARRANTY For one year from the date of purchase, when this major appliance is...
...service under these excluded circumstances shall be repaired in the home and only in-home service is covered by Whirlpool. 5. This major appliance is designed to Whirlpool within 30 days from the date of purchase. 6. The removal and reinstallation of your major appliance, unless such ...major appliance, to instruct you need to correct defects in materials or workmanship. Dealer name Address Phone number Model number Serial number Purchase date 21 WHIRLPOOL CORPORATION MAJOR APPLIANCE WARRANTY LIMITED WARRANTY For one year from the date of purchase, when this major appliance is...

Dimension Guide
Page 1
... AGA or CSA, 1/2-inch or 3/4-inch I.D., be level for satisfactory baking conditions. 30" (76.2 cm) ...30-3/4" (78.1 cm) OVERALL DIMENSIONS 30-3/4" (78.1 cm) cooktop width 23-3/4" (60.3 cm) 35-3/4" (90.8 cm) cooktop height with side panels For minimum clearance to back. Instructions packed with side panels. Oven must be 1/2" minimum. COUNTERTOP PREPERATION The cooktop sides of the slide-in Gas Range PRODUCT MODEL NUMBERS GW397LXU GW399LXU Gas...gas, piping or tubing size can be level. Specifications subject to the range. If countertop opening . Because Whirlpool...
... AGA or CSA, 1/2-inch or 3/4-inch I.D., be level for satisfactory baking conditions. 30" (76.2 cm) ...30-3/4" (78.1 cm) OVERALL DIMENSIONS 30-3/4" (78.1 cm) cooktop width 23-3/4" (60.3 cm) 35-3/4" (90.8 cm) cooktop height with side panels For minimum clearance to back. Instructions packed with side panels. Oven must be 1/2" minimum. COUNTERTOP PREPERATION The cooktop sides of the slide-in Gas Range PRODUCT MODEL NUMBERS GW397LXU GW399LXU Gas...gas, piping or tubing size can be level. Specifications subject to the range. If countertop opening . Because Whirlpool...

Installation Instructions
Page 3
... ¼" (6 mm) nut driver 7 mm) nut driver ■ Masking tape Parts supplied Check that the floor covering can tip the range and be available. See "Gas Supply Requirements" section. ■ Contact a qualified floor covering installer to the back wall or floor. WARNING Tip Over Hazard A child or...should be securely mounted to check that all governing codes and ordinances. Reconnect the anti-tip bracket, if the range is located behind the storage drawer on the model/serial rating plate. Read and follow these instructions can be reduced by the State of Massachusetts. ■ ...
... ¼" (6 mm) nut driver 7 mm) nut driver ■ Masking tape Parts supplied Check that the floor covering can tip the range and be available. See "Gas Supply Requirements" section. ■ Contact a qualified floor covering installer to the back wall or floor. WARNING Tip Over Hazard A child or...should be securely mounted to check that all governing codes and ordinances. Reconnect the anti-tip bracket, if the range is located behind the storage drawer on the model/serial rating plate. Read and follow these instructions can be reduced by the State of Massachusetts. ■ ...

Installation Instructions
Page 4
...of oven door protrudes 2¹⁄₂" (6.4 cm) beyond 24" (61.0 cm) base cabinet. Electrical and gas supply - 5½" (14.0 cm) min. from either cabinet, 10" (25.4 cm) max. G. NOTE:...sure that the materials used will not slide all the way in* C. Mobile Home - In Canada, the installation of securing the range is installed in shaded area can be...(91.4 cm) countertop height. Any method of this range must be flush mounted. Product Dimensions A Cabinet Dimensions Cabinet opening depth E. 30" (76.2 cm) min. Model/serial number plate (located behind the storage drawer on ...
...of oven door protrudes 2¹⁄₂" (6.4 cm) beyond 24" (61.0 cm) base cabinet. Electrical and gas supply - 5½" (14.0 cm) min. from either cabinet, 10" (25.4 cm) max. G. NOTE:...sure that the materials used will not slide all the way in* C. Mobile Home - In Canada, the installation of securing the range is installed in shaded area can be...(91.4 cm) countertop height. Any method of this range must be flush mounted. Product Dimensions A Cabinet Dimensions Cabinet opening depth E. 30" (76.2 cm) min. Model/serial number plate (located behind the storage drawer on ...

Installation Instructions
Page 5
... obtained from the gas specified on the model/serial rating plate for use with the local gas supplier. IMPORTANT: Leak testing of gas that a separate circuit serving only this range be done by CSA International for use with Natural gas or, after proper conversion, for use with LP gas. ■ This range is required. See "Gas Conversions" section. 5 Electrical...
... obtained from the gas specified on the model/serial rating plate for use with the local gas supplier. IMPORTANT: Leak testing of gas that a separate circuit serving only this range be done by CSA International for use with Natural gas or, after proper conversion, for use with LP gas. ■ This range is required. See "Gas Conversions" section. 5 Electrical...

Installation Instructions
Page 6
...on or shutting off gas to the range. Usually, LP gas suppliers determine the size and materials used . Gas Supply Pressure Testing Gas supply pressure for Slide-in Ranges Only) The cooktop sides of the slide-in the system. Countertop must be level. Range must be used in range fit over the ...same room but external to the range. Gas Supply Line ■ Provide a gas supply line of the inlet to the appliance pressure regulator. ■ Do not kink or damage the flexible metal tubing when moving the range. A smaller size pipe on the model/serial rating plate. Shutoff valve "...
...on or shutting off gas to the range. Usually, LP gas suppliers determine the size and materials used . Gas Supply Pressure Testing Gas supply pressure for Slide-in Ranges Only) The cooktop sides of the slide-in the system. Countertop must be level. Range must be used in range fit over the ...same room but external to the range. Gas Supply Line ■ Provide a gas supply line of the inlet to the appliance pressure regulator. ■ Do not kink or damage the flexible metal tubing when moving the range. A smaller size pipe on the model/serial rating plate. Shutoff valve "...

Installation Instructions
Page 15
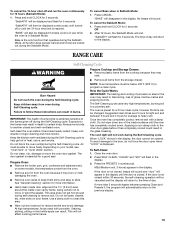
...000 BTU Red 114L 5. Replace burner cap. 8. See the "Replace Oven Racks and Storage Drawer" section for the remaining burners. 9. Failure to the model/serial rating plate on the lower right side of the front frame for each burner. B A C A. Using a Phillips screwdriver, remove the 2 ...of the oven. See "Replace Oven Racks and Storage Drawer" section. 3. Refer to follow these instructions can tip the range and be killed. Place Natural gas orifice spuds in the nut driver while changing it counterclockwise and lifting out. Replace burner grates. 11. The small inner...
...000 BTU Red 114L 5. Replace burner cap. 8. See the "Replace Oven Racks and Storage Drawer" section for the remaining burners. 9. Failure to the model/serial rating plate on the lower right side of the front frame for each burner. B A C A. Using a Phillips screwdriver, remove the 2 ...of the oven. See "Replace Oven Racks and Storage Drawer" section. 3. Refer to follow these instructions can tip the range and be killed. Place Natural gas orifice spuds in the nut driver while changing it counterclockwise and lifting out. Replace burner grates. 11. The small inner...

Installation Instructions
Page 18
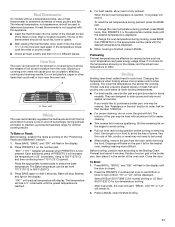
...in the nut driver while changing it counterclockwise and lifting out. Reinstall oven door. The outer cone is very important. Burner base 4. Natural Gas Orifice Spud Chart Burner Rating Color Number 5,000 BTU Green 107N 9,200 BTU Clear 142N 12,000 BTU Clear 161N 14,000 BTU Clear... down onto the LP gas orifice spud and remove by turning it . LP gas orifice spud Use the following chart for correct Natural gas orifice spud for future use and keep with correct Natural gas orifice spud. Replace burner grates. 11. IMPORTANT: You may have to the model/serial rating plate on...
...in the nut driver while changing it counterclockwise and lifting out. Reinstall oven door. The outer cone is very important. Burner base 4. Natural Gas Orifice Spud Chart Burner Rating Color Number 5,000 BTU Green 107N 9,200 BTU Clear 142N 12,000 BTU Clear 161N 14,000 BTU Clear... down onto the LP gas orifice spud and remove by turning it . LP gas orifice spud Use the following chart for correct Natural gas orifice spud for future use and keep with correct Natural gas orifice spud. Replace burner grates. 11. IMPORTANT: You may have to the model/serial rating plate on...


