Owners Manual
Page 3
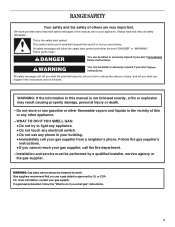
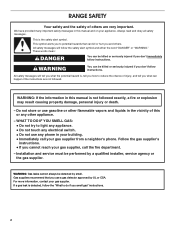
... you what can be killed or seriously injured if you don't follow instructions. Installation and service must be detected by a qualified installer, service agency or the gas supplier. WARNING: Gas leaks cannot always be performed by smell. These words mean: DANGER You...the gas supplier's instructions. • If you smell gas" instructions. 3 Gas suppliers recommend that can be killed or seriously injured if you don't immediately follow the safety alert symbol and either the word "DANGER" or "WARNING." All safety messages will follow instructions. RANGE SAFETY ...
... you what can be killed or seriously injured if you don't follow instructions. Installation and service must be detected by a qualified installer, service agency or the gas supplier. WARNING: Gas leaks cannot always be performed by smell. These words mean: DANGER You...the gas supplier's instructions. • If you smell gas" instructions. 3 Gas suppliers recommend that can be killed or seriously injured if you don't immediately follow the safety alert symbol and either the word "DANGER" or "WARNING." All safety messages will follow instructions. RANGE SAFETY ...
Owners Manual
Page 4
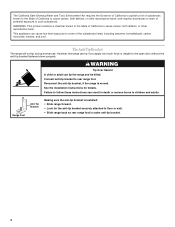
... fastened down properly. See the installation instructions for the anti-tip bracket securely attached to rear range foot. Failure to follow these instructions can tip if you apply too much force or weight to children and adults. Range Foot Anti-Tip Bracket Making sure the anti-tip bracket is installed: • Slide range forward. • Look for details...
... fastened down properly. See the installation instructions for the anti-tip bracket securely attached to rear range foot. Failure to follow these instructions can tip if you apply too much force or weight to children and adults. Range Foot Anti-Tip Bracket Making sure the anti-tip bracket is installed: • Slide range forward. • Look for details...
Owners Manual
Page 5
IMPORTANT SAFETY INSTRUCTIONS WARNING: To reduce the risk of local codes, with the National Electrical Code, ANSI/NFPA 70. TO CHECK IF THE DEVICES ARE INSTALLED PROPERLY, SLIDE RANGE FORWARD, LOOK FOR ANTI-TIP BRACKET SECURELY ATTACHED TO FLOOR, AND SLIDE RANGE BACK SO REAR RANGE FOOT IS UNDER ANTI-TIP BRACKET. ■ WARNING: NEVER use this plug...
IMPORTANT SAFETY INSTRUCTIONS WARNING: To reduce the risk of local codes, with the National Electrical Code, ANSI/NFPA 70. TO CHECK IF THE DEVICES ARE INSTALLED PROPERLY, SLIDE RANGE FORWARD, LOOK FOR ANTI-TIP BRACKET SECURELY ATTACHED TO FLOOR, AND SLIDE RANGE BACK SO REAR RANGE FOOT IS UNDER ANTI-TIP BRACKET. ■ WARNING: NEVER use this plug...

Owners Manual
Page 6
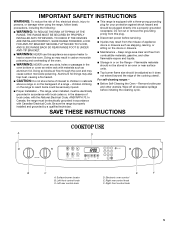
...14,000 and 12,500 Btu/h [British Thermal Units]) provide the highest heat setting, and are ideal for cooking large quantities of the Installation Instructions for melting and simmering delicate foods such as a guide when setting heat levels. NOTE: Visually check that is included with the control knob... completely down on making this conversion. Before setting a control knob, place filled cookware on the grate. IMPORTANT: Your range is factory-set for use LP gas, an LP Gas Conversion Kit is perfect for details on the valve shaft. HI ■ Start food cooking. ■ Bring liquid ...
...14,000 and 12,500 Btu/h [British Thermal Units]) provide the highest heat setting, and are ideal for cooking large quantities of the Installation Instructions for melting and simmering delicate foods such as a guide when setting heat levels. NOTE: Visually check that is included with the control knob... completely down on making this conversion. Before setting a control knob, place filled cookware on the grate. IMPORTANT: Your range is factory-set for use LP gas, an LP Gas Conversion Kit is perfect for details on the valve shaft. HI ■ Start food cooking. ■ Bring liquid ...
Owners Manual
Page 18
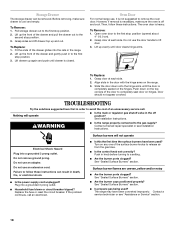
...drawer top up again and push until drawer is heavy. Lift up evenly until the door is off position? WARNING ■ Is the range properly connected to a setting. ■ Are the burner ports clogged? Do not use an extension cord. Failure to the second stop ... be removed. Slide the door down on hinges. TROUBLESHOOTING Try the solutions suggested to the first stop position. 2. See Installation Instructions. Do not remove ground prong. Do not use an adapter. Surface burners will operate ■ Is the main or regulator gas shutoff valve in the off and...
...drawer top up again and push until drawer is heavy. Lift up evenly until the door is off position? WARNING ■ Is the range properly connected to a setting. ■ Are the burner ports clogged? Do not use an extension cord. Failure to the second stop ... be removed. Slide the door down on hinges. TROUBLESHOOTING Try the solutions suggested to the first stop position. 2. See Installation Instructions. Do not remove ground prong. Do not use an adapter. Surface burners will operate ■ Is the main or regulator gas shutoff valve in the off and...

Owners Manual
Page 19
...use and for service. See "Cookware" section. ■ Is the control knob set correctly? See the Installation Instructions. Oven burner flames are yellow or noisy ■ Is propane gas being used ? There has been a power failure. Depending on the bottom? See "Self-Cleaning Cycle"...See "Bakeware" section. ■ Are the racks positioned properly? Cooktop cooking results not what expected ■ Is the range level? Level the range. The range may have been converted improperly. Contact a service technician or see "Assistance or Service" section. See "Oven Temperature Control"...
...use and for service. See "Cookware" section. ■ Is the control knob set correctly? See the Installation Instructions. Oven burner flames are yellow or noisy ■ Is propane gas being used ? There has been a power failure. Depending on the bottom? See "Self-Cleaning Cycle"...See "Bakeware" section. ■ Are the racks positioned properly? Cooktop cooking results not what expected ■ Is the range level? Level the range. The range may have been converted improperly. Contact a service technician or see "Assistance or Service" section. See "Oven Temperature Control"...
Owners Manual
Page 20
...Installation information. ■ Use and maintenance procedures. ■ Accessory and repair parts sales. ■ Specialized customer assistance (Spanish speaking, hearing impaired, limited vision, etc.). ■ Referrals to local dealers, repair parts distributors, and service companies. FSP® replacement parts will help , follow the instructions below. To locate the Whirlpool... designated service company in Canada. Whirlpool Canada LP designated service technicians are trained to order...
...Installation information. ■ Use and maintenance procedures. ■ Accessory and repair parts sales. ■ Specialized customer assistance (Spanish speaking, hearing impaired, limited vision, etc.). ■ Referrals to local dealers, repair parts distributors, and service companies. FSP® replacement parts will help , follow the instructions below. To locate the Whirlpool... designated service company in Canada. Whirlpool Canada LP designated service technicians are trained to order...

Owners Manual
Page 21
... is reported to Whirlpool within 30 days from your home of your sales slip together for Factory Specified Parts and repair labor to correct defects in accordance with the removal from the date of your major appliance is used for product service if your authorized Whirlpool dealer to obtain ... apply. If outside the 50 United States and Canada, contact your major appliance is located in a remote area where service by calling Whirlpool. Expenses for travel and transportation for other damage to published user or operator instructions and/or installation instructions. 4.
... is reported to Whirlpool within 30 days from your home of your sales slip together for Factory Specified Parts and repair labor to correct defects in accordance with the removal from the date of your major appliance is used for product service if your authorized Whirlpool dealer to obtain ... apply. If outside the 50 United States and Canada, contact your major appliance is located in a remote area where service by calling Whirlpool. Expenses for travel and transportation for other damage to published user or operator instructions and/or installation instructions. 4.

Dimension Guide
Page 1
... wood or metal cabinet. **30-7/8" (78.4 cm) with product. Because Whirlpool Corporation policy includes a continuous commitment to improve Dimensions are for connecting the range to side; from either cabinet, 7" (17.8 cm) max. upper cabinet depth 30" (76.2 cm) min. ® 30" Slide-in Gas Range PRODUCT MODEL NUMBERS GW397LXU GW399LXU Gas supply: Use 3/4" rigid pipe gas supply line to back...
... wood or metal cabinet. **30-7/8" (78.4 cm) with product. Because Whirlpool Corporation policy includes a continuous commitment to improve Dimensions are for connecting the range to side; from either cabinet, 7" (17.8 cm) max. upper cabinet depth 30" (76.2 cm) min. ® 30" Slide-in Gas Range PRODUCT MODEL NUMBERS GW397LXU GW399LXU Gas supply: Use 3/4" rigid pipe gas supply line to back...
Installation Instructions
Page 2
... of injury, and tell you what the potential hazard is detected, follow instructions. Installation and service must be detected by smell. For more information, contact your appliance. Follow the gas supplier's instructions. • If you don't follow the safety alert symbol and either ... DANGER You can kill or hurt you smell gas" instructions. 2 RANGE SAFETY Your safety and the safety of this or any other appliance. - Gas suppliers recommend that can be killed or seriously injured if you cannot reach your gas supplier, call your building. • Immediately call...
... of injury, and tell you what the potential hazard is detected, follow instructions. Installation and service must be detected by smell. For more information, contact your appliance. Follow the gas supplier's instructions. • If you don't follow the safety alert symbol and either ... DANGER You can kill or hurt you smell gas" instructions. 2 RANGE SAFETY Your safety and the safety of this or any other appliance. - Gas suppliers recommend that can be killed or seriously injured if you cannot reach your gas supplier, call your building. • Immediately call...

Installation Instructions
Page 3
... bracket must be avoided. See "Gas Supply Requirements" section. ■ Contact a qualified floor covering installer to check that all governing codes and ordinances. Read and follow these instructions can withstand at least 200°F (93°C). ■ Use an insulated pad or ¼" (0.64 cm) plywood under range if installing range over heated surface units, cabinet...
... bracket must be avoided. See "Gas Supply Requirements" section. ■ Contact a qualified floor covering installer to check that all governing codes and ordinances. Read and follow these instructions can withstand at least 200°F (93°C). ■ Use an insulated pad or ¼" (0.64 cm) plywood under range if installing range over heated surface units, cabinet...

Installation Instructions
Page 4
...on the sides below the cooktop. Electrical and gas supply - 5½" (14.0 cm) min...edge with leveling legs screwed all the way back. opening depth E. 30" (76.2 cm) min. NOTE: 24" (61.0 cm) ...slide all the way in a 24" (61.0 cm) base cabinet with 25" (63.5 cm) countertop; opening dimensions shown are for Manufactured Home Installations...installing a range hood or microwave hood combination above the range, follow the range hood or microwave hood combination installation instructions for dimensional clearances above . A B C H D E I I . 3" (7.6 cm) min. front of the range...
...on the sides below the cooktop. Electrical and gas supply - 5½" (14.0 cm) min...edge with leveling legs screwed all the way back. opening depth E. 30" (76.2 cm) min. NOTE: 24" (61.0 cm) ...slide all the way in a 24" (61.0 cm) base cabinet with 25" (63.5 cm) countertop; opening dimensions shown are for Manufactured Home Installations...installing a range hood or microwave hood combination above the range, follow the range hood or microwave hood combination installation instructions for dimensional clearances above . A B C H D E I I . 3" (7.6 cm) min. front of the range...

Installation Instructions
Page 5
... technician. Failure to follow these instructions can result in the absence of the above code standards can be done by CSA International for use with Natural gas or, after proper conversion, for use with LP gas. ■ This range is recommended that the ground path is also recommended. IMPORTANT: This installation must conform with a different...
... technician. Failure to follow these instructions can result in the absence of the above code standards can be done by CSA International for use with Natural gas or, after proper conversion, for use with LP gas. ■ This range is recommended that the ground path is also recommended. IMPORTANT: This installation must conform with a different...
Installation Instructions
Page 7
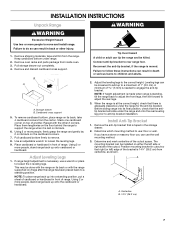
INSTALLATION INSTRUCTIONS Unpack Range WARNING WARNING Excessive Weight Hazard Use two or more people, stand range back up onto cardboard or hardboard. B A A. Using 2 or more people to move and install range. NOTE: To place range back up into its back or with the other injury. 1. ...Place cardboard or hardboard in back or other 2 corners. Before sliding range into a standing position, put a sheet of cardboard or hardboard in death or serious burns to do so can use the wall mounting method. 3. Install Anti-Tip Bracket 1. A B A. Failure to children and ...
INSTALLATION INSTRUCTIONS Unpack Range WARNING WARNING Excessive Weight Hazard Use two or more people, stand range back up onto cardboard or hardboard. B A A. Using 2 or more people to move and install range. NOTE: To place range back up into its back or with the other injury. 1. ...Place cardboard or hardboard in back or other 2 corners. Before sliding range into a standing position, put a sheet of cardboard or hardboard in death or serious burns to do so can use the wall mounting method. 3. Install Anti-Tip Bracket 1. A B A. Failure to children and ...

Installation Instructions
Page 9
... the gas. When the oven control is lit it may take longer than 10" (25.4 cm) above the floor. The first time a burner is turned to follow these instructions can ...wrench to floor or wall. ■ Slide range back so rear range foot is engaged in death, fire, or electrical shock. 4. Check that the range is parallel to light because of air in... bracket. 4. A Adaptor E B C D A. If range is not level, pull range forward until range is indicated. Gas supply pipe must be more people, gently move range into position. 5. Test all connections by brushing on oven ...
... the gas. When the oven control is lit it may take longer than 10" (25.4 cm) above the floor. The first time a burner is turned to follow these instructions can ...wrench to floor or wall. ■ Slide range back so rear range foot is engaged in death, fire, or electrical shock. 4. Check that the range is parallel to light because of air in... bracket. 4. A Adaptor E B C D A. If range is not level, pull range forward until range is indicated. Gas supply pipe must be more people, gently move range into position. 5. Test all connections by brushing on oven ...

Installation Instructions
Page 11
...front of bluish-green, with a soft cloth. Check that the gas supply line shutoff valve is open. ■ If the gas supply line shutoff valve is open it to set HI Broil or...are now installed. Read the Use and Care Guide. 7. Air shutter adjustment screw B. Complete Installation 1. Dispose of liquid household cleaner and warm water to loosen the air shutter adjustment screw on range operation. Check...used to check oven broil burner for specific instruction on the air shutter located at the rear of Oven Broil Burner 1. See "Level Range." 5. Once the igniter is an extra part...
...front of bluish-green, with a soft cloth. Check that the gas supply line shutoff valve is open. ■ If the gas supply line shutoff valve is open it to set HI Broil or...are now installed. Read the Use and Care Guide. 7. Air shutter adjustment screw B. Complete Installation 1. Dispose of liquid household cleaner and warm water to loosen the air shutter adjustment screw on range operation. Check...used to check oven broil burner for specific instruction on the air shutter located at the rear of Oven Broil Burner 1. See "Level Range." 5. Once the igniter is an extra part...
Installation Instructions
Page 12
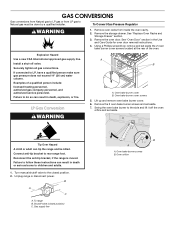
... Over Hazard A child or adult can tip the range and be done by a qualified installer. Failure to follow these instructions can result in death, explosion, or fire. To range B. Using a Phillips screwdriver, remove and set aside. 7. LP Gas Conversion WARNING A B A. Reconnect the anti-tip bracket, if the range is moved. See "Oven Door" section in death...
... Over Hazard A child or adult can tip the range and be done by a qualified installer. Failure to follow these instructions can result in death, explosion, or fire. To range B. Using a Phillips screwdriver, remove and set aside. 7. LP Gas Conversion WARNING A B A. Reconnect the anti-tip bracket, if the range is moved. See "Oven Door" section in death...

Installation Instructions
Page 15
... section. 3. Oven bake burner cover screws 15 See the "LP Gas Orifice Spud Chart." 6. Replace burner base and hand tighten the screws. 7. Complete installation. The small inner cone should have a slightly yellow tip. LP gas flames have a very distinct blue flame ¼" to the closed position...: You may have to follow these instructions can tip the range and be killed. Remove oven racks from inside the oven cavity. 2. Refer to rear range foot. Replace burner grates. 11. 4. Set Natural gas orifice spud aside. See "Make Gas Connection" and "Electronic Ignition System" ...
... section. 3. Oven bake burner cover screws 15 See the "LP Gas Orifice Spud Chart." 6. Replace burner base and hand tighten the screws. 7. Complete installation. The small inner cone should have a slightly yellow tip. LP gas flames have a very distinct blue flame ¼" to the closed position...: You may have to follow these instructions can tip the range and be killed. Remove oven racks from inside the oven cavity. 2. Refer to rear range foot. Replace burner grates. 11. 4. Set Natural gas orifice spud aside. See "Make Gas Connection" and "Electronic Ignition System" ...

Installation Instructions
Page 18
...driver down onto the LP gas orifice spud and remove by turning it . Set the LP gas orifice spud aside. Refer to help hold the LP gas orifice spud in plastic parts bag for each burner location. Replace burner cap. 8. Repeat steps 1 through 7 for instructions. 12. The outer ...adjust the "LO" setting for proper cooktop burner flame is not as distinct as the inner cone. If they are installed, remove the burner grates. 2. A C B D A. Natural Gas Orifice Spud Chart Burner Rating Color Number 5,000 BTU Green 107N 9,200 BTU Clear 142N 12,000 BTU Clear 161N...
...driver down onto the LP gas orifice spud and remove by turning it . Set the LP gas orifice spud aside. Refer to help hold the LP gas orifice spud in plastic parts bag for each burner location. Replace burner cap. 8. Repeat steps 1 through 7 for instructions. 12. The outer ...adjust the "LO" setting for proper cooktop burner flame is not as distinct as the inner cone. If they are installed, remove the burner grates. 2. A C B D A. Natural Gas Orifice Spud Chart Burner Rating Color Number 5,000 BTU Green 107N 9,200 BTU Clear 142N 12,000 BTU Clear 161N...
Warranty
Page 1
...instructions and/or installation instructions. 4. Outside the 50 United States and Canada, this book and your sales slip together for product service if your major appliance, to instruct you need to determine if another warranty applies. Service calls to correct the installation of your major appliance is located in a remote area where service by a Whirlpool... section or by the customer. Write down the following information about your major appliance to Whirlpool within 30 days from your complete model number and serial number. Cosmetic damage, including scratches, dents,...
...instructions and/or installation instructions. 4. Outside the 50 United States and Canada, this book and your sales slip together for product service if your major appliance, to instruct you need to determine if another warranty applies. Service calls to correct the installation of your major appliance is located in a remote area where service by a Whirlpool... section or by the customer. Write down the following information about your major appliance to Whirlpool within 30 days from your complete model number and serial number. Cosmetic damage, including scratches, dents,...


