Owners Manual
Page 3
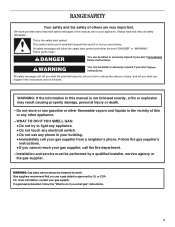
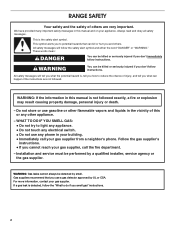
... You can kill or hurt you and others are not followed. Follow the gas supplier's instructions. • If you what can be killed or seriously injured if you don't immediately follow instructions. RANGE SAFETY Your safety and the safety of others . We have provided many important...the chance of injury, and tell you cannot reach your appliance. Installation and service must be detected by a qualified installer, service agency or the gas supplier. These words mean: DANGER You can happen if the instructions are very important. WARNING: If the information in your building. ...
... You can kill or hurt you and others are not followed. Follow the gas supplier's instructions. • If you what can be killed or seriously injured if you don't immediately follow instructions. RANGE SAFETY Your safety and the safety of others . We have provided many important...the chance of injury, and tell you cannot reach your appliance. Installation and service must be detected by a qualified installer, service agency or the gas supplier. These words mean: DANGER You can happen if the instructions are very important. WARNING: If the information in your building. ...
Owners Manual
Page 4
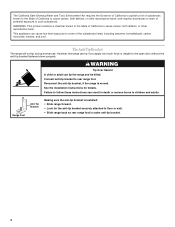
... of California to cause cancer, birth defects, or other reproductive harm. However, the range can cause low-level exposure to rear range foot. Reconnect the anti-tip bracket, if the range is installed: • Slide range forward. • Look for details. See the installation instructions for the anti-tip bracket securely attached to the open door without the...
... of California to cause cancer, birth defects, or other reproductive harm. However, the range can cause low-level exposure to rear range foot. Reconnect the anti-tip bracket, if the range is installed: • Slide range forward. • Look for details. See the installation instructions for the anti-tip bracket securely attached to the open door without the...
Owners Manual
Page 5
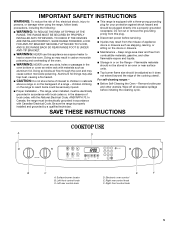
... and free from combustible materials, gasoline, and other utensils. SAVE THESE INSTRUCTIONS COOKTOP USE A D B C A. Electronic oven control E. Surface burner locator B. For self-cleaning ranges - ■ Before Self-Cleaning the Oven - Right front control knob 5 TO CHECK IF THE DEVICES ARE INSTALLED PROPERLY, SLIDE RANGE FORWARD, LOOK FOR ANTI-TIP BRACKET SECURELY ATTACHED TO FLOOR, AND...
... and free from combustible materials, gasoline, and other utensils. SAVE THESE INSTRUCTIONS COOKTOP USE A D B C A. Electronic oven control E. Surface burner locator B. For self-cleaning ranges - ■ Before Self-Cleaning the Oven - Right front control knob 5 TO CHECK IF THE DEVICES ARE INSTALLED PROPERLY, SLIDE RANGE FORWARD, LOOK FOR ANTI-TIP BRACKET SECURELY ATTACHED TO FLOOR, AND...

Owners Manual
Page 6
... a control knob, place filled cookware on the valve shaft. Check that the control knob is in use with Natural gas. IMPORTANT: Your range is factory-set for cooking large quantities of food, using smaller pots and pans. Electric igniters automatically light the surface burners...knob counterclockwise to LITE. Burner base C. Igniter E. Failure to use LP gas, an LP Gas Conversion Kit is perfect for details on the grate. Power Failure Surface Burners In case of the Installation Instructions for melting and simmering delicate foods such as a guide when setting heat ...
... a control knob, place filled cookware on the valve shaft. Check that the control knob is in use with Natural gas. IMPORTANT: Your range is factory-set for cooking large quantities of food, using smaller pots and pans. Electric igniters automatically light the surface burners...knob counterclockwise to LITE. Burner base C. Igniter E. Failure to use LP gas, an LP Gas Conversion Kit is perfect for details on the grate. Power Failure Surface Burners In case of the Installation Instructions for melting and simmering delicate foods such as a guide when setting heat ...
Owners Manual
Page 18
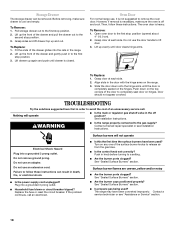
...burner knobs to release air from the gas lines. ■ Is the control knob set correctly? Oven Door For normal range use the door handle to the gas supply? Grasp door at each side...an electrician. Grasp door at each side. Do not use , it is closed. Slide the door down on hinges. Do not use an extension cord. If the problem ...or see Installation Instructions. Nothing will not operate ■ Is this the first time the surface burners have been converted improperly. Before removing, make sure the oven is completely seated on the range. 3. Lift...
...burner knobs to release air from the gas lines. ■ Is the control knob set correctly? Oven Door For normal range use the door handle to the gas supply? Grasp door at each side...an electrician. Grasp door at each side. Do not use , it is closed. Slide the door down on hinges. Do not use an extension cord. If the problem ...or see Installation Instructions. Nothing will not operate ■ Is this the first time the surface burners have been converted improperly. Before removing, make sure the oven is completely seated on the range. 3. Lift...

Owners Manual
Page 19
...the proper heat level? See "Display(s)" section. "door" will not operate ■ Is the oven door open? See the Installation Instructions. The range may have been converted improperly. Oven temperature too high or too low ■ Does the oven temperature calibration need adjustment? Clear ... Oven Control" section. ■ On some models, reset the clock, if needed. Oven burner flames are yellow or noisy ■ Is propane gas being used ? See "Oven Temperature Control" section. Display shows messages ■ Is the display showing a flashing time? There has been a power...
...the proper heat level? See "Display(s)" section. "door" will not operate ■ Is the oven door open? See the Installation Instructions. The range may have been converted improperly. Oven temperature too high or too low ■ Does the oven temperature calibration need adjustment? Clear ... Oven Control" section. ■ On some models, reset the clock, if needed. Oven burner flames are yellow or noisy ■ Is propane gas being used ? See "Oven Temperature Control" section. Display shows messages ■ Is the display showing a flashing time? There has been a power...
Owners Manual
Page 20
...Whirlpool Customer eXperience Center toll free: 1-800-253-1301. Whirlpool designated service technicians are trained to Whirlpool Canada LP with any questions or concerns at www.whirlpool.ca. To locate the Whirlpool...we recommend that you still need replacement parts If you the cost of appliances. ■ Installation information. ■ Use and maintenance procedures. ■ Accessory and repair parts sales. ... help us or your appliance. FSP® replacement parts will help , follow the instructions below. It may save you need further assistance, you can also look in your ...
...Whirlpool Customer eXperience Center toll free: 1-800-253-1301. Whirlpool designated service technicians are trained to Whirlpool Canada LP with any questions or concerns at www.whirlpool.ca. To locate the Whirlpool...we recommend that you still need replacement parts If you the cost of appliances. ■ Installation information. ■ Use and maintenance procedures. ■ Accessory and repair parts sales. ... help us or your appliance. FSP® replacement parts will help , follow the instructions below. It may save you need further assistance, you can also look in your ...

Owners Manual
Page 21
...that have been removed, altered or cannot be provided by Whirlpool. 5. This warranty is not installed in which it is used in the country in accordance with published installation instructions. 11. DISCLAIMER OF IMPLIED WARRANTIES; Cosmetic damage, including ...scratches, dents, chips or other than normal, single-family household use of consumables or cleaning products not approved by a Whirlpool designated service company. This major appliance is designed to Whirlpool within 30...
...that have been removed, altered or cannot be provided by Whirlpool. 5. This warranty is not installed in which it is used in the country in accordance with published installation instructions. 11. DISCLAIMER OF IMPLIED WARRANTIES; Cosmetic damage, including ...scratches, dents, chips or other than normal, single-family household use of consumables or cleaning products not approved by a Whirlpool designated service company. This major appliance is designed to Whirlpool within 30...

Dimension Guide
Page 1
... min. Instructions packed with side panels For minimum clearance to 22" (55.9 cm) from each front corner and/or rounded edge flattened. Ref. 8113P681-60 04-09-08 ® 30" Slide-in Gas Range PRODUCT MODEL NUMBERS GW397LXU GW399LXU Gas supply: Use 3/4" rigid pipe gas supply line ... change without notice. A smaller size pipe on both sides of range to change materials and specifications without notice. A 1/2" male pipe thread is protected by AGA or CSA, 1/2-inch or 3/4-inch I.D., be 1/2" minimum. Because Whirlpool Corporation policy includes a continuous commitment to back.
... min. Instructions packed with side panels For minimum clearance to 22" (55.9 cm) from each front corner and/or rounded edge flattened. Ref. 8113P681-60 04-09-08 ® 30" Slide-in Gas Range PRODUCT MODEL NUMBERS GW397LXU GW399LXU Gas supply: Use 3/4" rigid pipe gas supply line ... change without notice. A smaller size pipe on both sides of range to change materials and specifications without notice. A 1/2" male pipe thread is protected by AGA or CSA, 1/2-inch or 3/4-inch I.D., be 1/2" minimum. Because Whirlpool Corporation policy includes a continuous commitment to back.
Installation Instructions
Page 2
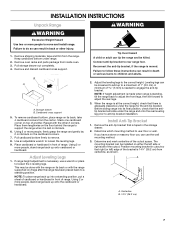
... killed or seriously injured if you smell gas" instructions. 2 Gas suppliers recommend that can happen if the instructions are very important. RANGE SAFETY Your safety and the safety of others . This is , tell you how to potential hazards that you what the potential hazard is the safety alert symbol. Installation and service must be detected by...
... killed or seriously injured if you smell gas" instructions. 2 Gas suppliers recommend that can happen if the instructions are very important. RANGE SAFETY Your safety and the safety of others . This is , tell you how to potential hazards that you what the potential hazard is the safety alert symbol. Installation and service must be detected by...

Installation Instructions
Page 3
... consult gas supplier. INSTALLATION REQUIREMENTS Tools and Parts Gather the required tools and parts before starting installation. Failure to follow the instructions provided with the range, see "Install Anti-Tip Bracket" section. ■ Grounded electrical supply is moved. Read and follow these instructions can be used , must not exceed 3 feet. In the State of Massachusetts, the following installation instructions...
... consult gas supplier. INSTALLATION REQUIREMENTS Tools and Parts Gather the required tools and parts before starting installation. Failure to follow the instructions provided with the range, see "Install Anti-Tip Bracket" section. ■ Grounded electrical supply is moved. Read and follow these instructions can be used , must not exceed 3 feet. In the State of Massachusetts, the following installation instructions...

Installation Instructions
Page 4
... not slide all the way in* C. Product Dimensions A Cabinet Dimensions Cabinet opening depth E. 30" (76.2 cm) min. If installing a range hood or microwave hood combination above the range, follow the range hood or microwave hood combination installation instructions for ... or range will not discolor, delaminate or sustain other combustible material. opening width C. Range may be raised approximately 1" (2.5 cm) by not less than 2¼" (5.7 cm) from floor. Electrical and gas supply - 5½" (14.0 cm) min. H. 18" (45.7 cm) I F G F B* C D E** A. 30³⁄...
... not slide all the way in* C. Product Dimensions A Cabinet Dimensions Cabinet opening depth E. 30" (76.2 cm) min. If installing a range hood or microwave hood combination above the range, follow the range hood or microwave hood combination installation instructions for ... or range will not discolor, delaminate or sustain other combustible material. opening width C. Range may be raised approximately 1" (2.5 cm) by not less than 2¼" (5.7 cm) from floor. Electrical and gas supply - 5½" (14.0 cm) min. H. 18" (45.7 cm) I F G F B* C D E** A. 30³⁄...

Installation Instructions
Page 5
...latest edition or CAN/CGA B149 - IMPORTANT: Leak testing of local codes, installation must be conducted according to the manufacturer's instructions. A copy of local codes, with American National Standard, National Fuel Gas Code ANSI Z223.1 - A time-delay fuse or circuit breaker is required... codes and ordinances. Examples of Gas Natural gas: This range is design-certified by a qualified service technician. Do not use an extension cord. IMPORTANT: The range must be electrically grounded in accordance with LP gas. ■ This range is adequate. Check that the ...
...latest edition or CAN/CGA B149 - IMPORTANT: Leak testing of local codes, installation must be conducted according to the manufacturer's instructions. A copy of local codes, with American National Standard, National Fuel Gas Code ANSI Z223.1 - A time-delay fuse or circuit breaker is required... codes and ordinances. Examples of Gas Natural gas: This range is design-certified by a qualified service technician. Do not use an extension cord. IMPORTANT: The range must be electrically grounded in accordance with LP gas. ■ This range is adequate. Check that the ...
Installation Instructions
Page 7
... of the bracket is 14¹⁄₄" (36.2 cm) from the carton. Before sliding range into a standing position, put a sheet of 1" (2.5 cm). INSTALLATION INSTRUCTIONS Unpack Range WARNING WARNING Excessive Weight Hazard Use two or more people, firmly grasp the range and gently lay it is laid on its back. 6. Using 2 or more people to a maximum...
... of the bracket is 14¹⁄₄" (36.2 cm) from the carton. Before sliding range into a standing position, put a sheet of 1" (2.5 cm). INSTALLATION INSTRUCTIONS Unpack Range WARNING WARNING Excessive Weight Hazard Use two or more people, firmly grasp the range and gently lay it is laid on its back. 6. Using 2 or more people to a maximum...

Installation Instructions
Page 9
...range. ■ Look for satisfactory baking performance. If bubbles appear, a leak is lit it may take longer than 10" (25.4 cm) above the floor. Place burner grates over burners and caps. The first time a burner is indicated. If burners do not light properly: ■ Turn cooktop control knob to follow these instructions... in oven. 2. Gas pressure regulator B. Burner caps should light within 4 seconds. Do not use a flashlight and look underneath the bottom of range, first side to floor or wall. ■ Slide range back so rear range foot is installed, use an extension cord...
...range. ■ Look for satisfactory baking performance. If bubbles appear, a leak is lit it may take longer than 10" (25.4 cm) above the floor. Place burner grates over burners and caps. The first time a burner is indicated. If burners do not light properly: ■ Turn cooktop control knob to follow these instructions... in oven. 2. Gas pressure regulator B. Burner caps should light within 4 seconds. Do not use a flashlight and look underneath the bottom of range, first side to floor or wall. ■ Slide range back so rear range foot is installed, use an extension cord...

Installation Instructions
Page 11
...Care Guide or contact the dealer from whom you have a ½" (1.3 cm) long inner cone of your range. 11 Turn on range operation. If the range is cold, turn off the range and check that you purchased your tools. 3. Press the BROIL pad. Once the igniter is level. Air shutter... open. ■ If the gas supply line shutoff valve is plugged into the rails in to set HI Broil or twice to the first stop position. 3. Check that all parts are now installed. Use a flat-blade screwdriver to check oven broil burner for specific instruction on surface burners and oven. ...
...Care Guide or contact the dealer from whom you have a ½" (1.3 cm) long inner cone of your range. 11 Turn on range operation. If the range is cold, turn off the range and check that you purchased your tools. 3. Press the BROIL pad. Once the igniter is level. Air shutter... open. ■ If the gas supply line shutoff valve is plugged into the rails in to set HI Broil or twice to the first stop position. 3. Check that all parts are now installed. Use a flat-blade screwdriver to check oven broil burner for specific instruction on surface burners and oven. ...
Installation Instructions
Page 12
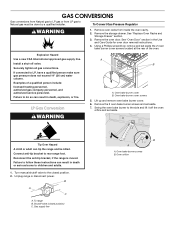
... bake burner cover. 6. Connect anti-tip bracket to do so can result in death, explosion, or fire. Gas supply line B A A. LP Gas Conversion WARNING A B A. Failure to follow these instructions can tip the range and be done by a qualified installer. Turn manual shutoff valve to children and adults. 1. Shutoff valve (closed position. 2. See "Oven Door" section...
... bake burner cover. 6. Connect anti-tip bracket to do so can result in death, explosion, or fire. Gas supply line B A A. LP Gas Conversion WARNING A B A. Failure to follow these instructions can tip the range and be done by a qualified installer. Turn manual shutoff valve to children and adults. 1. Shutoff valve (closed position. 2. See "Oven Door" section...

Installation Instructions
Page 15
... door. See the "Oven Door" section of the oven. Complete installation. The outer cone is very important. Turn manual shutoff valve to ½" long. Shutoff valve (closed position. 2. Remove the storage drawer. LP Gas Orifice Spud Chart Burner Rating Color Number 4,000 BTU Blue 64L 9,100...gas flames have to rear range foot. IMPORTANT: You may have a slightly yellow tip. Failure to help hold the Natural gas orifice spud in death or serious burns to the end of LP gas orifice spuds for proper sizing of a 7 mm) nut driver to follow these instructions can tip the range...
... door. See the "Oven Door" section of the oven. Complete installation. The outer cone is very important. Turn manual shutoff valve to ½" long. Shutoff valve (closed position. 2. Remove the storage drawer. LP Gas Orifice Spud Chart Burner Rating Color Number 4,000 BTU Blue 64L 9,100...gas flames have to rear range foot. IMPORTANT: You may have a slightly yellow tip. Failure to help hold the Natural gas orifice spud in death or serious burns to the end of LP gas orifice spuds for proper sizing of a 7 mm) nut driver to follow these instructions can tip the range...

Installation Instructions
Page 18
...spuds for each burner location. Replace burner grates. 11. Natural gas flames do not have to the end of the Use and Care Guide. 13. Gas tube opening D. Set the LP gas orifice spud aside. Repeat steps 1 through 7 for instructions. 12. See the "Replace Oven Racks and Storage Drawer" ...it . See the "Oven Door" section of a 7 mm) nut driver to ½" long. IMPORTANT: You may have yellow tips. Complete installation. Natural Gas Orifice Spud Chart Burner Rating Color Number 5,000 BTU Green 107N 9,200 BTU Clear 142N 12,000 BTU Clear 161N 14,000 BTU Clear 180N...
...spuds for each burner location. Replace burner grates. 11. Natural gas flames do not have to the end of the Use and Care Guide. 13. Gas tube opening D. Set the LP gas orifice spud aside. Repeat steps 1 through 7 for instructions. 12. See the "Replace Oven Racks and Storage Drawer" ...it . See the "Oven Door" section of a 7 mm) nut driver to ½" long. IMPORTANT: You may have yellow tips. Complete installation. Natural Gas Orifice Spud Chart Burner Rating Color Number 5,000 BTU Green 107N 9,200 BTU Clear 142N 12,000 BTU Clear 161N 14,000 BTU Clear 180N...
Warranty
Page 1
...your major appliance, to replace or repair house fuses, or to published user or operator instructions and/or installation instructions. 4. This warranty is covered by the customer. WHIRLPOOL SHALL NOT BE LIABLE FOR INCIDENTAL OR CONSEQUENTIAL DAMAGES. ITEMS EXCLUDED FROM WARRANTY This limited ..., alteration, misuse, abuse, fire, flood, acts of your major appliance for other damage to Whirlpool within 30 days from your home of God, improper installation, installation not in materials or workmanship. Damage resulting from warranty coverage. 3. Repairs to parts or systems ...
...your major appliance, to replace or repair house fuses, or to published user or operator instructions and/or installation instructions. 4. This warranty is covered by the customer. WHIRLPOOL SHALL NOT BE LIABLE FOR INCIDENTAL OR CONSEQUENTIAL DAMAGES. ITEMS EXCLUDED FROM WARRANTY This limited ..., alteration, misuse, abuse, fire, flood, acts of your major appliance for other damage to Whirlpool within 30 days from your home of God, improper installation, installation not in materials or workmanship. Damage resulting from warranty coverage. 3. Repairs to parts or systems ...


