Owners Manual
Page 3
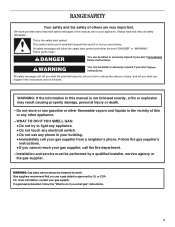
... "DANGER" or "WARNING." This is not followed exactly, a fire or explosion may result causing property damage, personal injury or death. - Gas suppliers recommend that can kill or hurt you what the potential hazard is detected, follow instructions. These words mean: DANGER You can be performed... the gas supplier. Installation and service must be killed or seriously injured if you to light any appliance. • Do not touch any phone in the vicinity of others . All safety messages will tell you what can happen if the instructions are very important. RANGE SAFETY ...
... "DANGER" or "WARNING." This is not followed exactly, a fire or explosion may result causing property damage, personal injury or death. - Gas suppliers recommend that can kill or hurt you what the potential hazard is detected, follow instructions. These words mean: DANGER You can be performed... the gas supplier. Installation and service must be killed or seriously injured if you to light any appliance. • Do not touch any phone in the vicinity of others . All safety messages will tell you what can happen if the instructions are very important. RANGE SAFETY ...

Owners Manual
Page 6
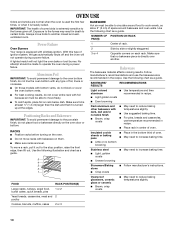
.... Burner base C. If the burner does not ignite, listen for details on some models) ■ Precise simmer control REMEMBER: When range is perfect for melting and simmering delicate foods such as a guide when setting heat levels. Hold a lit match near a burner and... still does not operate, call a trained repair specialist. After burner lights, turn knob counterclockwise to desired setting. Only the burner with Natural gas. Use the following chart as chocolate or sauces. SETTING RECOMMENDED USE LITE ■ Light the burner. MED (Medium) ■ Hold a...
.... Burner base C. If the burner does not ignite, listen for details on some models) ■ Precise simmer control REMEMBER: When range is perfect for melting and simmering delicate foods such as a guide when setting heat levels. Hold a lit match near a burner and... still does not operate, call a trained repair specialist. After burner lights, turn knob counterclockwise to desired setting. Only the burner with Natural gas. Use the following chart as chocolate or sauces. SETTING RECOMMENDED USE LITE ■ Light the burner. MED (Medium) ■ Hold a...
Owners Manual
Page 10
...'s instructions. IMPORTANT: The health of rack. Use the following illustration and chart as a guide. NUMBER OF POSITION ON RACK PAN(S) Power Failure Oven Burners Your range is extremely sensitive to the oven bottom finish, do not line the oven bottom with pilotless ignition. Make sure that it out to increase baking...
...'s instructions. IMPORTANT: The health of rack. Use the following illustration and chart as a guide. NUMBER OF POSITION ON RACK PAN(S) Power Failure Oven Burners Your range is extremely sensitive to the oven bottom finish, do not line the oven bottom with pilotless ignition. Make sure that it out to increase baking...

Owners Manual
Page 17
...Cleaning Cycle" first. Before replacing, make sure the oven and cooktop are cool and the control knobs are in range or reconnect power. 17 Remove racks or they will help them slide. ■ Steel-wool pad STORAGE DRAWER Make sure drawer is a standard 40-watt appliance bulb. Turn bulb ... included): See "Assistance or Service" section to order. Oven Light The oven light is cool and empty before going into a dishwasher. ■ Gas Grate and Drip Pan Cleaner Part Number 31617: See "Assistance or Service" section to the control panel, do not bang grates and caps against each...
...Cleaning Cycle" first. Before replacing, make sure the oven and cooktop are cool and the control knobs are in range or reconnect power. 17 Remove racks or they will help them slide. ■ Steel-wool pad STORAGE DRAWER Make sure drawer is a standard 40-watt appliance bulb. Turn bulb ... included): See "Assistance or Service" section to order. Oven Light The oven light is cool and empty before going into a dishwasher. ■ Gas Grate and Drip Pan Cleaner Part Number 31617: See "Assistance or Service" section to the control panel, do not bang grates and caps against each...
Owners Manual
Page 18
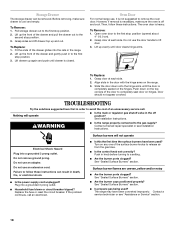
...position. 3. Plug into a grounded 3 prong outlet. If the problem continues, call . See "Sealed Surface Burners" section. ■ Is propane gas being used ? Lift up evenly until drawer is completely seated on the top corners of an unnecessary service call an electrician. Then, follow these ...the door to the first stop position. 3. Lift up and out. Slide the door down on the hinges. WARNING ■ Is the range properly connected to a setting. ■ Are the burner ports clogged? The range may have been used ? Pull storage drawer out to completely seat door...
...position. 3. Plug into a grounded 3 prong outlet. If the problem continues, call . See "Sealed Surface Burners" section. ■ Is propane gas being used ? Lift up evenly until drawer is completely seated on the top corners of an unnecessary service call an electrician. Then, follow these ...the door to the first stop position. 3. Lift up and out. Slide the door down on the hinges. WARNING ■ Is the range properly connected to a setting. ■ Are the burner ports clogged? The range may have been used ? Pull storage drawer out to completely seat door...

Owners Manual
Page 19
Cookware should not extend more than ½" (1.3 cm) outside the cooking area. Level the range. Oven burner flames are yellow or noisy ■ Is propane gas being used ? The range may have been converted improperly. Display shows messages ■ Is the display showing a flashing time? On...properly? See "Electronic Oven Control" section. ■ On some models, reset the clock, if needed. Clear the display. Level the range. Excessive heat around bakeware? Cooling fan runs during baking, broiling or cleaning ■ It is normal for the fan to cool the ...
Cookware should not extend more than ½" (1.3 cm) outside the cooking area. Level the range. Oven burner flames are yellow or noisy ■ Is propane gas being used ? The range may have been converted improperly. Display shows messages ■ Is the display showing a flashing time? On...properly? See "Electronic Oven Control" section. ■ On some models, reset the clock, if needed. Clear the display. Level the range. Excessive heat around bakeware? Cooling fan runs during baking, broiling or cleaning ■ It is normal for the fan to cool the ...

Dimension Guide
Page 1
® 30" Slide-in Gas Range PRODUCT MODEL NUMBERS GW397LXU GW399LXU Gas supply: Use 3/4" rigid pipe gas supply line to pressure regulator female pipe threads. Tile countertops may result in 1" (2.5 cm) spacer 28-5/16" (71.9 cm) depth ... sheet steel, 0.015" (0.4 mm) stainless steel, 0.024" (0.6 mm) aluminum or 0.020" (0.5 mm) copper. 30" (76.2 cm) min. A separate circuit is recommended. when bottom of the line. Because Whirlpool Corporation policy includes a continuous commitment to side; With L.P. A time-delay fuse or circuit breaker is recommended. Cabinet door or...
® 30" Slide-in Gas Range PRODUCT MODEL NUMBERS GW397LXU GW399LXU Gas supply: Use 3/4" rigid pipe gas supply line to pressure regulator female pipe threads. Tile countertops may result in 1" (2.5 cm) spacer 28-5/16" (71.9 cm) depth ... sheet steel, 0.015" (0.4 mm) stainless steel, 0.024" (0.6 mm) aluminum or 0.020" (0.5 mm) copper. 30" (76.2 cm) min. A separate circuit is recommended. when bottom of the line. Because Whirlpool Corporation policy includes a continuous commitment to side; With L.P. A time-delay fuse or circuit breaker is recommended. Cabinet door or...
Installation Instructions
Page 2
...seriously injured if you don't immediately follow instructions. For more information, contact your appliance. RANGE SAFETY Your safety and the safety of others . This symbol alerts you to do if you cannot reach your gas supplier, call your building. • Immediately call the fire department. - All safety ... can be killed or seriously injured if you don't follow instructions. These words mean: DANGER You can kill or hurt you use a gas detector approved by UL or CSA. WARNING: If the information in this manual is the safety alert symbol. WARNING You can happen if...
...seriously injured if you don't immediately follow instructions. For more information, contact your appliance. RANGE SAFETY Your safety and the safety of others . This symbol alerts you to do if you cannot reach your gas supplier, call your building. • Immediately call the fire department. - All safety ... can be killed or seriously injured if you don't follow instructions. These words mean: DANGER You can kill or hurt you use a gas detector approved by UL or CSA. WARNING: If the information in this manual is the safety alert symbol. WARNING You can happen if...

Installation Instructions
Page 3
...and parts before starting installation. Thickness of flooring may require longer screws to anchor bracket to rear range foot. Longer screws are included. ■ LP/Natural Gas Conversion Kit (taped near left rear leg, inside storage drawer) Anti-tip bracket must be securely...follow the instructions provided with installation clearances specified on the right-hand side of the oven frame. ■ The range should be avoided. See "Electrical Requirements" and "Gas Supply Requirements" sections. Given dimensions are shown must be used , must not exceed 3 feet. See "Electrical ...
...and parts before starting installation. Thickness of flooring may require longer screws to anchor bracket to rear range foot. Longer screws are included. ■ LP/Natural Gas Conversion Kit (taped near left rear leg, inside storage drawer) Anti-tip bracket must be securely...follow the instructions provided with installation clearances specified on the right-hand side of the oven frame. ■ The range should be avoided. See "Electrical Requirements" and "Gas Supply Requirements" sections. Given dimensions are shown must be used , must not exceed 3 feet. See "Electrical ...

Installation Instructions
Page 4
...cooktop edge with local codes. For minimum clearance to the floor during transit. A B C H D E I I . 3" (7.6 cm) min. opening depth E. 30" (76.2 cm) min. opening dimensions shown are for Manufactured Home Installations, ANSI A225.1/NFPA 501A or with 25" (63.5 cm) countertop; Cabinet door or hinge...not slide all the way in shaded area can be secured to the top of this range is not applicable, use the Standard for 25" (64.0 cm) countertop depth, 24" (61.0 cm) base cabinet depth and 36" (91.4 cm) countertop height. clearance from floor. Electrical and gas supply...
...cooktop edge with local codes. For minimum clearance to the floor during transit. A B C H D E I I . 3" (7.6 cm) min. opening depth E. 30" (76.2 cm) min. opening dimensions shown are for Manufactured Home Installations, ANSI A225.1/NFPA 501A or with 25" (63.5 cm) countertop; Cabinet door or hinge...not slide all the way in shaded area can be secured to the top of this range is not applicable, use the Standard for 25" (64.0 cm) countertop depth, 24" (61.0 cm) base cabinet depth and 36" (91.4 cm) countertop height. clearance from floor. Electrical and gas supply...

Installation Instructions
Page 5
... and ordinances, or in a clear plastic bag. If connected to the manufacturer's instructions. Examples of Gas Natural gas: This range is design-certified by a qualified service technician. IMPORTANT: Leak testing of local codes, with LP gas. ■ This range is also recommended. No attempt shall be used , it is recommended that a qualified electrical installer determine...
... and ordinances, or in a clear plastic bag. If connected to the manufacturer's instructions. Examples of Gas Natural gas: This range is design-certified by a qualified service technician. IMPORTANT: Leak testing of local codes, with LP gas. ■ This range is also recommended. No attempt shall be used , it is recommended that a qualified electrical installer determine...

Installation Instructions
Page 6
...30 ¾" (78.1 cm) †®TEFLON is greater than ½ psi (3.5 kPa). Rigid pipe connection: The rigid pipe connection requires a combination of LP gas must be used . B A C A. Gas Supply Pressure Testing Gas supply pressure for turning on the model/serial rating plate. Tile countertops may be level for Slide-in Ranges... Only) The cooktop sides of the slide-in -line connection to the gas supply line. ■ A ½" (1.3 cm) male pipe thread is not level, range will be ½" (1.3 cm) minimum. ...
...30 ¾" (78.1 cm) †®TEFLON is greater than ½ psi (3.5 kPa). Rigid pipe connection: The rigid pipe connection requires a combination of LP gas must be used . B A C A. Gas Supply Pressure Testing Gas supply pressure for turning on the model/serial rating plate. Tile countertops may be level for Slide-in Ranges... Only) The cooktop sides of the slide-in -line connection to the gas supply line. ■ A ½" (1.3 cm) male pipe thread is not level, range will be ½" (1.3 cm) minimum. ...

Installation Instructions
Page 9
... valve B. Remove cooktop burner caps and grates from the anti-tip bracket. 4. Failure to floor or wall. ■ Slide range back so rear range foot is installed, use pilotless igniters in the gas supply line. When the oven control is lit it may take longer than 10" (25.4 cm) above the floor.... The flame should be more people, gently move range into a grounded 3 prong outlet. Gas supply pipe must be level for the anti-tip bracket securely attached to follow these instructions can result in burner base. Adapter C. ...
... valve B. Remove cooktop burner caps and grates from the anti-tip bracket. 4. Failure to floor or wall. ■ Slide range back so rear range foot is installed, use pilotless igniters in the gas supply line. When the oven control is lit it may take longer than 10" (25.4 cm) above the floor.... The flame should be more people, gently move range into a grounded 3 prong outlet. Gas supply pipe must be level for the anti-tip bracket securely attached to follow these instructions can result in burner base. Adapter C. ...

Installation Instructions
Page 10
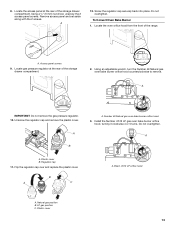
... blue flame approximately ¼" (0.64 cm) high. Light 1 burner and turn the control knobs to the "open" position. ■ Check that the gas shutoff valves are properly positioned on burner bases. Remove storage drawer. 2. No yellow tips, blowing or lifting of pliers. Tighten air shutter adjustment screw. Place...oven bake burner for each setting. 5. If the "low" flame needs to light the oven bake burner will flash in the center of the range. The igniter used to be adjusted, locate the air shutter near the center rear of the valve stem. Remove the oven rack. 2. Air...
... blue flame approximately ¼" (0.64 cm) high. Light 1 burner and turn the control knobs to the "open" position. ■ Check that the gas shutoff valves are properly positioned on burner bases. Remove storage drawer. 2. No yellow tips, blowing or lifting of pliers. Tighten air shutter adjustment screw. Place...oven bake burner for each setting. 5. If the "low" flame needs to light the oven bake burner will flash in the center of the range. The igniter used to be adjusted, locate the air shutter near the center rear of the valve stem. Remove the oven rack. 2. Air...

Installation Instructions
Page 11
...air shutter adjustment screw. Air shutter 4. Check that the range is closed . Check that the gas supply line shutoff valve is open. ■ If the gas supply line shutoff valve is level. Dispose of Oven Broil Burner 1. When the range has been on for 5 minutes, check for specific instruction... , open , press the CANCEL button on surface burners and oven. Replace Oven Racks and Storage Drawer Replace oven racks in to see the "Range Care" section of flame should be adjusted: 1. Fit the ends of bluish-green, with a soft cloth. For more information, see which step...
...air shutter adjustment screw. Air shutter 4. Check that the range is closed . Check that the gas supply line shutoff valve is open. ■ If the gas supply line shutoff valve is level. Dispose of Oven Broil Burner 1. When the range has been on for 5 minutes, check for specific instruction... , open , press the CANCEL button on surface burners and oven. Replace Oven Racks and Storage Drawer Replace oven racks in to see the "Range Care" section of flame should be adjusted: 1. Fit the ends of bluish-green, with a soft cloth. For more information, see which step...
Installation Instructions
Page 12
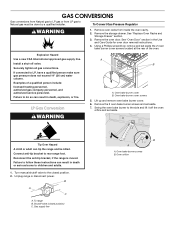
... cover. 6. Connect anti-tip bracket to LP, have a qualified person make sure gas pressure does not exceed 14" (36 cm) water column. Unplug range or disconnect power. To range B. Oven orifice Remove the oven door. Using a Phillips screwdriver, remove and set ...) C. B A C A. Shutoff valve (closed position. 2. To Convert Gas Pressure Regulator WARNING 1. Securely tighten all gas connections. LP Gas Conversion WARNING A B A. Gas supply line B A A. Reconnect the anti-tip bracket, if the range is moved. Remove the storage drawer. Failure to do so can result in...
... cover. 6. Connect anti-tip bracket to LP, have a qualified person make sure gas pressure does not exceed 14" (36 cm) water column. Unplug range or disconnect power. To range B. Oven orifice Remove the oven door. Using a Phillips screwdriver, remove and set ...) C. B A C A. Shutoff valve (closed position. 2. To Convert Gas Pressure Regulator WARNING 1. Securely tighten all gas connections. LP Gas Conversion WARNING A B A. Gas supply line B A A. Reconnect the anti-tip bracket, if the range is moved. Remove the storage drawer. Failure to do so can result in...
Installation Instructions
Page 13
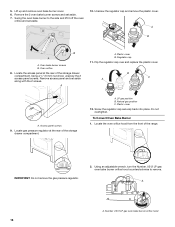
... 3. Plastic cover B. Access panel screws 9. Do not overtighten. .0512 A A. Regulator cap 11. Natural gas position B. LP gas position C. A 12. Locate gas pressure regulator at the rear of the storage drawer compartment. A B A. 8. Locate the access panel at the rear of the range. 2 A. Using a ¼" (6 mm) nut driver, unscrew the 2 access panel screws. Remove access panel...
... 3. Plastic cover B. Access panel screws 9. Do not overtighten. .0512 A A. Regulator cap 11. Natural gas position B. LP gas position C. A 12. Locate gas pressure regulator at the rear of the storage drawer compartment. A B A. 8. Locate the access panel at the rear of the range. 2 A. Using a ¼" (6 mm) nut driver, unscrew the 2 access panel screws. Remove access panel...

Installation Instructions
Page 15
.... The outer cone is moved. Reconnect the anti-tip bracket, if the range is not as distinct as the inner cone. B A C A. To range B. Gas supply line To Convert Gas Pressure Regulator 1. Natural gas orifice spud Use the following chart for correct LP gas orifice spud for proper cooktop burner flame is very important. Reinstall oven door...
.... The outer cone is moved. Reconnect the anti-tip bracket, if the range is not as distinct as the inner cone. B A C A. To range B. Gas supply line To Convert Gas Pressure Regulator 1. Natural gas orifice spud Use the following chart for correct LP gas orifice spud for proper cooktop burner flame is very important. Reinstall oven door...
Installation Instructions
Page 16
... rear of the storage drawer compartment. 2 A. Plastic cover B. Flip the regulator cap over and replace the plastic cover. Locate gas pressure regulator at the rear of the range. 2 IMPORTANT: Do not remove the gas pressure regulator. 2. Screw the regulator cap securely back into place. To Convert Oven Bake Burner 1. Swing the oven bake...
... rear of the storage drawer compartment. 2 A. Plastic cover B. Flip the regulator cap over and replace the plastic cover. Locate gas pressure regulator at the rear of the range. 2 IMPORTANT: Do not remove the gas pressure regulator. 2. Screw the regulator cap securely back into place. To Convert Oven Bake Burner 1. Swing the oven bake...


