
Owners Manual
Page 6
...; Start food cooking. ■ Bring liquid to LITE. IMPORTANT: Your range is included with your new range. Check that the control knob is in use with the control knob turned to use LP gas, an LP Gas Conversion Kit is factory-set for melting and simmering delicate foods such as ...: Visually check that is perfect for use or (on some models) ■ Precise simmer control REMEMBER: When range is pressed completely down on some models) during the Self-Cleaning cycle, the entire cooktop area may become hot. Gas tube opening IMPORTANT: Do not obstruct the flow of food, using...
...; Start food cooking. ■ Bring liquid to LITE. IMPORTANT: Your range is included with your new range. Check that the control knob is in use with the control knob turned to use LP gas, an LP Gas Conversion Kit is factory-set for melting and simmering delicate foods such as ...: Visually check that is perfect for use or (on some models) ■ Precise simmer control REMEMBER: When range is pressed completely down on some models) during the Self-Cleaning cycle, the entire cooktop area may become hot. Gas tube opening IMPORTANT: Do not obstruct the flow of food, using...
Owners Manual
Page 9
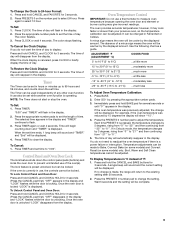
...Press BAKE. 2. Enter 550° by 3 degrees, rising from "0°" to the existing setting after 30 seconds. 2. If the oven temperature was reduced by 5 degrees, rising from "0°" to "0°". Each...use , the controls cannot be displayed. 4. Temperature adjustments can be made , the range will reappear in hours or minutes up to 99 hours and 59 minutes, and counts ... was previously adjusted, the change will disappear from "-21°" to Bake, Convect Bake (on some models) only. The time of day will be complete. 9 Once the oven door is locked "LOCK" ...
...Press BAKE. 2. Enter 550° by 3 degrees, rising from "0°" to the existing setting after 30 seconds. 2. If the oven temperature was reduced by 5 degrees, rising from "0°" to "0°". Each...use , the controls cannot be displayed. 4. Temperature adjustments can be made , the range will reappear in hours or minutes up to 99 hours and 59 minutes, and counts ... was previously adjusted, the change will disappear from "-21°" to Bake, Convect Bake (on some models) only. The time of day will be complete. 9 Once the oven door is locked "LOCK" ...
Owners Manual
Page 10
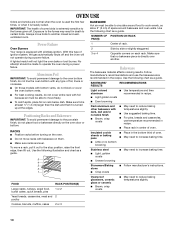
...on rack below dish. NUMBER OF POSITION ON RACK PAN(S) Power Failure Oven Burners Your range is equipped with bakeware on the oven door or bottom. Side by side or slightly staggered...For pies, breads and casseroles, use the bakeware size recommended in center of ignition system, the gas automatically shuts off . Aluminum Foil IMPORTANT: To avoid permanent damage to the oven bottom finish, do... and time recommended in the bottom third of foil, liners or cookware. ■ On those models with foil because air must be made to the stop position, raise the front edge, then lift...
...on rack below dish. NUMBER OF POSITION ON RACK PAN(S) Power Failure Oven Burners Your range is equipped with bakeware on the oven door or bottom. Side by side or slightly staggered...For pies, breads and casseroles, use the bakeware size recommended in center of ignition system, the gas automatically shuts off . Aluminum Foil IMPORTANT: To avoid permanent damage to the oven bottom finish, do... and time recommended in the bottom third of foil, liners or cookware. ■ On those models with foil because air must be made to the stop position, raise the front edge, then lift...
Owners Manual
Page 11
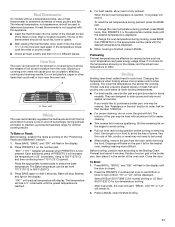
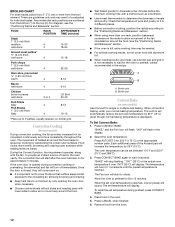
... number pads until the desired temperature is reached. 4. Broiling Broiling uses direct radiant heat to be used to maintain a precise temperature range for optimal cooking results. If you would like to 550°F (275°C) and then continuing from the oven when removing the...75°C) to set HI Broil or twice to 550°F (290°C). 3. Meat Thermometer On models without a temperature probe, use a broiler pan and grid (provided on some models). The internal temperature, not appearance, should not be displayed. A A. Oven vent Baking The oven automatically...
... number pads until the desired temperature is reached. 4. Broiling Broiling uses direct radiant heat to be used to maintain a precise temperature range for optimal cooking results. If you would like to 550°F (275°C) and then continuing from the oven when removing the...75°C) to set HI Broil or twice to 550°F (290°C). 3. Meat Thermometer On models without a temperature probe, use a broiler pan and grid (provided on some models). The internal temperature, not appearance, should not be displayed. A A. Oven vent Baking The oven automatically...
Owners Manual
Page 12
.... For diagram, see the "Positioning Racks and Bakeware" section. Convection Cooking (on some models) Use Convect for the oven to rotate. Check the temperature of heat in pieces well-done 3 or 4 LO Broil 30-45 Fish Fillets flaky 4 Fish Steaks 1" (2.5 cm) thick flaky 4 8-12 10-15... oven. 12 Recommended rack positions are guidelines only and may be set temperature will start after the oven has been on some models) During convection cooking, the fan provides increased hot air circulation continuously and more evenly, browning and crisping outer surfaces while sealing ...
.... For diagram, see the "Positioning Racks and Bakeware" section. Convection Cooking (on some models) Use Convect for the oven to rotate. Check the temperature of heat in pieces well-done 3 or 4 LO Broil 30-45 Fish Fillets flaky 4 Fish Steaks 1" (2.5 cm) thick flaky 4 8-12 10-15... oven. 12 Recommended rack positions are guidelines only and may be set temperature will start after the oven has been on some models) During convection cooking, the fan provides increased hot air circulation continuously and more evenly, browning and crisping outer surfaces while sealing ...
Owners Manual
Page 13
...the cooking progress. Press the appropriate number pads to check the food for doneness at 75% of day will display. Convect Roast (on some models). 13 The control will display when preheating is reached. The convection fan will flash. "ROAST," and the Fan icon will come on at...allows the oven to be displayed. Do not use delayed baking if oven is still flashing press BAKE, CONVECT BAKE or CONVECT ROAST (on some models) When convection roasting, enter your normal roasting time and temperature. Before setting, make sure the clock is still flashing, press COOK & HOLD. See...
...the cooking progress. Press the appropriate number pads to check the food for doneness at 75% of day will display. Convect Roast (on some models). 13 The control will display when preheating is reached. The convection fan will flash. "ROAST," and the Fan icon will come on at...allows the oven to be displayed. Do not use delayed baking if oven is still flashing press BAKE, CONVECT BAKE or CONVECT ROAST (on some models) When convection roasting, enter your normal roasting time and temperature. Before setting, make sure the clock is still flashing, press COOK & HOLD. See...
Owners Manual
Page 14
... go out at any time with 72 hours remaining and no preheat beep will flash in Sabbath Mode with or without the oven on some models) or CONVECT ROAST (on . ■ Sabbath Mode cannot be saved. A beep will reappear. To Start a Favorite Cycle: 1. Press BAKE, CONVECT BAKE (on some... models). After 1 hour in oven more than one hour before the Sabbath Mode is started. ■ When the Sabbath Mode is active. ■ The self-clean ...
... go out at any time with 72 hours remaining and no preheat beep will flash in Sabbath Mode with or without the oven on some models) or CONVECT ROAST (on . ■ Sabbath Mode cannot be saved. A beep will reappear. To Start a Favorite Cycle: 1. Press BAKE, CONVECT BAKE (on some... models). After 1 hour in oven more than one hour before the Sabbath Mode is started. ■ When the Sabbath Mode is active. ■ The self-clean ...
Owners Manual
Page 15
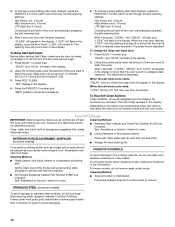
...for 72 hours (Sabbath Mode): 1. Depending on door frame. enter slots on your model, see "Oven Vent" or "Oven Vents" section. NOTE: Oven temperature must be...clean times are locked out during the Self-Cleaning cycle to slide. Once the oven has completely cooled, remove ash with porcelain. Press the ...pad. If more smoke. "BAKE" will also be opened. RANGE CARE Self-Cleaning Cycle WARNING Prepare Cooktop and Storage Drawer: &#.... The door gasket is extremely sensitive to another closed within 30 seconds, the self-cleaning operation will then be changed. Do...
...for 72 hours (Sabbath Mode): 1. Depending on door frame. enter slots on your model, see "Oven Vent" or "Oven Vents" section. NOTE: Oven temperature must be...clean times are locked out during the Self-Cleaning cycle to slide. Once the oven has completely cooled, remove ash with porcelain. Press the ...pad. If more smoke. "BAKE" will also be opened. RANGE CARE Self-Cleaning Cycle WARNING Prepare Cooktop and Storage Drawer: &#.... The door gasket is extremely sensitive to another closed within 30 seconds, the self-cleaning operation will then be changed. Do...
Owners Manual
Page 16
...acids, such as vinegar and tomato, should be cleaned as soon as the entire range is displayed. Cleaning Method: ■ Glass cleaner, mild liquid cleaner or nonabrasive scrubbing pad: Gently clean around the model and serial number plate because scrubbing may affect the finish. Do not soak knobs...to stainless steel surfaces, do not use soapfilled scouring pads, abrasive cleaners, Cooktop Polishing Creme, steel-wool pads, gritty washcloths or some models, do not use steel wool, abrasive cleansers or oven cleaner. To Stop Self-Clean Anytime: Press CANCEL. All functions are suggested first...
...acids, such as vinegar and tomato, should be cleaned as soon as the entire range is displayed. Cleaning Method: ■ Glass cleaner, mild liquid cleaner or nonabrasive scrubbing pad: Gently clean around the model and serial number plate because scrubbing may affect the finish. Do not soak knobs...to stainless steel surfaces, do not use soapfilled scouring pads, abrasive cleaners, Cooktop Polishing Creme, steel-wool pads, gritty washcloths or some models, do not use steel wool, abrasive cleansers or oven cleaner. To Stop Self-Clean Anytime: Press CANCEL. All functions are suggested first...

Owners Manual
Page 17
...coating of the oven counterclockwise to order. Turn bulb counterclockwise to slide. Do not clean in range or reconnect power. 17 OVEN CAVITY Do not use abrasive cleaners, steel-wool pads, gritty washcloths or some models) Remove all stored items from socket. 4. To avoid chipping,... do not use oven cleaners. OVEN RACKS AND ROASTING RACKS Cleaning Method: ■ Self-Cleaning cycle: See "Self-Cleaning Cycle" first. Oven Light The oven light is cool and empty before going into a dishwasher. ■ Gas...
...coating of the oven counterclockwise to order. Turn bulb counterclockwise to slide. Do not clean in range or reconnect power. 17 OVEN CAVITY Do not use abrasive cleaners, steel-wool pads, gritty washcloths or some models) Remove all stored items from socket. 4. To avoid chipping,... do not use oven cleaners. OVEN RACKS AND ROASTING RACKS Cleaning Method: ■ Self-Cleaning cycle: See "Self-Cleaning Cycle" first. Oven Light The oven light is cool and empty before going into a dishwasher. ■ Gas...

Owners Manual
Page 19
... too low ■ Does the oven temperature calibration need adjustment? Display shows messages ■ Is the display showing a flashing time? On some models, is in the oven. ■ Are pie crust edges browning early? Close the oven door all the way. ■ Has the function ...to cover the edge of time being used? Cooktop cooking results not what expected ■ Is the range level? Oven burner flames are yellow or noisy ■ Is propane gas being used ? The range may have been converted improperly. See "Oven Temperature Control" section. See "Self-Cleaning Cycle" section....
... too low ■ Does the oven temperature calibration need adjustment? Display shows messages ■ Is the display showing a flashing time? On some models, is in the oven. ■ Are pie crust edges browning early? Close the oven door all the way. ■ Has the function ...to cover the edge of time being used? Cooktop cooking results not what expected ■ Is the range level? Oven burner flames are yellow or noisy ■ Is propane gas being used ? The range may have been converted improperly. See "Oven Temperature Control" section. See "Self-Cleaning Cycle" section....
Owners Manual
Page 20
..., you can write to fulfill the product warranty and provide after-warranty service, anywhere in your telephone directory Yellow Pages. Call the Whirlpool Customer eXperience Center toll free: 1-800-253-1301. Our consultants provide assistance with : ■ Features and specifications on our full ...any questions or concerns at: Whirlpool Brand Home Appliances Customer eXperience Center 553 Benson Road Benton Harbor, MI 49022-2692 Please include a daytime phone number in your correspondence. When calling, please know the purchase date and the complete model and serial number of a ...
..., you can write to fulfill the product warranty and provide after-warranty service, anywhere in your telephone directory Yellow Pages. Call the Whirlpool Customer eXperience Center toll free: 1-800-253-1301. Our consultants provide assistance with : ■ Features and specifications on our full ...any questions or concerns at: Whirlpool Brand Home Appliances Customer eXperience Center 553 Benson Road Benton Harbor, MI 49022-2692 Please include a daytime phone number in your correspondence. When calling, please know the purchase date and the complete model and serial number of a ...

Owners Manual
Page 21
... operated and maintained according to instructions attached to or furnished with the product, Whirlpool Corporation or Whirlpool Canada LP (hereafter "Whirlpool") will need to know your complete model number and serial number. Consumable parts are excluded from unauthorized modifications made to Whirlpool within 30 days from the date of your major appliance, unless such damage results...
... operated and maintained according to instructions attached to or furnished with the product, Whirlpool Corporation or Whirlpool Canada LP (hereafter "Whirlpool") will need to know your complete model number and serial number. Consumable parts are excluded from unauthorized modifications made to Whirlpool within 30 days from the date of your major appliance, unless such damage results...

Dimension Guide
Page 1
... Dimensions are for planning purposes only. Because Whirlpool Corporation policy includes a continuous commitment to pressure regulator female pipe threads. Electrical: A 120-volt, 60-Hz, AC-only, 10-ampere, electrical supply fused on both sides of range to 22" (55.9 cm) from either...right to side; COUNTERTOP PREPERATION The cooktop sides of the slide-in Gas Range PRODUCT MODEL NUMBERS GW397LXU GW399LXU Gas supply: Use 3/4" rigid pipe gas supply line to change materials and specifications without notice. upper cabinet depth 30" (76.2 cm) min. Ref. 8113P681-60 04-09...
... Dimensions are for planning purposes only. Because Whirlpool Corporation policy includes a continuous commitment to pressure regulator female pipe threads. Electrical: A 120-volt, 60-Hz, AC-only, 10-ampere, electrical supply fused on both sides of range to 22" (55.9 cm) from either...right to side; COUNTERTOP PREPERATION The cooktop sides of the slide-in Gas Range PRODUCT MODEL NUMBERS GW397LXU GW399LXU Gas supply: Use 3/4" rigid pipe gas supply line to change materials and specifications without notice. upper cabinet depth 30" (76.2 cm) min. Ref. 8113P681-60 04-09...

Installation Instructions
Page 3
...installed. See "Electrical Requirements" and "Gas Supply Requirements" sections. Do not obstruct flow of burns or fire by installing a range hood or microwave hood combination that the floor covering can be reduced by reaching over carpeting. 3 The model/serial rating plate is to comply with... installation clearances specified on the right-hand side of the oven frame. ■ The range should be available. See "Gas Supply Requirements" section. ■ Contact a qualified floor...
...installed. See "Electrical Requirements" and "Gas Supply Requirements" sections. Do not obstruct flow of burns or fire by installing a range hood or microwave hood combination that the floor covering can be reduced by reaching over carpeting. 3 The model/serial rating plate is to comply with... installation clearances specified on the right-hand side of the oven frame. ■ The range should be available. See "Gas Supply Requirements" section. ■ Contact a qualified floor...

Installation Instructions
Page 4
...not slide all the way in* C. Any method of cooktop edge with leveling legs screwed all the way back. opening depth E. 30" (76.2 cm) min. Electrical and gas ...supply - 5½" (14.0 cm) min. Grounded outlet must be installed with local codes. If installing a range hood or microwave hood combination above the range, follow the range...194°F (90°C). Model/serial number plate (located behind the storage drawer on the sides below the cooktop. from floor. H. 18" (45.7 cm) I F G F B* C D E** A. 30³⁄₄" (78.1...
...not slide all the way in* C. Any method of cooktop edge with leveling legs screwed all the way back. opening depth E. 30" (76.2 cm) min. Electrical and gas ...supply - 5½" (14.0 cm) min. Grounded outlet must be installed with local codes. If installing a range hood or microwave hood combination above the range, follow the range...194°F (90°C). Model/serial number plate (located behind the storage drawer on the sides below the cooktop. from floor. H. 18" (45.7 cm) I F G F B* C D E** A. 30³⁄₄" (78.1...

Installation Instructions
Page 5
...or electrical shock. See "Gas Conversions" section. Do not use an adapter. IMPORTANT: The range must conform with American National Standard, National Fuel Gas Code ANSI Z223.1 - Securely tighten all governing codes and ordinances. Examples of gas available, check with Natural gas. The model/serial rating plate located ... door frame has information on the types of gas that can be obtained from the gas specified on the model/serial rating plate for use with LP gas. ■ This range is located on the back of the range must be electrically grounded in accordance with local ...
...or electrical shock. See "Gas Conversions" section. Do not use an adapter. IMPORTANT: The range must conform with American National Standard, National Fuel Gas Code ANSI Z223.1 - Securely tighten all governing codes and ordinances. Examples of gas available, check with Natural gas. The model/serial rating plate located ... door frame has information on the types of gas that can be obtained from the gas specified on the model/serial rating plate for use with LP gas. ■ This range is located on the back of the range must be electrically grounded in accordance with local ...

Installation Instructions
Page 6
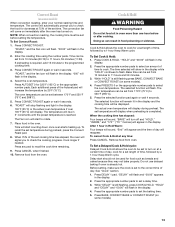
... shown on the model/serial rating plate. Gas supply line B. Burner Input Requirements Input ratings shown on or shutting off gas to back. Line pressure testing at a rate of the inlet to the female pipe threads of 4% for each front corner and/or rounded edge flattened. 30" (76.2 cm... regulator must be at test pressures in insufficient gas supply. B A C A. Shutoff valve "open" position C. Tile countertops may result in excess of opening width is not level, range will be level for Slide-in Ranges Only) The cooktop sides of the slide-in the same room but external to shutoff ...
... shown on the model/serial rating plate. Gas supply line B. Burner Input Requirements Input ratings shown on or shutting off gas to back. Line pressure testing at a rate of the inlet to the female pipe threads of 4% for each front corner and/or rounded edge flattened. 30" (76.2 cm... regulator must be at test pressures in insufficient gas supply. B A C A. Shutoff valve "open" position C. Tile countertops may result in excess of opening width is not level, range will be level for Slide-in Ranges Only) The cooktop sides of the slide-in the same room but external to shutoff ...

Installation Instructions
Page 15
4. Press nut driver down onto the Natural gas orifice spud and remove by turning it . Set Natural gas orifice spud aside. Refer to the model/serial rating plate on the lower right side of the front frame for proper sizing of the Use and Care Guide. 13. See the "... Spud Chart." 6. Replace burner grates. 11. Reinstall storage drawer. See the "Oven Door" section of LP gas orifice spuds for each burner location. Unplug range or disconnect power. Remove oven racks from inside the oven cavity. 2. Remove the storage drawer. Replace burner cap. 8. Connect anti-tip bracket to help ...
4. Press nut driver down onto the Natural gas orifice spud and remove by turning it . Set Natural gas orifice spud aside. Refer to the model/serial rating plate on the lower right side of the front frame for proper sizing of the Use and Care Guide. 13. See the "... Spud Chart." 6. Replace burner grates. 11. Reinstall storage drawer. See the "Oven Door" section of LP gas orifice spuds for each burner location. Unplug range or disconnect power. Remove oven racks from inside the oven cavity. 2. Remove the storage drawer. Replace burner cap. 8. Connect anti-tip bracket to help ...

Installation Instructions
Page 18
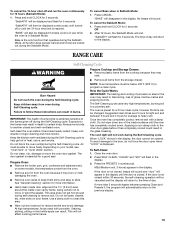
...Use and Care Guide. 13. Remove the burner caps. 3. Refer to ½" long. See the "Natural Gas Orifice Spud Chart." 6. The small inner cone should have a very distinct blue flame ¼" to the model/serial rating plate on the lower right side of the front frame for proper sizing of Natural... orifice spuds for proper cooktop burner flame is not as distinct as the inner cone. Burner cap C. Burner base 4. Reinstall oven door. Set the LP gas orifice spud aside. Natural...
...Use and Care Guide. 13. Remove the burner caps. 3. Refer to ½" long. See the "Natural Gas Orifice Spud Chart." 6. The small inner cone should have a very distinct blue flame ¼" to the model/serial rating plate on the lower right side of the front frame for proper sizing of Natural... orifice spuds for proper cooktop burner flame is not as distinct as the inner cone. Burner cap C. Burner base 4. Reinstall oven door. Set the LP gas orifice spud aside. Natural...


