Owners Manual
Page 1
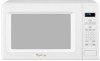
® MICROWAVE OVEN Use & Care Guide For questions about features, operation/performance, parts, accessories or service, call: 1-800-253-1301. or visit our website at... www.whirlpool.com Table of Contents 2 W10178096A Model GT4175
® MICROWAVE OVEN Use & Care Guide For questions about features, operation/performance, parts, accessories or service, call: 1-800-253-1301. or visit our website at... www.whirlpool.com Table of Contents 2 W10178096A Model GT4175
Owners Manual
Page 2
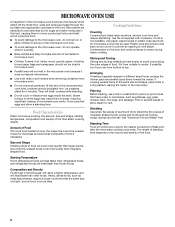
... 8 Food Characteristics 8 Cooking Guidelines 8 Cookware and Dinnerware 9 Aluminum Foil and Metal 9 Microwave Cooking Power 9 Manual Cooking 10 Cooking in Stages 10 Sensor Cooking 10 Sensor Popcorn 10 Sensor Cook 11 Sensor Reheat 11 Auto Defrost 12 Warm Hold 12 MICROWAVE OVEN CARE 13 General Cleaning 13 TROUBLESHOOTING 14 ASSISTANCE OR SERVICE 15 Replacement Parts 15 Built-In...
... 8 Food Characteristics 8 Cooking Guidelines 8 Cookware and Dinnerware 9 Aluminum Foil and Metal 9 Microwave Cooking Power 9 Manual Cooking 10 Cooking in Stages 10 Sensor Cooking 10 Sensor Popcorn 10 Sensor Cook 11 Sensor Reheat 11 Auto Defrost 12 Warm Hold 12 MICROWAVE OVEN CARE 13 General Cleaning 13 TROUBLESHOOTING 14 ASSISTANCE OR SERVICE 15 Replacement Parts 15 Built-In...
Owners Manual
Page 3
.... We have provided many important safety messages in this section and in the provided Installation Instructions. ■ Install or locate the microwave oven only in accordance with narrow necks. - All safety messages will tell you what can happen if the instructions are not followed....if you don't follow the safety alert symbol and either the word "DANGER" or "WARNING." SAVE THESE INSTRUCTIONS 3 Carefully attend the microwave oven when paper, plastic, or other utensil into the container. ■ Oversized foods or oversized metal utensils should be boiling. Do not overheat...
.... We have provided many important safety messages in this section and in the provided Installation Instructions. ■ Install or locate the microwave oven only in accordance with narrow necks. - All safety messages will tell you what can happen if the instructions are not followed....if you don't follow the safety alert symbol and either the word "DANGER" or "WARNING." SAVE THESE INSTRUCTIONS 3 Carefully attend the microwave oven when paper, plastic, or other utensil into the container. ■ Oversized foods or oversized metal utensils should be boiling. Do not overheat...
Owners Manual
Page 4
...except properly qualified service personnel. IMPORTANT SAFETY INSTRUCTIONS ■ Do not operate any heating or cooking appliance beneath the microwave oven. ■ Do not mount microwave oven over or near any portion of a heating or cooking appliance. ■ Do not use paper products when appliance ...9632; Do not cover racks or any other than manufacturer's recommended accessories, in this microwave oven when not in use. ■ Do not store anything directly on top of the microwave oven when the microwave oven is in operation. ■ Do not cover or block any openings on models with...
...except properly qualified service personnel. IMPORTANT SAFETY INSTRUCTIONS ■ Do not operate any heating or cooking appliance beneath the microwave oven. ■ Do not mount microwave oven over or near any portion of a heating or cooking appliance. ■ Do not use paper products when appliance ...9632; Do not cover racks or any other than manufacturer's recommended accessories, in this microwave oven when not in use. ■ Do not store anything directly on top of the microwave oven when the microwave oven is in operation. ■ Do not cover or block any openings on models with...
Owners Manual
Page 5
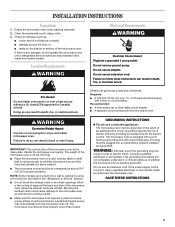
...■ dents on the interior or exterior of electric shock. Do not use an extension cord. Observe all cord connected appliances: The microwave oven must be built into a grounded 3 prong outlet. If vents are not completely understood, or if doubt exists as poor cooking results. ..., or electrical shock. IMPORTANT: The control side of electric shock by using one of any needed repairs. The weight of the microwave oven where the exhaust vents are in death, fire, or electrical shock. Do not use an extension cord. Location Requirements WARNING Electrical ...
...■ dents on the interior or exterior of electric shock. Do not use an extension cord. Observe all cord connected appliances: The microwave oven must be built into a grounded 3 prong outlet. If vents are not completely understood, or if doubt exists as poor cooking results. ..., or electrical shock. IMPORTANT: The control side of electric shock by using one of any needed repairs. The weight of the microwave oven where the exhaust vents are in death, fire, or electrical shock. Do not use an extension cord. Location Requirements WARNING Electrical ...
Owners Manual
Page 6
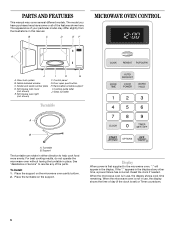
... shown here. Turntable B. For best cooking results, do not operate the microwave oven without having the turntable in either direction to help cook food more evenly. When the microwave oven is not in use, the display shows the time of the parts. Door... have some or all of your particular model may cover several different models. Metal shielded window C. Microwave oven light (not shown) F. B C D E F MICROWAVE OVEN CONTROL A J I . Place the turntable on the microwave oven cavity bottom. 2. Reset the clock if needed. Model and serial number plate D. If the ":"...
... shown here. Turntable B. For best cooking results, do not operate the microwave oven without having the turntable in either direction to help cook food more evenly. When the microwave oven is not in use, the display shows the time of the parts. Door... have some or all of your particular model may cover several different models. Metal shielded window C. Microwave oven light (not shown) F. B C D E F MICROWAVE OVEN CONTROL A J I . Place the turntable on the microwave oven cavity bottom. 2. Reset the clock if needed. Model and serial number plate D. If the ":"...
Owners Manual
Page 7
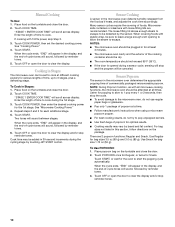
...day. 3. Clock This is opened. Touch CLOCK. 2. Touch number pads to resume the non-sensor cycle. Touch CLOCK. Tones Tones are audible signals that may be used to check, turn the microwave oven off if cooking during the countdown by canceling Timer, then repeating the above steps. Cook functions ...end-of-cycle tones, as reminder ■ Hidden feature exited Three tones ■ End of cycle Five tones ■ End of the microwave oven. The microwave oven light will come on or off (hidden). Options Settings can be selected, and displays can be added in 30-second increments to use ...
...day. 3. Clock This is opened. Touch CLOCK. 2. Touch number pads to resume the non-sensor cycle. Touch CLOCK. Tones Tones are audible signals that may be used to check, turn the microwave oven off if cooking during the countdown by canceling Timer, then repeating the above steps. Cook functions ...end-of-cycle tones, as reminder ■ Hidden feature exited Three tones ■ End of cycle Five tones ■ End of the microwave oven. The microwave oven light will come on or off (hidden). Options Settings can be selected, and displays can be added in 30-second increments to use ...
Owners Manual
Page 8
...to allow a standing time. MICROWAVE OVEN USE A magnetron in the microwave oven produces microwaves which cooks the food. ■ To avoid damage to the microwave oven, do not lean on or allow children to swing on the microwave oven door. ■ To avoid damage to the microwave oven, do not operate when it ...foil to vent steam. Starting Temperature Room temperature foods will heat faster than refrigerated foods, and refrigerated foods will not melt in microwave oven. ■ Paraffin wax will heat faster than other foods. At the end of food will finish cooking while standing. ■...
...to allow a standing time. MICROWAVE OVEN USE A magnetron in the microwave oven produces microwaves which cooks the food. ■ To avoid damage to the microwave oven, do not lean on or allow children to swing on the microwave oven door. ■ To avoid damage to the microwave oven, do not operate when it ...foil to vent steam. Starting Temperature Room temperature foods will heat faster than refrigerated foods, and refrigerated foods will not melt in microwave oven. ■ Paraffin wax will heat faster than other foods. At the end of food will finish cooking while standing. ■...
Owners Manual
Page 9
...the following guidelines: ■ To avoid damage to the microwave oven, do not allow contact with another metal object during microwave cooking. Microwave Cooking Power Many recipes for microwave cooking specify which cooking power to the microwave oven, do not allow aluminum foil or metal to touch the ... such as a guide, then test before using. Browning Dish Bottom must fit on some metal can occur and cause damage to the microwave oven. Cooking and heating foods that need a cook power lower than high. For example, whole fish and meat loaf. 70%, 7 Medium...
...the following guidelines: ■ To avoid damage to the microwave oven, do not allow contact with another metal object during microwave cooking. Microwave Cooking Power Many recipes for microwave cooking specify which cooking power to the microwave oven, do not allow aluminum foil or metal to touch the ... such as a guide, then test before using. Browning Dish Bottom must fit on some metal can occur and cause damage to the microwave oven. Cooking and heating foods that need a cook power lower than high. For example, whole fish and meat loaf. 70%, 7 Medium...
Owners Manual
Page 10
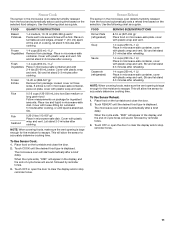
...to clear the display. To Cook in 30-second increments during a sensor cycle, sensing will stop the cycle. ■ To avoid damage to start the popping cycle automatically. Repeat steps 2 and 3 for the oven to the microwave oven, do not use regular paper bags or glassware. ■ Pop ...only 1 package of popcorn at all microwave cooking functions, the microwave oven should not exceed 95°F (35°C). ■ If the door is opened during the cycling stage by the sensor. Microwavesafe containers or steamers with 100% power, skip Step 3. 3. When ...
...to clear the display. To Cook in 30-second increments during a sensor cycle, sensing will stop the cycle. ■ To avoid damage to start the popping cycle automatically. Repeat steps 2 and 3 for the oven to the microwave oven, do not use regular paper bags or glassware. ■ Pop ...only 1 package of popcorn at all microwave cooking functions, the microwave oven should not exceed 95°F (35°C). ■ If the door is opened during the cycling stage by the sensor. Microwavesafe containers or steamers with 100% power, skip Step 3. 3. When ...
Owners Manual
Page 11
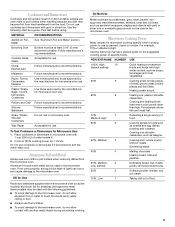
... stop reminder tones. Frozen Vegetables 1-4 cups (250 mL-1 L)/ Remove from package. This will start automatically after cooking. The microwave oven will allow the sensor to escape. Touch OFF or open the door to clear the display and/or stop reminder tones. 11 Place on three sides...humidity released from the food and automatically sets a reheat time based on the turntable and close the door. 2. The microwave oven will allow the sensor to escape. This will start automatically after cooking, or until liquid is large enough for ingredient amounts. Use the ...
... stop reminder tones. Frozen Vegetables 1-4 cups (250 mL-1 L)/ Remove from package. This will start automatically after cooking. The microwave oven will allow the sensor to escape. Touch OFF or open the door to clear the display and/or stop reminder tones. 11 Place on three sides...humidity released from the food and automatically sets a reheat time based on the turntable and close the door. 2. The microwave oven will allow the sensor to escape. This will start automatically after cooking, or until liquid is large enough for ingredient amounts. Use the ...
Owners Manual
Page 12
...and cook powers for defrosting Meat. Do not cover. Hot cooked food can be kept warm in microwave-safe baking dish, chicken breast side up Cornish hens Turkey: breast Place in the microwave oven. Opening the door during cooking. Use the following chart as possible during the entire cycle. Place food... time. The Warm Hold function uses 10% cook power. Auto Defrost The Auto Defrost feature's preset programs can be used or the microwave oven can be manually set from fruit juice containers) before or after cooking. See "Aluminum Foil and Metal" first. Enter the weight.
...and cook powers for defrosting Meat. Do not cover. Hot cooked food can be kept warm in microwave-safe baking dish, chicken breast side up Cornish hens Turkey: breast Place in the microwave oven. Opening the door during cooking. Use the following chart as possible during the entire cycle. Place food... time. The Warm Hold function uses 10% cook power. Auto Defrost The Auto Defrost feature's preset programs can be used or the microwave oven can be manually set from fruit juice containers) before or after cooking. See "Aluminum Foil and Metal" first. Enter the weight.
Owners Manual
Page 13
... ■ Vinegar for 2 to stainless steel models, rub in direction of either lemon juice or vinegar for 2 to 5 minutes in microwave oven. MICROWAVE OVEN CARE General Cleaning IMPORTANT: Before cleaning, make sure all -purpose cleaner: Rinse with clean water and dry with soft cloth. ■ .... TURNTABLE Replace turntable immediately after cleaning. Rub in place. ■ Mild cleanser and scouring pad ■ Dishwasher MICROWAVE OVEN DOOR AND EXTERIOR The area where the microwave oven door and frame touch when closed should be kept clean. ■ Wipe with soft, lint-free cloth. Soap...
... ■ Vinegar for 2 to stainless steel models, rub in direction of either lemon juice or vinegar for 2 to 5 minutes in microwave oven. MICROWAVE OVEN CARE General Cleaning IMPORTANT: Before cleaning, make sure all -purpose cleaner: Rinse with clean water and dry with soft cloth. ■ .... TURNTABLE Replace turntable immediately after cleaning. Rub in place. ■ Mild cleanser and scouring pad ■ Dishwasher MICROWAVE OVEN DOOR AND EXTERIOR The area where the microwave oven door and frame touch when closed should be kept clean. ■ Wipe with soft, lint-free cloth. Soap...
Owners Manual
Page 14
... Place 1 cup (250 mL) of food need longer cooking times. ■ Is the incoming voltage less than that specified in "Microwave Oven Safety?" Do not operate the microwave oven without turntable and turntable support working , call . There has been a power failure or the Clock time has been turned off . ... reset the circuit breaker. If the problem continues, call for the electronic device. ■ Is the radio or TV receiver near the microwave oven? If microwave oven still does not operate, call an electrician. If it still is not operating ■ Is the Timer in use ? Cooking times seem...
... Place 1 cup (250 mL) of food need longer cooking times. ■ Is the incoming voltage less than that specified in "Microwave Oven Safety?" Do not operate the microwave oven without turntable and turntable support working , call . There has been a power failure or the Clock time has been turned off . ... reset the circuit breaker. If the problem continues, call for the electronic device. ■ Is the radio or TV receiver near the microwave oven? If microwave oven still does not operate, call an electrician. If it still is not operating ■ Is the Timer in use ? Cooking times seem...
Owners Manual
Page 15
... / Stainless MK1170XPQ / White MK1170XPB / Black MK1170XPT / Biscuit MK1170XPS / Stainless RBS275PD GBS277PD RBS305PD GBS307PD *Approved, electric single microwave ovens only For further assistance If you need further assistance, you need to fulfill the product warranty and provide afterwarranty service, anywhere...; Specialized customer assistance (Spanish speaking, hearing impaired, limited vision, etc.). ■ Referrals to build every new WHIRLPOOL® appliance. Replacement Parts Glass Turntable Part Number 8205150 Turntable Support/Roller Assembly Part Number 8205151 If you need...
... / Stainless MK1170XPQ / White MK1170XPB / Black MK1170XPT / Biscuit MK1170XPS / Stainless RBS275PD GBS277PD RBS305PD GBS307PD *Approved, electric single microwave ovens only For further assistance If you need further assistance, you need to fulfill the product warranty and provide afterwarranty service, anywhere...; Specialized customer assistance (Spanish speaking, hearing impaired, limited vision, etc.). ■ Referrals to build every new WHIRLPOOL® appliance. Replacement Parts Glass Turntable Part Number 8205150 Turntable Support/Roller Assembly Part Number 8205151 If you need...
Dimension Guide
Page 1
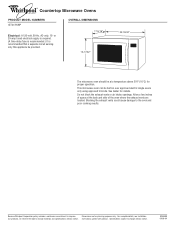
...damage to change materials and specifications without notice. 8205088 09-08-04 Because Whirlpool Corporation policy includes a continuous commitment to change without notice. Specifications subject to the oven and poor cooking results. Instructions packed with product. or 20-amp fused ...only this appliance be built-in over approved electric single ovens only using approved trim kits. Allow a few inches of the oven where the exhaust vents are for planning purposes only. ® Countertop Microwave Ovens PRODUCT MODEL NUMBERS GT4175SP Electrical: A 120-volt, 60...
...damage to change materials and specifications without notice. 8205088 09-08-04 Because Whirlpool Corporation policy includes a continuous commitment to change without notice. Specifications subject to the oven and poor cooking results. Instructions packed with product. or 20-amp fused ...only this appliance be built-in over approved electric single ovens only using approved trim kits. Allow a few inches of the oven where the exhaust vents are for planning purposes only. ® Countertop Microwave Ovens PRODUCT MODEL NUMBERS GT4175SP Electrical: A 120-volt, 60...
Installation Instructions
Page 2
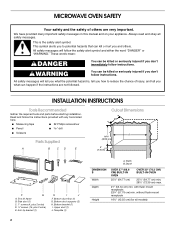
... cm) 3" (7.6 cm) Width F G A. Bottom duct floor (1) G. Template (1) 2 A. Depth DIMENSION S Width Depth Height OVER 27" (68.6 CM) BUILT-IN OVEN OVER 30" (76.2 CM) BUILT-IN OVEN 25¹⁄₂" (64.77 cm) 25¹⁄₂" (64.77 cm) min; 28¹⁄₂" (72.39 cm...will follow the safety alert symbol and either the word "DANGER" or "WARNING." Anti-tip bracket (1) H I . with any tools listed here. MICROWAVE OVEN SAFETY Your safety and the safety of injury, and tell you what the potential hazard is the safety alert symbol. We have provided many important...
... cm) 3" (7.6 cm) Width F G A. Bottom duct floor (1) G. Template (1) 2 A. Depth DIMENSION S Width Depth Height OVER 27" (68.6 CM) BUILT-IN OVEN OVER 30" (76.2 CM) BUILT-IN OVEN 25¹⁄₂" (64.77 cm) 25¹⁄₂" (64.77 cm) min; 28¹⁄₂" (72.39 cm...will follow the safety alert symbol and either the word "DANGER" or "WARNING." Anti-tip bracket (1) H I . with any tools listed here. MICROWAVE OVEN SAFETY Your safety and the safety of injury, and tell you what the potential hazard is the safety alert symbol. We have provided many important...
Installation Instructions
Page 3
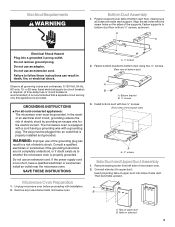
...fuse or circuit breaker is recommended.) It is too short, have a qualified electrician or serviceman install an outlet near the microwave oven. Do not use an adapter. Tabs of electric shock by providing an escape wire for the electric current. Electrical Requirements ... appliance be provided. WARNING: Improper use an extension cord. Consult a qualified electrician or serviceman if the grounding instructions are inside microwave oven. Unplug microwave oven before proceeding with two ¹⁄₂" screws. (Front view of bottom duct) A B A. Remove any loose items inside...
...fuse or circuit breaker is recommended.) It is too short, have a qualified electrician or serviceman install an outlet near the microwave oven. Do not use an adapter. Tabs of electric shock by providing an escape wire for the electric current. Electrical Requirements ... appliance be provided. WARNING: Improper use an extension cord. Consult a qualified electrician or serviceman if the grounding instructions are inside microwave oven. Unplug microwave oven before proceeding with two ¹⁄₂" screws. (Front view of bottom duct) A B A. Remove any loose items inside...

Installation Instructions
Page 4
... flange C. ¹⁄₂" screws B A. ¹⁄₂" screws B. Attach the side duct and upper duct assembly to centerline of bottom duct. Microwave Oven Placement 1. Cutout opening B 2.06 cm) C. 3" (7.62 cm) EF D. 16³⁄₄" (42.55 cm) E. Be sure to align... the centerline of template to left side of double-sided tape. Bottom bracket 2. Fasten duct assembly to scale.) B C A. Slide microwave oven partway into place, engaging anti-tip bracket. 4. Drill pilot holes through positioning flange. (Use drill.) Then install three ¹⁄₂...
... flange C. ¹⁄₂" screws B A. ¹⁄₂" screws B. Attach the side duct and upper duct assembly to centerline of bottom duct. Microwave Oven Placement 1. Cutout opening B 2.06 cm) C. 3" (7.62 cm) EF D. 16³⁄₄" (42.55 cm) E. Be sure to align... the centerline of template to left side of double-sided tape. Bottom bracket 2. Fasten duct assembly to scale.) B C A. Slide microwave oven partway into place, engaging anti-tip bracket. 4. Drill pilot holes through positioning flange. (Use drill.) Then install three ¹⁄₂...


