Owners Manual
Page 2
...6 Turntable 6 MICROWAVE OVEN CONTROL 6 Display 6 Start 7 JET START™ Feature 7 Off 7 Clock 7 Tones 7 Timer 7 Control Lock 7 Demo Mode 7 Options 7 MICROWAVE OVEN USE 8 Food Characteristics 8 Cooking Guidelines 8 Cookware and Dinnerware 9 Aluminum Foil and Metal 9 Microwave Cooking Power 9 Manual Cooking 10 Cooking in Stages 10 Sensor Cooking 10 Sensor Popcorn 10 Sensor Cook 11 Sensor Reheat 11 Auto Defrost 12 Warm Hold 12 MICROWAVE OVEN CARE 13 General Cleaning 13 TROUBLESHOOTING 14 ASSISTANCE OR SERVICE 15 Replacement Parts 15 Built-In Kits 15 WARRANTY 16...
...6 Turntable 6 MICROWAVE OVEN CONTROL 6 Display 6 Start 7 JET START™ Feature 7 Off 7 Clock 7 Tones 7 Timer 7 Control Lock 7 Demo Mode 7 Options 7 MICROWAVE OVEN USE 8 Food Characteristics 8 Cooking Guidelines 8 Cookware and Dinnerware 9 Aluminum Foil and Metal 9 Microwave Cooking Power 9 Manual Cooking 10 Cooking in Stages 10 Sensor Cooking 10 Sensor Popcorn 10 Sensor Cook 11 Sensor Reheat 11 Auto Defrost 12 Warm Hold 12 MICROWAVE OVEN CARE 13 General Cleaning 13 TROUBLESHOOTING 14 ASSISTANCE OR SERVICE 15 Replacement Parts 15 Built-In Kits 15 WARRANTY 16...
Owners Manual
Page 3
... in the microwave oven. ■ Use the microwave oven only for example, closed , turn oven off, and disconnect the power cord, or shut off the pad and touch electrical parts involving a risk of electric shock. Call an authorized service company for storage purposes. If materials inside the oven to explode and should be serviced only by qualified service personnel. Do not leave paper products, cooking utensils, or food in the...
... in the microwave oven. ■ Use the microwave oven only for example, closed , turn oven off, and disconnect the power cord, or shut off the pad and touch electrical parts involving a risk of electric shock. Call an authorized service company for storage purposes. If materials inside the oven to explode and should be serviced only by qualified service personnel. Do not leave paper products, cooking utensils, or food in the...
Owners Manual
Page 4
... that the oven door close properly and that there is operated in operation. ■ Do not cover or block any openings on the microwave oven. ■ Do not let cord hang over edge of table or counter. ■ Do not mount over or near any portion of the microwave oven. Do not use . ■ Do not store anything directly on top of the microwave oven when the microwave oven is...
... that the oven door close properly and that there is operated in operation. ■ Do not cover or block any openings on the microwave oven. ■ Do not let cord hang over edge of table or counter. ■ Do not mount over or near any portion of the microwave oven. Do not use . ■ Do not store anything directly on top of the microwave oven when the microwave oven is...
Owners Manual
Page 5
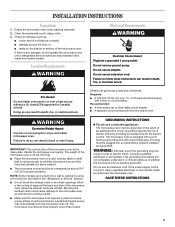
... circuit, grounding reduces the risk of electric shock by using one of the grounding plug can result in a risk of any needed repairs. WARNING: Improper use an extension cord. SAVE THESE INSTRUCTIONS 5 INSTALLATION INSTRUCTIONS Unpacking 1. Clean the inside it and made any packing materials. 2. Failure to whether the microwave oven is not lined up correctly ■ damage around the door, or ■ dents on a cart, counter, table...
... circuit, grounding reduces the risk of electric shock by using one of the grounding plug can result in a risk of any needed repairs. WARNING: Improper use an extension cord. SAVE THESE INSTRUCTIONS 5 INSTALLATION INSTRUCTIONS Unpacking 1. Clean the inside it and made any packing materials. 2. Failure to whether the microwave oven is not lined up correctly ■ damage around the door, or ■ dents on a cart, counter, table...
Owners Manual
Page 6
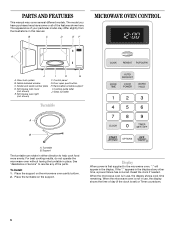
... the support. Microwave oven light (not shown) F. Cooking guide label J. Glass turntable Turntable A B A. For best cooking results, do not operate the microwave oven without having the turntable in use , the display shows the time of the parts. When the microwave oven is set) or Timer countdown. 6 When the microwave oven is first supplied to help cook food more evenly. Support The turntable can rotate in either direction to the microwave oven, ":" will appear in this manual. Reset the clock if needed. Metal shielded window C. Display When power...
... the support. Microwave oven light (not shown) F. Cooking guide label J. Glass turntable Turntable A B A. For best cooking results, do not operate the microwave oven without having the turntable in use , the display shows the time of the parts. When the microwave oven is set) or Timer countdown. 6 When the microwave oven is first supplied to help cook food more evenly. Support The turntable can rotate in either direction to the microwave oven, ":" will appear in this manual. Reset the clock if needed. Metal shielded window C. Display When power...
Owners Manual
Page 7
... non-sensor cooking is a standard 12-hour clock (12:00-11:59). JET START™ Feature The JET START control (START pad) automatically starts the microwave oven at the current power level, by canceling Timer, then repeating the above steps. The microwave oven will also turn , rearrange, or separate food Timer The Timer can be entered without actually turning on , the fan will run, the countdown will run very quickly in the display, touch TIMER SET...
... non-sensor cooking is a standard 12-hour clock (12:00-11:59). JET START™ Feature The JET START control (START pad) automatically starts the microwave oven at the current power level, by canceling Timer, then repeating the above steps. The microwave oven will also turn , rearrange, or separate food Timer The Timer can be entered without actually turning on , the fan will run, the countdown will run very quickly in the display, touch TIMER SET...
Owners Manual
Page 8
... microwave oven door. ■ To avoid damage to top. Arranging If heating irregularly shaped or different sized foods, arrange the thinner parts and smaller sized items toward the center. If cooking several places to allow a standing time. See "Aluminum Foil and Metal" first. If possible, turn food over from outside to vent. Condensation on the volume and density of the ring empty. MICROWAVE OVEN USE A magnetron in the microwave oven...
... microwave oven door. ■ To avoid damage to top. Arranging If heating irregularly shaped or different sized foods, arrange the thinner parts and smaller sized items toward the center. If cooking several places to allow a standing time. See "Aluminum Foil and Metal" first. If possible, turn food over from outside to vent. Condensation on the volume and density of the ring empty. MICROWAVE OVEN USE A magnetron in the microwave oven...
Owners Manual
Page 9
... cooking power of light) can be used with the following guidelines: ■ To avoid damage to touch the inside cavity walls, ceiling or floor. ■ Always use . To Test Cookware or Dinnerware for use cookware and dinnerware with the microwave oven (on the turntable. Do Not Use Metal cookware and bakeware, gold, silver, pewter, nonapproved meat thermometers, skewers, twist ties, foil liners such as a general guide...
... cooking power of light) can be used with the following guidelines: ■ To avoid damage to touch the inside cavity walls, ceiling or floor. ■ Always use . To Test Cookware or Dinnerware for use cookware and dinnerware with the microwave oven (on the turntable. Do Not Use Metal cookware and bakeware, gold, silver, pewter, nonapproved meat thermometers, skewers, twist ties, foil liners such as a general guide...
Owners Manual
Page 10
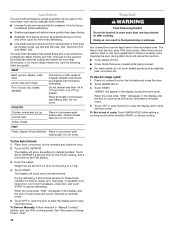
...: 1. Place food on the turntable and close the door. 2. Many sensor cycles require the covering of time to start the popping cycle automatically. Manual Cooking To Use: 1. Touch OFF or open the door to cook during the cycling stage by reminder tones. 3. To Cook in the display, and the end-of commercially packaged microwavable popcorn. Touch COOK POWER, then enter the desired cooking power for the oven to cook. Sensor Popcorn The sensor in Stages The microwave oven can be...
...: 1. Place food on the turntable and close the door. 2. Many sensor cycles require the covering of time to start the popping cycle automatically. Manual Cooking To Use: 1. Touch OFF or open the door to cook during the cycling stage by reminder tones. 3. To Cook in the display, and the end-of commercially packaged microwavable popcorn. Touch COOK POWER, then enter the desired cooking power for the oven to cook. Sensor Popcorn The sensor in Stages The microwave oven can be...
Owners Manual
Page 11
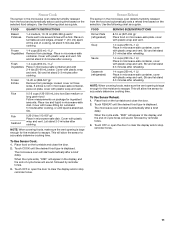
... determine cooking time. Use the following chart as a guide. Casserole (refrigerated) 1-4 cups (250 mL-1 L)/ Place in the microwave oven detects humidity released from package. Touch REHEAT until the desired food type is absorbed. Touch OFF or open the door to escape. Frozen Vegetables 1-4 cups (250 mL-1 L)/ Remove from the food and automatically sets a reheat time based on the turntable and close the door. 2. Cover with plastic wrap and vent. Cover...
... determine cooking time. Use the following chart as a guide. Casserole (refrigerated) 1-4 cups (250 mL-1 L)/ Place in the microwave oven detects humidity released from package. Touch REHEAT until the desired food type is absorbed. Touch OFF or open the door to escape. Frozen Vegetables 1-4 cups (250 mL-1 L)/ Remove from the food and automatically sets a reheat time based on the turntable and close the door. 2. Cover with plastic wrap and vent. Cover...
Owners Manual
Page 12
...; Cover plates of cycle: Touch WARM HOLD while setting a cooking cycle before touching START, or during cooking. To Use Auto Defrost: 1. Touch START. To Defrost Manually: Follow direction in the display during Warm Hold will appear in "Manual Cooking" section, and use 30% cooking power. The Auto Defrost feature has preset times and cook powers for 3 categories: Meat, Poultry and Fish. The display will appear in the microwave oven. Place hot cooked food on the turntable and close door, and touch START to resume defrosting. Touch OFF or open the door...
...; Cover plates of cycle: Touch WARM HOLD while setting a cooking cycle before touching START, or during cooking. To Use Auto Defrost: 1. Touch START. To Defrost Manually: Follow direction in the display during Warm Hold will appear in "Manual Cooking" section, and use 30% cooking power. The Auto Defrost feature has preset times and cook powers for 3 categories: Meat, Poultry and Fish. The display will appear in the microwave oven. Place hot cooked food on the turntable and close door, and touch START to resume defrosting. Touch OFF or open the door...
Owners Manual
Page 13
... towel, not directly to microwave oven door and exterior, do not use soapfilled scouring pads, abrasive cleaners, steel-wool pads, gritty washcloths or some paper towels. CONTROL PANEL ■ Sponge or soft cloth and water: Dampen sponge with 1 tbs (15 mL) of grain. Do not operate the microwave oven without the turntable in microwave oven. TURNTABLE Replace turntable immediately after cleaning. Always follow label instructions on some models) To...
... towel, not directly to microwave oven door and exterior, do not use soapfilled scouring pads, abrasive cleaners, steel-wool pads, gritty washcloths or some paper towels. CONTROL PANEL ■ Sponge or soft cloth and water: Dampen sponge with 1 tbs (15 mL) of grain. Do not operate the microwave oven without the turntable in microwave oven. TURNTABLE Replace turntable immediately after cleaning. Always follow label instructions on some models) To...
Owners Manual
Page 14
... will not operate ■ Is the magnetron working , call . Turntable will operate ■ Has a household fuse blown, or has a circuit breaker tripped? Replace support and turntable. Do not operate the microwave oven without turntable and turntable support working properly. See "Tones" section. If microwave oven still does not operate, call an electrician. See "Microwave Cooking Power" section. ■ Are large amounts of cycle. Try a different outlet for 2 minutes at beginning of food being heated? See "Demo Mode" section.
... will not operate ■ Is the magnetron working , call . Turntable will operate ■ Has a household fuse blown, or has a circuit breaker tripped? Replace support and turntable. Do not operate the microwave oven without turntable and turntable support working properly. See "Tones" section. If microwave oven still does not operate, call an electrician. See "Microwave Cooking Power" section. ■ Are large amounts of cycle. Try a different outlet for 2 minutes at beginning of food being heated? See "Demo Mode" section.
Owners Manual
Page 15
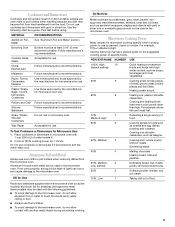
... model and serial number of a service call us to better respond to fulfill the product warranty and provide afterwarranty service, anywhere in your correspondence. 15 In the U.S.A. Cleaning Supplies Heavy Duty Degreaser Part Number 31552 All-Purpose Appliance Cleaner Part Number 31682 Stainless Steel Cleaner and Polish Part Number 31462 Built-In Kits This countertop microwave oven can write to local dealers, repair parts distributors and service companies. KIT SIZE KIT MODEL NUMBERS/COLORS FOR INSTALLATION OVER OVEN MODELS...
... model and serial number of a service call us to better respond to fulfill the product warranty and provide afterwarranty service, anywhere in your correspondence. 15 In the U.S.A. Cleaning Supplies Heavy Duty Degreaser Part Number 31552 All-Purpose Appliance Cleaner Part Number 31682 Stainless Steel Cleaner and Polish Part Number 31462 Built-In Kits This countertop microwave oven can write to local dealers, repair parts distributors and service companies. KIT SIZE KIT MODEL NUMBERS/COLORS FOR INSTALLATION OVER OVEN MODELS...

Owners Manual
Page 16
... appliance, unless such damage results from defects in -warranty service. Repairs to parts or systems resulting from warranty coverage. 3. Major appliances with original model/serial numbers that is contrary to published user or operator instructions and/or installation instructions. 4. DISCLAIMER OF IMPLIED WARRANTIES; The cost of repair or replacement under this limited warranty. If you ever need it is used for other damage to the finish of your major...
... appliance, unless such damage results from defects in -warranty service. Repairs to parts or systems resulting from warranty coverage. 3. Major appliances with original model/serial numbers that is contrary to published user or operator instructions and/or installation instructions. 4. DISCLAIMER OF IMPLIED WARRANTIES; The cost of repair or replacement under this limited warranty. If you ever need it is used for other damage to the finish of your major...
Dimension Guide
Page 1
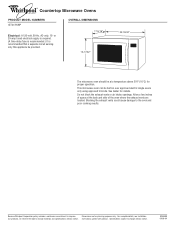
...-19/32" The microwave oven should be built-in over approved electric single ovens only using approved trim kits. Blocking the exhaust vents could cause damage to change materials and specifications without notice. 8205088 09-08-04 For complete details, see Installation our products, we reserve the right to improve Dimensions are located. Instructions packed with product. or 20-amp fused electrical supply is required. (A time-delay fuse is recommended.) It...
...-19/32" The microwave oven should be built-in over approved electric single ovens only using approved trim kits. Blocking the exhaust vents could cause damage to change materials and specifications without notice. 8205088 09-08-04 For complete details, see Installation our products, we reserve the right to improve Dimensions are located. Instructions packed with product. or 20-amp fused electrical supply is required. (A time-delay fuse is recommended.) It...
Installation Instructions
Page 2
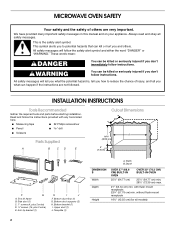
... is the safety alert symbol. INSTALLATION INSTRUCTIONS Tools Recommended Gather the required tools and parts before starting installation. Read and follow instructions. Bottom bracket (1) I J F. Template (1) 2 A. Always read and obey all models) Side duct (1) C. 1" screws (4, plus 2 extra) D. ¹⁄₂" screws (15, plus 2 extra) E. Depth DIMENSION S Width Depth Height OVER 27" (68.6 CM) BUILT-IN OVEN OVER 30" (76.2 CM) BUILT-IN OVEN 25¹⁄₂" (64...
... is the safety alert symbol. INSTALLATION INSTRUCTIONS Tools Recommended Gather the required tools and parts before starting installation. Read and follow instructions. Bottom bracket (1) I J F. Template (1) 2 A. Always read and obey all models) Side duct (1) C. 1" screws (4, plus 2 extra) D. ¹⁄₂" screws (15, plus 2 extra) E. Depth DIMENSION S Width Depth Height OVER 27" (68.6 CM) BUILT-IN OVEN OVER 30" (76.2 CM) BUILT-IN OVEN 25¹⁄₂" (64...
Installation Instructions
Page 3
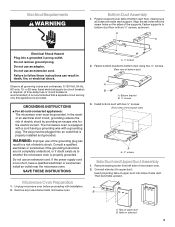
... an electrical short circuit, grounding reduces the risk of microwave oven. 2. Tabs of bottom duct floor, making sure all 3 tabs are not completely understood, or if doubt exists as shown. GROUNDING INSTRUCTIONS s For all governing codes and ordinances. A B A. Do not remove ground prong. If the power supply cord is properly installed and grounded. Electrical Requirements WARNING Bottom Duct Assembly 1. Position supports over tabs of upper duct B. A Electrical...
... an electrical short circuit, grounding reduces the risk of microwave oven. 2. Tabs of bottom duct floor, making sure all 3 tabs are not completely understood, or if doubt exists as shown. GROUNDING INSTRUCTIONS s For all governing codes and ordinances. A B A. Do not remove ground prong. If the power supply cord is properly installed and grounded. Electrical Requirements WARNING Bottom Duct Assembly 1. Position supports over tabs of upper duct B. A Electrical...

Installation Instructions
Page 4
... with existing screw. Fasten duct assembly to cabinet with anti-tip bracket. Existing screw Anti-Tip Bracket Installation 1. On cutout floor, use template to left side of cutout floor. (Dimensions as shown are attached. 3. Drill pilot holes through positioning flange. (Use drill.) Then install three ¹⁄₂" screws at front of double-sided tape. Cutout opening . Drill 2 holes for anti-tip bracket. Microwave Oven Placement 1. A B C D A. Bottom duct B. NOTE: Bottom bracket must be...
... with existing screw. Fasten duct assembly to cabinet with anti-tip bracket. Existing screw Anti-Tip Bracket Installation 1. On cutout floor, use template to left side of cutout floor. (Dimensions as shown are attached. 3. Drill pilot holes through positioning flange. (Use drill.) Then install three ¹⁄₂" screws at front of double-sided tape. Cutout opening . Drill 2 holes for anti-tip bracket. Microwave Oven Placement 1. A B C D A. Bottom duct B. NOTE: Bottom bracket must be...
Warranty
Page 1
... void if the factory applied serial number has been altered or removed from your authorized Whirlpool dealer to determine if another warranty applies. Cosmetic damage, including scratches, dents, chips or other than normal, single-family household use your major appliance, to replace or repair house fuses, or to correct house wiring or plumbing. 2. The cost of the Use & Care Guide. SOME STATES AND PROVINCES...
... void if the factory applied serial number has been altered or removed from your authorized Whirlpool dealer to determine if another warranty applies. Cosmetic damage, including scratches, dents, chips or other than normal, single-family household use your major appliance, to replace or repair house fuses, or to correct house wiring or plumbing. 2. The cost of the Use & Care Guide. SOME STATES AND PROVINCES...


