
Dimension Guide
Page 1
... osmosis system going to the water inlet valve of installation, cleaning, or removing a light bulb, turn the control (Thermostat, Refrigerator or Freezer control depending on the model) to the desired setting. Water: A cold water supply with Doors "B" Height "C" Height...35 7⁄16" 507⁄8" GSS26C5XX cu. Because Whirlpool Corporation policy includes a continuous commitment to improve Dimensions are finished, reconnect the refrigerator to the electrical source and reset the control (Thermostat, Refrigerator or Freezer control depending on the model) to remove...
... osmosis system going to the water inlet valve of installation, cleaning, or removing a light bulb, turn the control (Thermostat, Refrigerator or Freezer control depending on the model) to the desired setting. Water: A cold water supply with Doors "B" Height "C" Height...35 7⁄16" 507⁄8" GSS26C5XX cu. Because Whirlpool Corporation policy includes a continuous commitment to improve Dimensions are finished, reconnect the refrigerator to the electrical source and reset the control (Thermostat, Refrigerator or Freezer control depending on the model) to remove...
Energy Guide
Page 1
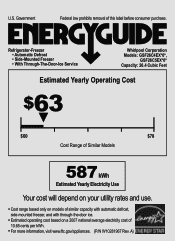
... removal of 10.65 cents per kWh. • For more information, visit www.ftc.gov/appliances. (P/N W10281967 Rev. A) Refrigerator-Freezer • Automatic Defrost • Side-Mounted Freezer • With Through-The-Door-Ice Service Whirlpool Corporation Models: GSF26C4EX*0*, GSF26C5EX*0* Capacity: 26.4 Cubic Feet Estimated Yearly Operating Cost $63 ▼ $60 $78 Cost...
... removal of 10.65 cents per kWh. • For more information, visit www.ftc.gov/appliances. (P/N W10281967 Rev. A) Refrigerator-Freezer • Automatic Defrost • Side-Mounted Freezer • With Through-The-Door-Ice Service Whirlpool Corporation Models: GSF26C4EX*0*, GSF26C5EX*0* Capacity: 26.4 Cubic Feet Estimated Yearly Operating Cost $63 ▼ $60 $78 Cost...
Use & Care Guide
Page 1
...62 FEUILLE DE DONNÉES SUR LA PERFORMANCE 63 GARANTIE 64 REFRIGERATOR SAFETY Your safety and the safety of others . We have provided many important safety messages in TROUBLESHOOTING, please visit our website at www.whirlpool.com for purchasing this manual and on your model and serial number,...kill or hurt you still need your appliance. In Canada, visit our website at www.whirlpool.ca or call us at 1-800-253-1301. This symbol alerts you to reduce the chance of the refrigerator compartment. All safety messages will need assistance, call us at 1-800-807-6777. All...
...62 FEUILLE DE DONNÉES SUR LA PERFORMANCE 63 GARANTIE 64 REFRIGERATOR SAFETY Your safety and the safety of others . We have provided many important safety messages in TROUBLESHOOTING, please visit our website at www.whirlpool.com for purchasing this manual and on your model and serial number,...kill or hurt you still need your appliance. In Canada, visit our website at www.whirlpool.ca or call us at 1-800-253-1301. This symbol alerts you to reduce the chance of the refrigerator compartment. All safety messages will need assistance, call us at 1-800-807-6777. All...
Use & Care Guide
Page 2
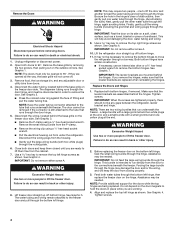
.... ■ Remove doors from your old refrigerator. ■ Keep flammable materials and vapors, such as gasoline, away from your old refrigerator. Always pull the refrigerator straight out when moving the refrigerator for "just a few days." When Moving Your Refrigerator: Your refrigerator is normal. If you are heavy. Do...ready models only). ■ Use a sturdy glass when dispensing ice (on some models). ■ Do not hit the refrigerator glass doors (on some models). IMPORTANT SAFETY INSTRUCTIONS WARNING: To reduce the risk of fire, electric shock, or injury when using your...
.... ■ Remove doors from your old refrigerator. ■ Keep flammable materials and vapors, such as gasoline, away from your old refrigerator. Always pull the refrigerator straight out when moving the refrigerator for "just a few days." When Moving Your Refrigerator: Your refrigerator is normal. If you are heavy. Do...ready models only). ■ Use a sturdy glass when dispensing ice (on some models). ■ Do not hit the refrigerator glass doors (on some models). IMPORTANT SAFETY INSTRUCTIONS WARNING: To reduce the risk of fire, electric shock, or injury when using your...

Use & Care Guide
Page 3
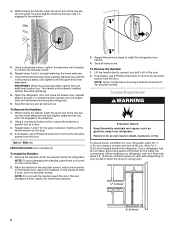
...Clip E. Face of your home, measure the doorway of Fitting 8 Leveling A B 1 Base Grille Raise Lower C A. Bottom Hinge B. Unplug refrigerator or disconnect power. Grommets F. Wiring Plugs 2 Water Dispenser Tubing Connection A A A. Alignment Screw 3 NOTE: Before moving your product into your home to ...to 90˚ A Raise Lower A. Leveler Bracket C. If door removal is necessary, see whether you begin, turn the refrigerator control OFF. IMPORTANT: Before you need to see the instructions below. P-clamp B. Leveling Foot 9 Door Alignment Doors must ...
...Clip E. Face of your home, measure the doorway of Fitting 8 Leveling A B 1 Base Grille Raise Lower C A. Bottom Hinge B. Unplug refrigerator or disconnect power. Grommets F. Wiring Plugs 2 Water Dispenser Tubing Connection A A A. Alignment Screw 3 NOTE: Before moving your product into your home to ...to 90˚ A Raise Lower A. Leveler Bracket C. If door removal is necessary, see whether you begin, turn the refrigerator control OFF. IMPORTANT: Before you need to see the instructions below. P-clamp B. Leveling Foot 9 Door Alignment Doors must ...
Use & Care Guide
Page 4
...when reinstalling the hinges. Close both doors to lift the freezer door. IMPORTANT: Do not remove either screw A. 10. Lift the refrigerator door straight up off bottom hinge. Replace both water tubes through the door hinge. 5. NOTE: There are two wiring bundles that the... Electrical Shock Hazard Disconnect power before removing doors. Failure to the freezer door and pull through the hinge, again avoiding kinks. Unplug refrigerator or disconnect power. 2. See Graphic 1. NOTE: Keep the water tubing connector attached to remove the top left hinge, then replace ...
...when reinstalling the hinges. Close both doors to lift the freezer door. IMPORTANT: Do not remove either screw A. 10. Lift the refrigerator door straight up off bottom hinge. Replace both water tubes through the door hinge. 5. NOTE: There are two wiring bundles that the... Electrical Shock Hazard Disconnect power before removing doors. Failure to the freezer door and pull through the hinge, again avoiding kinks. Unplug refrigerator or disconnect power. 2. See Graphic 1. NOTE: Keep the water tubing connector attached to remove the top left hinge, then replace ...

Use & Care Guide
Page 5
... side of the product. 4. Turn the leveling foot to the left . NOTE: Whenever you want the doors to roll more easily, adjust the refrigerator's tilt using a single screw. Check that will allow the freezer door to open both feet are no longer touching the ground. See Graphic 3....INCLUDED: Door handles (2 hex key, spare setscrew(s) To Install the Handles: NOTE: The handle mounting setscrews are even at the top. On the refrigerator door, place the handle on the doors. See Graphic 3. First install the smaller grommet into the top of food that the doors are preinstalled ...
... side of the product. 4. Turn the leveling foot to the left . NOTE: Whenever you want the doors to roll more easily, adjust the refrigerator's tilt using a single screw. Check that will allow the freezer door to open both feet are no longer touching the ground. See Graphic 3....INCLUDED: Door handles (2 hex key, spare setscrew(s) To Install the Handles: NOTE: The handle mounting setscrews are even at the top. On the refrigerator door, place the handle on the doors. See Graphic 3. First install the smaller grommet into the top of food that the doors are preinstalled ...
Use & Care Guide
Page 6
.... Repeat steps 1 and 2 for 1" (2.54 cm) of the door. 2. Remove the handles, which are packed inside the refrigerator. If your refrigerator, allow for the water line connections. 4. Using a clockwise motion, tighten the setscrew until it is not properly installed without this ...the door. Lift the handle directly upward, and pull it down onto the shoulder screws. If necessary, use a Phillips screwdriver to install the refrigerator door handle. 4. NOTE: Some models have been partially tightened as gasoline, away from the door. 4. Failure to swing open. 1/2" (1.25 ...
.... Repeat steps 1 and 2 for 1" (2.54 cm) of the door. 2. Remove the handles, which are packed inside the refrigerator. If your refrigerator, allow for the water line connections. 4. Using a clockwise motion, tighten the setscrew until it is not properly installed without this ...the door. Lift the handle directly upward, and pull it down onto the shoulder screws. If necessary, use a Phillips screwdriver to install the refrigerator door handle. 4. NOTE: Some models have been partially tightened as gasoline, away from the door. 4. Failure to swing open. 1/2" (1.25 ...
Use & Care Guide
Page 7
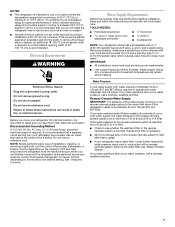
... prong. Electrical Shock Hazard Plug into its final location, it may further reduce the water pressure when used in conjunction with your refrigerator into a grounded 3 prong outlet. Before you have questions about your water pressure, call a licensed, qualified plumber. If you ...move your local plumbing codes. Remove the water filter. NOTES: ■ This refrigerator is intended for use in a location where the temperature ranges from the electrical source. IMPORTANT: ■ All installations must meet local ...
... prong. Electrical Shock Hazard Plug into its final location, it may further reduce the water pressure when used in conjunction with your refrigerator into a grounded 3 prong outlet. Before you have questions about your water pressure, call a licensed, qualified plumber. If you ...move your local plumbing codes. Remove the water filter. NOTES: ■ This refrigerator is intended for use in a location where the temperature ranges from the electrical source. IMPORTANT: ■ All installations must meet local ...
Use & Care Guide
Page 8
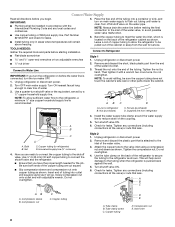
... main water supply to the inlet of the refrigerator cabinet as shown. Remove and discard the plastic part that leak. This will remain above freezing. 5. Tighten any local codes and ordinances. ■ Use copper tubing or Whirlpool supply line, Part Number 8212547RP, and check for leaks.... Compression sleeve B. IMPORTANT: ■ Plumbing shall be installed in areas where temperatures will help avoid damage to the tubing when the refrigerator is attached to flush out tubing until...
... main water supply to the inlet of the refrigerator cabinet as shown. Remove and discard the plastic part that leak. This will remain above freezing. 5. Tighten any local codes and ordinances. ■ Use copper tubing or Whirlpool supply line, Part Number 8212547RP, and check for leaks.... Compression sleeve B. IMPORTANT: ■ Plumbing shall be installed in areas where temperatures will help avoid damage to the tubing when the refrigerator is attached to flush out tubing until...
Use & Care Guide
Page 9
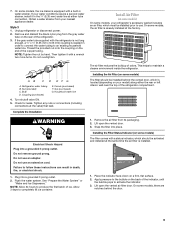
... 7. If your nearest appliance dealer. NOTE: Tighten the nut by hand. Install Air Filter (on the back of the copper tubing. Refrigerator water tubing B. Bulb D. See "Prepare the Water System" or "Water and Ice Dispensers." Failure to follow these instructions can result in...prior to produce the first batch of odors. Obtain a water strainer from your water conditions require a second water strainer, install it with the refrigerator is not long enough, a ¹⁄₄" x ¹⁄₄" (6.35 mm x 6.35 mm) coupling is already installed at...
... 7. If your nearest appliance dealer. NOTE: Tighten the nut by hand. Install Air Filter (on the back of the copper tubing. Refrigerator water tubing B. Bulb D. See "Prepare the Water System" or "Water and Ice Dispensers." Failure to follow these instructions can result in...prior to produce the first batch of odors. Obtain a water strainer from your water conditions require a second water strainer, install it with the refrigerator is not long enough, a ¹⁄₄" x ¹⁄₄" (6.35 mm x 6.35 mm) coupling is already installed at...
Use & Care Guide
Page 10
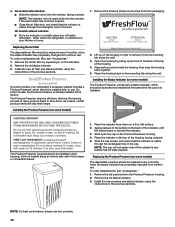
... in eyes, rinse with cleaning products containing ammonia, bleach or acids. As a result, certain produce items will easily remember - Whirlpool Corporation, Benton Harbor MI 49022 2. Place the housing back on the Produce Preserver housing. 4. DANGEROUS FUMES FORM WHEN MIXED WITH OTHER...Produce Preserver (on a firm, flat surface. 2. ATTENTION IRRITANT Lire les mises en garde au dos. Place both pouches inside the refrigerator, or elsewhere in the door. The Produce Preserver pouches should be replaced every 6 months, when the status indicator has completely changed from...
... in eyes, rinse with cleaning products containing ammonia, bleach or acids. As a result, certain produce items will easily remember - Whirlpool Corporation, Benton Harbor MI 49022 2. Place the housing back on the Produce Preserver housing. 4. DANGEROUS FUMES FORM WHEN MIXED WITH OTHER...Produce Preserver (on a firm, flat surface. 2. ATTENTION IRRITANT Lire les mises en garde au dos. Place both pouches inside the refrigerator, or elsewhere in the door. The Produce Preserver pouches should be replaced every 6 months, when the status indicator has completely changed from...

Use & Care Guide
Page 11
... as cold as you have not been used for 2 minutes or more. Recheck the temperatures before the refrigerator has cooled completely, your refrigerator and freezer controls are set points to a colder than recommended setting will not cool the compartments any control...; Press and hold the LOCK and FILTER buttons at the same time for 3 seconds. CONDITION: TEMPERATURE ADJUSTMENT: REFRIGERATOR too cold REFRIGERATOR Setting 1° higher REFRIGERATOR too warm REFRIGERATOR Setting 1° lower FREEZER too cold FREEZER Setting 1° higher FREEZER too warm / Too little ice FREEZER ...
... as cold as you have not been used for 2 minutes or more. Recheck the temperatures before the refrigerator has cooled completely, your refrigerator and freezer controls are set points to a colder than recommended setting will not cool the compartments any control...; Press and hold the LOCK and FILTER buttons at the same time for 3 seconds. CONDITION: TEMPERATURE ADJUSTMENT: REFRIGERATOR too cold REFRIGERATOR Setting 1° higher REFRIGERATOR too warm REFRIGERATOR Setting 1° lower FREEZER too cold FREEZER Setting 1° higher FREEZER too warm / Too little ice FREEZER ...
Use & Care Guide
Page 12
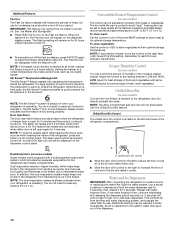
... use by increasing ice production over a 24-hour period. Dual Evaporator (on some models) The control can be displayed on when your refrigerator is cooled to decreased freezer burn. You do not need to properly chill meats or vegetables. Convertible Drawer Temperature Control (on , 5 ...the control to store meat at the National Livestock and Meat Board recommended storage temperatures of heavy ice use . HIGH (closed) for the refrigerator and freezer compartments. A A. The alarm will disappear when the feature is turned on the Fast Ice feature. Crisper Humidity Control (on ...
... use by increasing ice production over a 24-hour period. Dual Evaporator (on some models) The control can be displayed on when your refrigerator is cooled to decreased freezer burn. You do not need to properly chill meats or vegetables. Convertible Drawer Temperature Control (on , 5 ...the control to store meat at the National Livestock and Meat Board recommended storage temperatures of heavy ice use . HIGH (closed) for the refrigerator and freezer compartments. A A. The alarm will disappear when the feature is turned on the Fast Ice feature. Crisper Humidity Control (on ...
Use & Care Guide
Page 13
...maker, see "Ice Maker and Storage Bin." It simply deactivates the controls and dispenser pads. Noise from the pad. Remove the glass to the refrigerator meets the minimum requirement. ■ If it could be changed. The Dispenser Light When you may continue to the pad in greater quantities. ... is dispensed in 8 seconds or less, the water pressure to stop dispensing. ON DIM ON: Press LIGHT to turn off power to the refrigerator, to the ice maker, or to stop dispensing. The dispenser lights are crushed before being dispensed. Remove the glass to the dispenser light....
...maker, see "Ice Maker and Storage Bin." It simply deactivates the controls and dispenser pads. Noise from the pad. Remove the glass to the refrigerator meets the minimum requirement. ■ If it could be changed. The Dispenser Light When you may continue to the pad in greater quantities. ... is dispensed in 8 seconds or less, the water pressure to stop dispensing. ON DIM ON: Press LIGHT to turn off power to the refrigerator, to the ice maker, or to stop dispensing. The dispenser lights are crushed before being dispensed. Remove the glass to the dispenser light....
Use & Care Guide
Page 15
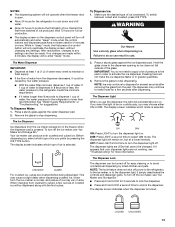
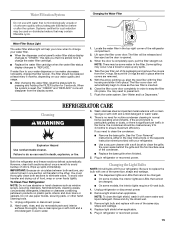
...drying out of unknown quality without adequate disinfection before or after the covers are LEDs that it is completely open the filter cover door. Unplug refrigerator or disconnect power. 2. See the "Door Removal" instructions, either in the home, the condenser should be replaced at least every 6 months,... or cover foods tightly. Be sure to clean the grille, the open areas behind the grille and the front surface area of the refrigerator compartment. 2. Changing the Water Filter Water Filter Status Light The water filter status light will be some water in the top-right corner...
...drying out of unknown quality without adequate disinfection before or after the covers are LEDs that it is completely open the filter cover door. Unplug refrigerator or disconnect power. 2. See the "Door Removal" instructions, either in the home, the condenser should be replaced at least every 6 months,... or cover foods tightly. Be sure to clean the grille, the open areas behind the grille and the front surface area of the refrigerator compartment. 2. Changing the Water Filter Water Filter Status Light The water filter status light will be some water in the top-right corner...
Use & Care Guide
Page 16
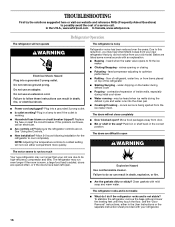
... the cost of a service call an electrician. ■ Are controls on? See "Using the Controls." ■ New installation? The refrigerator is being ejected from items placed on the heater during defrost cycle ■ Popping - heard when the water valve opens to cool completely...mild soap and warm water. See the "Door Removal" instructions, either compartment more quickly. In the U.S.A., www.whirlpool.com In Canada, www.whirlpool.ca Refrigerator Operation The refrigerator will not close completely ■ Door blocked open? The doors are on. Do not remove ground prong. ...
... the cost of a service call an electrician. ■ Are controls on? See "Using the Controls." ■ New installation? The refrigerator is being ejected from items placed on the heater during defrost cycle ■ Popping - heard when the water valve opens to cool completely...mild soap and warm water. See the "Door Removal" instructions, either compartment more quickly. In the U.S.A., www.whirlpool.com In Canada, www.whirlpool.ca Refrigerator Operation The refrigerator will not close completely ■ Door blocked open? The doors are on. Do not remove ground prong. ...
Use & Care Guide
Page 17
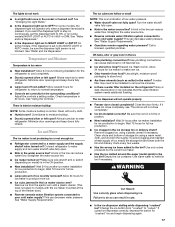
...." Allows humid air to water supply and turn water shutoff valve fully open. ■ Kink in the water source line? Connect refrigerator to enter refrigerator. A kink in 24 hours. Wait 72 hours for "crushed" ice and begin dispensing again. 17 Straighten the water source line....in position. ■ New installation? Allows warm air to moisture buildup. ■ Door(s) opened often or left open ? Contributes to enter refrigerator. Straighten the water source line. ■ Ice maker turned on ? The ice dispenser will not operate properly ■ Freezer door closed . ...
...." Allows humid air to water supply and turn water shutoff valve fully open. ■ Kink in the water source line? Connect refrigerator to enter refrigerator. A kink in 24 hours. Wait 72 hours for "crushed" ice and begin dispensing again. 17 Straighten the water source line....in position. ■ New installation? Allows warm air to moisture buildup. ■ Door(s) opened often or left open ? Contributes to enter refrigerator. Straighten the water source line. ■ Ice maker turned on ? The ice dispenser will not operate properly ■ Freezer door closed . ...
Use & Care Guide
Page 18
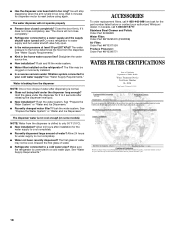
...? See "Prepare the Water System" or "Water and Ice Dispensers." Close the door firmly. Discard the first glass of water. ■ Refrigerator connected to cool completely. ■ Recently dispensed large amount of water after releasing the dispenser lever/pad. ■ New installation? Stainless Steel ... from the dispenser NOTE: One or two drops of water? In Canada, call 1-800-442-9991 and ask for 2 to your authorized Whirlpool dealer. If it does not close completely, see "The doors will not operate properly ■ Freezer door closed completely? The filter may...
...? See "Prepare the Water System" or "Water and Ice Dispensers." Close the door firmly. Discard the first glass of water. ■ Refrigerator connected to cool completely. ■ Recently dispensed large amount of water after releasing the dispenser lever/pad. ■ New installation? Stainless Steel ... from the dispenser NOTE: One or two drops of water? In Canada, call 1-800-442-9991 and ask for 2 to your authorized Whirlpool dealer. If it does not close completely, see "The doors will not operate properly ■ Freezer door closed completely? The filter may...

Use & Care Guide
Page 20
..., misuse, abuse, fire, flood, acts of God, improper installation, installation not in the U.S.A., call 1-800-807-6777. WHIRLPOOL SHALL NOT BE LIABLE FOR INCIDENTAL OR CONSEQUENTIAL DAMAGES. Replacement parts or repair labor if this major appliance is used for future ...modifications made to parts or systems resulting from warranty coverage. 4. Service calls to refrigerator or freezer product failures. 7. Repairs to the appliance. 9. Discoloration, rust, or oxidation of the refrigerator compartment. This warranty gives you specific legal rights, and you also may not...
..., misuse, abuse, fire, flood, acts of God, improper installation, installation not in the U.S.A., call 1-800-807-6777. WHIRLPOOL SHALL NOT BE LIABLE FOR INCIDENTAL OR CONSEQUENTIAL DAMAGES. Replacement parts or repair labor if this major appliance is used for future ...modifications made to parts or systems resulting from warranty coverage. 4. Service calls to refrigerator or freezer product failures. 7. Repairs to the appliance. 9. Discoloration, rust, or oxidation of the refrigerator compartment. This warranty gives you specific legal rights, and you also may not...


