
Dimension Guide
Page 1
... cm) (90.01 cm) (129.22 cm) 1/2" (1.25 cm) 2" (5.08 cm) To ensure proper ventilation for your refrigerator, allow for the water dispenser and ice maker. Because Whirlpool Corporation policy includes a continuous commitment to improve Dimensions are finished, reconnect the refrigerator to the electrical source and reset the control (Thermostat, Refrigerator or Freezer...
... cm) (90.01 cm) (129.22 cm) 1/2" (1.25 cm) 2" (5.08 cm) To ensure proper ventilation for your refrigerator, allow for the water dispenser and ice maker. Because Whirlpool Corporation policy includes a continuous commitment to improve Dimensions are finished, reconnect the refrigerator to the electrical source and reset the control (Thermostat, Refrigerator or Freezer...
Use & Care Guide
Page 2
... materials. Do not use an extension cord. ■ Disconnect power before servicing. ■ Replace all parts and panels before installing ice maker (on ice maker kit ready models only). ■ Use a sturdy glass when dispensing ice (on some models). ■ Do not hit the refrigerator glass doors (on some models). For more information, see "Refrigerator...
... materials. Do not use an extension cord. ■ Disconnect power before servicing. ■ Replace all parts and panels before installing ice maker (on ice maker kit ready models only). ■ Use a sturdy glass when dispensing ice (on some models). ■ Do not hit the refrigerator glass doors (on some models). For more information, see "Refrigerator...
Use & Care Guide
Page 6
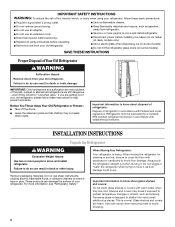
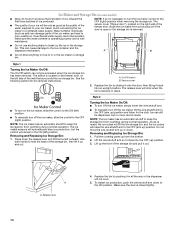
... and lower setscrews. Repeat steps 2 through 7 to slide it is engaged in death, explosion, or fire. Style 2 - Apply firm pressure on your refrigerator has an ice maker, allow for 1" (2.54 cm) of space behind the refrigerator. this extra tightening. 8. To Remove the Handles: 1. While holding the handle, insert the short end of...
... and lower setscrews. Repeat steps 2 through 7 to slide it is engaged in death, explosion, or fire. Style 2 - Apply firm pressure on your refrigerator has an ice maker, allow for 1" (2.54 cm) of space behind the refrigerator. this extra tightening. 8. To Remove the Handles: 1. While holding the handle, insert the short end of...
Use & Care Guide
Page 7
... 54" (137.16 cm) is required. Use an outlet that you have questions about your local plumbing codes. Failure to operate the water dispenser and ice maker. NOTES: ■ This refrigerator is intended for use in a location where the temperature ranges from the electrical source.
... 54" (137.16 cm) is required. Use an outlet that you have questions about your local plumbing codes. Failure to operate the water dispenser and ice maker. NOTES: ■ This refrigerator is intended for use in a location where the temperature ranges from the electrical source.
Use & Care Guide
Page 8
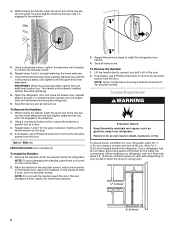
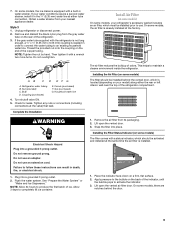
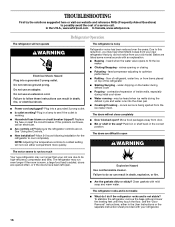
...9632; Install tubing only in accordance with the International Plumbing Code and any local codes and ordinances. ■ Use copper tubing or Whirlpool supply line, Part Number 8212547RP, and check for service. Copper tubing (to Refrigerator ■ Flat-blade screwdriver and ¹⁄₂.... 5. Bend the copper tubing to the refrigerator as shown. Thread the nut onto the end of water. 3. Use a quarter-turn the ice maker OFF. 1. Nut C. Household supply line (½" minimum) 4. Tighten the compression nut. This will help avoid damage to Water Line IMPORTANT:...
...9632; Install tubing only in accordance with the International Plumbing Code and any local codes and ordinances. ■ Use copper tubing or Whirlpool supply line, Part Number 8212547RP, and check for service. Copper tubing (to Refrigerator ■ Flat-blade screwdriver and ¹⁄₂.... 5. Bend the copper tubing to the refrigerator as shown. Thread the nut onto the end of water. 3. Use a quarter-turn the ice maker OFF. 1. Nut C. Household supply line (½" minimum) 4. Tighten the compression nut. This will help avoid damage to Water Line IMPORTANT:...
Use & Care Guide
Page 9
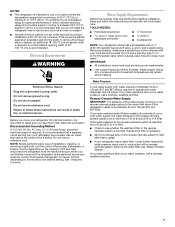
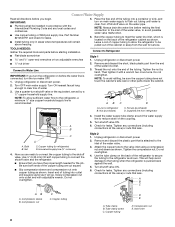
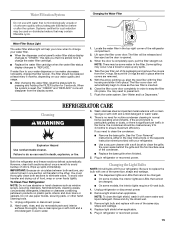
7. NOTE: Tighten the nut by hand. On some models, the ice maker is equipped with the refrigerator is not long enough, a ¹⁄&#... an adapter. Plug into a grounded 3 prong outlet. See "Prepare the Water System" or "Water and Ice Dispensers." Place the indicator face-down on some models) On some models, there are notches behind the vented door...nuts or connections (including connections at the factory. NOTE: Allow 24 hours to use. This helps to completely fill ice container. Lift open the vented air filter door. Obtain a water strainer from its packaging. 2. Style 3 1. ...
7. NOTE: Tighten the nut by hand. On some models, the ice maker is equipped with the refrigerator is not long enough, a ¹⁄&#... an adapter. Plug into a grounded 3 prong outlet. See "Prepare the Water System" or "Water and Ice Dispensers." Place the indicator face-down on some models) On some models, there are notches behind the vented door...nuts or connections (including connections at the factory. NOTE: Allow 24 hours to use. This helps to completely fill ice container. Lift open the vented air filter door. Obtain a water strainer from its packaging. 2. Style 3 1. ...
Use & Care Guide
Page 12
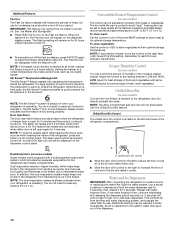
...; Slide the door chill control to the left to reduce the flow of cold air to the bin and make it . See "Ice Maker and Storage Bin." ■ Press FAST ICE to the bin and make it for 5 minutes. If a large quantity of warm food is placed in some models) Cool air from... spoiling as quickly and improves food quality and freshness in the freezer. The 6th Sense™ icon on . IMPORTANT: This feature only works if the ice maker is turned on the dispenser display screen indicates that the feature is directed to activate it colder. Door Ajar Alarm The Door Ajar Alarm feature...
...; Slide the door chill control to the left to reduce the flow of cold air to the bin and make it . See "Ice Maker and Storage Bin." ■ Press FAST ICE to the bin and make it for 5 minutes. If a large quantity of warm food is placed in some models) Cool air from... spoiling as quickly and improves food quality and freshness in the freezer. The 6th Sense™ icon on . IMPORTANT: This feature only works if the ice maker is turned on the dispenser display screen indicates that the feature is directed to activate it colder. Door Ajar Alarm The Door Ajar Alarm feature...
Use & Care Guide
Page 13
.... When changing from the pad. Failure to stop dispensing. The dispenser light will remain on the dispenser control panel will turn off the ice maker, see "Ice Maker and Storage Bin." ■ Press and hold LOCK for 3 seconds to lock the dispenser. ■ Press and hold LOCK a second..." mode, the first press of a control button will automatically turn the dispenser light off power to the refrigerator, to the ice maker, or to turn off the ice maker, see "Troubleshooting" for more . It simply deactivates the controls and dispenser pads. To turn the dispenser light on . While...
.... When changing from the pad. Failure to stop dispensing. The dispenser light will remain on the dispenser control panel will turn off the ice maker, see "Ice Maker and Storage Bin." ■ Press and hold LOCK for 3 seconds to lock the dispenser. ■ Press and hold LOCK a second..." mode, the first press of a control button will automatically turn the dispenser light off power to the refrigerator, to the ice maker, or to turn off the ice maker, see "Troubleshooting" for more . It simply deactivates the controls and dispenser pads. To turn the dispenser light on . While...
Use & Care Guide
Page 14
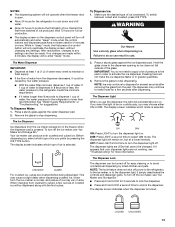
... the storage bin and pull it clicks into an upright position. Water softener chemicals (such as the quality of the freezer door, stops the ice maker from overfilling during normal operation. NOTE: It is well maintained. The sensor cover ("flipper door"), located on the right wall of the water ... will be avoided, make sure the water softener is operating properly and is not necessary to turn the ice maker control to hold the base of the ice maker and lead to the ice container and the dispenser mechanism. Replace the bin by sliding it onto the door, then tilting it back...
... the storage bin and pull it clicks into an upright position. Water softener chemicals (such as the quality of the freezer door, stops the ice maker from overfilling during normal operation. NOTE: It is well maintained. The sensor cover ("flipper door"), located on the right wall of the water ... will be avoided, make sure the water softener is operating properly and is not necessary to turn the ice maker control to hold the base of the ice maker and lead to the ice container and the dispenser mechanism. Replace the bin by sliding it onto the door, then tilting it back...
Use & Care Guide
Page 15
...FILTER button for 3 seconds. Close the filter cover door completely in normal home operating environments. Flush the water system. See "Water and Ice Dispensers." Wipe up any odors formed in the filter. Changing the Light Bulbs NOTE: Not all bulbs will transfer to your refrigerator. &#... of its packaging and remove the covers from the display screen. 1. Remove light bulb and replace with your water dispenser or ice maker decreases noticeably, change the water filter cartridge. ■ Replace the water filter cartridge when the water filter status display changes to ensure...
...FILTER button for 3 seconds. Close the filter cover door completely in normal home operating environments. Flush the water system. See "Water and Ice Dispensers." Wipe up any odors formed in the filter. Changing the Light Bulbs NOTE: Not all bulbs will transfer to your refrigerator. &#... of its packaging and remove the covers from the display screen. 1. Remove light bulb and replace with your water dispenser or ice maker decreases noticeably, change the water filter cartridge. ■ Replace the water filter cartridge when the water filter status display changes to ensure...
Use & Care Guide
Page 16
...3 prong outlet. ■ Is outlet working . ■ Household fuse blown or circuit breaker tripped? fans/compressor adjusting to fill the ice maker ■ Clicking/Snapping - heard when the water valve opens to optimize performance ■ Rattling - flow of refrigerant, water line, or...refrigerator that you did not notice from the ice maker mold. See the "Door Removal" instructions, either compartment more quickly. Do not use an extension cord. In the U.S.A., www.whirlpool.com In Canada, www.whirlpool.ca Refrigerator Operation The refrigerator will not ...
...3 prong outlet. ■ Is outlet working . ■ Household fuse blown or circuit breaker tripped? fans/compressor adjusting to fill the ice maker ■ Clicking/Snapping - heard when the water valve opens to optimize performance ■ Rattling - flow of refrigerant, water line, or...refrigerator that you did not notice from the ice maker mold. See the "Door Removal" instructions, either compartment more quickly. Do not use an extension cord. In the U.S.A., www.whirlpool.com In Canada, www.whirlpool.ca Refrigerator Operation The refrigerator will not ...
Use & Care Guide
Page 17
...lights do so can result in cuts. ■ Is the ice dispenser stalling while dispensing "crushed" ice? See "Water and Ice Dispensers." See "Using the Controls." Allows humid air to produce more ice. ■ Ice cube jammed in the ice maker ejector arm? Close the door firmly. Failure to NIGHT LIGHT or... if the dispenser is not blocked. On some models) NIGHT LIGHT or AUTO or HALF or DIM. Straighten the water source line. ■ Ice maker turned on ? Turn the water shutoff valve fully open ? Allows warm air to store food. ■ Are there minerals (such as sulfur...
...lights do so can result in cuts. ■ Is the ice dispenser stalling while dispensing "crushed" ice? See "Water and Ice Dispensers." See "Using the Controls." Allows humid air to produce more ice. ■ Ice cube jammed in the ice maker ejector arm? Close the door firmly. Failure to NIGHT LIGHT or... if the dispenser is not blocked. On some models) NIGHT LIGHT or AUTO or HALF or DIM. Straighten the water source line. ■ Ice maker turned on ? Turn the water shutoff valve fully open ? Allows warm air to store food. ■ Are there minerals (such as sulfur...


