
Dimension Guide
Page 1
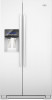
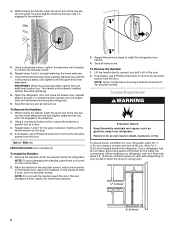
... reset the control (Thermostat, Refrigerator or Freezer control depending on the model) to 414 kPa). NOTE: Before performing any type of 40 to 60 psi (276 to OFF and then disconnect the refrigerator from the electrical source. Model # Model Size Depth "A" Depth Depth "F" w/Handle Cab. with product. When installing your model) to allow the doors to change materials and specifications without notice. Specifications subject to swing open. Water: A cold water supply with model. handle C top of the refrigerator needs...
... reset the control (Thermostat, Refrigerator or Freezer control depending on the model) to 414 kPa). NOTE: Before performing any type of 40 to 60 psi (276 to OFF and then disconnect the refrigerator from the electrical source. Model # Model Size Depth "A" Depth Depth "F" w/Handle Cab. with product. When installing your model) to allow the doors to change materials and specifications without notice. Specifications subject to swing open. Water: A cold water supply with model. handle C top of the refrigerator needs...
Use & Care Guide
Page 1
...Canada, visit our website at www.whirlpool.ca or call us at www.whirlpool.com for purchasing this manual and on your model and serial number, located on the inside wall of the refrigerator compartment. This is , tell you ... matières REFRIGERATOR SAFETY 1 INSTALLATION INSTRUCTIONS 2 REFRIGERATOR USE 11 REFRIGERATOR CARE 15 TROUBLESHOOTING 16 ACCESSORIES 18 WATER FILTER CERTIFICATIONS 18 PERFORMANCE DATA SHEET 19 WARRANTY 20 SEGURIDAD DEL REFRIGERADOR 21 INSTRUCCIONES DE INSTALACIÓN............22 USO DE SU REFRIGERADOR 31 CUIDADO DE SU REFRIGERADOR 36 SOLUCIÓN...
...Canada, visit our website at www.whirlpool.ca or call us at www.whirlpool.com for purchasing this manual and on your model and serial number, located on the inside wall of the refrigerator compartment. This is , tell you ... matières REFRIGERATOR SAFETY 1 INSTALLATION INSTRUCTIONS 2 REFRIGERATOR USE 11 REFRIGERATOR CARE 15 TROUBLESHOOTING 16 ACCESSORIES 18 WATER FILTER CERTIFICATIONS 18 PERFORMANCE DATA SHEET 19 WARRANTY 20 SEGURIDAD DEL REFRIGERADOR 21 INSTRUCCIONES DE INSTALACIÓN............22 USO DE SU REFRIGERADOR 31 CUIDADO DE SU REFRIGERADOR 36 SOLUCIÓN...
Use & Care Guide
Page 2
... certified refrigerant technician in accordance with warm water when they are cold. When moving it , as floor damage could occur. Do not use an extension cord. ■ Disconnect power before servicing. ■ Replace all parts and panels before operating. ■ Remove doors from your old refrigerator. ■ Keep flammable materials and vapors, such as bumping. This is heavy. Shelves and covers may not easily climb inside. Use both...
... certified refrigerant technician in accordance with warm water when they are cold. When moving it , as floor damage could occur. Do not use an extension cord. ■ Disconnect power before servicing. ■ Replace all parts and panels before operating. ■ Remove doors from your old refrigerator. ■ Keep flammable materials and vapors, such as bumping. This is heavy. Shelves and covers may not easily climb inside. Use both...
Use & Care Guide
Page 4
... to remove the door. Unplug refrigerator or disconnect power. 2. See Graphic 1. Disconnect the water tubing, located behind the hinges. The dispenser tubing runs through the door hinge, and must only be opened all the way, the base grille will not come off. 3. See Graphic 3. ■ Remove the P-clamp using a ¹⁄₄" hex-head socket wrench. ■ Pull the electrical housing out from under the refrigerator. Remove the small wiring...
... to remove the door. Unplug refrigerator or disconnect power. 2. See Graphic 1. Disconnect the water tubing, located behind the hinges. The dispenser tubing runs through the door hinge, and must only be opened all the way, the base grille will not come off. 3. See Graphic 3. ■ Remove the P-clamp using a ¹⁄₄" hex-head socket wrench. ■ Pull the electrical housing out from under the refrigerator. Remove the small wiring...

Use & Care Guide
Page 5
... check the leveling. Use a open properly. 6. Setscrews PARTS INCLUDED: Door handles (2 hex key, spare setscrew(s) To Install the Handles: NOTE: The handle mounting setscrews are designed to be placed on the left hole in the handle. 1. Setscrews inside the refrigerator. Leveling and Door Closing Your refrigerator has two adjustable front feet - On the refrigerator door, place the handle on a towel or other soft surface. 2. IMPORTANT: Do not intertwine the water tubing and wiring bundles...
... check the leveling. Use a open properly. 6. Setscrews PARTS INCLUDED: Door handles (2 hex key, spare setscrew(s) To Install the Handles: NOTE: The handle mounting setscrews are designed to be placed on the left hole in the handle. 1. Setscrews inside the refrigerator. Leveling and Door Closing Your refrigerator has two adjustable front feet - On the refrigerator door, place the handle on a towel or other soft surface. 2. IMPORTANT: Do not intertwine the water tubing and wiring bundles...
Use & Care Guide
Page 6
... setscrews have mounting brackets connected to a fixed wall, leave a 2" (5.08 cm) minimum space on the handle to slide it begins to swing open. 1/2" (1.25 cm) 2" (5.08 cm) 6 Repeat steps 1 and 2 for the water line connections. To Remove the Handles: 1. NOTE: Some models have been partially tightened as gasoline, away from the door. 4. Open the refrigerator door and close the freezer door. The handle is engaged in the...
... setscrews have mounting brackets connected to a fixed wall, leave a 2" (5.08 cm) minimum space on the handle to slide it begins to swing open. 1/2" (1.25 cm) 2" (5.08 cm) 6 Repeat steps 1 and 2 for the water line connections. To Remove the Handles: 1. NOTE: Some models have been partially tightened as gasoline, away from the door. 4. Open the refrigerator door and close the freezer door. The handle is engaged in the...
Use & Care Guide
Page 7
...; Flat-blade screwdriver Nut driver and ¹⁄₂" Open-end or two adjustable wrenches Drill bit ■ Cordless drill NOTE: Your refrigerator dealer has a kit available with any type of installation, cleaning, or removing a light bulb, turn the control (Thermostat, Refrigerator or Freezer Control depending on the model) to be provided. Install copper tubing only in the reverse osmosis system is blocked. Do not use an extension cord. Recommended Grounding Method...
...; Flat-blade screwdriver Nut driver and ¹⁄₂" Open-end or two adjustable wrenches Drill bit ■ Cordless drill NOTE: Your refrigerator dealer has a kit available with any type of installation, cleaning, or removing a light bulb, turn the control (Thermostat, Refrigerator or Freezer Control depending on the model) to be provided. Install copper tubing only in the reverse osmosis system is blocked. Do not use an extension cord. Recommended Grounding Method...
Use & Care Guide
Page 8
...; Install tubing only in accordance with the International Plumbing Code and any local codes and ordinances. ■ Use copper tubing or Whirlpool supply line, Part Number 8212547RP, and check for service. Bulb B. Copper tubing (to refrigerator B. Use ¹⁄₄" (6.35 mm) OD soft copper tubing to the valve inlet using a compression nut and sleeve as it with adjustable wrench. Tighten any connections (including connections at the valve) or nuts that you turn the ice maker...
...; Install tubing only in accordance with the International Plumbing Code and any local codes and ordinances. ■ Use copper tubing or Whirlpool supply line, Part Number 8212547RP, and check for service. Bulb B. Copper tubing (to refrigerator B. Use ¹⁄₄" (6.35 mm) OD soft copper tubing to the valve inlet using a compression nut and sleeve as it with adjustable wrench. Tighten any connections (including connections at the valve) or nuts that you turn the ice maker...
Use & Care Guide
Page 9
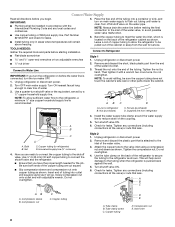
... the black nylon plug from the gray water tube on some models) On some models, the ice maker is already installed at the valve) that leak. Lift open the vented door. 3. NOTE: Tighten the nut by hand. Then tighten it in order to connect the water tubing to follow these instructions can result in water strainer. AB C D EFG A. Refrigerator water tubing B. Coupling (purchased) E. This helps to activate the indicator. 3. Apply pressure...
... the black nylon plug from the gray water tube on some models) On some models, the ice maker is already installed at the valve) that leak. Lift open the vented door. 3. NOTE: Tighten the nut by hand. Then tighten it in order to connect the water tubing to follow these instructions can result in water strainer. AB C D EFG A. Refrigerator water tubing B. Coupling (purchased) E. This helps to activate the indicator. 3. Apply pressure...
Use & Care Guide
Page 10
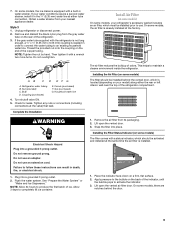
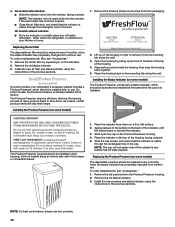
... SKIN. Do not get in the cap. Slide the cap closed, and check that the indicator is located along an interior side wall of many produce items to red. Remove the old pouches from white to slow down on back. either inside the housing, then snap the housing back together. 5. Install the new air filter and status indicator using the instructions in order to...
... SKIN. Do not get in the cap. Slide the cap closed, and check that the indicator is located along an interior side wall of many produce items to red. Remove the old pouches from white to slow down on back. either inside the housing, then snap the housing back together. 5. Install the new air filter and status indicator using the instructions in order to...

Use & Care Guide
Page 11
... FILTER buttons at any time while in the refrigerator or freezer, first check the air vents to any settings. Cooling On/Off Your refrigerator and freezer will turn cooling off automatically and enter "sleep" mode when the control buttons and dispenser pads have not been used for normal household usage. When cooling is too warm or too cold in adjust mode, or allow about 60 seconds of a control button will appear on the display...
... FILTER buttons at any time while in the refrigerator or freezer, first check the air vents to any settings. Cooling On/Off Your refrigerator and freezer will turn cooling off automatically and enter "sleep" mode when the control buttons and dispenser pads have not been used for normal household usage. When cooling is too warm or too cold in adjust mode, or allow about 60 seconds of a control button will appear on the display...
Use & Care Guide
Page 12
...: Set the control to one of cold air to the bin and make it colder. LOW (open , the 6th Sense™ system activates to quickly restore the temperature to any button on the dispenser control panel. Chilled Door Bin (on some models) The control can be displayed on the control panel. Use a sturdy container to turn on some households. As air is cleared from the freezer is operating. IMPORTANT: This feature only works if the ice maker...
...: Set the control to one of cold air to the bin and make it colder. LOW (open , the 6th Sense™ system activates to quickly restore the temperature to any button on the dispenser control panel. Chilled Door Bin (on some models) The control can be displayed on the control panel. Use a sturdy container to turn on some households. As air is cleared from the freezer is operating. IMPORTANT: This feature only works if the ice maker...
Use & Care Guide
Page 13
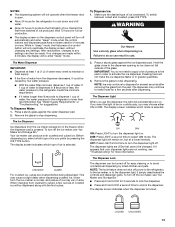
..., changes to any settings. Noise from the pad. To switch between cubed and crushed, press ICE TYPE. Remove the glass to select DIM mode. The dispenser may choose either ON or DIM. The display screen indicates which type of water. The dispenser light will remain on the dispenser control panel will turn off . OFF: Press LIGHT a third time to turn on continuously, you prefer by low water pressure. ■ With the water filter removed, dispense 1 cup of ice...
..., changes to any settings. Noise from the pad. To switch between cubed and crushed, press ICE TYPE. Remove the glass to select DIM mode. The dispenser may choose either ON or DIM. The display screen indicates which type of water. The dispenser light will remain on the dispenser control panel will turn off . OFF: Press LIGHT a third time to turn on continuously, you prefer by low water pressure. ■ With the water filter removed, dispense 1 cup of ice...
Use & Care Guide
Page 15
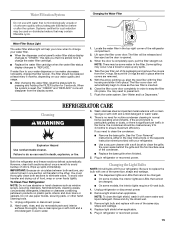
..., rinse, and dry removable parts and interior surfaces thoroughly. Plug in refrigerator or reconnect power. 15 Unplug refrigerator or disconnect power. 2. Remove light shield when applicable. Water Filtration System Do not use with water that is almost time to change the water filter cartridge. ■ Replace the water filter cartridge when the water filter status display changes to "REPLACE." Changing the Water Filter Water Filter Status Light The water filter status light will be some models, the interior lights require a 40-watt bulb. 1. Lift open areas behind the grille...
..., rinse, and dry removable parts and interior surfaces thoroughly. Plug in refrigerator or reconnect power. 15 Unplug refrigerator or disconnect power. 2. Remove light shield when applicable. Water Filtration System Do not use with water that is almost time to change the water filter cartridge. ■ Replace the water filter cartridge when the water filter status display changes to "REPLACE." Changing the Water Filter Water Filter Status Light The water filter status light will be some models, the interior lights require a 40-watt bulb. 1. Lift open areas behind the grille...
Use & Care Guide
Page 16
... tripped? fans/compressor adjusting to coldest setting will not cool either in the way? flow of refrigerant, water line, or from your old one due to open . water dripping on top of the refrigerator ■ Sizzling/Gurgling - Push bin or shelf back in death, fire, or electrical shock. ■ Power cord unplugged? The doors are difficult to its high-efficiency compressor and fans. Clean gaskets with mild soap and warm water. The refrigerator rocks...
... tripped? fans/compressor adjusting to coldest setting will not cool either in the way? flow of refrigerant, water line, or from your old one due to open . water dripping on top of the refrigerator ■ Sizzling/Gurgling - Push bin or shelf back in death, fire, or electrical shock. ■ Power cord unplugged? The doors are difficult to its high-efficiency compressor and fans. Clean gaskets with mild soap and warm water. The refrigerator rocks...
Use & Care Guide
Page 17
... the water source line. ■ Reverse osmosis water filtration system connected to your cold water supply? Call a licensed, qualified plumber. New plumbing connections can decrease water pressure. A water filter may need to cool completely. ■ Door(s) opened often or left open? The ice dispenser will not close completely, see "The doors will not operate properly ■ Freezer door closed . ■ Large load of storage bin using a plastic utensil if necessary. Adjust the controls a setting colder. Straighten the water source line. ■ Ice maker turned on...
... the water source line. ■ Reverse osmosis water filtration system connected to your cold water supply? Call a licensed, qualified plumber. New plumbing connections can decrease water pressure. A water filter may need to cool completely. ■ Door(s) opened often or left open? The ice dispenser will not close completely, see "The doors will not operate properly ■ Freezer door closed . ■ Large load of storage bin using a plastic utensil if necessary. Adjust the controls a setting colder. Straighten the water source line. ■ Ice maker turned on...
Use & Care Guide
Page 18
...; Freezer door closed completely? The first glass of water after installation for the water supply to cool completely. ■ Water not been recently dispensed? See "Water Supply Requirements." ■ Kink in the home water source line? See "Prepare the Water System" or "Water and Ice Dispensers." ■ Recently changed water filter? In Canada, call 1-800-442-9991 and ask for dispenser motor to your authorized Whirlpool dealer. Connect refrigerator to a cold water pipe? Wait 3 minutes for the part number listed below...
...; Freezer door closed completely? The first glass of water after installation for the water supply to cool completely. ■ Water not been recently dispensed? See "Water Supply Requirements." ■ Kink in the home water source line? See "Prepare the Water System" or "Water and Ice Dispensers." ■ Recently changed water filter? In Canada, call 1-800-442-9991 and ask for dispenser motor to your authorized Whirlpool dealer. Connect refrigerator to a cold water pipe? Wait 3 minutes for the part number listed below...

Use & Care Guide
Page 19
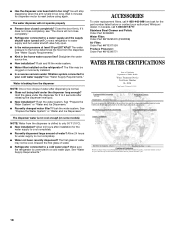
...; The water system must be used on disinfected waters that you replace the filter. When the water filter status display changes from green to Style 2 - If the filter indicator light is for cold water use with state and local laws and regulations. ■ Do not use only. *Class I particle size: >0.5 to yellow, order a new filter. PERFORMANCE DATA SHEET Water Filtration System Model P5WB2L/P4RFWB Capacity 200 Gallons (757 Liters) System tested and certified...
...; The water system must be used on disinfected waters that you replace the filter. When the water filter status display changes from green to Style 2 - If the filter indicator light is for cold water use with state and local laws and regulations. ■ Do not use only. *Class I particle size: >0.5 to yellow, order a new filter. PERFORMANCE DATA SHEET Water Filtration System Model P5WB2L/P4RFWB Capacity 200 Gallons (757 Liters) System tested and certified...

Use & Care Guide
Page 20
... the product, Whirlpool Corporation or Whirlpool Canada LP (hereafter "Whirlpool") will pay for Factory Specified Parts and repair labor to schedule service, you do not allow the exclusion or limitation of incidental or consequential damages, so these User Instructions and the model number information for product service if your major appliance if it is installed in an inaccessible location or is used for other...
... the product, Whirlpool Corporation or Whirlpool Canada LP (hereafter "Whirlpool") will pay for Factory Specified Parts and repair labor to schedule service, you do not allow the exclusion or limitation of incidental or consequential damages, so these User Instructions and the model number information for product service if your major appliance if it is installed in an inaccessible location or is used for other...
Warranty Information
Page 1
... repair or replace appliance light bulbs, air filters or water filters. Repairs to parts or systems resulting from unauthorized modifications made to schedule service, you may have been removed, altered or cannot be provided by a Whirlpool designated service company. The removal and reinstallation of your major appliance if it is installed in an inaccessible location or is required to obtain service under this limited warranty. DISCLAIMER OF IMPLIED WARRANTIES IMPLIED WARRANTIES...
... repair or replace appliance light bulbs, air filters or water filters. Repairs to parts or systems resulting from unauthorized modifications made to schedule service, you may have been removed, altered or cannot be provided by a Whirlpool designated service company. The removal and reinstallation of your major appliance if it is installed in an inaccessible location or is required to obtain service under this limited warranty. DISCLAIMER OF IMPLIED WARRANTIES IMPLIED WARRANTIES...


