Installation Instructions
Page 1
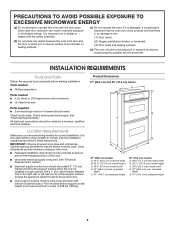
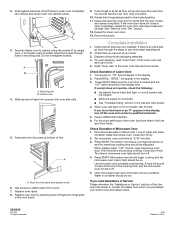
... electrical supply. Location Requirements Make sure you have everything needed s A UL listed or CSA approved conduit connector s UL listed wire nuts Parts supplied s 2 screws (single oven) or 4 screws (double oven) Check local codes. s Electrical supply junction box should be solid,... s Grounded electrical supply is damaged. It is important not to defeat or tamper with oven. See "Electrical Requirements." Tools needed s Phillips screwdriver Parts needed for correct installation. recessed depth E. 41" (104.1 cm) recessed height 30" (76.2 cm) models A. 28³⁄₈" (...
... electrical supply. Location Requirements Make sure you have everything needed s A UL listed or CSA approved conduit connector s UL listed wire nuts Parts supplied s 2 screws (single oven) or 4 screws (double oven) Check local codes. s Electrical supply junction box should be solid,... s Grounded electrical supply is damaged. It is important not to defeat or tamper with oven. See "Electrical Requirements." Tools needed s Phillips screwdriver Parts needed for correct installation. recessed depth E. 41" (104.1 cm) recessed height 30" (76.2 cm) models A. 28³⁄₈" (...
Installation Instructions
Page 2
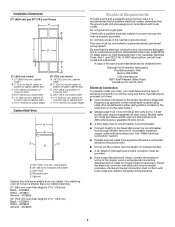
...-amp circuit. Aluminum/copper connection must conform with the National Electrical Code, ANSI/NFPA 70-latest edition or CSA Standards C22.1-94, Canadian Electrical Code, Part 1 and C22.2 No. Recessed oven E. cutout depth B. 23" (58.4 cm) recessed oven depth C. Cabinet Cabinet filler kits are adequate and in conformance with local codes...
...-amp circuit. Aluminum/copper connection must conform with the National Electrical Code, ANSI/NFPA 70-latest edition or CSA Standards C22.1-94, Canadian Electrical Code, Part 1 and C22.2 No. Recessed oven E. cutout depth B. 23" (58.4 cm) recessed oven depth C. Cabinet Cabinet filler kits are adequate and in conformance with local codes...
Installation Instructions
Page 3
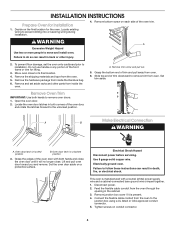
... conduit from oven. Tighten screws on each side of trim and pull away from the oven to do so can result in back or other parts from inside the literature bag. 6. Remove bottom screw on conduit connector. 4 Grasp the bottom end of the oven trim. This oven is present. 4. Remove junction...
... conduit from oven. Tighten screws on each side of trim and pull away from the oven to do so can result in back or other parts from inside the literature bag. 6. Remove bottom screw on conduit connector. 4 Grasp the bottom end of the oven trim. This oven is present. 4. Remove junction...
Installation Instructions
Page 5
...inside microwave oven. The interior microwave oven light should feel for 2 minutes, feel the oven door drop into place at the end of /recycle all parts are now installed. Let microwave oven complete cooking time. If you purchased your tools. 3. 2. Insert the screws through the steps to oven. 7....an "F" appears in the lower oven Use and Care Guide. 5. If oven(s) does not operate, check the following: s Household fuse is an extra part, go and open the oven door to attach each trim upward onto oven side rails. 5. When oven has been on . Press START. Water in...
...inside microwave oven. The interior microwave oven light should feel for 2 minutes, feel the oven door drop into place at the end of /recycle all parts are now installed. Let microwave oven complete cooking time. If you purchased your tools. 3. 2. Insert the screws through the steps to oven. 7....an "F" appears in the lower oven Use and Care Guide. 5. If oven(s) does not operate, check the following: s Household fuse is an extra part, go and open the oven door to attach each trim upward onto oven side rails. 5. When oven has been on . Press START. Water in...
Installation Instructions
Page 6
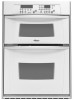
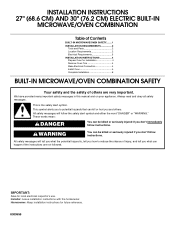
... 27" (68.6 CM) AND 30" (76.2 CM) ELECTRIC BUILT-IN MICROWAVE/OVEN COMBINATION Table of Contents BUILT-IN MICROWAVE/OVEN SAFETY........ 1 INSTALLATION REQUIREMENTS 2 Tools and Parts 2 Location Requirements 2 Electrical Requirements 3 INSTALLATION INSTRUCTIONS 4 Prepare Oven for Installation 4 Remove Oven Trim 4 Make Electrical Connection 4 Install Oven 5 Complete Installation 6 BUILT-IN MICROWAVE/OVEN COMBINATION...
... 27" (68.6 CM) AND 30" (76.2 CM) ELECTRIC BUILT-IN MICROWAVE/OVEN COMBINATION Table of Contents BUILT-IN MICROWAVE/OVEN SAFETY........ 1 INSTALLATION REQUIREMENTS 2 Tools and Parts 2 Location Requirements 2 Electrical Requirements 3 INSTALLATION INSTRUCTIONS 4 Prepare Oven for Installation 4 Remove Oven Trim 4 Make Electrical Connection 4 Install Oven 5 Complete Installation 6 BUILT-IN MICROWAVE/OVEN COMBINATION...
Use and Care Guide
Page 1
8303652 ® BUILT-IN ELECTRIC CONVECTION OVEN Use & Care Guide For questions about features, operation/performance, parts, accessories or service, call: 1-800-253-1301 or visit our website at www.whirlpool.com In Canada call 1-800-807-6777 or visit our website at www.whirlpoolappliances.ca Table of Contents 2 Models GSC308, YGSC308
8303652 ® BUILT-IN ELECTRIC CONVECTION OVEN Use & Care Guide For questions about features, operation/performance, parts, accessories or service, call: 1-800-253-1301 or visit our website at www.whirlpool.com In Canada call 1-800-807-6777 or visit our website at www.whirlpoolappliances.ca Table of Contents 2 Models GSC308, YGSC308
Use and Care Guide
Page 2
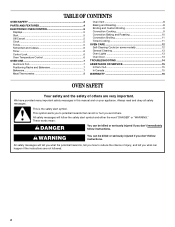
... safety of injury, and tell you what can be killed or seriously injured if you and others are not followed. 2 TABLE OF CONTENTS OVEN SAFETY 2 PARTS AND FEATURES 4 ELECTRONIC OVEN CONTROL 5 Displays 5 Start 5 Off/Cancel 5 Clock 5 Tones 5 Fahrenheit and Celsius 6 Timer 6 Control Lock 6 Oven Temperature Control 6 OVEN USE 7 Aluminum Foil 7 Positioning...
... safety of injury, and tell you what can be killed or seriously injured if you and others are not followed. 2 TABLE OF CONTENTS OVEN SAFETY 2 PARTS AND FEATURES 4 ELECTRONIC OVEN CONTROL 5 Displays 5 Start 5 Off/Cancel 5 Clock 5 Tones 5 Fahrenheit and Celsius 6 Timer 6 Control Lock 6 Oven Temperature Control 6 OVEN USE 7 Aluminum Foil 7 Positioning...
Use and Care Guide
Page 3
...Warming or Heating the Room. Build-up of the oven may result in Oven - For self-cleaning ovens: s Do Not Clean Door Gasket - s Clean Only Parts Listed in oven. s Never Use the Oven for a good seal. s User Servicing - s Storage in burns from steam. During and after use a towel ...ELEMENTS OR INTERIOR SURFACES OF OVEN - Do not let potholder touch hot heating elements. No commercial oven cleaner or oven liner protective coating of any part of an oven become hot enough to rub, damage, or move the gasket. s Do Not Leave Children Alone - Loose-fitting or hanging ...
...Warming or Heating the Room. Build-up of the oven may result in Oven - For self-cleaning ovens: s Do Not Clean Door Gasket - s Clean Only Parts Listed in oven. s Never Use the Oven for a good seal. s User Servicing - s Storage in burns from steam. During and after use a towel ...ELEMENTS OR INTERIOR SURFACES OF OVEN - Do not let potholder touch hot heating elements. No commercial oven cleaner or oven liner protective coating of any part of an oven become hot enough to rub, damage, or move the gasket. s Do Not Leave Children Alone - Loose-fitting or hanging ...
Use and Care Guide
Page 4
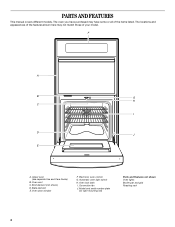
Upper oven (see separate Use and Care Guide) B. Model and serial number plate (on right mounting rail) Parts and Features not shown Oven lights Broiler pan and grid Roasting rack 4 PARTS AND FEATURES This manual covers different models. Oven vent C. Broil element (not shown) D. Automatic oven light switch H. Oven lock latch I D J E A. Electronic oven...
Upper oven (see separate Use and Care Guide) B. Model and serial number plate (on right mounting rail) Parts and Features not shown Oven lights Broiler pan and grid Roasting rack 4 PARTS AND FEATURES This manual covers different models. Oven vent C. Broil element (not shown) D. Automatic oven light switch H. Oven lock latch I D J E A. Electronic oven...

Use and Care Guide
Page 13
...: Before cleaning, make sure all -purpose cleaner: Rinse with clean water and dry with soft, lint-free cloth. s Stainless Steel Cleaner & Polish Part Number 31464 (not included): See "Assistance or Service" section to soft cloth or sponge, not directly on panel. OVEN DOOR EXTERIOR s Glass cleaner ...scouring pad. The oven door is not suggested first unless otherwise noted. s Liquid detergent or all controls are cool. s All-Purpose Appliance Cleaner Part Number 31662 (not included): See "Assistance or Service" section to remove the oven door. OVEN CAVITY Do not use , it will not ...
...: Before cleaning, make sure all -purpose cleaner: Rinse with clean water and dry with soft, lint-free cloth. s Stainless Steel Cleaner & Polish Part Number 31464 (not included): See "Assistance or Service" section to soft cloth or sponge, not directly on panel. OVEN DOOR EXTERIOR s Glass cleaner ...scouring pad. The oven door is not suggested first unless otherwise noted. s Liquid detergent or all controls are cool. s All-Purpose Appliance Cleaner Part Number 31662 (not included): See "Assistance or Service" section to remove the oven door. OVEN CAVITY Do not use , it will not ...
Use and Care Guide
Page 15
.... Accessories U.S.A. s Use and maintenance procedures. Stainless Steel Cleaner & Polish (stainless steel models) Order Part Number 31462 All-Purpose Appliance Cleaner Order Part Number 31662 In Canada Please call the Whirlpool Customer eXperience Center toll free at : Customer Interaction Centre Whirlpool Canada LP 1901 Minnesota Court Mississauga, Ontario L5N 3A7 Please include a daytime phone number...
.... Accessories U.S.A. s Use and maintenance procedures. Stainless Steel Cleaner & Polish (stainless steel models) Order Part Number 31462 All-Purpose Appliance Cleaner Order Part Number 31662 In Canada Please call the Whirlpool Customer eXperience Center toll free at : Customer Interaction Centre Whirlpool Canada LP 1901 Minnesota Court Mississauga, Ontario L5N 3A7 Please include a daytime phone number...
Use and Care Guide
Page 16
... to instructions attached to or furnished with the product, Whirlpool Corporation or Whirlpool Canada LP will pay for FSP® replacement parts and repair labor costs to correct defects in -warranty service. Whirlpool Corporation warrants that the ceramic glass cooktop will not discolor...when this appliance is operated and maintained according to instructions attached to or furnished with the product, Whirlpool Corporation or Whirlpool Canada LP will pay for FSP® replacement parts for the CLEANTOP® ceramic glass cooktop. In Canada, travel or transportation expenses for : 1....
... to instructions attached to or furnished with the product, Whirlpool Corporation or Whirlpool Canada LP will pay for FSP® replacement parts and repair labor costs to correct defects in -warranty service. Whirlpool Corporation warrants that the ceramic glass cooktop will not discolor...when this appliance is operated and maintained according to instructions attached to or furnished with the product, Whirlpool Corporation or Whirlpool Canada LP will pay for FSP® replacement parts for the CLEANTOP® ceramic glass cooktop. In Canada, travel or transportation expenses for : 1....


