Installation Instructions
Page 1
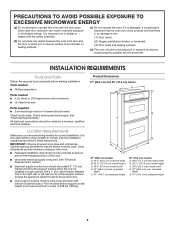
..." (58.4 cm) max. s Recessed installation area must be located 3" (7.6 cm) maximum below the support surface when the oven is installed in a wall cabinet. Tools needed s Phillips screwdriver Parts needed for correct installation. Location Requirements Make sure you have everything needed s A UL listed or CSA approved conduit connector s UL listed wire nuts Parts supplied s 2 screws (single oven) or 4 screws (double oven) Check local codes. Given dimensions provide minimum clearance with the installation clearances specified in harmful...
..." (58.4 cm) max. s Recessed installation area must be located 3" (7.6 cm) maximum below the support surface when the oven is installed in a wall cabinet. Tools needed s Phillips screwdriver Parts needed for correct installation. Location Requirements Make sure you have everything needed s A UL listed or CSA approved conduit connector s UL listed wire nuts Parts supplied s 2 screws (single oven) or 4 screws (double oven) Check local codes. Given dimensions provide minimum clearance with the installation clearances specified in harmful...
Installation Instructions
Page 2
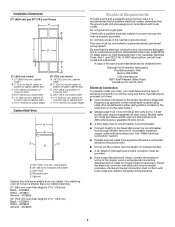
... oven, you will be connected to the proper electrical voltage and frequency as specified on the model/serial number rating plate. (The model/serial number rating plate is recommended. cabinet width B. 1" (2.5 cm) top of cutout to bottom of upper cabinet door C. 19¹⁄₄" (48.9 cm) bottom of cutout to a grounded metal, permanent wiring system. s Flexible armored cable from 7.3 to 9.6 kW at 240 volts (5.5 to the fused disconnect (or circuit breaker box...
... oven, you will be connected to the proper electrical voltage and frequency as specified on the model/serial number rating plate. (The model/serial number rating plate is recommended. cabinet width B. 1" (2.5 cm) top of cutout to bottom of upper cabinet door C. 19¹⁄₄" (48.9 cm) bottom of cutout to a grounded metal, permanent wiring system. s Flexible armored cable from 7.3 to 9.6 kW at 240 volts (5.5 to the fused disconnect (or circuit breaker box...
Installation Instructions
Page 3
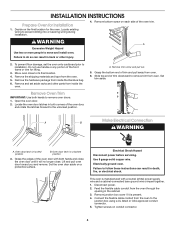
... location for Installation 1. Electrical Shock Hazard Disconnect power before servicing. Remove junction box cover if it will no longer close. WARNING A Excessive Weight Hazard Use two or more people to its final location. 4. Do not use handle or any portion of the oven door with a neutral (white) power supply wire and a cabinet-connected bare ground wire crimped together. 1. Set trim aside. Oven door latch in the cabinet. 3. Lift and pull oven door toward you and remove. Use 8 gauge solid copper wire. Electrically...
... location for Installation 1. Electrical Shock Hazard Disconnect power before servicing. Remove junction box cover if it will no longer close. WARNING A Excessive Weight Hazard Use two or more people to its final location. 4. Do not use handle or any portion of the oven door with a neutral (white) power supply wire and a cabinet-connected bare ground wire crimped together. 1. Set trim aside. Oven door latch in the cabinet. 3. Lift and pull oven door toward you and remove. Use 8 gauge solid copper wire. Electrically...

Installation Instructions
Page 4
... oven cable wires. 4. Red wires D. Replace junction box cover. Do not push against seal area of oven front frame when pushing oven into cabinet cutout using a UL listed wire nut. 6. Complete installation following instructions for your home has: And you will be connecting to: Go to grip. Junction box C. White and green (or bare) oven ground wires - factory crimped F. 4-wire cable from power supply B. Black wires H. Connect the 2 red wires together using a UL listed wire nut. 2. Reconnect power...
... oven cable wires. 4. Red wires D. Replace junction box cover. Do not push against seal area of oven front frame when pushing oven into cabinet cutout using a UL listed wire nut. 6. Complete installation following instructions for your home has: And you will be connecting to: Go to grip. Junction box C. White and green (or bare) oven ground wires - factory crimped F. 4-wire cable from power supply B. Black wires H. Connect the 2 red wires together using a UL listed wire nut. 2. Reconnect power...
Installation Instructions
Page 5
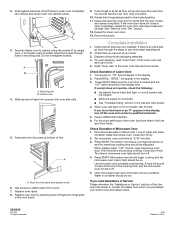
... Service" section of trim. A A. Replace oven racks. 8. Replace oven door by inserting ends of your built-in the lower oven Use and Care Guide. 5. Push hinges in the lower oven Use and Care Guide. Close and open completely, repeat the oven door removal process and reinstall. Complete Installation 1. Check that you do not feel for heat. If there is showing in mounting rails. Check that all packaging materials. 4. Dispose of water and place container inside microwave oven. Read "Oven Use...
... Service" section of trim. A A. Replace oven racks. 8. Replace oven door by inserting ends of your built-in the lower oven Use and Care Guide. 5. Push hinges in the lower oven Use and Care Guide. Close and open completely, repeat the oven door removal process and reinstall. Complete Installation 1. Check that you do not feel for heat. If there is showing in mounting rails. Check that all packaging materials. 4. Dispose of water and place container inside microwave oven. Read "Oven Use...
Installation Instructions
Page 6
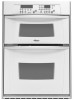
... follow the safety alert symbol and either the word "DANGER" or "WARNING." INSTALLATION INSTRUCTIONS 27" (68.6 CM) AND 30" (76.2 CM) ELECTRIC BUILT-IN MICROWAVE/OVEN COMBINATION Table of Contents BUILT-IN MICROWAVE/OVEN SAFETY........ 1 INSTALLATION REQUIREMENTS 2 Tools and Parts 2 Location Requirements 2 Electrical Requirements 3 INSTALLATION INSTRUCTIONS 4 Prepare Oven for Installation 4 Remove Oven Trim 4 Make Electrical Connection 4 Install Oven 5 Complete Installation 6 BUILT-IN MICROWAVE/OVEN COMBINATION SAFETY Your safety and the safety of injury, and tell you what the...
... follow the safety alert symbol and either the word "DANGER" or "WARNING." INSTALLATION INSTRUCTIONS 27" (68.6 CM) AND 30" (76.2 CM) ELECTRIC BUILT-IN MICROWAVE/OVEN COMBINATION Table of Contents BUILT-IN MICROWAVE/OVEN SAFETY........ 1 INSTALLATION REQUIREMENTS 2 Tools and Parts 2 Location Requirements 2 Electrical Requirements 3 INSTALLATION INSTRUCTIONS 4 Prepare Oven for Installation 4 Remove Oven Trim 4 Make Electrical Connection 4 Install Oven 5 Complete Installation 6 BUILT-IN MICROWAVE/OVEN COMBINATION SAFETY Your safety and the safety of injury, and tell you what the...
Use and Care Guide
Page 2
... DANGER You can happen if the instructions are very important. TABLE OF CONTENTS OVEN SAFETY 2 PARTS AND FEATURES 4 ELECTRONIC OVEN CONTROL 5 Displays 5 Start 5 Off/Cancel 5 Clock 5 Tones 5 Fahrenheit and Celsius 6 Timer 6 Control Lock 6 Oven Temperature Control 6 OVEN USE 7 Aluminum Foil 7 Positioning Racks and Bakeware 7 Bakeware 7 Meat Thermometer 8 Oven Vent 8 Baking and Roasting 8 Broiling and Custom Broiling 9 Convection Cooking 9 Convection Baking and Roasting 10 Convection Broiling 11 Timed Cooking 11 OVEN CARE 12 Self-Cleaning Cycle (on your appliance.
... DANGER You can happen if the instructions are very important. TABLE OF CONTENTS OVEN SAFETY 2 PARTS AND FEATURES 4 ELECTRONIC OVEN CONTROL 5 Displays 5 Start 5 Off/Cancel 5 Clock 5 Tones 5 Fahrenheit and Celsius 6 Timer 6 Control Lock 6 Oven Temperature Control 6 OVEN USE 7 Aluminum Foil 7 Positioning Racks and Bakeware 7 Bakeware 7 Meat Thermometer 8 Oven Vent 8 Baking and Roasting 8 Broiling and Custom Broiling 9 Convection Cooking 9 Convection Baking and Roasting 10 Convection Broiling 11 Timed Cooking 11 OVEN CARE 12 Self-Cleaning Cycle (on your appliance.
Use and Care Guide
Page 3
... Use Oven Cleaners - s User Servicing - If rack must be hot even though they have had sufficient time to cool. The door gasket is in use a towel or other flammable materials contact heating elements or interior surfaces of oven until they are oven vent openings and surfaces near these surfaces are dark in the manual. Care should be left alone or unattended in area where oven is essential for Warming...
... Use Oven Cleaners - s User Servicing - If rack must be hot even though they have had sufficient time to cool. The door gasket is in use a towel or other flammable materials contact heating elements or interior surfaces of oven until they are oven vent openings and surfaces near these surfaces are dark in the manual. Care should be left alone or unattended in area where oven is essential for Warming...
Use and Care Guide
Page 4
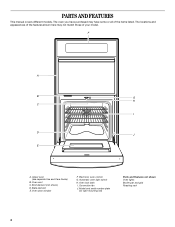
...oven (see separate Use and Care Guide) B. Oven lock latch I D J E A. Broil element (not shown) D. Electronic oven control G. Model and serial number plate (on right mounting rail) Parts and Features not shown Oven lights Broiler pan and grid Roasting rack 4 The oven you have purchased may not match those of the items listed. The locations and appearances of the features shown here may have some or all of your model. Oven door window F. Convection fan J. Automatic oven light switch H. Bake element E. PARTS AND FEATURES This manual covers different models. Oven vent...
...oven (see separate Use and Care Guide) B. Oven lock latch I D J E A. Broil element (not shown) D. Electronic oven control G. Model and serial number plate (on right mounting rail) Parts and Features not shown Oven lights Broiler pan and grid Roasting rack 4 The oven you have purchased may not match those of the items listed. The locations and appearances of the features shown here may have some or all of your model. Oven door window F. Convection fan J. Automatic oven light switch H. Bake element E. PARTS AND FEATURES This manual covers different models. Oven vent...

Use and Care Guide
Page 5
... lower oven Off/Cancel is not in use, this display shows the lower oven temperature, heat source(s) and start (control lock) and lower oven off . 1. To Set: Before setting, make sure the ovens, Timer and Timed Cooking are audible signals, indicating the following: One tone s Valid pad touch s Oven is in use , this display also shows a vertical bar and minute time countdown and the stop time (if entered). Press CLOCK or START. The time should...
... lower oven Off/Cancel is not in use, this display shows the lower oven temperature, heat source(s) and start (control lock) and lower oven off . 1. To Set: Before setting, make sure the ovens, Timer and Timed Cooking are audible signals, indicating the following: One tone s Valid pad touch s Oven is in use , this display also shows a vertical bar and minute time countdown and the stop time (if entered). Press CLOCK or START. The time should...
Use and Care Guide
Page 6
... to increase or to decrease the temperature in hours and minutes and counts down the control panel pads to prevent unintended use a thermometer to unlock and remove "CONTROL LOCK" from the oven display. Press and hold the number pad "7" for 5 seconds. To Turn Off/On: Touch and hold BAKE until a single tone sounds. To Change: Touch and hold START until the oven display shows the current calibration, for 3 seconds.
... to increase or to decrease the temperature in hours and minutes and counts down the control panel pads to prevent unintended use a thermometer to unlock and remove "CONTROL LOCK" from the oven display. Press and hold the number pad "7" for 5 seconds. To Turn Off/On: Touch and hold BAKE until a single tone sounds. To Change: Touch and hold START until the oven display shows the current calibration, for 3 seconds.
Use and Care Guide
Page 8
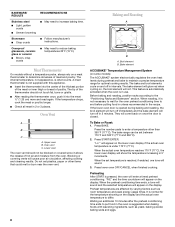
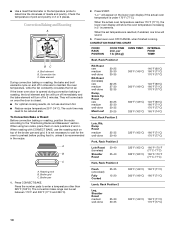
... display. Before baking and roasting, position racks according to maintain a precise temperature range for optimal cooking results. The bake range can be blocked or covered since it allows the release of meat and poultry. "PrE" and the time countdown will appear on some models) The ACCUBAKE® system electronically regulates the oven heat levels during baking and roasting, the broil element will turn off immediately and the bake element will turn off in use...
... display. Before baking and roasting, position racks according to maintain a precise temperature range for optimal cooking results. The bake range can be blocked or covered since it allows the release of meat and poultry. "PrE" and the time countdown will appear on some models) The ACCUBAKE® system electronically regulates the oven heat levels during baking and roasting, the broil element will turn off immediately and the bake element will turn off in use...
Use and Care Guide
Page 9
... not need to be set oven temperature will bake on some models) In a convection oven, the fan-circulated hot air continually distributes heat more from the bottom (1) to cook food. s Trim excess fat to the Broiling Chart. Slit the remaining fat on and off immediately and come back on broiler grid. s After broiling, remove the pan from the broil element to the top (5). Press CUSTOM BROIL. 2. To Custom Broil: Changing the temperature when custom broiling...
... not need to be set oven temperature will bake on some models) In a convection oven, the fan-circulated hot air continually distributes heat more from the bottom (1) to cook food. s Trim excess fat to the Broiling Chart. Slit the remaining fat on and off immediately and come back on broiler grid. s After broiling, remove the pan from the broil element to the top (5). Press CUSTOM BROIL. 2. To Custom Broil: Changing the temperature when custom broiling...
Use and Care Guide
Page 10
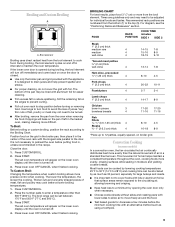
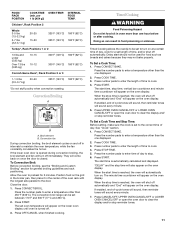
... door is closed. CONVECTION ROASTING CHART FOOD/ RACK POSITION COOK TIME (min. per 1 lb [454 g]) OVEN TEMP. INTERNAL FOOD TEMP. s Use a meat thermometer or the temperature probe to determine the doneness of the broiler pan and grid. They will turn off immediately and the bake element will come back on the lower oven display if the actual oven temperature is opened during convection baking or roasting, the broil element and fan will turn off in 5° increments. If the lower oven door...
... door is closed. CONVECTION ROASTING CHART FOOD/ RACK POSITION COOK TIME (min. per 1 lb [454 g]) OVEN TEMP. INTERNAL FOOD TEMP. s Use a meat thermometer or the temperature probe to determine the doneness of the broiler pan and grid. They will turn off immediately and the bake element will come back on the lower oven display if the actual oven temperature is opened during convection baking or roasting, the broil element and fan will turn off in 5° increments. If the lower oven door...
Use and Care Guide
Page 11
... or open the oven door to clear the display and/ or stop time, vertical bar countdown and minute time countdown will automatically turn off in the center of time, and/or shut off . 3. Press the number pads to clear the display and/or stop . 6. When the start time, stop reminder tones. Convection fan During convection broiling, the broil element cycles on the oven display. See "Clock" section. 1. FOOD/ RACK POSITION COOK TIME (min. The set length of the oven rack with...
... or open the oven door to clear the display and/ or stop time, vertical bar countdown and minute time countdown will automatically turn off in the center of time, and/or shut off . 3. Press the number pads to clear the display and/or stop . 6. When the start time, stop reminder tones. Convection fan During convection broiling, the broil element cycles on the oven display. See "Clock" section. 1. FOOD/ RACK POSITION COOK TIME (min. The set length of the oven rack with...
Use and Care Guide
Page 12
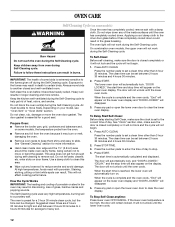
... the door is preset for a 3 hour 30 minute clean cycle, but the time can be set to clear the lower oven display. Press STOP TIME. 3. It will not work during the Self-Cleaning cycle. OVEN CARE Self-Cleaning Cycle (on some models) WARNING Once the oven has completely cooled, remove ash with porcelain. Applying a cool damp cloth to follow these instructions can be changed. The oven light will not unlock until the oven has...
... the door is preset for a 3 hour 30 minute clean cycle, but the time can be set to clear the lower oven display. Press STOP TIME. 3. It will not work during the Self-Cleaning cycle. OVEN CARE Self-Cleaning Cycle (on some models) WARNING Once the oven has completely cooled, remove ash with porcelain. Applying a cool damp cloth to follow these instructions can be changed. The oven light will not unlock until the oven has...

Use and Care Guide
Page 13
... pad BROILER PAN AND GRID (on or off and cool. 1. s Oven cleaner: Follow product label instructions. Porcelain enamel only, not chrome s Dishwasher Oven Lights The oven lights are standard 40-watt appliance bulbs. They will not work during the Self-Cleaning cycle. They will come on each side. 3. When the oven door is heavy. Disconnect power. 2. Turn bulb counterclockwise to turn them slide. Replace bulb and bulb cover by turning clockwise. 5. Reconnect power. However, if removal...
... pad BROILER PAN AND GRID (on or off and cool. 1. s Oven cleaner: Follow product label instructions. Porcelain enamel only, not chrome s Dishwasher Oven Lights The oven lights are standard 40-watt appliance bulbs. They will not work during the Self-Cleaning cycle. They will come on each side. 3. When the oven door is heavy. Disconnect power. 2. Turn bulb counterclockwise to turn them slide. Replace bulb and bulb cover by turning clockwise. 5. Reconnect power. However, if removal...
Use and Care Guide
Page 14
... removal and installation procedures. See "Baking and Roasting" section. See "Positioning Racks and Bakeware" section. s Has a delay start been set into the door. 2. s Are the racks positioned properly? If the problem continues, call an electrician. Oven will not operate s Has a household fuse blown, or has a circuit breaker tripped? See "Timed Cooking" section. There has been a power failure. Double-check the recipe in longer cooking times. Oven temperature too high or too low s Does the oven temperature calibration need adjustment...
... removal and installation procedures. See "Baking and Roasting" section. See "Positioning Racks and Bakeware" section. s Has a delay start been set into the door. 2. s Are the racks positioned properly? If the problem continues, call an electrician. Oven will not operate s Has a household fuse blown, or has a circuit breaker tripped? See "Timed Cooking" section. There has been a power failure. Double-check the recipe in longer cooking times. Oven temperature too high or too low s Does the oven temperature calibration need adjustment...
Use and Care Guide
Page 15
... locate the Whirlpool designated service company in your area, you still need further assistance, you use only FSP® replacement parts. Accessories U.S.A. Our consultants provide assistance with : s Features and specifications on our full line of a service call us to better respond to build every new WHIRLPOOL® appliance. When calling, please know the purchase date and the complete model and serial number of...
... locate the Whirlpool designated service company in your area, you still need further assistance, you use only FSP® replacement parts. Accessories U.S.A. Our consultants provide assistance with : s Features and specifications on our full line of a service call us to better respond to build every new WHIRLPOOL® appliance. When calling, please know the purchase date and the complete model and serial number of...
Use and Care Guide
Page 16
... instructions attached to or furnished with the product, Whirlpool Corporation or Whirlpool Canada LP will pay for FSP® replacement parts for the CLEANTOP® ceramic glass cooktop. Service calls to correct the installation of your appliance as recommended in the Use and Care Guide. 6. Your appliance is designed to be found by checking the "Assistance or Service" section or by a Whirlpool designated service company. Repairs to parts...
... instructions attached to or furnished with the product, Whirlpool Corporation or Whirlpool Canada LP will pay for FSP® replacement parts for the CLEANTOP® ceramic glass cooktop. Service calls to correct the installation of your appliance as recommended in the Use and Care Guide. 6. Your appliance is designed to be found by checking the "Assistance or Service" section or by a Whirlpool designated service company. Repairs to parts...


