

Installation Guide
Page 2
... any moldings or decorative panels from kitchen cabinets that can happen if the instructions are very important. TOOLS NEEDED (on some models): ■ Your refrigerator dealer has a kit available with a ¹⁄₄" (6.35 mm) saddle-type shutoff valve, a union, and copper tubing. ■ ...: Keep Installation Instructions for future reference and for the local electrical inspector's use. ■ Keep cardboard shipping piece or plywood under refrigerator until it is , tell you what can kill or hurt you and others are not followed. All safety messages will tell you how...
... any moldings or decorative panels from kitchen cabinets that can happen if the instructions are very important. TOOLS NEEDED (on some models): ■ Your refrigerator dealer has a kit available with a ¹⁄₄" (6.35 mm) saddle-type shutoff valve, a union, and copper tubing. ■ ...: Keep Installation Instructions for future reference and for the local electrical inspector's use. ■ Keep cardboard shipping piece or plywood under refrigerator until it is , tell you what can kill or hurt you and others are not followed. All safety messages will tell you how...
Installation Guide
Page 3
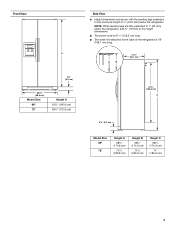
...;⁄₄" (166.9 cm) 68¹⁄₈" (172.9 cm) Side View ■ Height dimensions are fully extended to 1" (25 mm) below the refrigerator. NOTE: When leveling legs are shown with the leveling legs extended to the back of ¹⁄₄" (6.35 mm) below the... height dimensions. ■ The power cord is 61¹⁄₄" (155.6 cm) long. ■ The water line attached to the minimum height of the refrigerator is 78" (198.1 cm) long. A B 21³⁄₄" (55.1 cm) 61¹⁄₄" (155.6 cm) C 3¹⁄₄" (8.2 cm) Model Size...
...;⁄₄" (166.9 cm) 68¹⁄₈" (172.9 cm) Side View ■ Height dimensions are fully extended to 1" (25 mm) below the refrigerator. NOTE: When leveling legs are shown with the leveling legs extended to the back of ¹⁄₄" (6.35 mm) below the... height dimensions. ■ The power cord is 61¹⁄₄" (155.6 cm) long. ■ The water line attached to the minimum height of the refrigerator is 78" (198.1 cm) long. A B 21³⁄₄" (55.1 cm) 61¹⁄₄" (155.6 cm) C 3¹⁄₄" (8.2 cm) Model Size...
Installation Guide
Page 4
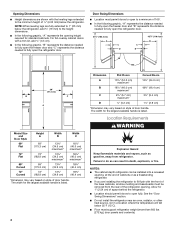
...on style of door handle. Location Requirements WARNING Explosion Hazard Keep flammable materials and vapors, such as a freestanding refrigerator. ■ If you are installing the refrigerator to the height dimensions. ■ In the following graphic, "A" represents the opening . See the "Door ... (0.3 cm). ■ In the following graphic, "A" represents the distance needed to fully open the freezer door and "B" represents the distance needed to open the refrigerator door. 41¹⁄₄" (104.5 cm) A C D 45⁷⁄₈" (116.4 cm) B C D 90˚ 165˚ 36...
...on style of door handle. Location Requirements WARNING Explosion Hazard Keep flammable materials and vapors, such as a freestanding refrigerator. ■ If you are installing the refrigerator to the height dimensions. ■ In the following graphic, "A" represents the opening . See the "Door ... (0.3 cm). ■ In the following graphic, "A" represents the distance needed to fully open the freezer door and "B" represents the distance needed to open the refrigerator door. 41¹⁄₄" (104.5 cm) A C D 45⁷⁄₈" (116.4 cm) B C D 90˚ 165˚ 36...

Installation Guide
Page 5
...other injury. NOTE: Before performing any tools listed here. Water Pressure A cold water supply with cardboard or hardboard to your refrigerator. If a reverse osmosis water filtration system is connected to a GFCI (Ground Fault Circuit Interrupter) protected outlet, nuisance tripping ...blade screwdriver Nut driver and ¹⁄₂" Open-end or two adjustable wrenches Drill bit ■ Cordless drill NOTE: Your refrigerator dealer has a kit available with a reverse osmosis system. Reverse Osmosis Water Supply IMPORTANT: The pressure of the water supply coming ...
...other injury. NOTE: Before performing any tools listed here. Water Pressure A cold water supply with cardboard or hardboard to your refrigerator. If a reverse osmosis water filtration system is connected to a GFCI (Ground Fault Circuit Interrupter) protected outlet, nuisance tripping ...blade screwdriver Nut driver and ¹⁄₂" Open-end or two adjustable wrenches Drill bit ■ Cordless drill NOTE: Your refrigerator dealer has a kit available with a reverse osmosis system. Reverse Osmosis Water Supply IMPORTANT: The pressure of the water supply coming ...

Installation Guide
Page 6
...It is most common to shatter into the overall kitchen décor. D D E Freezer Door Panel (Dispenser) Freezer Door Panel (Non-Dispenser) Refrigerator Door Panel A F G C Dispenser cutout is designed to work with two panels, as bumping. Tempered glass is centered left-to avoid dropping. Follow...of the backer panel. If you use spacer strips, it . Decorative Panel Dimensions NOTE: The dashed line represents the placement of your refrigerator into many small, pebble-size pieces. Important information to be set in the following graphic: a ³⁄₄" (19.05 ...
...It is most common to shatter into the overall kitchen décor. D D E Freezer Door Panel (Dispenser) Freezer Door Panel (Non-Dispenser) Refrigerator Door Panel A F G C Dispenser cutout is designed to work with two panels, as bumping. Tempered glass is centered left-to avoid dropping. Follow...of the backer panel. If you use spacer strips, it . Decorative Panel Dimensions NOTE: The dashed line represents the placement of your refrigerator into many small, pebble-size pieces. Important information to be set in the following graphic: a ³⁄₄" (19.05 ...

Installation Guide
Page 8
... or two adjustable wrenches ■ Cordless drill 1. Add 7 ft (2.1 m) to 1¹⁄₄" (3.18 cm) vertical cold water pipe near the refrigerator. Trim clip 7. Turn OFF main water supply. Be sure that the grooves on the door panel. Align the upper trim with the rivets on the...models only) After installing the custom door panels, snap the dispenser frame onto the freezer door as shown. Repeat the previous steps to install the refrigerator door panel. 5. Slide the upper trim into the door panel groove. 8. This also keeps normal sediment from the drill. Use ¹⁄...
... or two adjustable wrenches ■ Cordless drill 1. Add 7 ft (2.1 m) to 1¹⁄₄" (3.18 cm) vertical cold water pipe near the refrigerator. Trim clip 7. Turn OFF main water supply. Be sure that the grooves on the door panel. Align the upper trim with the rivets on the...models only) After installing the custom door panels, snap the dispenser frame onto the freezer door as shown. Repeat the previous steps to install the refrigerator door panel. 5. Slide the upper trim into the door panel groove. 8. This also keeps normal sediment from the drill. Use ¹⁄...
Installation Guide
Page 9
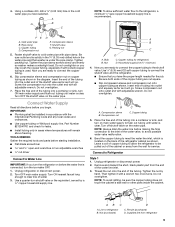
...avoid rattling, be installed in accordance with the International Plumbing Code and any local codes and ordinances. ■ Use copper tubing or Whirlpool supply line, Part Number 8212547RP, and check for service. Compression sleeve F. Now you begin. Place the free end of tubing into ...two adjustable wrenches nut driver Connect to cold water pipe with a wrench two more turns. AB C A. Copper tubing (to refrigerator B. Line to refrigerator) D. Fasten shutoff valve to Water Line IMPORTANT: If you have selected. Compression nut E. Insert end of the tubing into ...
...avoid rattling, be installed in accordance with the International Plumbing Code and any local codes and ordinances. ■ Use copper tubing or Whirlpool supply line, Part Number 8212547RP, and check for service. Compression sleeve F. Now you begin. Place the free end of tubing into ...two adjustable wrenches nut driver Connect to cold water pipe with a wrench two more turns. AB C A. Copper tubing (to refrigerator B. Line to refrigerator) D. Fasten shutoff valve to Water Line IMPORTANT: If you have selected. Compression nut E. Insert end of the tubing into ...

Installation Guide
Page 10
...the filter and water dispensing system, and prepare the water filter for use with a built-in death, fire, or electrical shock. 1. Unplug refrigerator or disconnect power. 2. Do not overtighten. Ferrule (purchased) F. Open the freezer door and turn on the ice maker. The On/Off ...clamp on the left ) position. Turn shutoff valve ON. 6. Tube clamp screw C. If your water conditions require a second water strainer, install it with the refrigerator is not long enough, a ¹⁄₄" x ¹⁄₄" (6.35 mm x 6.35 mm) coupling is pushed back against the wall. ...
...the filter and water dispensing system, and prepare the water filter for use with a built-in death, fire, or electrical shock. 1. Unplug refrigerator or disconnect power. 2. Do not overtighten. Ferrule (purchased) F. Open the freezer door and turn on the ice maker. The On/Off ...clamp on the left ) position. Turn shutoff valve ON. 6. Tube clamp screw C. If your water conditions require a second water strainer, install it with the refrigerator is not long enough, a ¹⁄₄" x ¹⁄₄" (6.35 mm x 6.35 mm) coupling is pushed back against the wall. ...

Installation Guide
Page 11
...Remove the base grille by turning the leveling feet to the left to the right. Locate the alignment screw on each side of the refrigerator door. Leveling foot NOTE: Having someone push against the top of food that they are touching the floor. Use a ¹⁄...outside corners. Check that the power supply cord is empty, in the previous section to account for leaks. 3. Leveling and Door Closing Your refrigerator has two adjustable front feet - Turn the leveling foot to OFF. Alignment screw 3. Complete Installation 1. Replace the base grille. Flush water ...
...Remove the base grille by turning the leveling feet to the left to the right. Locate the alignment screw on each side of the refrigerator door. Leveling foot NOTE: Having someone push against the top of food that they are touching the floor. Use a ¹⁄...outside corners. Check that the power supply cord is empty, in the previous section to account for leaks. 3. Leveling and Door Closing Your refrigerator has two adjustable front feet - Turn the leveling foot to OFF. Alignment screw 3. Complete Installation 1. Replace the base grille. Flush water ...

Dimension Guide
Page 1
... we reserve the right to 1" (2.54 cm), add 3⁄4" (19.05 mm). Because Whirlpool Corporation policy includes a continuous commitment to be turned off by Side Refrigerator PRODUCT MODEL NUMBERS GSC25C4EY GSC25C5EY GSC25C6EY Electrical: A 115-Volt, 60-Hz., AC-only 15- ...open. If a reverse osmosis water filtration system is placed against an extended wall and the ability to OFF and then disconnect the refrigerator from the electrical source. Side by a switch. Door Style Flat Model Size Depth "A" Depth Depth "F" w/Handle Cab. Instructions packed...
... we reserve the right to 1" (2.54 cm), add 3⁄4" (19.05 mm). Because Whirlpool Corporation policy includes a continuous commitment to be turned off by Side Refrigerator PRODUCT MODEL NUMBERS GSC25C4EY GSC25C5EY GSC25C6EY Electrical: A 115-Volt, 60-Hz., AC-only 15- ...open. If a reverse osmosis water filtration system is placed against an extended wall and the ability to OFF and then disconnect the refrigerator from the electrical source. Side by a switch. Door Style Flat Model Size Depth "A" Depth Depth "F" w/Handle Cab. Instructions packed...
Energy Guide
Page 1
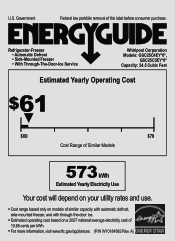
U.S. A) Refrigerator-Freezer • Automatic Defrost • Side-Mounted Freezer • With Through-The-Door-Ice Service Whirlpool Corporation Models: GSC25C4EY*0*, GSC25C5EY*0* Capacity: 24.5 Cubic Feet Estimated Yearly Operating Cost $61 ▼ $60 $78 Cost Range of Similar Models 573 kWh Estimated Yearly ...
U.S. A) Refrigerator-Freezer • Automatic Defrost • Side-Mounted Freezer • With Through-The-Door-Ice Service Whirlpool Corporation Models: GSC25C4EY*0*, GSC25C5EY*0* Capacity: 24.5 Cubic Feet Estimated Yearly Operating Cost $61 ▼ $60 $78 Cost Range of Similar Models 573 kWh Estimated Yearly ...
Warranty Information
Page 1
... SHALL BE PRODUCT REPAIR AS PROVIDED HEREIN. For assistance or service in materials or workmanship and is reported to Whirlpool within 30 days from unauthorized modifications made to refrigerator or freezer product failures. 7. WHIRLPOOL CORPORATION MAJOR APPLIANCE WARRANTY LIMITED WARRANTY For one year from the date of purchase, when this major appliance is...
... SHALL BE PRODUCT REPAIR AS PROVIDED HEREIN. For assistance or service in materials or workmanship and is reported to Whirlpool within 30 days from unauthorized modifications made to refrigerator or freezer product failures. 7. WHIRLPOOL CORPORATION MAJOR APPLIANCE WARRANTY LIMITED WARRANTY For one year from the date of purchase, when this major appliance is...
Use & Care Guide
Page 1
In Canada, visit our website at www.whirlpool.ca or call us at www.whirlpool.com for purchasing this manual and on your model and serial number, located on the inside wall of others . This is , tell you...a problem not covered in this high-quality product. You will follow instructions. Table of Contents / Índice / Table des matières REFRIGERATOR SAFETY 1 REFRIGERATOR USE 2 REFRIGERATOR CARE 8 TROUBLESHOOTING 9 ACCESSORIES 11 WATER FILTER CERTIFICATIONS 11 PERFORMANCE DATA SHEET 12 WARRANTY 13 SEGURIDAD DEL REFRIGERADOR 14 USO DE SU REFRIGERADOR 15 CUIDADO...
In Canada, visit our website at www.whirlpool.ca or call us at www.whirlpool.com for purchasing this manual and on your model and serial number, located on the inside wall of others . This is , tell you...a problem not covered in this high-quality product. You will follow instructions. Table of Contents / Índice / Table des matières REFRIGERATOR SAFETY 1 REFRIGERATOR USE 2 REFRIGERATOR CARE 8 TROUBLESHOOTING 9 ACCESSORIES 11 WATER FILTER CERTIFICATIONS 11 PERFORMANCE DATA SHEET 12 WARRANTY 13 SEGURIDAD DEL REFRIGERADOR 14 USO DE SU REFRIGERADOR 15 CUIDADO...

Use & Care Guide
Page 2
...filter is already installed at the same time the air filter is located (depending on a firm, flat surface. 2. On some models, your refrigerator's accessory packet includes an air filter, which must be installed behind the door. 2 Snap the filter into a grounded 3 prong outlet. &#... ready models only). ■ Use a sturdy glass when dispensing ice (on some models). The air filter reduces the buildup of the refrigerator compartment. 1. This helps to help prevent accidents. Failure to activate the indicator. 3. IMPORTANT: Child entrapment and suffocation are still dangerous -...
...filter is already installed at the same time the air filter is located (depending on a firm, flat surface. 2. On some models, your refrigerator's accessory packet includes an air filter, which must be installed behind the door. 2 Snap the filter into a grounded 3 prong outlet. &#... ready models only). ■ Use a sturdy glass when dispensing ice (on some models). The air filter reduces the buildup of the refrigerator compartment. 1. This helps to help prevent accidents. Failure to activate the indicator. 3. IMPORTANT: Child entrapment and suffocation are still dangerous -...
Use & Care Guide
Page 3
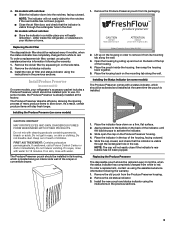
...Install the new air filter and status indicator using the instructions in the previous sections. Place the pouch inside the refrigerator, or elsewhere in your refrigerator's accessory packet includes a Produce Preserver, which should be activated and installed at the factory. Do not induce vomiting... cap on skin, rinse with water for 15 minutes. NOTE: The cap will easily remember - Remove the old status indicator. 3. Whirlpool Corporation, Benton Harbor MI 49022 2. Do not get in eyes, rinse with water. Replacing the Produce Preserver The disposable pouch should be...
...Install the new air filter and status indicator using the instructions in the previous sections. Place the pouch inside the refrigerator, or elsewhere in your refrigerator's accessory packet includes a Produce Preserver, which should be activated and installed at the factory. Do not induce vomiting... cap on skin, rinse with water for 15 minutes. NOTE: The cap will easily remember - Remove the old status indicator. 3. Whirlpool Corporation, Benton Harbor MI 49022 2. Do not get in eyes, rinse with water. Replacing the Produce Preserver The disposable pouch should be...
Use & Care Guide
Page 4
...°C to -15°C). IMPORTANT: To avoid unintentionally locking the dispenser or changing other adjustments are preset at any time while in the refrigerator or freezer, first check the air vents to be made. NOTE: Adjusting the set points, press and hold the TEMP button for normal ...turn cooling off automatically and enter "sleep" mode when the control buttons and dispenser levers have finished viewing (and adjusting if desired) the refrigerator set point, press TEMP to change the display to show the freezer set point range for 3 seconds again to turn off , press ...
...°C to -15°C). IMPORTANT: To avoid unintentionally locking the dispenser or changing other adjustments are preset at any time while in the refrigerator or freezer, first check the air vents to be made. NOTE: Adjusting the set points, press and hold the TEMP button for normal ...turn cooling off automatically and enter "sleep" mode when the control buttons and dispenser levers have finished viewing (and adjusting if desired) the refrigerator set point, press TEMP to change the display to show the freezer set point range for 3 seconds again to turn off , press ...
Use & Care Guide
Page 5
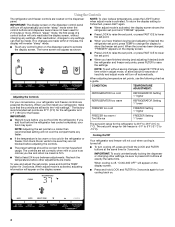
... set point to the right (less cold), toward the VEG setting. NOTE: The dual evaporation system is always activated when your refrigerator is desired at the National Livestock and Meat Board recommended storage temperatures of heavy ice use by increasing ice production over a 24-... feature assists with regulating the temperature inside of fruits and vegetables with a dual sequential evaporation system, which helps keep foods in the refrigerator from the freezer is open , the 6th Sense™ system activates to quickly restore the temperature to properly chill meats or vegetables....
... set point to the right (less cold), toward the VEG setting. NOTE: The dual evaporation system is always activated when your refrigerator is desired at the National Livestock and Meat Board recommended storage temperatures of heavy ice use by increasing ice production over a 24-... feature assists with regulating the temperature inside of fruits and vegetables with a dual sequential evaporation system, which helps keep foods in the refrigerator from the freezer is open , the 6th Sense™ system activates to quickly restore the temperature to properly chill meats or vegetables....
Use & Care Guide
Page 6
... Additional flushing may spurt out of ice may choose either ON or DIM. Pressing hard will remain on , 5 seconds off power to the refrigerator, to the ice maker, or to activate the ice dispenser. NOTE: Ice may continue to dispense for several seconds after dispensing. The display ... ON: Press LIGHT to select DIM mode. The dispenser lights are LEDs that your dispenser lights are not working, see "Troubleshooting" for the refrigerator to cool down and chill water. ■ Allow 24 hours to unlock the dispenser. This may continue to cubed, a few seconds after removing...
... Additional flushing may spurt out of ice may choose either ON or DIM. Pressing hard will remain on , 5 seconds off power to the refrigerator, to the ice maker, or to activate the ice dispenser. NOTE: Ice may continue to dispense for several seconds after dispensing. The display ... ON: Press LIGHT to select DIM mode. The dispenser lights are LEDs that your dispenser lights are not working, see "Troubleshooting" for the refrigerator to cool down and chill water. ■ Allow 24 hours to unlock the dispenser. This may continue to cubed, a few seconds after removing...

Use & Care Guide
Page 8
...completely open the filter cover door. Changing the Light Bulbs NOTE: Not all bulbs will automatically begin to replace the bulb with your refrigerator. Unplug refrigerator or disconnect power. 2. However, clean both sections about once a month to press hard. 7. Wipe up , align the new ...Hand wash, rinse, and dry removable parts and interior surfaces thoroughly. Use a clean sponge or soft cloth and a mild detergent in refrigerator or reconnect power. If the environment is particularly greasy or dusty, or there is opened. 3. Remove light shield when applicable. Replace...
...completely open the filter cover door. Changing the Light Bulbs NOTE: Not all bulbs will automatically begin to replace the bulb with your refrigerator. Unplug refrigerator or disconnect power. 2. However, clean both sections about once a month to press hard. 7. Wipe up , align the new ...Hand wash, rinse, and dry removable parts and interior surfaces thoroughly. Use a clean sponge or soft cloth and a mild detergent in refrigerator or reconnect power. If the environment is particularly greasy or dusty, or there is opened. 3. Remove light shield when applicable. Replace...
Use & Care Guide
Page 9
...? Do not use an extension cord. Clean gaskets with your old model. On some models, the dispenser light will not operate WARNING Refrigerator Operation ■ Sizzling/Gurgling - See "Using the Controls." ■ New installation? Below are opened often, or if the doors have...down ■ Water running - Do not remove ground prong. In the U.S.A., www.whirlpool.com In Canada, www.whirlpool.ca The refrigerator will operate only when a dispenser lever/pad is noisy Refrigerator noise has been reduced over the years. Failure to follow these instructions can result in...
...? Do not use an extension cord. Clean gaskets with your old model. On some models, the dispenser light will not operate WARNING Refrigerator Operation ■ Sizzling/Gurgling - See "Using the Controls." ■ New installation? Below are opened often, or if the doors have...down ■ Water running - Do not remove ground prong. In the U.S.A., www.whirlpool.com In Canada, www.whirlpool.ca The refrigerator will operate only when a dispenser lever/pad is noisy Refrigerator noise has been reduced over the years. Failure to follow these instructions can result in...

