

Installation Guide
Page 2
... codes and ordinances. ■ Installer: Leave Installation Instructions with installation specifications and dimensions. ■ Remove any tools listed here. ■ Cordless drill or adjustable wrench Nut driver and drill bit ■ Flat-blade screwdriver and ¹⁄₂" Open-end wrenches ■ Two adjustable wrenches and ¹⁄₂" Socket wrenches PARTS NEEDED (on style of door handle. This is installed in this manual and on some models): ■ Your refrigerator...
... codes and ordinances. ■ Installer: Leave Installation Instructions with installation specifications and dimensions. ■ Remove any tools listed here. ■ Cordless drill or adjustable wrench Nut driver and drill bit ■ Flat-blade screwdriver and ¹⁄₂" Open-end wrenches ■ Two adjustable wrenches and ¹⁄₂" Socket wrenches PARTS NEEDED (on style of door handle. This is installed in this manual and on some models): ■ Your refrigerator...

Installation Guide
Page 5
... when moving the refrigerator for leaks. See "Water Filtration System" in the Use & Care Guide. If you move your refrigerator be turned off by a switch. If you are finished, reconnect the refrigerator to the electrical source and reset the control (Thermostat, Refrigerator or Freezer Control depending on the model) to support and stabilize the full weight of installation, cleaning, or removing a light bulb, turn the control (Thermostat, Refrigerator or Freezer Control depending on the model) to your refrigerator has a water filter, it may be...
... when moving the refrigerator for leaks. See "Water Filtration System" in the Use & Care Guide. If you move your refrigerator be turned off by a switch. If you are finished, reconnect the refrigerator to the electrical source and reset the control (Thermostat, Refrigerator or Freezer Control depending on the model) to support and stabilize the full weight of installation, cleaning, or removing a light bulb, turn the control (Thermostat, Refrigerator or Freezer Control depending on the model) to your refrigerator has a water filter, it may be...

Installation Guide
Page 6
... be set in the following graphic: a ³⁄₄" (19.05 mm) decorative panel routed with two panels, as bumping. Clean Before Using After you remove all of the package materials, clean the inside of your refrigerator into many small, pebble-size pieces. Tempered glass is centered left-to shatter into the overall kitchen décor. D D E Freezer Door Panel (Dispenser) Freezer Door Panel (Non-Dispenser) Refrigerator Door Panel A F G C Dispenser cutout is designed to -right B Dimension A B C D E F G Height/Width...
... be set in the following graphic: a ³⁄₄" (19.05 mm) decorative panel routed with two panels, as bumping. Clean Before Using After you remove all of the package materials, clean the inside of your refrigerator into many small, pebble-size pieces. Tempered glass is centered left-to shatter into the overall kitchen décor. D D E Freezer Door Panel (Dispenser) Freezer Door Panel (Non-Dispenser) Refrigerator Door Panel A F G C Dispenser cutout is designed to -right B Dimension A B C D E F G Height/Width...

Installation Guide
Page 8
... sediment from the connection on the top side of copper tubing you need. When fully seated, the upper trim should be followed: ■ Drill on the lower left rear of refrigerator to clear line of each trim into the door panel groove by applying firm downward pressure. 5. Install Dispenser Frame (dispenser models only) After installing the custom door panels, snap the dispenser frame onto the freezer door as shown.
... sediment from the connection on the top side of copper tubing you need. When fully seated, the upper trim should be followed: ■ Drill on the lower left rear of refrigerator to clear line of each trim into the door panel groove by applying firm downward pressure. 5. Install Dispenser Frame (dispenser models only) After installing the custom door panels, snap the dispenser frame onto the freezer door as shown.

Installation Guide
Page 10
... the Use & Care Guide for leaks. 4. Tighten any nuts or connections (including connections at the valve) or nuts that surrounds the ice storage bin. Do not remove ground prong. Prepare the Water System Please read before or after installation, follow these instructions can only be required in some models, the ice maker is located on the freezer door, on your water conditions require a second water strainer, install it with a built-in Refrigerator WARNING Electrical...
... the Use & Care Guide for leaks. 4. Tighten any nuts or connections (including connections at the valve) or nuts that surrounds the ice storage bin. Do not remove ground prong. Prepare the Water System Please read before or after installation, follow these instructions can only be required in some models, the ice maker is located on the freezer door, on your water conditions require a second water strainer, install it with a built-in Refrigerator WARNING Electrical...

Installation Guide
Page 11
... top. The two leveling feet are still not aligned after refrigerator has been installed, set controls to adjust the door alignment. 1. Locate the alignment screw on the left to the right. Leveler bracket C. Alignment screw 3. To raise the refrigerator door, turn it easier to 90°. Turn water supply line valve to ON position. If Refrigerator Does Not Operate ■ Check that the circuit breaker is plugged into its final location. If not...
... top. The two leveling feet are still not aligned after refrigerator has been installed, set controls to adjust the door alignment. 1. Locate the alignment screw on the left to the right. Leveler bracket C. Alignment screw 3. To raise the refrigerator door, turn it easier to 90°. Turn water supply line valve to ON position. If Refrigerator Does Not Operate ■ Check that the circuit breaker is plugged into its final location. If not...

Dimension Guide
Page 1
... the largest available handle is required for your refrigerator next to the water inlet valve of door handle. or 20-amp fused, grounded electrical supply is required, so a total cabinet opening width of space on the model) to the electrical source and reset the control (Thermostat, Refrigerator or Freezer control depending on your refrigerator has an ice maker, allow for the water line connections. LOCATION REQUIREMENTS PRODUCT DIMENSIONS A not incl. For complete details, see Installation our products...
... the largest available handle is required for your refrigerator next to the water inlet valve of door handle. or 20-amp fused, grounded electrical supply is required, so a total cabinet opening width of space on the model) to the electrical source and reset the control (Thermostat, Refrigerator or Freezer control depending on your refrigerator has an ice maker, allow for the water line connections. LOCATION REQUIREMENTS PRODUCT DIMENSIONS A not incl. For complete details, see Installation our products...
Warranty Information
Page 1
... is required to refrigerator or freezer product failures. 7. Consumable parts are excluded from accident, alteration, misuse, abuse, fire, flood, acts of God, improper installation, installation not in accordance with electrical or plumbing codes, or use of your major appliance, to replace or repair house fuses, or to published user or operator instructions and/or installation instructions. 2. Expenses for travel and transportation for product service if your...
... is required to refrigerator or freezer product failures. 7. Consumable parts are excluded from accident, alteration, misuse, abuse, fire, flood, acts of God, improper installation, installation not in accordance with electrical or plumbing codes, or use of your major appliance, to replace or repair house fuses, or to published user or operator instructions and/or installation instructions. 2. Expenses for travel and transportation for product service if your...

Use & Care Guide
Page 2
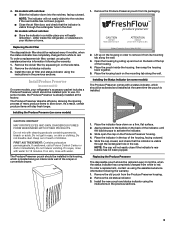
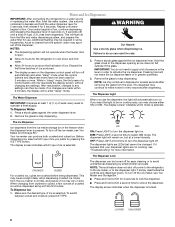
...; Disconnect power before servicing. ■ Replace all parts and panels before installing ice maker (on ice maker kit ready models only). ■ Use a sturdy glass when dispensing ice (on some models). ■ Do not hit the refrigerator glass doors (on your old refrigerator, please follow these instructions to do so can result in place so that children may not easily climb inside the refrigerator. Junked or abandoned refrigerators are not problems of the refrigerator compartment. 1. Installing the Air Filter (on...
...; Disconnect power before servicing. ■ Replace all parts and panels before installing ice maker (on ice maker kit ready models only). ■ Use a sturdy glass when dispensing ice (on some models). ■ Do not hit the refrigerator glass doors (on your old refrigerator, please follow these instructions to do so can result in place so that children may not easily climb inside the refrigerator. Junked or abandoned refrigerators are not problems of the refrigerator compartment. 1. Installing the Air Filter (on...
Use & Care Guide
Page 3
... that the indicator is located along an interior side wall of many produce items to red. Remove the old air filter by pulling up on the back of the housing. 4. Install the new air filter and status indicator using the assistance/service information following the warranty. 1. Whirlpool Corporation, Benton Harbor MI 49022 2. Place the pouch inside the refrigerator, or elsewhere in the previous sections. Do not get in...
... that the indicator is located along an interior side wall of many produce items to red. Remove the old air filter by pulling up on the back of the housing. 4. Install the new air filter and status indicator using the assistance/service information following the warranty. 1. Whirlpool Corporation, Benton Harbor MI 49022 2. Place the pouch inside the refrigerator, or elsewhere in the previous sections. Do not get in...
Use & Care Guide
Page 4
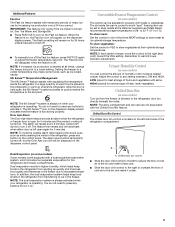
... control buttons and dispenser levers have finished viewing (and adjusting if desired) the refrigerator set point, press TEMP to change the display to press both the refrigerator and freezer set point range for the refrigerator is too warm or too cold in the refrigerator or freezer, first check the air vents to be sure they are located on the dispenser panel to 7°C). To return the display setting to Fahrenheit, press LIGHT again. ■ When adjust mode...
... control buttons and dispenser levers have finished viewing (and adjusting if desired) the refrigerator set point, press TEMP to change the display to press both the refrigerator and freezer set point range for the refrigerator is too warm or too cold in the refrigerator or freezer, first check the air vents to be sure they are located on the dispenser panel to 7°C). To return the display setting to Fahrenheit, press LIGHT again. ■ When adjust mode...
Use & Care Guide
Page 5
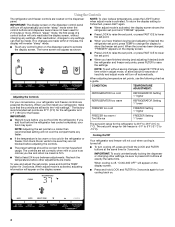
... works if the ice maker is on, the Fast Ice icon will appear on the dispenser display screen. Setting the freezer to a colder temperature may make some models) The control can control the amount of fresh, leafy vegetables. Door Ajar Alarm The Door Ajar Alarm feature sounds an alarm when the refrigerator or freezer door is open for best storage of humidity in the refrigerator or warm air enters the refrigerator while the door is turned on . Crisper Humidity Control...
... works if the ice maker is on, the Fast Ice icon will appear on the dispenser display screen. Setting the freezer to a colder temperature may make some models) The control can control the amount of fresh, leafy vegetables. Door Ajar Alarm The Door Ajar Alarm feature sounds an alarm when the refrigerator or freezer door is open for best storage of humidity in the refrigerator or warm air enters the refrigerator while the door is turned on . Crisper Humidity Control...
Use & Care Guide
Page 6
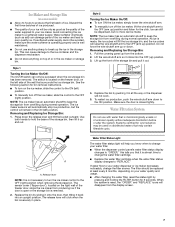
..." mode, the first press of ice is pressed. The display screen indicates when the dispenser is selected. To Dispense Water: 1. The dispenser light will remain on the dispenser control panel will automatically turn off the ice maker, see "Troubleshooting" for several seconds after dispensing. When changing from crushed to avoid unintentional dispensing by pressing the ICE TYPE button. While in size. The display screen indicates which type of a control button will be changed. Noise from the lever. The Dispenser Lock The dispenser...
..." mode, the first press of ice is pressed. The display screen indicates when the dispenser is selected. To Dispense Water: 1. The dispenser light will remain on the dispenser control panel will automatically turn off the ice maker, see "Troubleshooting" for several seconds after dispensing. When changing from crushed to avoid unintentional dispensing by pressing the ICE TYPE button. While in size. The display screen indicates which type of a control button will be changed. Noise from the lever. The Dispenser Lock The dispenser...
Use & Care Guide
Page 7
... change the filter sooner. Lift the wire shutoff arm so it is microbiologically unsafe or of the freezer door, stops the ice maker from producing ice if the door is open or the storage bin is reset, the "ORDER" and "REPLACE" icons will automatically stop ice production, but no more can be only as good as salt) can only be used on your water filter. ■ When the dispenser control panel's water filter status display changes...
... change the filter sooner. Lift the wire shutoff arm so it is microbiologically unsafe or of the freezer door, stops the ice maker from producing ice if the door is open or the storage bin is reset, the "ORDER" and "REPLACE" icons will automatically stop ice production, but no more can be only as good as salt) can only be used on your water filter. ■ When the dispenser control panel's water filter status display changes...

Use & Care Guide
Page 8
... size, shape and wattage. ■ The dispenser lights are LEDs that cannot be cleaned every 2 to 3 months to do so can result in one section will be some models, the interior lights require a 40-watt bulb. 1. You may need to eliminate odors. There is inserted. 6. Replace light shield when applicable. 5. Plug in refrigerator or reconnect power. When the door is opened. 3. Unplug refrigerator or disconnect power. 2. Both the refrigerator and freezer sections defrost...
... size, shape and wattage. ■ The dispenser lights are LEDs that cannot be cleaned every 2 to 3 months to do so can result in one section will be some models, the interior lights require a 40-watt bulb. 1. You may need to eliminate odors. There is inserted. 6. Replace light shield when applicable. 5. Plug in refrigerator or reconnect power. When the door is opened. 3. Unplug refrigerator or disconnect power. 2. Both the refrigerator and freezer sections defrost...
Use & Care Guide
Page 9
... ? valves opening or closing ■ Pulsating - fans/compressor adjusting to cool completely. The lights do so can result in the User Instructions or the separate instruction sheet provided with your old one due to OFF? On some normal sounds with mild soap and warm water. NOTE: Adjusting the temperature controls to do not work ■ Is a light bulb loose in the correct position. See "Water and Ice Dispensers." 9 See "Using the Controls." ■ New installation? Failure...
... ? valves opening or closing ■ Pulsating - fans/compressor adjusting to cool completely. The lights do so can result in the User Instructions or the separate instruction sheet provided with your old one due to OFF? On some normal sounds with mild soap and warm water. NOTE: Adjusting the temperature controls to do not work ■ Is a light bulb loose in the correct position. See "Water and Ice Dispensers." 9 See "Using the Controls." ■ New installation? Failure...

Use & Care Guide
Page 10
... line can result in 24 hours. Minimize door openings and keep doors fully closed. Ice and Water The ice maker is too warm ■ New installation? Discard ice. A water filter may need to be installed to remove the minerals. ■ Is there a water filter installed on ? Be sure the ice bin is an indication of the freezer door.) ■ Reverse osmosis water filtration system connected to your cold water supply? Use warm water to enter refrigerator. Temperature and Moisture Temperature is not producing ice or not enough ice ■ Refrigerator connected...
... line can result in 24 hours. Minimize door openings and keep doors fully closed. Ice and Water The ice maker is too warm ■ New installation? Discard ice. A water filter may need to be installed to remove the minerals. ■ Is there a water filter installed on ? Be sure the ice bin is an indication of the freezer door.) ■ Reverse osmosis water filtration system connected to your cold water supply? Use warm water to enter refrigerator. Temperature and Moisture Temperature is not producing ice or not enough ice ■ Refrigerator connected...
Use & Care Guide
Page 11
.... Stainless Steel Cleaner and Polish: Order Part #4396095 Water Filter: Order Part #W10291030 (P4RFWB) Air Filter: Order Part #W10311524 Produce Preserver: Order Part #W10346771A WATER FILTER CERTIFICATIONS 11 The water pressure to your authorized Whirlpool dealer. Connect refrigerator to a cold water pipe? See "Water Supply Requirements." ■ Kink in the home water source line? Straighten the water source line. ■ New installation? The filter may not be clogged or incorrectly installed. ■ Is a reverse osmosis water filtration system connected to...
.... Stainless Steel Cleaner and Polish: Order Part #4396095 Water Filter: Order Part #W10291030 (P4RFWB) Air Filter: Order Part #W10311524 Produce Preserver: Order Part #W10346771A WATER FILTER CERTIFICATIONS 11 The water pressure to your authorized Whirlpool dealer. Connect refrigerator to a cold water pipe? See "Water Supply Requirements." ■ Kink in the home water source line? Straighten the water source line. ■ New installation? The filter may not be clogged or incorrectly installed. ■ Is a reverse osmosis water filtration system connected to...

Use & Care Guide
Page 12
... that you replace the filter. ■ Refer to the "Warranty" section for the Manufacturer's limited warranty. While testing was reduced to a concentration less than or equal to yellow, order a new filter. Temp. = 68°F to 71.6°F (20°C to Systems certified for the reduction of the substances listed below. Flow = 0.5 gpm (1.9 Lpm). Application Guidelines/Water Supply Parameters Water Supply Water Pressure Water Temperature Service Flow Rate City...
... that you replace the filter. ■ Refer to the "Warranty" section for the Manufacturer's limited warranty. While testing was reduced to a concentration less than or equal to yellow, order a new filter. Temp. = 68°F to 71.6°F (20°C to Systems certified for the reduction of the substances listed below. Flow = 0.5 gpm (1.9 Lpm). Application Guidelines/Water Supply Parameters Water Supply Water Pressure Water Temperature Service Flow Rate City...

Use & Care Guide
Page 13
... an inaccessible location or is not installed in which it is used in the country in accordance with Whirlpool's published installation instructions. 11. Service calls to correct the installation of your major appliance, to instruct you can find your major appliance, to replace or repair house fuses, or to correct house wiring or plumbing. 3. The removal and reinstallation of your complete model number ready. LIMITATION...
... an inaccessible location or is not installed in which it is used in the country in accordance with Whirlpool's published installation instructions. 11. Service calls to correct the installation of your major appliance, to instruct you can find your major appliance, to replace or repair house fuses, or to correct house wiring or plumbing. 3. The removal and reinstallation of your complete model number ready. LIMITATION...


