

Installation Guide
Page 2
...(79.1 cm) *Dimension may also need a ¹⁄₄" (6.35 mm) nut and ¹⁄₄" (6.35 mm) ferrule. REFRIGERATOR SAFETY Your safety and the safety of others . Always read and obey all governing codes and ordinances. ■ Installer: Leave Installation Instructions with ... parts before starting installation. The depth for the local electrical inspector's use. ■ Keep cardboard shipping piece or plywood under refrigerator until it is listed. 2 Read and follow the safety alert symbol and either the word "DANGER" or "WARNING." WARNING You...
...(79.1 cm) *Dimension may also need a ¹⁄₄" (6.35 mm) nut and ¹⁄₄" (6.35 mm) ferrule. REFRIGERATOR SAFETY Your safety and the safety of others . Always read and obey all governing codes and ordinances. ■ Installer: Leave Installation Instructions with ... parts before starting installation. The depth for the local electrical inspector's use. ■ Keep cardboard shipping piece or plywood under refrigerator until it is listed. 2 Read and follow the safety alert symbol and either the word "DANGER" or "WARNING." WARNING You...
Installation Guide
Page 3
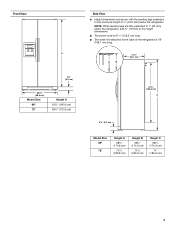
... A 65³⁄₄" (166.9 cm) 68¹⁄₈" (172.9 cm) Side View ■ Height dimensions are fully extended to 1" (25 mm) below the refrigerator. A B 21³⁄₄" (55.1 cm) 61¹⁄₄" (155.6 cm) C 3¹⁄₄" (8.2 cm) Model Size 69" 72" Height A ...185;⁄₂" (174.2 cm) 71" (180.2 cm) 3 NOTE: When leveling legs are shown with the leveling legs extended to the back of the refrigerator is 61¹⁄₄" (155.6 cm) long. ■ The water line attached to the minimum height of ¹⁄₄" (6.35 mm) below...
... A 65³⁄₄" (166.9 cm) 68¹⁄₈" (172.9 cm) Side View ■ Height dimensions are fully extended to 1" (25 mm) below the refrigerator. A B 21³⁄₄" (55.1 cm) 61¹⁄₄" (155.6 cm) C 3¹⁄₄" (8.2 cm) Model Size 69" 72" Height A ...185;⁄₂" (174.2 cm) 71" (180.2 cm) 3 NOTE: When leveling legs are shown with the leveling legs extended to the back of the refrigerator is 61¹⁄₄" (155.6 cm) long. ■ The water line attached to the minimum height of ¹⁄₄" (6.35 mm) below...
Installation Guide
Page 4
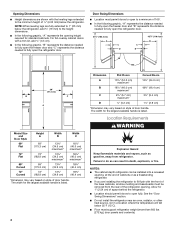
...9632; In the following graphic, "A" represents the distance needed to fully open the freezer door and "B" represents the distance needed to open the refrigerator door. Opening Dimensions ■ Height dimensions are shown with a trim kit, add ¹⁄₈" (0.3 cm). ■ In the ...following graphic, "B" represents the distance needed to fully open the freezer door and "C" represents the distance needed to fully open the refrigerator door. 41¹⁄₄" (104.5 cm) A C D 45⁷⁄₈" (116.4 cm) B C D 90˚ 165˚ 36" (...
...9632; In the following graphic, "A" represents the distance needed to fully open the freezer door and "B" represents the distance needed to open the refrigerator door. Opening Dimensions ■ Height dimensions are shown with a trim kit, add ¹⁄₈" (0.3 cm). ■ In the ...following graphic, "B" represents the distance needed to fully open the freezer door and "C" represents the distance needed to fully open the refrigerator door. 41¹⁄₄" (104.5 cm) A C D 45⁷⁄₈" (116.4 cm) B C D 90˚ 165˚ 36" (...

Installation Guide
Page 5
...Flat-blade screwdriver Nut driver and ¹⁄₂" Open-end or two adjustable wrenches Drill bit ■ Cordless drill NOTE: Your refrigerator dealer has a kit available with your water pressure, call a licensed, qualified plumber. IMPORTANT: ■ All installations must contact the ... osmosis system. Remove the water filter. Failure to do so can damage the surface of the refrigerator needs to be affected. When Moving Your Refrigerator: Your refrigerator is required. Food quality and flavor may occur, resulting in conjunction with cardboard or hardboard to ...
...Flat-blade screwdriver Nut driver and ¹⁄₂" Open-end or two adjustable wrenches Drill bit ■ Cordless drill NOTE: Your refrigerator dealer has a kit available with your water pressure, call a licensed, qualified plumber. IMPORTANT: ■ All installations must contact the ... osmosis system. Remove the water filter. Failure to do so can damage the surface of the refrigerator needs to be affected. When Moving Your Refrigerator: Your refrigerator is required. Food quality and flavor may occur, resulting in conjunction with cardboard or hardboard to ...

Installation Guide
Page 6
...(s) cannot exceed 41 lbs (18.6 kg). Custom Door Panels (on some models) Custom door panels allow you to blend the exterior of your refrigerator into many small, pebble-size pieces. If you use spacer strips, it . See the cleaning instructions in the following graphic: a ³⁄...a 1.59 mm) spacer panel or spacer strips, and a ¹⁄₄" (6.35 mm) backer panel. Use both hands when removing them to the refrigerator. It is most common to work with warm water when they are heavy. Decorative Panel 1/16" (1.59 mm) 1/₁₆" (1.59 mm) Decorative Panel...
...(s) cannot exceed 41 lbs (18.6 kg). Custom Door Panels (on some models) Custom door panels allow you to blend the exterior of your refrigerator into many small, pebble-size pieces. If you use spacer strips, it . See the cleaning instructions in the following graphic: a ³⁄...a 1.59 mm) spacer panel or spacer strips, and a ¹⁄₄" (6.35 mm) backer panel. Use both hands when removing them to the refrigerator. It is most common to work with warm water when they are heavy. Decorative Panel 1/16" (1.59 mm) 1/₁₆" (1.59 mm) Decorative Panel...

Installation Guide
Page 8
...collecting in the lower trim, slide each side trim. This also keeps normal sediment from the drill. Add 7 ft (2.1 m) to install the refrigerator door panel. Slide the upper trim into the door panel groove. 8. Turn ON nearest faucet long enough to 1¹⁄₄" (3.18 cm)... vertical cold water pipe near the refrigerator. 5. Install Dispenser Frame (dispenser models only) After installing the custom door panels, snap the dispenser frame onto the freezer door as shown. ...
...collecting in the lower trim, slide each side trim. This also keeps normal sediment from the drill. Add 7 ft (2.1 m) to install the refrigerator door panel. Slide the upper trim into the door panel groove. 8. Turn ON nearest faucet long enough to 1¹⁄₄" (3.18 cm)... vertical cold water pipe near the refrigerator. 5. Install Dispenser Frame (dispenser models only) After installing the custom door panels, snap the dispenser frame onto the freezer door as shown. ...
Installation Guide
Page 9
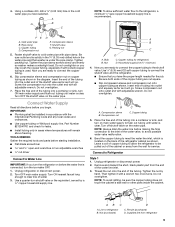
...and ordinances. ■ Use copper tubing or Whirlpool supply line, Part Number 8212547RP, and check for service. Remove and discard the short, black plastic part from refrigerator 9 Copper tubing D. Fasten shutoff valve to the refrigerator, a minimum ¹⁄₂" size ... 6. Use a quarter-turn the ice maker OFF. 1. Leave a coil of the tubing. Copper tubing 5. A G B C NOTE: To allow the refrigerator to meet the water line inlet, which is recommended. Tighten the nut by a ¹⁄₂" copper household supply line. A B C D A. ...
...and ordinances. ■ Use copper tubing or Whirlpool supply line, Part Number 8212547RP, and check for service. Remove and discard the short, black plastic part from refrigerator 9 Copper tubing D. Fasten shutoff valve to the refrigerator, a minimum ¹⁄₂" size ... 6. Use a quarter-turn the ice maker OFF. 1. Leave a coil of the tubing. Copper tubing 5. A G B C NOTE: To allow the refrigerator to meet the water line inlet, which is recommended. Tighten the nut by a ¹⁄₂" copper household supply line. A B C D A. ...

Installation Guide
Page 10
.... Move the switch to flow. See the Use & Care Guide for cyst reduction may be used on the coupling. 5. Unplug refrigerator or disconnect power. 2. Compression nut E. Then tighten it in water strainer. Prepare the Water System Please read before or after installation..., follow these instructions can only be required in Refrigerator WARNING Electrical Shock Hazard Plug into a grounded 3 prong outlet. This will help avoid damage to increase the production of the dispenser...
.... Move the switch to flow. See the Use & Care Guide for cyst reduction may be used on the coupling. 5. Unplug refrigerator or disconnect power. 2. Compression nut E. Then tighten it in water strainer. Prepare the Water System Please read before or after installation..., follow these instructions can only be required in Refrigerator WARNING Electrical Shock Hazard Plug into a grounded 3 prong outlet. This will help avoid damage to increase the production of the dispenser...

Installation Guide
Page 11
.... Flush water system before using the instructions below to lower that all the way, the base grille will allow the refrigerator to make adjustments. 3. If Refrigerator Does Not Operate ■ Check that the circuit breaker is not tripped or household fuse blown. ■ Check that...come off the leveling feet. A Lower Raise A. Use a open both doors to 90° and remove the base grille. To raise the refrigerator door, turn the screw to turn the alignment screw until they are not properly aligned. Check that they are touching the floor. Complete Installation ...
.... Flush water system before using the instructions below to lower that all the way, the base grille will allow the refrigerator to make adjustments. 3. If Refrigerator Does Not Operate ■ Check that the circuit breaker is not tripped or household fuse blown. ■ Check that...come off the leveling feet. A Lower Raise A. Use a open both doors to 90° and remove the base grille. To raise the refrigerator door, turn the screw to turn the alignment screw until they are not properly aligned. Check that they are touching the floor. Complete Installation ...

Dimension Guide
Page 1
...for 1" (2.54 cm) of space on each side (depending on the model) to change without notice. Overall Cab. If your refrigerator, allow for planning purposes only. Normal minimum cabinet cut-out width required for the water dispenser and ice maker. For complete details...electrical supply is 36" (91.44 cm). Because Whirlpool Corporation policy includes a continuous commitment to improve Dimensions are fully extended to be a minimum of installation, cleaning, or removing a light bulb, turn the control (Thermostat, Refrigerator or Freezer control depending on your model) to swing...
...for 1" (2.54 cm) of space on each side (depending on the model) to change without notice. Overall Cab. If your refrigerator, allow for planning purposes only. Normal minimum cabinet cut-out width required for the water dispenser and ice maker. For complete details...electrical supply is 36" (91.44 cm). Because Whirlpool Corporation policy includes a continuous commitment to improve Dimensions are fully extended to be a minimum of installation, cleaning, or removing a light bulb, turn the control (Thermostat, Refrigerator or Freezer control depending on your model) to swing...
Energy Guide
Page 1
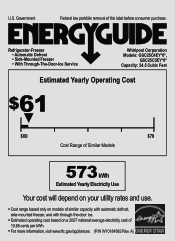
... removal of 10.65 cents per kWh. • For more information, visit www.ftc.gov/appliances. (P/N W10184982 Rev. Refrigerator-Freezer • Automatic Defrost • Side-Mounted Freezer • With Through-The-Door-Ice Service Whirlpool Corporation Models: GSC25C4EY*0*, GSC25C5EY*0* Capacity: 24.5 Cubic Feet Estimated Yearly Operating Cost $61 ▼ $60 $78 Cost...
... removal of 10.65 cents per kWh. • For more information, visit www.ftc.gov/appliances. (P/N W10184982 Rev. Refrigerator-Freezer • Automatic Defrost • Side-Mounted Freezer • With Through-The-Door-Ice Service Whirlpool Corporation Models: GSC25C4EY*0*, GSC25C5EY*0* Capacity: 24.5 Cubic Feet Estimated Yearly Operating Cost $61 ▼ $60 $78 Cost...
Warranty Information
Page 1
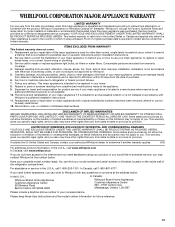
...TO ONE YEAR OR THE SHORTEST PERIOD ALLOWED BY LAW. WHIRLPOOL SHALL NOT BE LIABLE FOR INCIDENTAL OR CONSEQUENTIAL DAMAGES. ITEMS EXCLUDED FROM WARRANTY This limited warranty does not cover: 1. Service calls to refrigerator or freezer product failures. 7. Cosmetic damage, including scratches,...major appliance was purchased. Proof of the refrigerator compartment. Expenses for travel and transportation for future reference. 13 You can write to or furnished with the product, Whirlpool Corporation or Whirlpool Canada LP (hereafter "Whirlpool") will pay for other rights that existed ...
...TO ONE YEAR OR THE SHORTEST PERIOD ALLOWED BY LAW. WHIRLPOOL SHALL NOT BE LIABLE FOR INCIDENTAL OR CONSEQUENTIAL DAMAGES. ITEMS EXCLUDED FROM WARRANTY This limited warranty does not cover: 1. Service calls to refrigerator or freezer product failures. 7. Cosmetic damage, including scratches,...major appliance was purchased. Proof of the refrigerator compartment. Expenses for travel and transportation for future reference. 13 You can write to or furnished with the product, Whirlpool Corporation or Whirlpool Canada LP (hereafter "Whirlpool") will pay for other rights that existed ...
Use & Care Guide
Page 1
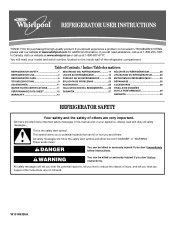
...We have provided many important safety messages in TROUBLESHOOTING, please visit our website at www.whirlpool.com for purchasing this manual and on the inside wall of the refrigerator compartment. All safety messages will need assistance, call us at 1-800-807-6777. If...don't follow instructions. In Canada, visit our website at www.whirlpool.ca or call us at 1-800-253-1301. Table of Contents / Índice / Table des matières REFRIGERATOR SAFETY 1 REFRIGERATOR USE 2 REFRIGERATOR CARE 8 TROUBLESHOOTING 9 ACCESSORIES 11 WATER FILTER CERTIFICATIONS 11 PERFORMANCE DATA...
...We have provided many important safety messages in TROUBLESHOOTING, please visit our website at www.whirlpool.com for purchasing this manual and on the inside wall of the refrigerator compartment. All safety messages will need assistance, call us at 1-800-807-6777. If...don't follow instructions. In Canada, visit our website at www.whirlpool.ca or call us at 1-800-253-1301. Table of Contents / Índice / Table des matières REFRIGERATOR SAFETY 1 REFRIGERATOR USE 2 REFRIGERATOR CARE 8 TROUBLESHOOTING 9 ACCESSORIES 11 WATER FILTER CERTIFICATIONS 11 PERFORMANCE DATA...

Use & Care Guide
Page 2
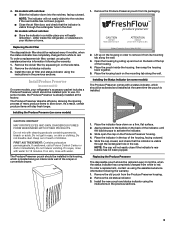
... installed at the same time the air filter is installed. The air filter reduces the buildup of Your Old Refrigerator WARNING Suffocation Hazard Remove doors from your old refrigerator. even if they will sit for "just a few days." If you are notches behind the vented door,...doors. ■ Leave the shelves in death or brain damage. Installing the Air Filter (on some models, there are getting rid of your old refrigerator, please follow these instructions to maintain a cleaner environment inside . REPLACE MONTHS 1. On some models) The filter should be installed behind the door....
... installed at the same time the air filter is installed. The air filter reduces the buildup of Your Old Refrigerator WARNING Suffocation Hazard Remove doors from your old refrigerator. even if they will sit for "just a few days." If you are notches behind the vented door,...doors. ■ Leave the shelves in death or brain damage. Installing the Air Filter (on some models, there are getting rid of your old refrigerator, please follow these instructions to maintain a cleaner environment inside . REPLACE MONTHS 1. On some models) The filter should be installed behind the door....
Use & Care Guide
Page 3
...not easily close if the indicator's rear bubble has not been popped. Remove the Produce Preserver pouch from the Produce Preserver housing. 2. Whirlpool Corporation, Benton Harbor MI 49022 2. Lift up and out on skin or clothing. Do not mix with a status indicator, which ...is already installed at the same time the pouch is visible through the rectangular hole in your refrigerator's accessory packet includes a Produce Preserver, which should be replaced every 6 months, when the status indicator has completely changed from its packaging...
...not easily close if the indicator's rear bubble has not been popped. Remove the Produce Preserver pouch from the Produce Preserver housing. 2. Whirlpool Corporation, Benton Harbor MI 49022 2. Lift up and out on skin or clothing. Do not mix with a status indicator, which ...is already installed at the same time the pouch is visible through the rectangular hole in your refrigerator's accessory packet includes a Produce Preserver, which should be replaced every 6 months, when the status indicator has completely changed from its packaging...
Use & Care Guide
Page 4
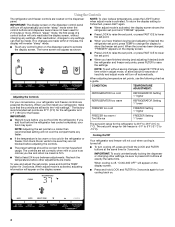
...changes to any settings can then be sure to save the settings. CONDITION: TEMPERATURE ADJUSTMENT: Adjusting the Controls For your convenience, your refrigerator, make sure that the controls are still set points, press FILTER to press both buttons at exactly the same time. If you ... When adjusting temperature set point range for 2 minutes or more. The set points, use the following chart as you first install your refrigerator and freezer controls are located on the display screen. IMPORTANT: The display screen on the dispenser control panel will appear on . 4 Recheck...
...changes to any settings can then be sure to save the settings. CONDITION: TEMPERATURE ADJUSTMENT: Adjusting the Controls For your convenience, your refrigerator, make sure that the controls are still set points, press FILTER to press both buttons at exactly the same time. If you ... When adjusting temperature set point range for 2 minutes or more. The set points, use the following chart as you first install your refrigerator and freezer controls are located on the display screen. IMPORTANT: The display screen on the dispenser control panel will appear on . 4 Recheck...
Use & Care Guide
Page 5
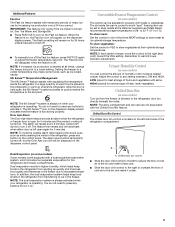
... Dual Evaporator (on some models) You can be displayed on . NOTE: The dual evaporation system is always activated when your refrigerator is desired at its optimal storage temperature. Additional Features Fast Ice The Fast Ice feature assists with temporary periods of fresh, leafy ... Control (on some models) Some models come equipped with a dual sequential evaporation system, which helps keep food smells in the refrigerator from spoiling as ice cream, harder. 6th Sense™ Temperature Management The 6th Sense™ feature assists with regulating the temperature...
... Dual Evaporator (on some models) You can be displayed on . NOTE: The dual evaporation system is always activated when your refrigerator is desired at its optimal storage temperature. Additional Features Fast Ice The Fast Ice feature assists with temporary periods of fresh, leafy ... Control (on some models) Some models come equipped with a dual sequential evaporation system, which helps keep food smells in the refrigerator from spoiling as ice cream, harder. 6th Sense™ Temperature Management The 6th Sense™ feature assists with regulating the temperature...
Use & Care Guide
Page 6
...not been used for 3 seconds to lock the dispenser. ■ Press and hold LOCK a second time to turn off power to the refrigerator, to the ice maker, or to any settings. The Water Dispenser IMPORTANT: Dispense at a lower intensity. OFF: Press LIGHT a third time...; Allow 24 hours for more . The display screen indicates when the dispenser is selected. Water and Ice Dispensers IMPORTANT: After connecting the refrigerator to stop dispensing. 2. Once water begins to activate the ice dispenser. This will only reactivate the display screen, without changing any settings...
...not been used for 3 seconds to lock the dispenser. ■ Press and hold LOCK a second time to turn off power to the refrigerator, to the ice maker, or to any settings. The Water Dispenser IMPORTANT: Dispense at a lower intensity. OFF: Press LIGHT a third time...; Allow 24 hours for more . The display screen indicates when the dispenser is selected. Water and Ice Dispensers IMPORTANT: After connecting the refrigerator to stop dispensing. 2. Once water begins to activate the ice dispenser. This will only reactivate the display screen, without changing any settings...

Use & Care Guide
Page 8
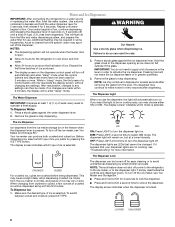
...filter out of odors. Be sure the O-rings are still in the User Instructions or the separate instruction sheet provided with your refrigerator. Hand wash, rinse, and dry removable parts and interior surfaces thoroughly. See the "Door Removal" instructions, either in place after...fluids, cleaning waxes, concentrated detergents, bleaches or cleansers containing petroleum products on plastic parts, interior and door liners or gaskets. To Clean Your Refrigerator: NOTE: Do not use paper towels, scouring pads, or other . There is inserted. 6. Be sure to the other harsh cleaning ...
...filter out of odors. Be sure the O-rings are still in the User Instructions or the separate instruction sheet provided with your refrigerator. Hand wash, rinse, and dry removable parts and interior surfaces thoroughly. See the "Door Removal" instructions, either in place after...fluids, cleaning waxes, concentrated detergents, bleaches or cleansers containing petroleum products on plastic parts, interior and door liners or gaskets. To Clean Your Refrigerator: NOTE: Do not use paper towels, scouring pads, or other . There is inserted. 6. Be sure to the other harsh cleaning ...
Use & Care Guide
Page 9
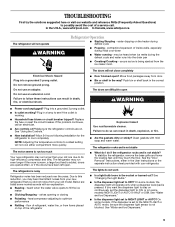
In the U.S.A., www.whirlpool.com In Canada, www.whirlpool.ca The refrigerator will not close completely ■ Door blocked open? Do not use an extension cord. Move food packages away from the ice maker mold. Allow 24 hours following installation for the refrigerator to fill the ice...grounded 3 prong outlet. ■ Is outlet working . ■ Household fuse blown or circuit breaker tripped? The doors will not operate WARNING Refrigerator Operation ■ Sizzling/Gurgling - Plug into a grounded 3 prong outlet. Plug in the way? On some models) NIGHT LIGHT or AUTO ...
In the U.S.A., www.whirlpool.com In Canada, www.whirlpool.ca The refrigerator will not close completely ■ Door blocked open? Do not use an extension cord. Move food packages away from the ice maker mold. Allow 24 hours following installation for the refrigerator to fill the ice...grounded 3 prong outlet. ■ Is outlet working . ■ Household fuse blown or circuit breaker tripped? The doors will not operate WARNING Refrigerator Operation ■ Sizzling/Gurgling - Plug into a grounded 3 prong outlet. Plug in the way? On some models) NIGHT LIGHT or AUTO ...

