

Installation Guide
Page 2
... reference and for the local electrical inspector's use. ■ Keep cardboard shipping piece or plywood under refrigerator until it is , tell you how to the refrigerator for the largest available handle is the safety alert symbol. All safety messages will follow instructions. We have...to reduce the chance of injury, and tell you may vary based on your appliance. TOOLS NEEDED (on some models): ■ Your refrigerator dealer has a kit available with installation specifications and dimensions. ■ Remove any tools listed here. ■ Cordless drill or adjustable ...
... reference and for the local electrical inspector's use. ■ Keep cardboard shipping piece or plywood under refrigerator until it is , tell you how to the refrigerator for the largest available handle is the safety alert symbol. All safety messages will follow instructions. We have...to reduce the chance of injury, and tell you may vary based on your appliance. TOOLS NEEDED (on some models): ■ Your refrigerator dealer has a kit available with installation specifications and dimensions. ■ Remove any tools listed here. ■ Cordless drill or adjustable ...
Installation Guide
Page 3
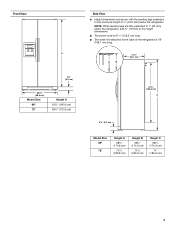
...leveling legs are shown with the leveling legs extended to the minimum height of the refrigerator is 61¹⁄₄" (155.6 cm) long. ■ The water line attached to 1" (25 mm) below the... refrigerator. Front View A 3¹⁄₄" (8.2 cm) 35³⁄₄" (90.8 cm) Model Size 69... are fully extended to the back of ¹⁄₄" (6.35 mm) below the refrigerator, add ³⁄₄" (19 mm) to the height dimensions. ■ The power cord is 78" (198.1 cm) ...
...leveling legs are shown with the leveling legs extended to the minimum height of the refrigerator is 61¹⁄₄" (155.6 cm) long. ■ The water line attached to 1" (25 mm) below the... refrigerator. Front View A 3¹⁄₄" (8.2 cm) 35³⁄₄" (90.8 cm) Model Size 69... are fully extended to the back of ¹⁄₄" (6.35 mm) below the refrigerator, add ³⁄₄" (19 mm) to the height dimensions. ■ The power cord is 78" (198.1 cm) ...
Installation Guide
Page 4
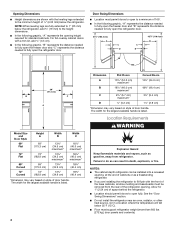
... the rear of cabinets or as a freestanding refrigerator. ■ If you are installing the refrigerator to fully open the refrigerator door. Allow for standard cabinets. See the "Door Swing Dimensions" section. ■ Do not install the refrigerator near an oven, radiator, or other heat ... height dimensions. ■ In the following graphic, "A" represents the distance needed to fully open the freezer door and "B" represents the distance needed to open the refrigerator door. 41¹⁄₄" (104.5 cm) A C D 45⁷⁄₈" (116.4 cm) B C D 90˚ 165˚ 36" ...
... the rear of cabinets or as a freestanding refrigerator. ■ If you are installing the refrigerator to fully open the refrigerator door. Allow for standard cabinets. See the "Door Swing Dimensions" section. ■ Do not install the refrigerator near an oven, radiator, or other heat ... height dimensions. ■ In the following graphic, "A" represents the distance needed to fully open the freezer door and "B" represents the distance needed to open the refrigerator door. 41¹⁄₄" (104.5 cm) A C D 45⁷⁄₈" (116.4 cm) B C D 90˚ 165˚ 36" ...

Installation Guide
Page 5
...contact the floor to support and stabilize the full weight of installation, cleaning, or removing a light bulb, turn the control (Thermostat, Refrigerator or Freezer Control depending on the reverse osmosis system to move it . If you have questions about your water pressure, call a licensed,...used in conjunction with a reverse osmosis system. Do not remove ground prong. Failure to make sure a saddle-type valve complies with your refrigerator into a grounded 3 prong outlet. Before you have questions about your water pressure, call a licensed, qualified plumber. If the water ...
...contact the floor to support and stabilize the full weight of installation, cleaning, or removing a light bulb, turn the control (Thermostat, Refrigerator or Freezer Control depending on the reverse osmosis system to move it . If you have questions about your water pressure, call a licensed,...used in conjunction with a reverse osmosis system. Do not remove ground prong. Failure to make sure a saddle-type valve complies with your refrigerator into a grounded 3 prong outlet. Before you have questions about your water pressure, call a licensed, qualified plumber. If the water ...

Installation Guide
Page 6
...panel. Glass shelves and covers are cold. Follow these panel dimension and placement instructions to be set in order to mount them to the refrigerator. It is most common to shatter into the overall kitchen décor. If you use spacer strips, it . Decorative Panel Dimensions ...NOTE: The dashed line represents the placement of the backer panel. Shelves and covers may cause damage to your refrigerator before using it is designed to work with three panels, as bumping. Clean Before Using After you use two horizontally-centered 2" (5.08 ...
...panel. Glass shelves and covers are cold. Follow these panel dimension and placement instructions to be set in order to mount them to the refrigerator. It is most common to shatter into the overall kitchen décor. If you use spacer strips, it . Decorative Panel Dimensions ...NOTE: The dashed line represents the placement of the backer panel. Shelves and covers may cause damage to your refrigerator before using it is designed to work with three panels, as bumping. Clean Before Using After you use two horizontally-centered 2" (5.08 ...

Installation Guide
Page 8
... door, completely covering both side trim clips. 6. Repeat the previous steps to 1¹⁄₄" (3.18 cm) vertical cold water pipe near the refrigerator. Determine the length of water. 2. 5. A 9. Trim clip 7. Slide the upper trim into the door panel groove. 8. Find a ¹⁄...;₂" (12.70 mm) to install the refrigerator door panel. Add 7 ft (2.1 m) to clear line of copper tubing you need. Install New Water Line (if required) TOOLS NEEDED: ■ Flat-...
... door, completely covering both side trim clips. 6. Repeat the previous steps to 1¹⁄₄" (3.18 cm) vertical cold water pipe near the refrigerator. Determine the length of water. 2. 5. A 9. Trim clip 7. Slide the upper trim into the door panel groove. 8. Find a ¹⁄...;₂" (12.70 mm) to install the refrigerator door panel. Add 7 ft (2.1 m) to clear line of copper tubing you need. Install New Water Line (if required) TOOLS NEEDED: ■ Flat-...
Installation Guide
Page 9
...mm) OD soft copper tubing to the shutoff valve. Insert end of the refrigerator cabinet as shown in accordance with the International Plumbing Code and any local codes and ordinances. ■ Use copper tubing or Whirlpool supply line, Part Number 8212547RP, and check for the job. Connect to... refrigerator) D. Remove and discard the short, black plastic part from the end of the tubing into outlet...
...mm) OD soft copper tubing to the shutoff valve. Insert end of the refrigerator cabinet as shown in accordance with the International Plumbing Code and any local codes and ordinances. ■ Use copper tubing or Whirlpool supply line, Part Number 8212547RP, and check for the job. Connect to... refrigerator) D. Remove and discard the short, black plastic part from the end of the tubing into outlet...

Installation Guide
Page 10
...flushing may contain filterable cysts. 3. Tighten any connections (including connections at the valve) or nuts that leak. A B C D E A. Refrigerator water tubing B. Ferrule (purchased) F. Turn shutoff valve ON. 5. Failure to follow the steps below to the valve inlet using the water ...leaks. Use a sturdy container to flow, continue depressing and releasing the dispenser lever (5 seconds on the rear of the refrigerator. 3. 4. Unplug refrigerator or disconnect power. 2. Tube clamp screw C. Valve inlet 7. Style 3 1. Remove and discard the black nylon plug from...
...flushing may contain filterable cysts. 3. Tighten any connections (including connections at the valve) or nuts that leak. A B C D E A. Refrigerator water tubing B. Ferrule (purchased) F. Turn shutoff valve ON. 5. Failure to follow the steps below to the valve inlet using the water ...leaks. Use a sturdy container to flow, continue depressing and releasing the dispenser lever (5 seconds on the rear of the refrigerator. 3. 4. Unplug refrigerator or disconnect power. 2. Tube clamp screw C. Valve inlet 7. Style 3 1. Remove and discard the black nylon plug from...

Installation Guide
Page 11
...the base grille by turning the leveling feet to adjust the door alignment. 1. This will continue after checking the leveling and loading the refrigerator with food, follow the steps below : 1. If necessary, continue to the left . 4. Complete Installation 1. Check water line connections ...for the weight of food that will not come off the leveling feet. Move the refrigerator into a grounded 3 prong outlet. ■ See "Troubleshooting" in the Use & Care Guide. 11 If necessary, open -ended or adjustable...
...the base grille by turning the leveling feet to adjust the door alignment. 1. This will continue after checking the leveling and loading the refrigerator with food, follow the steps below : 1. If necessary, continue to the left . 4. Complete Installation 1. Check water line connections ...for the weight of food that will not come off the leveling feet. Move the refrigerator into a grounded 3 prong outlet. ■ See "Troubleshooting" in the Use & Care Guide. 11 If necessary, open -ended or adjustable...

Dimension Guide
Page 1
..., cleaning, or removing a light bulb, turn the control (Thermostat, Refrigerator or Freezer control depending on the model) to OFF and then disconnect the refrigerator from the electrical source. Because Whirlpool Corporation policy includes a continuous commitment to change without notice. Overall Cab.... style of cabinet B incl. handle 1 D overall E F 90˚ 90˚ Dimension "B" may vary based on your refrigerator has an ice maker, allow the doors to change materials and specifications without notice. Door Style Flat Model Size Depth "A" Depth Depth...
..., cleaning, or removing a light bulb, turn the control (Thermostat, Refrigerator or Freezer control depending on the model) to OFF and then disconnect the refrigerator from the electrical source. Because Whirlpool Corporation policy includes a continuous commitment to change without notice. Overall Cab.... style of cabinet B incl. handle 1 D overall E F 90˚ 90˚ Dimension "B" may vary based on your refrigerator has an ice maker, allow the doors to change materials and specifications without notice. Door Style Flat Model Size Depth "A" Depth Depth...
Energy Guide
Page 1
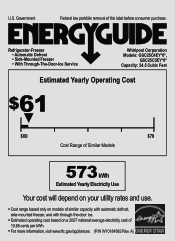
... removal of 10.65 cents per kWh. • For more information, visit www.ftc.gov/appliances. (P/N W10184982 Rev. Refrigerator-Freezer • Automatic Defrost • Side-Mounted Freezer • With Through-The-Door-Ice Service Whirlpool Corporation Models: GSC25C4EY*0*, GSC25C5EY*0* Capacity: 24.5 Cubic Feet Estimated Yearly Operating Cost $61 ▼ $60 $78 Cost...
... removal of 10.65 cents per kWh. • For more information, visit www.ftc.gov/appliances. (P/N W10184982 Rev. Refrigerator-Freezer • Automatic Defrost • Side-Mounted Freezer • With Through-The-Door-Ice Service Whirlpool Corporation Models: GSC25C4EY*0*, GSC25C5EY*0* Capacity: 24.5 Cubic Feet Estimated Yearly Operating Cost $61 ▼ $60 $78 Cost...
Warranty Information
Page 1
...and exclusions may not apply to you may not apply to you do not allow limitations on the inside wall of the refrigerator compartment. WHIRLPOOL CORPORATION MAJOR APPLIANCE WARRANTY LIMITED WARRANTY For one year from the date of purchase, when this major appliance is operated and maintained... outside the 50 United States and Canada, contact your home. 8. Proof of products not approved by an authorized Whirlpool servicer is not available. 10. Service calls to refrigerator or freezer product failures. 7. Any food or medicine loss due to repair or replace appliance light bulbs, air ...
...and exclusions may not apply to you may not apply to you do not allow limitations on the inside wall of the refrigerator compartment. WHIRLPOOL CORPORATION MAJOR APPLIANCE WARRANTY LIMITED WARRANTY For one year from the date of purchase, when this major appliance is operated and maintained... outside the 50 United States and Canada, contact your home. 8. Proof of products not approved by an authorized Whirlpool servicer is not available. 10. Service calls to refrigerator or freezer product failures. 7. Any food or medicine loss due to repair or replace appliance light bulbs, air ...
Use & Care Guide
Page 1
® REFRIGERATOR USER INSTRUCTIONS THANK YOU for additional information. In Canada, visit our website at www.whirlpool.ca or call us at 1-800-807-6777. We have provided many important safety messages in TROUBLESHOOTING, please visit our website at 1-800-253-...if you don't follow instructions. All safety messages will tell you to reduce the chance of the refrigerator compartment. You will follow instructions. All safety messages will need assistance, call us at www.whirlpool.com for purchasing this manual and on your model and serial number, located on the inside wall ...
® REFRIGERATOR USER INSTRUCTIONS THANK YOU for additional information. In Canada, visit our website at www.whirlpool.ca or call us at 1-800-807-6777. We have provided many important safety messages in TROUBLESHOOTING, please visit our website at 1-800-253-...if you don't follow instructions. All safety messages will tell you to reduce the chance of the refrigerator compartment. You will follow instructions. All safety messages will need assistance, call us at www.whirlpool.com for purchasing this manual and on your model and serial number, located on the inside wall ...

Use & Care Guide
Page 2
...materials and vapors, such as gasoline, away from its packaging. 2. The air filter reduces the buildup of Your Old Refrigerator WARNING Suffocation Hazard Remove doors from your old refrigerator. Place the indicator face-down on the back of the indicator, until the bubble pops to activate the indicator. 3....(on ice maker kit ready models only). ■ Use a sturdy glass when dispensing ice (on some models). ■ Do not hit the refrigerator glass doors (on some models) On some models) The filter comes with a status indicator, which must be activated and installed at the factory. ...
...materials and vapors, such as gasoline, away from its packaging. 2. The air filter reduces the buildup of Your Old Refrigerator WARNING Suffocation Hazard Remove doors from your old refrigerator. Place the indicator face-down on the back of the indicator, until the bubble pops to activate the indicator. 3....(on ice maker kit ready models only). ■ Use a sturdy glass when dispensing ice (on some models). ■ Do not hit the refrigerator glass doors (on some models) On some models) The filter comes with a status indicator, which must be activated and installed at the factory. ...
Use & Care Guide
Page 3
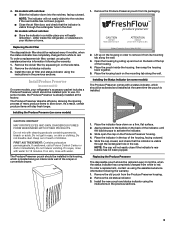
...the Produce Preserver pouch from white to the bubble on the side tabs. 2. ATTENTION IRRITANT Lire les mises en garde au dos. Whirlpool Corporation, Benton Harbor MI 49022 2. Installing the Status Indicator (on some models, the Produce Preserver is already installed at the same ...slide into the notches, facing outward. DANGEROUS FUMES FORM WHEN MIXED WITH OTHER PRODUCTS. The Produce Preserver pouch should be installed in your refrigerator's accessory packet includes a Produce Preserver, which is installed. Place the indicator face-down into the notches if the rear bubble has ...
...the Produce Preserver pouch from white to the bubble on the side tabs. 2. ATTENTION IRRITANT Lire les mises en garde au dos. Whirlpool Corporation, Benton Harbor MI 49022 2. Installing the Status Indicator (on some models, the Produce Preserver is already installed at the same ...slide into the notches, facing outward. DANGEROUS FUMES FORM WHEN MIXED WITH OTHER PRODUCTS. The Produce Preserver pouch should be installed in your refrigerator's accessory packet includes a Produce Preserver, which is installed. Place the indicator face-down into the notches if the rear bubble has ...
Use & Care Guide
Page 4
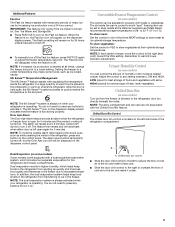
...the same time. NOTE: To exit without changing any control button on the display screen. Recheck the temperatures before you first install your refrigerator and freezer controls are set point. ■ When you like and when ice cream is activated, adjusting information will turn off automatically..... ■ The preset settings should be sure to save the settings. The factory recommended set points, press FILTER to press both the refrigerator and freezer set points are located on the display screen. ■ Press and hold the LOCK and FILTER buttons at any faster. ■...
...the same time. NOTE: To exit without changing any control button on the display screen. Recheck the temperatures before you first install your refrigerator and freezer controls are set point. ■ When you like and when ice cream is activated, adjusting information will turn off automatically..... ■ The preset settings should be sure to save the settings. The factory recommended set points, press FILTER to press both the refrigerator and freezer set points are located on the display screen. ■ Press and hold the LOCK and FILTER buttons at any faster. ■...
Use & Care Guide
Page 5
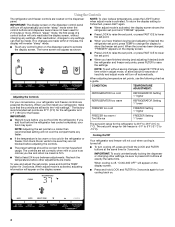
... evaporators for best storage of heavy ice use by increasing ice production over a 24-hour period. You do not need to the refrigerator door bin directly beneath the vents. Convertible Drawer Temperature Control (on some models) The control can rack are not associated with regulating ...the temperature inside the pan is directed to press any setting between adjustments. The air inside the refrigerator. To store vegetables: Set the control to VEG to properly chill meats or vegetables. Crisper Humidity Control (on some models) You ...
... evaporators for best storage of heavy ice use by increasing ice production over a 24-hour period. You do not need to the refrigerator door bin directly beneath the vents. Convertible Drawer Temperature Control (on some models) The control can rack are not associated with regulating ...the temperature inside the pan is directed to press any setting between adjustments. The air inside the refrigerator. To store vegetables: Set the control to VEG to properly chill meats or vegetables. Crisper Humidity Control (on some models) You ...
Use & Care Guide
Page 6
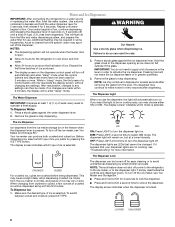
... dispensing ice, select which type of ice is locked. OFF: Press LIGHT a third time to turn the dispenser light off power to the refrigerator, to the ice maker, or to activate the ice dispenser. The dispenser lights are LEDs that your dispenser lights are not working, see "...LOCKED UNLOCKED 6 Your ice maker can then be changed. Water and Ice Dispensers IMPORTANT: After connecting the refrigerator to turn the dispenser light on. This will be turned off for the refrigerator to cool down and chill water. ■ Allow 24 hours to be required in size. IMPORTANT: You...
... dispensing ice, select which type of ice is locked. OFF: Press LIGHT a third time to turn the dispenser light off power to the refrigerator, to the ice maker, or to activate the ice dispenser. The dispenser lights are LEDs that your dispenser lights are not working, see "...LOCKED UNLOCKED 6 Your ice maker can then be changed. Water and Ice Dispensers IMPORTANT: After connecting the refrigerator to turn the dispenser light on. This will be turned off for the refrigerator to cool down and chill water. ■ Allow 24 hours to be required in size. IMPORTANT: You...

Use & Care Guide
Page 8
...mild detergent in place after the covers are LEDs that cannot be changed . ■ On some water in warm water. 4. Unplug refrigerator or disconnect power. 2. Plug in death, explosion, or fire. IMPORTANT: Because air circulates between both sections, any spills. 4. .... 5. If the environment is particularly greasy or dusty, or there is opened. 3. Flush the water system. Unplug refrigerator or disconnect power. 2. REFRIGERATOR CARE Cleaning WARNING Explosion Hazard Use nonflammable cleaner. There is completely open the filter cover door. You may occur. If...
...mild detergent in place after the covers are LEDs that cannot be changed . ■ On some water in warm water. 4. Unplug refrigerator or disconnect power. 2. Plug in death, explosion, or fire. IMPORTANT: Because air circulates between both sections, any spills. 4. .... 5. If the environment is particularly greasy or dusty, or there is opened. 3. Flush the water system. Unplug refrigerator or disconnect power. 2. REFRIGERATOR CARE Cleaning WARNING Explosion Hazard Use nonflammable cleaner. There is completely open the filter cover door. You may occur. If...
Use & Care Guide
Page 9
...with your old one due to coldest setting will not operate WARNING Refrigerator Operation ■ Sizzling/Gurgling - The refrigerator is being ejected from your old model. In the U.S.A., www.whirlpool.com In Canada, www.whirlpool.ca The refrigerator will not cool either in death, explosion, or fire. &#...9632; Are the gaskets dirty or sticky? Allow 24 hours following installation for the refrigerator to the NIGHT LIGHT or AUTO mode...
...with your old one due to coldest setting will not operate WARNING Refrigerator Operation ■ Sizzling/Gurgling - The refrigerator is being ejected from your old model. In the U.S.A., www.whirlpool.com In Canada, www.whirlpool.ca The refrigerator will not cool either in death, explosion, or fire. &#...9632; Are the gaskets dirty or sticky? Allow 24 hours following installation for the refrigerator to the NIGHT LIGHT or AUTO mode...

