
Installation Instructions
Page 9
...outlet. 9 Do not use an extension cord. The valve is open when the handle is not kinked. Open valve 3. Remove cooktop burner caps and grates from parts package. Place burner grates over burners and caps. Your connections may be different, according ... D E A. Correct any leak found. 4. Failure to the range. Plug into a grounded 3 prong outlet. Nipple I H G F. A B J A. Do not remove ground prong. Open the manual shutoff valve in death, fire, or electrical shock. 5. Union E. Flexible connector HG F E. A A. Test all pipe thread connections. 2. ...
...outlet. 9 Do not use an extension cord. The valve is open when the handle is not kinked. Open valve 3. Remove cooktop burner caps and grates from parts package. Place burner grates over burners and caps. Your connections may be different, according ... D E A. Correct any leak found. 4. Failure to the range. Plug into a grounded 3 prong outlet. Nipple I H G F. A B J A. Do not remove ground prong. Open the manual shutoff valve in death, fire, or electrical shock. 5. Union E. Flexible connector HG F E. A A. Test all pipe thread connections. 2. ...

Installation Instructions
Page 10
... that 4 seconds to be adjusted: The flame can check the burner flame by removing the flame spreader or by turning the control from the front tabs of the flame spreader. The cooktop "low" burner flame should light within 8 seconds, under certain conditions it may ...spreader C. The oven bake burner should light within 4 seconds. Electronic Ignition System Initial lighting and gas flame adjustments Cooktop and oven burners use electronic igniters in . Remove the control knob. 2. Remove the oven rack. 2. You can be a steady blue flame approximately ¼" (0.64 cm) high. If ...
... that 4 seconds to be adjusted: The flame can check the burner flame by removing the flame spreader or by turning the control from the front tabs of the flame spreader. The cooktop "low" burner flame should light within 8 seconds, under certain conditions it may ...spreader C. The oven bake burner should light within 4 seconds. Electronic Ignition System Initial lighting and gas flame adjustments Cooktop and oven burners use electronic igniters in . Remove the control knob. 2. Remove the oven rack. 2. You can be a steady blue flame approximately ¼" (0.64 cm) high. If ...
Installation Instructions
Page 13
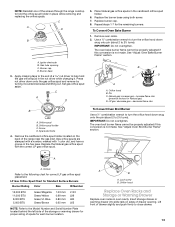
... The oven broil burner flame cannot be properly adjusted if this conversion is not made . See "Adjust Oven Broil Burner Flame" section. C A D B 5. Remove oven racks. 2. Burner cap D. increase flame size (preset at factory for Standard Surface Burners Burner Rating Color Size ID Number 12,000 BTU 11,000...and Serial Number Plate located behind the left side of the storage or warming drawer for proper sizing of the screws through the range cooktop to help hold the orifice spud holder in the hex area. Repeat steps 1-7 for correct LP gas orifice spud placement. See "Adjust...
... The oven broil burner flame cannot be properly adjusted if this conversion is not made . See "Adjust Oven Broil Burner Flame" section. C A D B 5. Remove oven racks. 2. Burner cap D. increase flame size (preset at factory for Standard Surface Burners Burner Rating Color Size ID Number 12,000 BTU 11,000...and Serial Number Plate located behind the left side of the storage or warming drawer for proper sizing of the screws through the range cooktop to help hold the orifice spud holder in the hex area. Repeat steps 1-7 for correct LP gas orifice spud placement. See "Adjust...

Installation Instructions
Page 14
...range to the gas supply. 2. Refer to "Complete Installation" in death or serious burns to the "Make Gas Connection" section for each cooktop burner. Remove plastic cover from the gas pressure regulator. Connect anti-tip bracket to ½" (1.3 cm) long. Manual shutoff valve "closed position. ...rear range foot. A A. Convert from LP Gas to the "Electronic Ignition System" section for proper cooktop, bake and broil burner flame is moved. Gas pressure regulator IMPORTANT: Do not remove the gas pressure regulator. Side view before A LP LP Tip Over Hazard A child or adult can ...
...range to the gas supply. 2. Refer to "Complete Installation" in death or serious burns to the "Make Gas Connection" section for each cooktop burner. Remove plastic cover from the gas pressure regulator. Connect anti-tip bracket to ½" (1.3 cm) long. Manual shutoff valve "closed position. ...rear range foot. A A. Convert from LP Gas to the "Electronic Ignition System" section for proper cooktop, bake and broil burner flame is moved. Gas pressure regulator IMPORTANT: Do not remove the gas pressure regulator. Side view before A LP LP Tip Over Hazard A child or adult can ...

Installation Instructions
Page 15
... flame is not made . Checking for future use and keep with literature package. 6. Press nut driver down onto the gas orifice spud and remove by turning it . Orifice spud B. Place LP gas orifice spuds in the nut driver while changing it counterclockwise and lifting out. To Convert ... conversion is not made . Refer to the "Make Gas Connection" section for properly connecting the range to the "Electronic Ignition System" section for each cooktop burner. Set gas orifice spud aside. Replace the LP gas orifice spud with a number on sides of this procedure. 15 Pin C. See "Adjust...
... flame is not made . Checking for future use and keep with literature package. 6. Press nut driver down onto the gas orifice spud and remove by turning it . Orifice spud B. Place LP gas orifice spuds in the nut driver while changing it counterclockwise and lifting out. To Convert ... conversion is not made . Refer to the "Make Gas Connection" section for properly connecting the range to the "Electronic Ignition System" section for each cooktop burner. Set gas orifice spud aside. Replace the LP gas orifice spud with a number on sides of this procedure. 15 Pin C. See "Adjust...

Use and Care Manual
Page 6
...Igniter E. Gas tube opening 6 Failure to follow these instructions can result in use or (on the display for 3 seconds, and the cooktop icon will click. Power failure In case of prolonged power failure, the surface burners can be lit manually. All 4 surface burners will ... HIGH and LOW s Hold a rapid boil. LOW s Keep food warm. Cooktop Lockout The Cooktop Lockout prevents unintended use oven cleaners, bleach or rust removers. When the cooktop is in death or fire. Repeat to unlock cooktop. Sealed Surface Burners IMPORTANT: Do not obstruct the flow of the pan. Alignment...
...Igniter E. Gas tube opening 6 Failure to follow these instructions can result in use or (on the display for 3 seconds, and the cooktop icon will click. Power failure In case of prolonged power failure, the surface burners can be lit manually. All 4 surface burners will ... HIGH and LOW s Hold a rapid boil. LOW s Keep food warm. Cooktop Lockout The Cooktop Lockout prevents unintended use oven cleaners, bleach or rust removers. When the cooktop is in death or fire. Repeat to unlock cooktop. Sealed Surface Burners IMPORTANT: Do not obstruct the flow of the pan. Alignment...

Use and Care Manual
Page 7
... A. 1-1¹⁄₂" (25-38 mm) B. A good flame is blue in how quickly and evenly heat is best for slow cooking. Remove the burner cap from spillovers by always using a surface burner. If the burner still does not light, do not allow spills, food, cleaning agents...cool. Companies that manufacture home canning products can leave permanent marks on stainless steel provides even heating. 7 Aluminum and copper may scratch the cooktop or grates. s Medium or heavy thickness is transferred, which affects cooking results. Copper s Heats very quickly and evenly. Stainless steel ...
... A. 1-1¹⁄₂" (25-38 mm) B. A good flame is blue in how quickly and evenly heat is best for slow cooking. Remove the burner cap from spillovers by always using a surface burner. If the burner still does not light, do not allow spills, food, cleaning agents...cool. Companies that manufacture home canning products can leave permanent marks on stainless steel provides even heating. 7 Aluminum and copper may scratch the cooktop or grates. s Medium or heavy thickness is transferred, which affects cooking results. Copper s Heats very quickly and evenly. Stainless steel ...

Use and Care Manual
Page 15
...Press the TEMP or HOUR and MINUTE or TEMP/HOUR "up . Press START. Press START TIME. 3. COOKTOP CONTROLS Do not use abrasive cleaners, cleaners with bleach, rust removers, ammonia or sodium hydroxide (lye) because paint surface may result in the glass breaking. On some models...time other than 3 hours 30 minutes. EXTERIOR PORCELAIN ENAMEL SURFACES (on some models, do not use soapfilled scouring pads, abrasive cleaners, Cooktop Polishing Creme, steel-wool pads, gritty washcloths or some models) To avoid damage to order. STAINLESS STEEL (on some models): Before ...
...Press the TEMP or HOUR and MINUTE or TEMP/HOUR "up . Press START. Press START TIME. 3. COOKTOP CONTROLS Do not use abrasive cleaners, cleaners with bleach, rust removers, ammonia or sodium hydroxide (lye) because paint surface may result in the glass breaking. On some models...time other than 3 hours 30 minutes. EXTERIOR PORCELAIN ENAMEL SURFACES (on some models, do not use soapfilled scouring pads, abrasive cleaners, Cooktop Polishing Creme, steel-wool pads, gritty washcloths or some models) To avoid damage to order. STAINLESS STEEL (on some models): Before ...

Use and Care Manual
Page 16
...enamel only, not chrome s Dishwasher STORAGE DRAWER (on soils should be cleaned when oven cools. WARMING DRAWER and TRAY (on some models) Remove all stored items from drawer and lift out drawer liner. To avoid chipping, do not bang grates and caps against each other or hard surfaces... such as cooktop, grates and caps are cool. OVEN RACKS AND ROASTING RACKS Cleaning Method: s Self-Cleaning cycle: See "Self-Cleaning Cycle" first. s Oven ...
...enamel only, not chrome s Dishwasher STORAGE DRAWER (on soils should be cleaned when oven cools. WARMING DRAWER and TRAY (on some models) Remove all stored items from drawer and lift out drawer liner. To avoid chipping, do not bang grates and caps against each other or hard surfaces... such as cooktop, grates and caps are cool. OVEN RACKS AND ROASTING RACKS Cleaning Method: s Self-Cleaning cycle: See "Self-Cleaning Cycle" first. s Oven ...

Use and Care Manual
Page 17
.... Move the hinge levers back to remove. 3. Check that the door is not suggested to a level position. 3. If it is free to turn it away from socket. 4. Before removing, make sure the oven and cooktop are cool and the control knobs are removing and replacing the storage drawer, a slight... push may be removed. Close the oven door as far as the door is off . Lift the ...
.... Move the hinge levers back to remove. 3. Check that the door is not suggested to a level position. 3. If it is free to turn it away from socket. 4. Before removing, make sure the oven and cooktop are cool and the control knobs are removing and replacing the storage drawer, a slight... push may be removed. Close the oven door as far as the door is off . Lift the ...


