Installation Instructions
Page 2
... instructions are very important. Do not store or use any other flammable vapors and liquids in the vicinity of this or any phone in this manual is moved. WHAT TO DO IF YOU SMELL GAS: • Do not try to follow instructions. Installation and service must be killed. RANGE SAFETY Your... "WARNING." In the State of injury, and tell you what can be a T-handle type. WARNING Tip Over Hazard A child or adult can result in this manual and on your gas supplier, call your gas supplier from a neighbor's phone.
... instructions are very important. Do not store or use any other flammable vapors and liquids in the vicinity of this or any phone in this manual is moved. WHAT TO DO IF YOU SMELL GAS: • Do not try to follow instructions. Installation and service must be killed. RANGE SAFETY Your... "WARNING." In the State of injury, and tell you what can be a T-handle type. WARNING Tip Over Hazard A child or adult can result in this manual and on your gas supplier, call your gas supplier from a neighbor's phone.

Installation Instructions
Page 6
.... s Must include a shutoff valve: The supply line must be removed from the supply and fuel lines so range will be equipped with a manual shutoff valve. Burner Input Requirements Input ratings shown on or shutting off gas to the gas supply line. Do not use TEFLON®† tape...less than ½ psi (3.5 kPa). Gas Supply Pressure Testing Line pressure testing above ½ psi gauge (14" WCP) The range and its individual manual shutoff valve during any pressure testing of that system at a rate of that allows ease of LP gas must be as follows for Canada). Shutoff...
.... s Must include a shutoff valve: The supply line must be removed from the supply and fuel lines so range will be equipped with a manual shutoff valve. Burner Input Requirements Input ratings shown on or shutting off gas to the gas supply line. Do not use TEFLON®† tape...less than ½ psi (3.5 kPa). Gas Supply Pressure Testing Line pressure testing above ½ psi gauge (14" WCP) The range and its individual manual shutoff valve during any pressure testing of that system at a rate of that allows ease of LP gas must be as follows for Canada). Shutoff...

Installation Instructions
Page 7
... moved. Before moving range, slide range onto shipping base, cardboard or hardboard. 1. Install Anti-Tip Bracket WARNING 1. Do not remove the shipping base at this manual. 2. Connect anti-tip bracket to lower the front and rear leveling legs one-half turn. Tape template into place. 4. Front leveling leg If cabinet opening...
... moved. Before moving range, slide range onto shipping base, cardboard or hardboard. 1. Install Anti-Tip Bracket WARNING 1. Do not remove the shipping base at this manual. 2. Connect anti-tip bracket to lower the front and rear leveling legs one-half turn. Tape template into place. 4. Front leveling leg If cabinet opening...

Installation Instructions
Page 9
...approved noncorrosive leak-detection solution. Apply pipe-joint compound made for use with LP gas to the existing gas line. Open the manual shutoff valve in death, fire, or electrical shock. 5. Gas pressure regulator B. 90° elbow (must have ½" male pipe thread...positioned, surface burners will not light. Use pipe-joint compound C. Adapter (must be used to connect the range to all connections by brushing on " position. Manual gas shutoff valve F. ½" or ¾" gas pipe G. Plug into a grounded 3 prong outlet. Nipple D. Apply pipe-joint compound made for use ...
...approved noncorrosive leak-detection solution. Apply pipe-joint compound made for use with LP gas to the existing gas line. Open the manual shutoff valve in death, fire, or electrical shock. 5. Gas pressure regulator B. 90° elbow (must have ½" male pipe thread...positioned, surface burners will not light. Use pipe-joint compound C. Adapter (must be used to connect the range to all connections by brushing on " position. Manual gas shutoff valve F. ½" or ¾" gas pipe G. Plug into a grounded 3 prong outlet. Nipple D. Apply pipe-joint compound made for use ...
Installation Instructions
Page 12
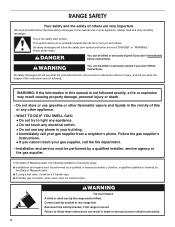
Explosion Hazard Use a new CSA International approved gas supply line. Reconnect the anti-tip bracket, if the range is moved. Manual shutoff valve "closed position. Gas supply line 12 C Side view after A. NOTE: On models with a ⁵⁄₈" combination wrench...child or adult can result in death, explosion, or fire. Unplug range or disconnect power. Examples of storage or warming drawer compartment. Turn the manual shutoff valve to LP Gas WARNING A A. B A C A. Turn over the gas pressure regulator cap and reinstall on regulator so that the ...
Explosion Hazard Use a new CSA International approved gas supply line. Reconnect the anti-tip bracket, if the range is moved. Manual shutoff valve "closed position. Gas supply line 12 C Side view after A. NOTE: On models with a ⁵⁄₈" combination wrench...child or adult can result in death, explosion, or fire. Unplug range or disconnect power. Examples of storage or warming drawer compartment. Turn the manual shutoff valve to LP Gas WARNING A A. B A C A. Turn over the gas pressure regulator cap and reinstall on regulator so that the ...

Installation Instructions
Page 14
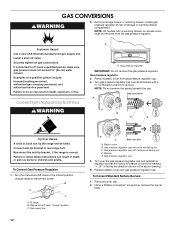
... " position C. Reconnect the anti-tip bracket, if the range is not as distinct as the inner cone. Turn the manual shutoff valve to rear range foot. Unplug range or disconnect power. B A C A. Gas supply line 2. Locate gas pressure regulator at rear ... NG C Side view after A. Gas pressure regulator cap with hollow end facing out C. Gas pressure regulator IMPORTANT: Do not remove the gas pressure regulator. Manual shutoff valve "closed position. Refer to the "Electronic Ignition System" section for properly connecting the range to children and adults. A A. To range B. Turn...
... " position C. Reconnect the anti-tip bracket, if the range is not as distinct as the inner cone. Turn the manual shutoff valve to rear range foot. Unplug range or disconnect power. B A C A. Gas supply line 2. Locate gas pressure regulator at rear ... NG C Side view after A. Gas pressure regulator cap with hollow end facing out C. Gas pressure regulator IMPORTANT: Do not remove the gas pressure regulator. Manual shutoff valve "closed position. Refer to the "Electronic Ignition System" section for properly connecting the range to children and adults. A A. To range B. Turn...

Installation Instructions
Page 15
... to 2½ turns). Screw D. XXX A A. Orifice hood Replace Oven Racks and Storage or Warming Drawer Replace oven racks in the "Installation Instructions" section of this manual to 2½ turns). Natural gas flames do not have to help hold the gas orifice spud in plastic parts bag for each burner location. 5. Press...
... to 2½ turns). Screw D. XXX A A. Orifice hood Replace Oven Racks and Storage or Warming Drawer Replace oven racks in the "Installation Instructions" section of this manual to 2½ turns). Natural gas flames do not have to help hold the gas orifice spud in plastic parts bag for each burner location. 5. Press...

Use and Care Manual
Page 3
... and service must be killed or seriously injured if you and others are not followed. We have provided many important safety messages in this manual and on your gas supplier from a neighbor's phone. These words mean: DANGER You can be performed by a qualified installer, service agency... of California to publish a list of substances known to the State of California to such substances. WARNING: If the information in this manual is the safety alert symbol. Follow the gas supplier's instructions. • If you don't immediately follow the safety alert symbol and either...
... and service must be killed or seriously injured if you and others are not followed. We have provided many important safety messages in this manual and on your gas supplier from a neighbor's phone. These words mean: DANGER You can be performed by a qualified installer, service agency... of California to publish a list of substances known to the State of California to such substances. WARNING: If the information in this manual is the safety alert symbol. Follow the gas supplier's instructions. • If you don't immediately follow the safety alert symbol and either...

Use and Care Manual
Page 5
PARTS AND FEATURES This manual covers several different models. Control Panel A A. Oven door window N. Oven door hinge E. Model and serial number plate (behind left side of the parts and features ...
PARTS AND FEATURES This manual covers several different models. Control Panel A A. Oven door window N. Oven door hinge E. Model and serial number plate (behind left side of the parts and features ...

Use and Care Manual
Page 6
.... SETTING RECOMMENDED USE IGNITE s Light the burner. Between HIGH and LOW s Hold a rapid boil. LOW s Keep food warm. s Simmer. The surface burners cannot be lit manually. A B D E C A. Alignment pins D. Power™ Burner (on some models) during the self-clean cycle. ACCUSIMMER® Burner (on . Only the burner with the control knob turned...
.... SETTING RECOMMENDED USE IGNITE s Light the burner. Between HIGH and LOW s Hold a rapid boil. LOW s Keep food warm. s Simmer. The surface burners cannot be lit manually. A B D E C A. Alignment pins D. Power™ Burner (on some models) during the self-clean cycle. ACCUSIMMER® Burner (on . Only the burner with the control knob turned...


