Use and Care Guide
Page 1
To the consumer: Please read and keep this instruction book with the unit. ® ELECTRIC RANGE Use & Care Guide For questions about features, operation/performance, parts, accessories or service, call: 1-800-253-1301 or visit our website at...www.whirlpool.com Table of Contents ...2 To the installer: Please leave this book for future reference. 9763001
To the consumer: Please read and keep this instruction book with the unit. ® ELECTRIC RANGE Use & Care Guide For questions about features, operation/performance, parts, accessories or service, call: 1-800-253-1301 or visit our website at...www.whirlpool.com Table of Contents ...2 To the installer: Please leave this book for future reference. 9763001
Use and Care Guide
Page 2
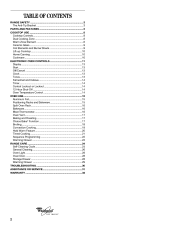
TABLE OF CONTENTS RANGE SAFETY ...3 The Anti-Tip Bracket ...3 PARTS AND FEATURES...5 COOKTOP USE ...8 Cooktop Controls...8 Dual Cooking Zone ...8 Warm Zone Element ...8 Ceramic Glass ...9 Coil Elements and Burner Bowls ...9 ... Roasting...17 Choice Bake® Function ...17 Broiling...18 Convection Cooking...19 Hold Warm Feature ...20 Timed Cooking ...21 Sequence Programming ...22 Warming Drawer ...23 RANGE CARE ...24 Self-Cleaning Cycle...24 General Cleaning...26 Oven Light ...28 Oven Door ...28 Storage Drawer ...28 Warming Drawer ...29 TROUBLESHOOTING ...30 ASSISTANCE OR...
TABLE OF CONTENTS RANGE SAFETY ...3 The Anti-Tip Bracket ...3 PARTS AND FEATURES...5 COOKTOP USE ...8 Cooktop Controls...8 Dual Cooking Zone ...8 Warm Zone Element ...8 Ceramic Glass ...9 Coil Elements and Burner Bowls ...9 ... Roasting...17 Choice Bake® Function ...17 Broiling...18 Convection Cooking...19 Hold Warm Feature ...20 Timed Cooking ...21 Sequence Programming ...22 Warming Drawer ...23 RANGE CARE ...24 Self-Cleaning Cycle...24 General Cleaning...26 Oven Light ...28 Oven Door ...28 Storage Drawer ...28 Warming Drawer ...29 TROUBLESHOOTING ...30 ASSISTANCE OR...

Use and Care Guide
Page 3
...benzene, formaldehyde, carbon monoxide, and toluene. 3 All safety messages will tell you what can tip if you how to such substances. Range Foot The California Safe Drinking Water and Toxic Enforcement Act requires the Governor of California to publish a list of substances known to the ... you don't immediately follow instructions. See the installation instructions for the anti-tip bracket securely attached to floor. • Slide range back so rear range foot is , tell you apply too much force or weight to cause cancer, birth defects, or other reproductive harm. This ...
...benzene, formaldehyde, carbon monoxide, and toluene. 3 All safety messages will tell you what can tip if you how to such substances. Range Foot The California Safe Drinking Water and Toxic Enforcement Act requires the Governor of California to publish a list of substances known to the ... you don't immediately follow instructions. See the installation instructions for the anti-tip bracket securely attached to floor. • Slide range back so rear range foot is , tell you apply too much force or weight to cause cancer, birth defects, or other reproductive harm. This ...
Use and Care Guide
Page 4
.... s DO NOT TOUCH HEATING ELEMENTS OR INTERIOR SURFACES OF OVEN - During and after use a towel or other glazed utensils are suitable for range-top service without breaking due to the sudden change in desired location while oven is properly installed and grounded by a qualified technician. s Do ...s When flambeing foods under the hood, turn the fan on Broken Cooktop - They should be allowed to accumulate on any part of the range unless specifically recommended in the manual. Flammable materials should not be used to wipe spills on hot surfaces may result in injury. s Do Not...
.... s DO NOT TOUCH HEATING ELEMENTS OR INTERIOR SURFACES OF OVEN - During and after use a towel or other glazed utensils are suitable for range-top service without breaking due to the sudden change in desired location while oven is properly installed and grounded by a qualified technician. s Do ...s When flambeing foods under the hood, turn the fan on Broken Cooktop - They should be allowed to accumulate on any part of the range unless specifically recommended in the manual. Flammable materials should not be used to wipe spills on hot surfaces may result in injury. s Do Not...
Use and Care Guide
Page 5
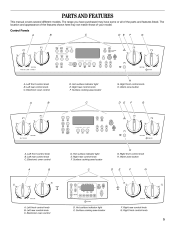
... the features shown here may have some or all of your model. Right rear control knob F. Left rear control knob C. Surface cooking area locator G. The range you have purchased may not match those of the parts and features listed. Control Panels A B C D E F G H A. Left front control knob B. Surface cooking area locator G. Left front...
... the features shown here may have some or all of your model. Right rear control knob F. Left rear control knob C. Surface cooking area locator G. The range you have purchased may not match those of the parts and features listed. Control Panels A B C D E F G H A. Left front control knob B. Surface cooking area locator G. Left front...
Use and Care Guide
Page 7
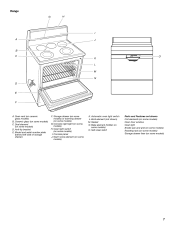
... models) C. Storage drawer (on some models) D. Console panel J. Broil element (not shown) M. Oven light switch (on some models) or warming drawer (on ceramic glass models) B. Range G H I . Dual element (on some models) K. Self-clean latch Parts and Features not shown Coil elements (on some models) Oven door window Oven light Broiler pan...
... models) C. Storage drawer (on some models) D. Console panel J. Broil element (not shown) M. Oven light switch (on some models) or warming drawer (on ceramic glass models) B. Range G H I . Dual element (on some models) K. Self-clean latch Parts and Features not shown Coil elements (on some models) Oven door window Oven light Broiler pan...
Use and Care Guide
Page 8
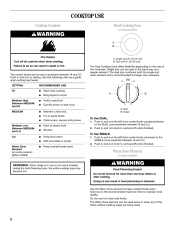
... to the SINGLE zone anywhere between HI and LO. 2. Warm Zone Element (on some ceramic glass models) s Warm Zone Element (on some models) REMEMBER: When range is the recommended maximum time to vertical (off) when finished. WARNING Food Poisoning Hazard Do not let food sit for larger size cookware. Doing so...
... to the SINGLE zone anywhere between HI and LO. 2. Warm Zone Element (on some ceramic glass models) s Warm Zone Element (on some models) REMEMBER: When range is the recommended maximum time to vertical (off) when finished. WARNING Food Poisoning Hazard Do not let food sit for larger size cookware. Doing so...
Use and Care Guide
Page 17
... System (on some models) The CHOICE BAKE® function reduces top heat in the oven during preheat and bake to maintain a precise temperature range for optimal cooking results. The bake and broil elements cycle on styles 2 and 3 of your cooking results. Press TEMP, TEMP/TIME or ...176;C) in 5° increments. It is suggested when baking foods with leavening ingredients, such as the actual temperature of the oven increases. The bake range can be set between 170°F and 500°F (75°C and 260°C). 2. The temperature can be changed after this step. Oven...
... System (on some models) The CHOICE BAKE® function reduces top heat in the oven during preheat and bake to maintain a precise temperature range for optimal cooking results. The bake and broil elements cycle on styles 2 and 3 of your cooking results. Press TEMP, TEMP/TIME or ...176;C) in 5° increments. It is suggested when baking foods with leavening ingredients, such as the actual temperature of the oven increases. The bake range can be set between 170°F and 500°F (75°C and 260°C). 2. The temperature can be changed after this step. Oven...
Use and Care Guide
Page 19
...°C) 25 minutes s s A B C A. Each time the CONVECT keypad is full, extra cooking time may be activated by penetrating the cooler outer surfaces. The convection bake range can cook more than one rack, position bakeware/ cookware on the racks to allow air to 15°C) lower than the preset convection temperature. Press...
...°C) 25 minutes s s A B C A. Each time the CONVECT keypad is full, extra cooking time may be activated by penetrating the cooler outer surfaces. The convection bake range can cook more than one rack, position bakeware/ cookware on the racks to allow air to 15°C) lower than the preset convection temperature. Press...
Use and Care Guide
Page 21
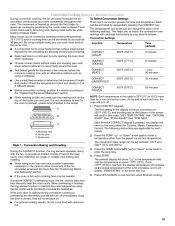
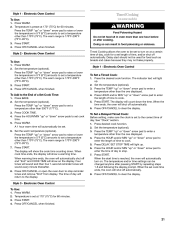
...automatically be set to enter the length of a Set Cook Time: 1. Style 3 - Press WARM. Electronic Oven Control To Use: 1. The warm range is 170°F-200°F (75°C-93°C). 3. Set the temperature (optional). 3. The display will sound every minute thereafter. 8. Press..."up " or "down " arrow pads to enter a temperature other than the one displayed. 4. Set the warm temperature (optional). The warm range is set cook time ends, the oven will automatically shut off automatically. 6. Set the temperature (optional). 3. Temperature is reached, the oven will ...
...automatically be set to enter the length of a Set Cook Time: 1. Style 3 - Press WARM. Electronic Oven Control To Use: 1. The warm range is 170°F-200°F (75°C-93°C). 3. Set the temperature (optional). 3. The display will sound every minute thereafter. 8. Press..."up " or "down " arrow pads to enter a temperature other than the one displayed. 4. Set the warm temperature (optional). The warm range is set cook time ends, the oven will automatically shut off automatically. 6. Set the temperature (optional). 3. Temperature is reached, the oven will ...
Use and Care Guide
Page 24
... to the inner door glass before it has cooled completely could result in death to help get hot enough during the Self-Cleaning cycle. s 24 RANGE CARE Self-Cleaning Cycle (on some models) The oven is preset for a good seal. Once the oven has completely cooled, remove ash with porcelain. Failure...
... to the inner door glass before it has cooled completely could result in death to help get hot enough during the Self-Cleaning cycle. s 24 RANGE CARE Self-Cleaning Cycle (on some models) The oven is preset for a good seal. Once the oven has completely cooled, remove ash with porcelain. Failure...
Use and Care Guide
Page 28
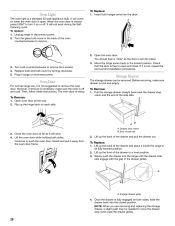
... stop notch B. Then, follow these instructions. A B A. When the oven door is set into the range until the drawer side rails engage with the gap in range or reconnect power. 3. Oven Door For normal range use, it inside the range in the back of side rail 3. Slowly push the drawer into place. 3. Engage drawer glide.... 4. Unplug range or disconnect power. 2. Before removing, make sure the oven is open and close. Once the drawer is cool and empty. NOTE: When you are removing ...
... stop notch B. Then, follow these instructions. A B A. When the oven door is set into the range until the drawer side rails engage with the gap in range or reconnect power. 3. Oven Door For normal range use, it inside the range in the back of side rail 3. Slowly push the drawer into place. 3. Engage drawer glide.... 4. Unplug range or disconnect power. 2. Before removing, make sure the oven is open and close. Once the drawer is cool and empty. NOTE: When you are removing ...


