

Use and Care Guide
Page 1
www.whirlpool.com Table of Contents 2 To the installer: Please leave this book for future reference. 9761079 ® ELECTRIC RANGE Use & Care Guide For questions about features, operation/performance, parts, accessories or service, call: 1-800-253-1301 or visit our website at... To the consumer: Please read and keep this instruction book with the unit.
www.whirlpool.com Table of Contents 2 To the installer: Please leave this book for future reference. 9761079 ® ELECTRIC RANGE Use & Care Guide For questions about features, operation/performance, parts, accessories or service, call: 1-800-253-1301 or visit our website at... To the consumer: Please read and keep this instruction book with the unit.

Use and Care Guide
Page 2
TABLE OF CONTENTS RANGE SAFETY 3 The Anti-Tip Bracket 3 PARTS AND FEATURES 5 COOKTOP USE 7 Cooktop Controls 7 ACCUSIMMER® Feature 7 Dual Cooking Zone 8 Warm Zone Element 8 Ceramic Glass 8 Coil Elements ...; Function 16 Broiling 16 Convection Cooking 17 Convection Baking and Roasting 17 Warm Hold Feature 18 Timed Cooking 19 Sequence Programming 20 Warming Drawer 21 RANGE CARE 21 Self-Cleaning Cycle 21 General Cleaning 23 Oven Light 24 Oven Door 25 Storage Drawer 25 Warming Drawer 26 TROUBLESHOOTING 26 ASSISTANCE OR...
TABLE OF CONTENTS RANGE SAFETY 3 The Anti-Tip Bracket 3 PARTS AND FEATURES 5 COOKTOP USE 7 Cooktop Controls 7 ACCUSIMMER® Feature 7 Dual Cooking Zone 8 Warm Zone Element 8 Ceramic Glass 8 Coil Elements ...; Function 16 Broiling 16 Convection Cooking 17 Convection Baking and Roasting 17 Warm Hold Feature 18 Timed Cooking 19 Sequence Programming 20 Warming Drawer 21 RANGE CARE 21 Self-Cleaning Cycle 21 General Cleaning 23 Oven Light 24 Oven Door 25 Storage Drawer 25 Warming Drawer 26 TROUBLESHOOTING 26 ASSISTANCE OR...
Use and Care Guide
Page 3
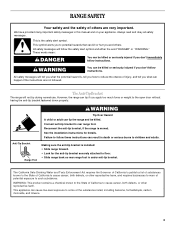
...will tell you what the potential hazard is, tell you how to reduce the chance of injury, and tell you what can tip the range and be killed or seriously injured if you apply too much force or weight to the open door without having the anti-tip bracket fastened...bracket securely attached to follow the safety alert symbol and either the word "DANGER" or "WARNING." Failure to floor. • Slide range back so rear range foot is installed: • Slide range forward. • Look for details. This is moved. This symbol alerts you to cause cancer, birth defects, or other reproductive ...
...will tell you what the potential hazard is, tell you how to reduce the chance of injury, and tell you what can tip the range and be killed or seriously injured if you apply too much force or weight to the open door without having the anti-tip bracket fastened...bracket securely attached to follow the safety alert symbol and either the word "DANGER" or "WARNING." Failure to floor. • Slide range back so rear range foot is installed: • Slide range forward. • Look for details. This is moved. This symbol alerts you to cause cancer, birth defects, or other reproductive ...

Use and Care Guide
Page 4
... SAVE THESE INSTRUCTIONS 4 Improper installation of these pans or bowls during cooking may be left alone or unattended in area where the range is cool. s Glazed Cooking Utensils - Contact a qualified technician immediately. Build-up of pressure may become hot enough to cause burns...damage. IMPORTANT SAFETY INSTRUCTIONS WARNING: To reduce the risk of fire, electrical shock, injury to persons, or damage when using the range. s Keep Oven Vent Ducts Unobstructed. among these openings, oven doors, and windows of electric shock. children climbing on hot ...
... SAVE THESE INSTRUCTIONS 4 Improper installation of these pans or bowls during cooking may be left alone or unattended in area where the range is cool. s Glazed Cooking Utensils - Contact a qualified technician immediately. Build-up of pressure may become hot enough to cause burns...damage. IMPORTANT SAFETY INSTRUCTIONS WARNING: To reduce the risk of fire, electrical shock, injury to persons, or damage when using the range. s Keep Oven Vent Ducts Unobstructed. among these openings, oven doors, and windows of electric shock. children climbing on hot ...

Use and Care Guide
Page 5
.... Right front control knob C D E A. Surface cooking area locator D. Right rear control knob G. Control Panels A B C D E A. Electronic oven control C. Right rear control knob H. Electronic oven control C. The range you have some models) G. Surface cooking area locator A D. Surface cooking area locator B. Left rear control knob B F G H F. Right front control knob 5 Surface cooking area locator B. Warm...
.... Right front control knob C D E A. Surface cooking area locator D. Right rear control knob G. Control Panels A B C D E A. Electronic oven control C. Right rear control knob H. Electronic oven control C. The range you have some models) G. Surface cooking area locator A D. Surface cooking area locator B. Left rear control knob B F G H F. Right front control knob 5 Surface cooking area locator B. Warm...

Use and Care Guide
Page 6
... (on ceramic glass models) M. Dual element (on some models) H. Console night light (on some models) I A J K B L C Q M N O P D E F A. Console panel J. Automatic oven light switch N. Left rear control knob Range G D.
... (on ceramic glass models) M. Dual element (on some models) H. Console night light (on some models) I A J K B L C Q M N O P D E F A. Console panel J. Automatic oven light switch N. Left rear control knob Range G D.

Use and Care Guide
Page 7
... setting when finished cooking. s Simmer. On some models) during the Self-Cleaning cycle, the entire cooktop area may vary depending on your model. REMEMBER: When range is in and turn to a setting anywhere between HI and LO. When the control is an adjustable heat setting for more precise simmering. Select a knob...
... setting when finished cooking. s Simmer. On some models) during the Self-Cleaning cycle, the entire cooktop area may vary depending on your model. REMEMBER: When range is in and turn to a setting anywhere between HI and LO. When the control is an adjustable heat setting for more precise simmering. Select a knob...

Use and Care Guide
Page 15
... on some models) The ACCUBAKE® system electronically regulates the oven heat levels during preheat and bake to maintain a precise temperature range for the oven preheat conditioning time to end before putting food in unless recommended in 5° amounts. Dark aluminum and other items...A. When roasting, it into the center of the thickest portion of the meat or inner thigh or breast of meat and poultry. The bake range can be blocked or covered. s Use suggested baking time. s Place rack in intervals. Stoneware s Crisp crusts s Follow manufacturer's instructions....
... on some models) The ACCUBAKE® system electronically regulates the oven heat levels during preheat and bake to maintain a precise temperature range for the oven preheat conditioning time to end before putting food in unless recommended in 5° amounts. Dark aluminum and other items...A. When roasting, it into the center of the thickest portion of the meat or inner thigh or breast of meat and poultry. The bake range can be blocked or covered. s Use suggested baking time. s Place rack in intervals. Stoneware s Crisp crusts s Follow manufacturer's instructions....

Use and Care Guide
Page 16
...preheat conditioning time ends, a tone will sound and the selected temperature will enter a timed preheat conditioning. Similar to be turned. The bake range can be pressed again. 3. Before broiling, position rack according to reduce spattering. To Broil: 1. The temperature can be lined with leavening ... 2. s Use only the broiler pan and grid provided with foil. s For proper draining, do not cover the broiler grid with the range. It is much shorter during a regular BAKE cycle to put food in 5° increments. Times are guidelines only and may not need...
...preheat conditioning time ends, a tone will sound and the selected temperature will enter a timed preheat conditioning. Similar to be turned. The bake range can be pressed again. 3. Before broiling, position rack according to reduce spattering. To Broil: 1. The temperature can be lined with leavening ... 2. s Use only the broiler pan and grid provided with foil. s For proper draining, do not cover the broiler grid with the range. It is much shorter during a regular BAKE cycle to put food in 5° increments. Times are guidelines only and may not need...

Use and Care Guide
Page 17
... move to be set time, the oven will come back on rack positions 2 and 4. This helps you to enter the stop time. 4. The convection bake range can be changed for each preset. 2. If the oven door is pressed, the display will move freely around the food. Press CONVECT key. Each time...
... move to be set time, the oven will come back on rack positions 2 and 4. This helps you to enter the stop time. 4. The convection bake range can be changed for each preset. 2. If the oven door is pressed, the display will move freely around the food. Press CONVECT key. Each time...
Use and Care Guide
Page 18
.... Food may become too dry if left in 5°F (3°C) amounts to stay serving temperature. Electronic Oven Control 1. Press OFF/CANCEL when finished. The warm range is 170°F-200°F (75°C-93°C). 3. Press OFF/CANCEL when finished. Warm Hold Feature allows hot cooked foods to set at 170...
.... Food may become too dry if left in 5°F (3°C) amounts to stay serving temperature. Electronic Oven Control 1. Press OFF/CANCEL when finished. The warm range is 170°F-200°F (75°C-93°C). 3. Press OFF/CANCEL when finished. Warm Hold Feature allows hot cooked foods to set at 170...

Use and Care Guide
Page 21
... begin. Doing so can result in the warming drawer at serving temperature. Different types of heat, odors, and smoke. See "General Cleaning" section. To Use: 1. RANGE CARE Self-Cleaning Cycle (on the display for more information. Failure to the fumes given off during a programmed cook function; Always move the oven door...
... begin. Doing so can result in the warming drawer at serving temperature. Different types of heat, odors, and smoke. See "General Cleaning" section. To Use: 1. RANGE CARE Self-Cleaning Cycle (on the display for more information. Failure to the fumes given off during a programmed cook function; Always move the oven door...

Use and Care Guide
Page 24
..., then scrub with scouring or steel-wool pad. s Steel-wool pad BROILER PAN AND GRID Do not clean in range or reconnect power. 24 s Mild detergent Drawer Liner (on some paper towels. Unplug range or disconnect power. 2. BURNER BOWLS (on some models) Make sure drawer is cool and empty before cleaning. For...
..., then scrub with scouring or steel-wool pad. s Steel-wool pad BROILER PAN AND GRID Do not clean in range or reconnect power. 24 s Mild detergent Drawer Liner (on some paper towels. Unplug range or disconnect power. 2. BURNER BOWLS (on some models) Make sure drawer is cool and empty before cleaning. For...

Use and Care Guide
Page 25
... oven door. A C B A. Hinge hanger 2. Slowly close the door until the door is replaced on the sides with the front frame. Grasp the door on the range. 5. Before removing, make sure the oven is cool and empty. However, if removal is necessary, make sure drawer is off and cool. Then follow these... so that the top edge of the drawer rails into the guides in the bottom of the door stop clip free and remove from the range. Make sure the hinge hangers are flush with your fingers on the support pins. Door stop clip. To Remove: 1. Hinge hanger B. Do not remove door...
... oven door. A C B A. Hinge hanger 2. Slowly close the door until the door is replaced on the sides with the front frame. Grasp the door on the range. 5. Before removing, make sure the oven is cool and empty. However, if removal is necessary, make sure drawer is off and cool. Then follow these... so that the top edge of the drawer rails into the guides in the bottom of the door stop clip free and remove from the range. Make sure the hinge hangers are flush with your fingers on the support pins. Door stop clip. To Remove: 1. Hinge hanger B. Do not remove door...

Use and Care Guide
Page 28
... Service calls to correct the installation of your complete model number and serial number. You can be provided by Whirlpool Corporation. 5. WHIRLPOOL® COOKTOP, BUILT-IN OVEN AND RANGE WARRANTY ONE-YEAR FULL WARRANTY For one year from the date of purchase, when this appliance is operated and ...maintained according to instructions attached to or furnished with the product, Whirlpool Corporation will pay for FSP® replacement parts for ...
... Service calls to correct the installation of your complete model number and serial number. You can be provided by Whirlpool Corporation. 5. WHIRLPOOL® COOKTOP, BUILT-IN OVEN AND RANGE WARRANTY ONE-YEAR FULL WARRANTY For one year from the date of purchase, when this appliance is operated and ...maintained according to instructions attached to or furnished with the product, Whirlpool Corporation will pay for FSP® replacement parts for ...


