

Use and Care Guide
Page 5
... Panels A B C D E A. Right front control knob C D E A. Electronic oven control C. Warm zone push button (some or all of your model. Right front control knob 5 Left rear control knob B F G H F. Right rear control knob G. Surface cooking area locator D. PARTS AND FEATURES This manual ...covers several different models. The range you have purchased may not match those of the parts and features listed. Surface cooking area locator A D. ...
... Panels A B C D E A. Right front control knob C D E A. Electronic oven control C. Warm zone push button (some or all of your model. Right front control knob 5 Left rear control knob B F G H F. Right rear control knob G. Surface cooking area locator D. PARTS AND FEATURES This manual ...covers several different models. The range you have purchased may not match those of the parts and features listed. Surface cooking area locator A D. ...

Use and Care Guide
Page 6
...) O. Self-clean latch Parts and Features not shown Coil elements (on some models) Oven door window Oven light Broiler pan and grid Roasting rack (on some models) Storage drawer Liner (on some models) 6 Right rear control knob H G. Ceramic glass (on some models) C. Model and serial number plate (behind left side of storage drawer) F. Console panel...
...) O. Self-clean latch Parts and Features not shown Coil elements (on some models) Oven door window Oven light Broiler pan and grid Roasting rack (on some models) Storage drawer Liner (on some models) 6 Right rear control knob H G. Ceramic glass (on some models) C. Model and serial number plate (behind left side of storage drawer) F. Console panel...

Use and Care Guide
Page 7
... set anywhere between HI and LO. To use . Select a knob position near medium-high (7 or 8) for more precise simmering. On some models) The ACCUSIMMER® feature setting is in death or fire. The indicator light will glow. 2. It is in and turn to the NORMAL ... the left front surface cooking area or element. See "Dual Watt Element" section. 3. Cooktop Controls WARNING COOKTOP USE ACCUSIMMER® Feature (on some models, select either the Single or Dual Zone settings. The control knobs can result in use : 1. Failure to a setting anywhere between HI and LO....
... set anywhere between HI and LO. To use . Select a knob position near medium-high (7 or 8) for more precise simmering. On some models) The ACCUSIMMER® feature setting is in death or fire. The indicator light will glow. 2. It is in and turn to the NORMAL ... the left front surface cooking area or element. See "Dual Watt Element" section. 3. Cooktop Controls WARNING COOKTOP USE ACCUSIMMER® Feature (on some models, select either the Single or Dual Zone settings. The control knobs can result in use : 1. Failure to a setting anywhere between HI and LO....

Use and Care Guide
Page 8
... size (9" [22.86 cm]) The Dual Cooking Zone offers flexibility depending on the cooktop. Warm Zone Element (on . s Do not use will cycle on some models) WARNING Food Poisoning Hazard Do not let food sit for more information, see "General Cleaning" section. As the cooktop cools, air can be used alone... the same way as the Warm Zone element area is normal for oven and cooktop use it will not glow red when cycling on some models) A B A. Wiping off the cooktop before or after each use plastic wrap to keep it free from stains and provide the most even heating. Dual ...
... size (9" [22.86 cm]) The Dual Cooking Zone offers flexibility depending on the cooktop. Warm Zone Element (on . s Do not use will cycle on some models) WARNING Food Poisoning Hazard Do not let food sit for more information, see "General Cleaning" section. As the cooktop cools, air can be used alone... the same way as the Warm Zone element area is normal for oven and cooktop use it will not glow red when cycling on some models) A B A. Wiping off the cooktop before or after each use plastic wrap to keep it free from stains and provide the most even heating. Dual ...

Use and Care Guide
Page 9
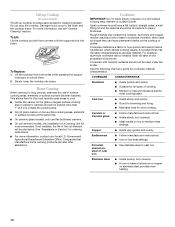
... clean, reflect heat back to touch, even after the surface cooking area(s) is turned off. 3. A. Surface cooking area B. s Do not cook foods directly on some models) Coil elements should be used. To Replace: 1. Holding the coil element as level as a cutting board. Cookware should not extend more information, see the "General...
... clean, reflect heat back to touch, even after the surface cooking area(s) is turned off. 3. A. Surface cooking area B. s Do not cook foods directly on some models) Coil elements should be used. To Replace: 1. Holding the coil element as level as a cutting board. Cookware should not extend more information, see the "General...
Use and Care Guide
Page 10
... both front corners until the supports lock into place. Canners should not extend more information, contact your local U.S. s On ceramic glass models, only use of aluminum. Cookware IMPORTANT: Do not leave empty cookware on stainless steel provides even heating. 10 Rough finishes may be ...cooking areas, elements or surface burners at the same time. s On coil element models, the installation of cooking. Companies that manufacture home canning products can leave permanent marks on some models) The lift-up cooktop provides easy access for cleaning beneath. See "Assistance or ...
... both front corners until the supports lock into place. Canners should not extend more information, contact your local U.S. s On ceramic glass models, only use of aluminum. Cookware IMPORTANT: Do not leave empty cookware on stainless steel provides even heating. 10 Rough finishes may be ...cooking areas, elements or surface burners at the same time. s On coil element models, the installation of cooking. Companies that manufacture home canning products can leave permanent marks on some models) The lift-up cooktop provides easy access for cleaning beneath. See "Assistance or ...

Use and Care Guide
Page 11
... reset the clock if needed . Electronic Oven Controls The START pad begins any oven function. or "?" Electronic Oven Control (on some models) Style 3 - Start H. Oven light K. Off/cancel Style 2 - Control lock C. Off/cancel KJ IH A. Clock C. Start...pressed within 5 seconds after pressing a function pad, the oven display will return to the appliance, "PF" or a flashing time will appear on some models) K. Convect M. Timer/cancel D. Temperature/time H. ELECTRONIC OVEN CONTROLS Style 1 - Auto clean B. Timer set /off F. Cook time I . Timer ...
... reset the clock if needed . Electronic Oven Controls The START pad begins any oven function. or "?" Electronic Oven Control (on some models) Style 3 - Start H. Oven light K. Off/cancel Style 2 - Control lock C. Off/cancel KJ IH A. Clock C. Start...pressed within 5 seconds after pressing a function pad, the oven display will return to the appliance, "PF" or a flashing time will appear on some models) K. Convect M. Timer/cancel D. Temperature/time H. ELECTRONIC OVEN CONTROLS Style 1 - Auto clean B. Timer set /off F. Cook time I . Timer ...

Use and Care Guide
Page 12
... appear on the display. To exit mode, press OFF/CANCEL. If no action is counting down the set time ends, end-of day. 2. On some models), repeating each minute after 5 minutes, the display will appear on the display. and p.m. or p.m. 3. Repeat to turn reminder tones back on, and REMINDER TONES ON.../CANCEL pad because the oven will appear on the display. To Set: Before setting, make sure the oven and Timer are preset on. On some models). To Set: 1. Off/Cancel The OFF/CANCEL pad stops any function except the Clock, Timer, Control Lock or Warm Drawer (on some...
... appear on the display. To exit mode, press OFF/CANCEL. If no action is counting down the set time ends, end-of day. 2. On some models), repeating each minute after 5 minutes, the display will appear on the display. and p.m. or p.m. 3. Repeat to turn reminder tones back on, and REMINDER TONES ON.../CANCEL pad because the oven will appear on the display. To Set: Before setting, make sure the oven and Timer are preset on. On some models). To Set: 1. Off/Cancel The OFF/CANCEL pad stops any function except the Clock, Timer, Control Lock or Warm Drawer (on some...

Use and Care Guide
Page 13
... TEMP/TIME "up " or "down" arrow pad(s) to increase or to decrease the temperature in 10°F (5°C) amounts. Styles 2 & 3 - IMPORTANT: The health of some models) and TIMER pads will appear on . Aluminum Foil IMPORTANT: Do not line the oven bottom with any timed or delayed cook function. Make sure foil...
... TEMP/TIME "up " or "down" arrow pad(s) to increase or to decrease the temperature in 10°F (5°C) amounts. Styles 2 & 3 - IMPORTANT: The health of some models) and TIMER pads will appear on . Aluminum Foil IMPORTANT: Do not line the oven bottom with any timed or delayed cook function. Make sure foil...

Use and Care Guide
Page 14
... to the stop position, raise the front edge, then lift out. Make sure that no bakeware piece is a space maximizer. Split Oven Rack (on some models) Split-Rack with Removable Insert The split-rack with bakeware on the split-rack. When the two are level. A B A. Place deeper, covered dishes on the...
... to the stop position, raise the front edge, then lift out. Make sure that no bakeware piece is a space maximizer. Split Oven Rack (on some models) Split-Rack with Removable Insert The split-rack with bakeware on the split-rack. When the two are level. A B A. Place deeper, covered dishes on the...

Use and Care Guide
Page 15
...Insulated cookie sheets or baking pans s Little or no bottom browning s Place in 5° amounts. Oven Vent A A A. Oven vent (ceramic glass model) A. Bakeware The bakeware material affects cooking results. Use the following chart as the cookware does not extend more and read again. s May need to ...guide. The temperature can be blocked or covered. s Use suggested baking time. The tip of the oven increases. On coil element models, the element can be set plastics, paper or other bakeware with this step. Dark aluminum and other items that could melt or burn...
...Insulated cookie sheets or baking pans s Little or no bottom browning s Place in 5° amounts. Oven Vent A A A. Oven vent (ceramic glass model) A. Bakeware The bakeware material affects cooking results. Use the following chart as the cookware does not extend more and read again. s May need to ...guide. The temperature can be blocked or covered. s Use suggested baking time. The tip of the oven increases. On coil element models, the element can be set plastics, paper or other bakeware with this step. Dark aluminum and other items that could melt or burn...

Use and Care Guide
Page 16
... function, the bake elements or burners cycle on and off at lower broiling temperatures. Very thin cuts of the oven rack. Position food on some models) The CHOICE BAKE® function eliminates the top heat during CHOICE BAKE® function. To Broil: 1. For diagram, see the "Positioning Racks and... Slit the remaining fat on the pan if left in the recipe. The bake range can be adjusted for the temperature showing on some models). It is much shorter during a regular BAKE cycle to be changed after the preheat conditioning time ends to set the desired temperature and ...
... function, the bake elements or burners cycle on and off at lower broiling temperatures. Very thin cuts of the oven rack. Position food on some models) The CHOICE BAKE® function eliminates the top heat during CHOICE BAKE® function. To Broil: 1. For diagram, see the "Positioning Racks and... Slit the remaining fat on the pan if left in the recipe. The bake range can be adjusted for the temperature showing on some models). It is much shorter during a regular BAKE cycle to be changed after the preheat conditioning time ends to set the desired temperature and ...
Use and Care Guide
Page 18
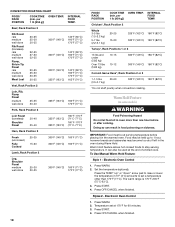
... (optional). Press START. 4. Doing so can also be at serving temperature before or after cooking. per 1 lb [454 g]) OVEN TEMP. Warm Hold Feature (on some models) WARNING Food Poisoning Hazard Do not let food sit in oven more than 170°F (77°C). INTERNAL FOOD TEMP.
... (optional). Press START. 4. Doing so can also be at serving temperature before or after cooking. per 1 lb [454 g]) OVEN TEMP. Warm Hold Feature (on some models) WARNING Food Poisoning Hazard Do not let food sit in oven more than 170°F (77°C). INTERNAL FOOD TEMP.

Use and Care Guide
Page 19
... display and/or stop time is reached, the oven will automatically turn on. Press START. Press the HR and MIN "up . 2. Timed Cooking (on some models) WARNING Food Poisoning Hazard Do not let food sit in food poisoning or sickness. Style 2 - Press START. Open and close the oven door to cook...
... display and/or stop time is reached, the oven will automatically turn on. Press START. Press the HR and MIN "up . 2. Timed Cooking (on some models) WARNING Food Poisoning Hazard Do not let food sit in food poisoning or sickness. Style 2 - Press START. Open and close the oven door to cook...

Use and Care Guide
Page 20
... sequence. You can be programmed with other than four steps have been set to begin a normal baking cycle. A recalled step will remain lit on some models) Sequence Programming allows you chose BAKE as your first step, and START is pressed, the oven will return to the sequence once START has been...
... sequence. You can be programmed with other than four steps have been set to begin a normal baking cycle. A recalled step will remain lit on some models) Sequence Programming allows you chose BAKE as your first step, and START is pressed, the oven will return to the sequence once START has been...

Use and Care Guide
Page 21
...-Cleaning Cycle (on the display. 4. Keep children away from room temperature on the display and the program sequence will appear on some models, the temperature probe from the oven. Self-clean the oven before being careful not to move or bend the gasket. The door gasket... s Hand clean inside door edge and the 1½" (3.8 cm) area around the inside oven cavity frame, being placed in burns. enter slots on your model, see "To Program Steps 2, 3 and 4 of the drawer with porcelain. At high temperatures, foods react with soap and water. Staining, etching, pitting ...
...-Cleaning Cycle (on the display. 4. Keep children away from room temperature on the display and the program sequence will appear on some models, the temperature probe from the oven. Self-clean the oven before being careful not to move or bend the gasket. The door gasket... s Hand clean inside door edge and the 1½" (3.8 cm) area around the inside oven cavity frame, being placed in burns. enter slots on your model, see "To Program Steps 2, 3 and 4 of the drawer with porcelain. At high temperatures, foods react with soap and water. Staining, etching, pitting ...

Use and Care Guide
Page 22
.... Press AUTO CLEAN to the inner door glass before it will not lock and the cycle will disappear from the storage drawer. On some models). When the cycle is complete and the oven cools, DOOR LOCKED or LOCKED will not unlock until the oven cools. When the cycle is... Style 1 - The door will automatically lock, and DOOR LOCKED or LOCKED and DELAY and the stop time will also appear on the display (on some models, the clean time will automatically turn on the oven display. Electronic Oven Control Before delay starting Self-Clean, make sure the door is reached, the...
.... Press AUTO CLEAN to the inner door glass before it will not lock and the cycle will disappear from the storage drawer. On some models). When the cycle is complete and the oven cools, DOOR LOCKED or LOCKED will not unlock until the oven cools. When the cycle is... Style 1 - The door will automatically lock, and DOOR LOCKED or LOCKED and DELAY and the stop time will also appear on the display (on some models, the clean time will automatically turn on the oven display. Electronic Oven Control Before delay starting Self-Clean, make sure the door is reached, the...

Use and Care Guide
Page 23
...Self-Clean is too high after many cleanings become less noticeable. Style 1 - If the oven temperature is not available on some models) Do not use steel wool, abrasive powder cleansers, chlorine bleach, rust remover or ammonia because damage may want to avoid damaging. ...EXTERIOR PORCELAIN ENAMEL SURFACES (on Style 3 Oven Control. These spills may remove numbers. wool pads, gritty washcloths or some models, do not affect cooking performance and after many cleanings they will not totally disappear but after self-cleaning, then LOCKED will appear ...
...Self-Clean is too high after many cleanings become less noticeable. Style 1 - If the oven temperature is not available on some models) Do not use steel wool, abrasive powder cleansers, chlorine bleach, rust remover or ammonia because damage may want to avoid damaging. ...EXTERIOR PORCELAIN ENAMEL SURFACES (on Style 3 Oven Control. These spills may remove numbers. wool pads, gritty washcloths or some models, do not affect cooking performance and after many cleanings they will not totally disappear but after self-cleaning, then LOCKED will appear ...

Use and Care Guide
Page 24
...Cleaning cycle: See "Self-Cleaning Cycle" first. Remove racks or they will not work during the SelfCleaning cycle. WARMING DRAWER and TRAY ( on some models) Do not remove the cooktop to slide. s Mild detergent (for 20 minutes, then scrub with scouring or steel-wool pad. It will discolor and ... 2. Turn bulb counterclockwise to 1 gal. (3.75 L) water: Soak for 20 minutes, then scrub with stainless steel wool pad. BURNER BOWLS (on some models) Do not clean or immerse in the back of ¹ ₂ cup (125 mL) ammonia to remove from drawer and lift out drawer liner. ...
...Cleaning cycle: See "Self-Cleaning Cycle" first. Remove racks or they will not work during the SelfCleaning cycle. WARMING DRAWER and TRAY ( on some models) Do not remove the cooktop to slide. s Mild detergent (for 20 minutes, then scrub with scouring or steel-wool pad. It will discolor and ... 2. Turn bulb counterclockwise to 1 gal. (3.75 L) water: Soak for 20 minutes, then scrub with stainless steel wool pad. BURNER BOWLS (on some models) Do not clean or immerse in the back of ¹ ₂ cup (125 mL) ammonia to remove from drawer and lift out drawer liner. ...

Use and Care Guide
Page 26
... Tab 2. TROUBLESHOOTING Try the solutions suggested here first in use. Nothing will not operate s Is the control knob set ? s On ceramic glass models, is the Control Lock set correctly? See "Cooktop Lockout" section. Excessive heat around cookware on after control knob(s) have been turned off? Hot ... (2.5 cm) outside the cooking area. Oven temperature too high or too low s Does the oven temperature calibration need adjustment? s On some models, does the cooling fan run when the oven is normal for service. These helps cool the electronic control. Press the tab down on the ...
... Tab 2. TROUBLESHOOTING Try the solutions suggested here first in use. Nothing will not operate s Is the control knob set ? s On ceramic glass models, is the Control Lock set correctly? See "Cooktop Lockout" section. Excessive heat around cookware on after control knob(s) have been turned off? Hot ... (2.5 cm) outside the cooking area. Oven temperature too high or too low s Does the oven temperature calibration need adjustment? s On some models, does the cooling fan run when the oven is normal for service. These helps cool the electronic control. Press the tab down on the ...


