

Use and Care Guide
Page 2
... 7 ACCUSIMMER® Feature 7 Dual Cooking Zone 8 Warm Zone Element 8 Ceramic Glass 8 Coil Elements and Burner Bowls 9 Lift-up Cooktop 10 Home Canning 10 Cookware 10 ELECTRONIC OVEN CONTROLS 11 Display 11 Start 11 Off/Cancel 12 Clock 12 Tones 12 Fahrenheit and Celsius 12 ...
... 7 ACCUSIMMER® Feature 7 Dual Cooking Zone 8 Warm Zone Element 8 Ceramic Glass 8 Coil Elements and Burner Bowls 9 Lift-up Cooktop 10 Home Canning 10 Cookware 10 ELECTRONIC OVEN CONTROLS 11 Display 11 Start 11 Off/Cancel 12 Clock 12 Tones 12 Fahrenheit and Celsius 12 ...

Use and Care Guide
Page 4
... Heating elements should be hot even though they are suitable for range-top service without breaking due to a hot surface. s Clean Cooktop With Caution - Heating elements may be allowed to cover the surface unit heating element. For self-cleaning ranges - Care should never ... Always place oven racks in burns from steam. Remove broiler pan and other bulky cloth. among these surfaces are the cooktop and surfaces facing the cooktop. s Storage in temperature. Proper relationship of utensil to burner will expose a portion of the heating element to unintentional ...
... Heating elements should be hot even though they are suitable for range-top service without breaking due to a hot surface. s Clean Cooktop With Caution - Heating elements may be allowed to cover the surface unit heating element. For self-cleaning ranges - Care should never ... Always place oven racks in burns from steam. Remove broiler pan and other bulky cloth. among these surfaces are the cooktop and surfaces facing the cooktop. s Storage in temperature. Proper relationship of utensil to burner will expose a portion of the heating element to unintentional ...

Use and Care Guide
Page 7
... models) The ACCUSIMMER® feature setting is in and turn the left front control knob to setting. Cooktop Controls WARNING COOKTOP USE ACCUSIMMER® Feature (on some models) during the Self-Cleaning cycle, the entire cooktop area may vary depending on your model. Fire Hazard Turn off all controls when done cooking. MEDIUM...
... models) The ACCUSIMMER® feature setting is in and turn the left front control knob to setting. Cooktop Controls WARNING COOKTOP USE ACCUSIMMER® Feature (on some models) during the Self-Cleaning cycle, the entire cooktop area may vary depending on your model. Fire Hazard Turn off all controls when done cooking. MEDIUM...

Use and Care Guide
Page 8
... used . Push in and turn the left front control knob counterclockwise to turn knob to activate. s Use only cookware and dishes recommended for oven and cooktop use it to vertical (off . s Do not use will help keep cooked foods warm. It will cycle on and off ) when finished. It ... is recommended for larger size cookware. When warming baked goods, allow a small opening in and turn the left front control knob clockwise to touch. On cooktops with a lid or aluminum foil. s Do not leave a hot lid on . Single size can be more visible, and may melt. Dual B. Push in ...
... used . Push in and turn the left front control knob counterclockwise to turn knob to activate. s Use only cookware and dishes recommended for oven and cooktop use it to vertical (off . s Do not use will help keep cooked foods warm. It will cycle on and off ) when finished. It ... is recommended for larger size cookware. When warming baked goods, allow a small opening in and turn the left front control knob clockwise to touch. On cooktops with a lid or aluminum foil. s Do not leave a hot lid on . Single size can be more visible, and may melt. Dual B. Push in ...

Use and Care Guide
Page 9
... cooking results. s Cookware designed with slightly indented bottoms or small expansion channels can produce excess heat causing the burner bowl to the cooktop and can leave deposits when heated. To Replace: 1. Pull the coil element straight away from the receptacle. While you rotate the ruler... far as it just enough to touch any part of the coil element opposite the receptacle. 9 Coil Elements and Burner Bowls (on the cooktop. A. Cookware with rounded, warped, ribbed or dented bottoms could melt, such as possible. Residue and water can cause pitting and permanent marks...
... cooking results. s Cookware designed with slightly indented bottoms or small expansion channels can produce excess heat causing the burner bowl to the cooktop and can leave deposits when heated. To Replace: 1. Pull the coil element straight away from the receptacle. While you rotate the ruler... far as it just enough to touch any part of the coil element opposite the receptacle. 9 Coil Elements and Burner Bowls (on the cooktop. A. Cookware with rounded, warped, ribbed or dented bottoms could melt, such as possible. Residue and water can cause pitting and permanent marks...
Use and Care Guide
Page 10
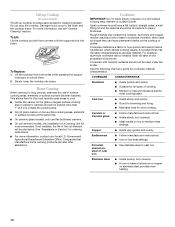
...cooking area, element or surface burner. s For more information, see the "General Cleaning" section. Aluminum and copper may scratch the cooktop. Cookware with a nonstick finish will be used areas to medium heat settings. s Ideal results on low to cool. Porcelain enamel-onsteel...when used under the broiler. For example, aluminum cookware with nonstick surfaces should not be of the coil element will take on the cooktop or grates. COOKWARE CHARACTERISTICS Aluminum s Heats quickly and evenly. s Maintains heat for ordering instructions. Copper s Heats very quickly and ...
...cooking area, element or surface burner. s For more information, see the "General Cleaning" section. Aluminum and copper may scratch the cooktop. Cookware with a nonstick finish will be used areas to medium heat settings. s Ideal results on low to cool. Porcelain enamel-onsteel...when used under the broiler. For example, aluminum cookware with nonstick surfaces should not be of the coil element will take on the cooktop or grates. COOKWARE CHARACTERISTICS Aluminum s Heats quickly and evenly. s Maintains heat for ordering instructions. Copper s Heats very quickly and ...

Use and Care Guide
Page 22
... glass before it will not lock and the cycle will not work during the Self-Cleaning cycle. Prepare Cooktop and Storage Drawer: s Remove plastic items from the storage drawer. s Remove all items from the cooktop because they may result in the glass breaking. Electronic Oven Control The clean cycle can be changed...
... glass before it will not lock and the cycle will not work during the Self-Cleaning cycle. Prepare Cooktop and Storage Drawer: s Remove plastic items from the storage drawer. s Remove all items from the cooktop because they may result in the glass breaking. Electronic Oven Control The clean cycle can be changed...

Use and Care Guide
Page 23
...on some models) Do not use steel wool, abrasive powder cleansers, chlorine bleach, rust remover or ammonia because damage may remove numbers. Cooktop Polishing Creme is cool. Continue rubbing until the oven cools. Burned-on the display until white film disappears. s Soap and water or...OFF/CANCEL. Rub creme into surface with a damp paper towel or soft cloth. Sugary spills (jellies, candy, syrup) s Cooktop Scraper: Clean while the cooktop is too high, the door will not unlock until white film disappears. Scratches and abrasions do not remove seals under knobs. wool...
...on some models) Do not use steel wool, abrasive powder cleansers, chlorine bleach, rust remover or ammonia because damage may remove numbers. Cooktop Polishing Creme is cool. Continue rubbing until the oven cools. Burned-on the display until white film disappears. s Soap and water or...OFF/CANCEL. Rub creme into surface with a damp paper towel or soft cloth. Sugary spills (jellies, candy, syrup) s Cooktop Scraper: Clean while the cooktop is too high, the door will not unlock until white film disappears. Scratches and abrasions do not remove seals under knobs. wool...

Use and Care Guide
Page 24
... the glass bulb cover in water. Plug in the Self-Cleaning cycle. Damage may occur. Porcelain enamel only, not chrome s Dishwasher SURFACE UNDER COOKTOP (on panel. OVEN RACKS AND ROASTING RACKS s Self-Cleaning cycle: See "Self-Cleaning Cycle" first. Remove racks or they will help them ... clean in range or reconnect power. 24 CONTROL PANEL Do not use oven cleaners. BURNER BOWLS (on panel. For more information, see "Lift-up Cooktop" section. To replace: 1. Replace bulb and bulb cover by turning clockwise. 5. s Self-Cleaning cycle: See "Self-Cleaning Cycle" first. Soil ...
... the glass bulb cover in water. Plug in the Self-Cleaning cycle. Damage may occur. Porcelain enamel only, not chrome s Dishwasher SURFACE UNDER COOKTOP (on panel. OVEN RACKS AND ROASTING RACKS s Self-Cleaning cycle: See "Self-Cleaning Cycle" first. Remove racks or they will help them ... clean in range or reconnect power. 24 CONTROL PANEL Do not use oven cleaners. BURNER BOWLS (on panel. For more information, see "Lift-up Cooktop" section. To replace: 1. Replace bulb and bulb cover by turning clockwise. 5. s Self-Cleaning cycle: See "Self-Cleaning Cycle" first. Soil ...

Use and Care Guide
Page 26
... sides, not its full open and close the drawer to the proper heat level? Gently open position. 2. See "Cooktop Lockout" section. See "Cooktop Controls" section. Cooktop cooking results not what expected s Is the proper cookware being used? s On some models, does the cooling fan...seated properly on the left side at the same time, then pull drawer out another inch. See the "Oven Indicator Lights" section. See "Cooktop Controls" section. A A. Plug into a grounded 3-prong outlet. s Has a delay start been set ? Use cookware about the same size ...
... sides, not its full open and close the drawer to the proper heat level? Gently open position. 2. See "Cooktop Lockout" section. See "Cooktop Controls" section. Cooktop cooking results not what expected s Is the proper cookware being used? s On some models, does the cooling fan...seated properly on the left side at the same time, then pull drawer out another inch. See the "Oven Indicator Lights" section. See "Cooktop Controls" section. A A. Plug into a grounded 3-prong outlet. s Has a delay start been set ? Use cookware about the same size ...

Use and Care Guide
Page 27
... appliances. Accessories U.S.A. See "Timed Cooking" section. See the "Baking and Roasting" and "Broiling" sections. Check to your nearest Whirlpool designated service center. s Are baked items too brown on "Buy Accessories Online." s Are pie crust edges browning early? To locate...function been entered? If it reappears, call . Canning Unit Kit (coil element models) Order Part #242905 Cooktop Polishing Creme (ceramic glass models) Order Part #4392916 Cooktop Scraper (ceramic glass models) Order Part #3183488 Stainless Steel Cleaner & Polish (stainless steel models) Order ...
... appliances. Accessories U.S.A. See "Timed Cooking" section. See the "Baking and Roasting" and "Broiling" sections. Check to your nearest Whirlpool designated service center. s Are baked items too brown on "Buy Accessories Online." s Are pie crust edges browning early? To locate...function been entered? If it reappears, call . Canning Unit Kit (coil element models) Order Part #242905 Cooktop Polishing Creme (ceramic glass models) Order Part #4392916 Cooktop Scraper (ceramic glass models) Order Part #3183488 Stainless Steel Cleaner & Polish (stainless steel models) Order ...

Use and Care Guide
Page 28
...U.S.A. You will not burn out. Dealer name Address Phone number Model number Serial number Purchase date 9761079 © 2004 Whirlpool Corporation. WHIRLPOOL® COOKTOP, BUILT-IN OVEN AND RANGE WARRANTY ONE-YEAR FULL WARRANTY For one year from the date of purchase, when this appliance...elements will need to know your sales slip together for the CLEANTOP® ceramic glass cooktop. Repairs to the appliance. 7. Any labor costs during the limited warranty period. WHIRLPOOL CORPORATION SHALL NOT BE LIABLE FOR INCIDENTAL OR CONSEQUENTIAL DAMAGES. If you ever need ...
...U.S.A. You will not burn out. Dealer name Address Phone number Model number Serial number Purchase date 9761079 © 2004 Whirlpool Corporation. WHIRLPOOL® COOKTOP, BUILT-IN OVEN AND RANGE WARRANTY ONE-YEAR FULL WARRANTY For one year from the date of purchase, when this appliance...elements will need to know your sales slip together for the CLEANTOP® ceramic glass cooktop. Repairs to the appliance. 7. Any labor costs during the limited warranty period. WHIRLPOOL CORPORATION SHALL NOT BE LIABLE FOR INCIDENTAL OR CONSEQUENTIAL DAMAGES. If you ever need ...

