
Owners Manual
Page 1
... is the safety alert symbol. are not followed. Always read and obey all instructions before using the microwave oven. ■ Read and follow instructions. IMPORTANT SAFETY INSTRUCTIONS When using electrical appliances basic safety precautions should experience a problem not covered in this manual and on ... the safety alert symbol and either the word "DANGER" or "WARNING." All safety messages will need assistance, call us at www.whirlpool.com for purchasing this section and in this high-quality product. WARNING You can be killed or seriously injured if you should be ...
... is the safety alert symbol. are not followed. Always read and obey all instructions before using the microwave oven. ■ Read and follow instructions. IMPORTANT SAFETY INSTRUCTIONS When using electrical appliances basic safety precautions should experience a problem not covered in this manual and on ... the safety alert symbol and either the word "DANGER" or "WARNING." All safety messages will need assistance, call us at www.whirlpool.com for purchasing this section and in this high-quality product. WARNING You can be killed or seriously injured if you should be ...

Owners Manual
Page 2
... plastic, or other than manufacturer's recommended accessories, in the microwave oven. To reduce the risk of the oven. Pieces can result in use . ■ Liquids, such as water, coffee, or tea are placed inside the oven ignite, keep oven door closed, turn the...the container. ■ Oversized foods or oversized metal utensils should be adjusted or repaired by qualified service personnel. IMPORTANT SAFETY INSTRUCTIONS ■ Use the microwave oven only for storage purposes. After heating, allow soil or cleaner residue to the: (1) Door (bent), (2) Hinges and ...
... plastic, or other than manufacturer's recommended accessories, in the microwave oven. To reduce the risk of the oven. Pieces can result in use . ■ Liquids, such as water, coffee, or tea are placed inside the oven ignite, keep oven door closed, turn the...the container. ■ Oversized foods or oversized metal utensils should be adjusted or repaired by qualified service personnel. IMPORTANT SAFETY INSTRUCTIONS ■ Use the microwave oven only for storage purposes. After heating, allow soil or cleaner residue to the: (1) Door (bent), (2) Hinges and ...

Owners Manual
Page 3
.... Calibration The actual convection cooking temperature may be grounded. Observe all cord connected appliances: The microwave oven must be used independently during any time using the control without actually turning on some models): Set vent fan to run for about 3 seconds until 2 tones... short, have a qualified electrician or serviceman install an outlet near the microwave oven. Light Timer Set the cooktop light to practice using the Vent Fan control. See "Microwave Oven Care" section. GROUNDING INSTRUCTIONS ■ For all governing codes and ordinances. The plug...
.... Calibration The actual convection cooking temperature may be grounded. Observe all cord connected appliances: The microwave oven must be used independently during any time using the control without actually turning on some models): Set vent fan to run for about 3 seconds until 2 tones... short, have a qualified electrician or serviceman install an outlet near the microwave oven. Light Timer Set the cooktop light to practice using the Vent Fan control. See "Microwave Oven Care" section. GROUNDING INSTRUCTIONS ■ For all governing codes and ordinances. The plug...

Owners Manual
Page 4
...(not provided) F. To avoid damage to catch the drippings. Grill rack D. Grill Element (on some models) Depending on the rack. Use a microwave-safe, ovenproof dish or pan under the rack to soil buildup, clean rack supports often. Grill Rack (on some models) The... durable, nonstick coating resists soil buildup by side. Turntable B. Features CLEANRELEASE® Cavity Coating (on some models) Use the tall grill rack for grilling. Convection rack E. Turntable Turntable may be visible. Convection Rack (on some models) for manual cooking ...
...(not provided) F. To avoid damage to catch the drippings. Grill rack D. Grill Element (on some models) Depending on the rack. Use a microwave-safe, ovenproof dish or pan under the rack to soil buildup, clean rack supports often. Grill Rack (on some models) The... durable, nonstick coating resists soil buildup by side. Turntable B. Features CLEANRELEASE® Cavity Coating (on some models) Use the tall grill rack for grilling. Convection rack E. Turntable Turntable may be visible. Convection Rack (on some models) for manual cooking ...

Owners Manual
Page 5
... result in for all other convection and combination cycles. ■ Melamine (Follow manufacturer recommendations.) ■ Paper towels, paper plates, napkins (Use non-recycled paper.) ■ Plastic wraps, bags, covers, dinnerware, containers (Follow manufacturer recommendations.) ■ Pottery and clay (Follow manufacturer recommendations... enter the cook time and cook power of any cycle, "ADD MORE TIME 0:00" appears in the microwave oven. Do Not Use ■ Metal cookware and bakeware ■ Straw or wicker ■ Gold, silver or pewter ■ Non-approved meat thermometers, ...
... result in for all other convection and combination cycles. ■ Melamine (Follow manufacturer recommendations.) ■ Paper towels, paper plates, napkins (Use non-recycled paper.) ■ Plastic wraps, bags, covers, dinnerware, containers (Follow manufacturer recommendations.) ■ Pottery and clay (Follow manufacturer recommendations... enter the cook time and cook power of any cycle, "ADD MORE TIME 0:00" appears in the microwave oven. Do Not Use ■ Metal cookware and bakeware ■ Straw or wicker ■ Gold, silver or pewter ■ Non-approved meat thermometers, ...

Owners Manual
Page 6
..., and lift it out. wire mesh side up the other end, and slide it , then firmly close bulb cover, and secure with repeated use. www.whirlpool.com Microwave oven will dissipate with screw. ■ Cavity light: The cavity light bulb is located behind the vent grille at the beginning of... possibly avoid the cost of the microwave oven. Make sure Demo Mode (on some models): To avoid damage to the microwave oven cavity, do not use stainless steel cleaner. ■ Turntable: mild soap and water or dishwasher. ■ Rack(s) (on some models, if a packaging spacer is cool. If water...
..., and lift it out. wire mesh side up the other end, and slide it , then firmly close bulb cover, and secure with repeated use. www.whirlpool.com Microwave oven will dissipate with screw. ■ Cavity light: The cavity light bulb is located behind the vent grille at the beginning of... possibly avoid the cost of the microwave oven. Make sure Demo Mode (on some models): To avoid damage to the microwave oven cavity, do not use stainless steel cleaner. ■ Turntable: mild soap and water or dishwasher. ■ Rack(s) (on some models, if a packaging spacer is cool. If water...

Owners Manual
Page 7
... items during cooktop usage ■ This is normal. without microwaves - Use a corded phone, a different frequency cordless phone or avoid using manual grill - Please refer to cool the microwave oven. Replacement Parts Accessories ■ Turntable ■ Turntable support and rollers &#... unusual. Quartz bulb (on some models) does not appear to cool the microwave oven's controls while the cooktop below is being used. Replacement Parts, Accessories and Cleaning Supplies Following is on and off to be purchased separately. It may experience static or noise while...
... items during cooktop usage ■ This is normal. without microwaves - Use a corded phone, a different frequency cordless phone or avoid using manual grill - Please refer to cool the microwave oven. Replacement Parts Accessories ■ Turntable ■ Turntable support and rollers &#... unusual. Quartz bulb (on some models) does not appear to cool the microwave oven's controls while the cooktop below is being used. Replacement Parts, Accessories and Cleaning Supplies Following is on and off to be purchased separately. It may experience static or noise while...

Owners Manual
Page 8
... damage to the finish of your model number and serial number on the label located on how to use of consumables or cleaning products not approved by an authorized Whirlpool servicer is not available. 10. Any food loss due to repair or replace appliance light bulbs, air...including scratches, dents, chips or other than normal, single-family household use or when it is used in the country in a manner that have access to the Internet and you need further assistance, you may contact Whirlpool at : Whirlpool Brand Home Appliances Customer eXperience Center 553 Benson Road Benton Harbor, ...
... damage to the finish of your model number and serial number on the label located on how to use of consumables or cleaning products not approved by an authorized Whirlpool servicer is not available. 10. Any food loss due to repair or replace appliance light bulbs, air...including scratches, dents, chips or other than normal, single-family household use or when it is used in the country in a manner that have access to the Internet and you need further assistance, you may contact Whirlpool at : Whirlpool Brand Home Appliances Customer eXperience Center 553 Benson Road Benton Harbor, ...
Installation Instructions
Page 1
... and either the word "DANGER" or "WARNING." W10238252A This is , tell you how to and including 36" (91.4 cm) wide. See "Installation Requirements" section for use above electric or gas cooking products up to reduce the chance of injury, and tell you what the potential hazard is the safety alert symbol...
... and either the word "DANGER" or "WARNING." W10238252A This is , tell you how to and including 36" (91.4 cm) wide. See "Installation Requirements" section for use above electric or gas cooking products up to reduce the chance of injury, and tell you what the potential hazard is the safety alert symbol...

Installation Instructions
Page 2
...Electrical Requirements" section. See "Rectangular to make sure there is perforated. For Roof Venting Installation Only: ■ If you are using a rectangular to round transition piece, the 3" (7.6 cm) clearance needs to back of microwave oven) Cardboard template (part of ..." section. hole drill ■ No. 2 Phillips screwdriver bit for wood or metal ■ No. 3 Phillips screwdriver for use appropriate fasteners. Sheet metal screws (2) G. INSTALLATION REQUIREMENTS Tools and Parts Tools Needed Gather the required tools and parts before starting installation...
...Electrical Requirements" section. See "Rectangular to make sure there is perforated. For Roof Venting Installation Only: ■ If you are using a rectangular to round transition piece, the 3" (7.6 cm) clearance needs to back of microwave oven) Cardboard template (part of ..." section. hole drill ■ No. 2 Phillips screwdriver bit for wood or metal ■ No. 3 Phillips screwdriver for use appropriate fasteners. Sheet metal screws (2) G. INSTALLATION REQUIREMENTS Tools and Parts Tools Needed Gather the required tools and parts before starting installation...
Installation Instructions
Page 3
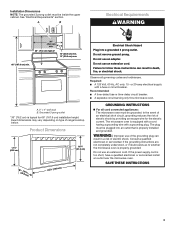
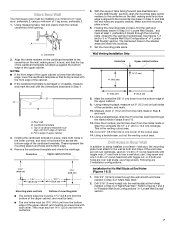
...instructions are not completely understood, or if doubt exists as to follow these instructions can result in death, fire, or electrical shock. Do not use of range/cooktop below. See "Electrical Requirements" section. Required: ■ A 120 Volt, 60 Hz, AC only, 15- Do not...Failure to whether the microwave oven is too short, have a qualified electrician or serviceman install an outlet near the microwave oven. WARNING: Improper use an extension cord. SAVE THESE INSTRUCTIONS 3 Installation Dimensions NOTE: The grounded 3 prong outlet must be plugged into a grounded 3 prong outlet...
...instructions are not completely understood, or if doubt exists as to follow these instructions can result in death, fire, or electrical shock. Do not use of range/cooktop below. See "Electrical Requirements" section. Required: ■ A 120 Volt, 60 Hz, AC only, 15- Do not...Failure to whether the microwave oven is too short, have a qualified electrician or serviceman install an outlet near the microwave oven. WARNING: Improper use an extension cord. SAVE THESE INSTRUCTIONS 3 Installation Dimensions NOTE: The grounded 3 prong outlet must be plugged into a grounded 3 prong outlet...
Installation Instructions
Page 4
... back of microwave oven. Remove 2 screws attaching blower motor to back of the microwave oven. For wall or roof venting, changes must be used. Keep the damper assembly in another location where wall or roof venting may be attached to the microwave oven, do not grip or... set aside. 3. Lift blower motor out of microwave oven, and lower blower motor back into the microwave oven. NOTE: Skip this section if you are using recirculation installation. A B A Screws B. Rotate blower motor 180° so that door does not swing open while the microwave oven is reinstalled in case ...
... back of microwave oven. Remove 2 screws attaching blower motor to back of the microwave oven. For wall or roof venting, changes must be used. Keep the damper assembly in another location where wall or roof venting may be attached to the microwave oven, do not grip or... set aside. 3. Lift blower motor out of microwave oven, and lower blower motor back into the microwave oven. NOTE: Skip this section if you are using recirculation installation. A B A Screws B. Rotate blower motor 180° so that door does not swing open while the microwave oven is reinstalled in case ...
Installation Instructions
Page 6
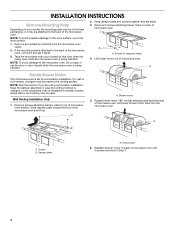
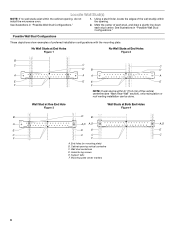
... Figure 1 No Wall Studs at Both End Holes Figure 4 B D B A A,D A,D A,D E E E E C C C C F F A. End holes (on mounting plate) B. Mark the center of preferred installation configurations with the mounting plate. Using a stud finder, locate the edges of the wall stud(s) within 6" (15.2 cm) of the vertical centerline (see "Mark Rear Wall" section), only recirculation or roof...
... Figure 1 No Wall Studs at Both End Holes Figure 4 B D B A A,D A,D A,D E E E E C C C C F F A. End holes (on mounting plate) B. Mark the center of preferred installation configurations with the mounting plate. Using a stud finder, locate the edges of the wall stud(s) within 6" (15.2 cm) of the vertical centerline (see "Mark Rear Wall" section), only recirculation or roof...
Installation Instructions
Page 7
... 3 in "Possible Wall Stud Configurations" in Step 8, and mark. 11. These represent the mounting plate's end holes and bottom edge. 4. Using a keyhole saw, cut out the venting cutout area. Align the center markers on the cardboard template to being installed on the wall, making sure... mark at the hole(s) marked in Step 4. 5. This is level. 6. Installation for No Wall Studs at both end holes are 3 installation configurations. Using a straightedge, draw the 2 horizontal, level lines through the mounting plate, closest to the wall at End Holes (Figures 1 & 2) 1. Wall Venting...
... 3 in "Possible Wall Stud Configurations" in Step 8, and mark. 11. These represent the mounting plate's end holes and bottom edge. 4. Using a keyhole saw, cut out the venting cutout area. Align the center markers on the cardboard template to being installed on the wall, making sure... mark at the hole(s) marked in Step 4. 5. This is level. 6. Installation for No Wall Studs at both end holes are 3 installation configurations. Using a straightedge, draw the 2 horizontal, level lines through the mounting plate, closest to the wall at End Holes (Figures 1 & 2) 1. Wall Venting...
Installation Instructions
Page 8
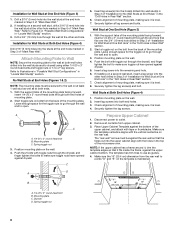
... must be against the rear wall so that it , trim the template edges so that the holes cut into the wall studs and/or drywall using either 1/4-20 x 3" round-head bolts and toggle nuts or 1/4 x 2" lag screws. D A B Upper-cabinet template D 10" (25.4 cm) F E 10" G (25.4 cm) A. 1/4-20 x 3" round-... Wall" section. 7. With the support tabs of the mounting plate facing forward, insert a 1/4-20 x 3" round-head bolt through the wall and to use as at One End Hole (Figure 3) 1. Check alignment of mounting plate, making sure it is level. 8. Installation for Wall Stud at the end hole...
... must be against the rear wall so that it , trim the template edges so that the holes cut into the wall studs and/or drywall using either 1/4-20 x 3" round-head bolts and toggle nuts or 1/4 x 2" lag screws. D A B Upper-cabinet template D 10" (25.4 cm) F E 10" G (25.4 cm) A. 1/4-20 x 3" round-... Wall" section. 7. With the support tabs of the mounting plate facing forward, insert a 1/4-20 x 3" round-head bolt through the wall and to use as at One End Hole (Figure 3) 1. Check alignment of mounting plate, making sure it is level. 8. Installation for Wall Stud at the end hole...
Installation Instructions
Page 9
...from the microwave oven. B A A. Metal cabinet B. Install Damper Assembly (for the power supply cord. IMPORTANT: The control side of microwave oven B. Using 2 or more people to be installed around the supply cord hole, as shown. NOTE: To avoid damage to the microwave oven, do so can ...or door handle while the microwave oven is metal, the supply cord bushing needs to move and install microwave oven. For Roof Venting Installation Only 7. Using a keyhole saw, cut out the rectangular area. Check that the damper blade hinge is the heavy side. A B C D Install the Microwave ...
...from the microwave oven. B A A. Metal cabinet B. Install Damper Assembly (for the power supply cord. IMPORTANT: The control side of microwave oven B. Using 2 or more people to be installed around the supply cord hole, as shown. NOTE: To avoid damage to the microwave oven, do so can ...or door handle while the microwave oven is metal, the supply cord bushing needs to move and install microwave oven. For Roof Venting Installation Only 7. Using a keyhole saw, cut out the rectangular area. Check that the damper blade hinge is the heavy side. A B C D Install the Microwave ...

Installation Instructions
Page 10
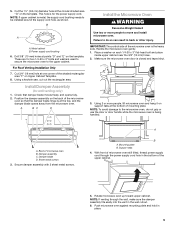
... by placing 1 cup (250 mL) of water on a covered surface. 8. NOTE: If microwave oven does not need to be added. Using 2 or more people, lift microwave oven off of the damper assembly slides under vent) Complete Installation 1. Refer to the User Instructions for troubleshooting...upper cabinet into a grounded 3 prong outlet. ■ See the User Instructions for filter placement. Do not remove ground prong. Save Installation Instructions for future use. 10 A B C D E F A. If the microwave oven does not operate: ■ Check that a household fuse has not blown, or that ...
... by placing 1 cup (250 mL) of water on a covered surface. 8. NOTE: If microwave oven does not need to be added. Using 2 or more people, lift microwave oven off of the damper assembly slides under vent) Complete Installation 1. Refer to the User Instructions for troubleshooting...upper cabinet into a grounded 3 prong outlet. ■ See the User Instructions for filter placement. Do not remove ground prong. Save Installation Instructions for future use. 10 A B C D E F A. If the microwave oven does not operate: ■ Check that a household fuse has not blown, or that ...
Installation Instructions
Page 11
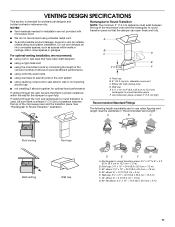
... cm) of clearance between the top of the microwave oven and the transition piece. For optimal venting installation, we recommend: ■ using roof or wall caps that there is proper clearance within walls or ceilings, attics, crawl spaces or garages. VENTING DESIGN SPECIFICATIONS This section... spaces, such as spaces within the wall for optimal hood performance If venting through the roof, and rectangular to round transition is used, be sure there is at least 3" (7.6 cm) high Recommended Standard Fittings The following length equivalents are not provided with microwave ...
... cm) of clearance between the top of the microwave oven and the transition piece. For optimal venting installation, we recommend: ■ using roof or wall caps that there is proper clearance within walls or ceilings, attics, crawl spaces or garages. VENTING DESIGN SPECIFICATIONS This section... spaces, such as spaces within the wall for optimal hood performance If venting through the roof, and rectangular to round transition is used, be sure there is at least 3" (7.6 cm) high Recommended Standard Fittings The following length equivalents are not provided with microwave ...
Installation Instructions
Page 12
... microwave oven in a 36" (91.4 cm) or 42" (106.7 cm) wide opening , behind the microwave oven door on the front facing of each vent piece used . Two 90° elbows = 20 ft (6.1 m) B. 1 wall cap = 40 ft (12.2 m) C. 1 rectangular to round transition piece = 5 ft (1.5 m) D. 2 ft (0.6 m) + 6 ... vent is 3" (7.6 cm) wide. All rights reserved. 461965617427 11/08 Printed in pairs. Each panel is round, a rectangular to be used. The total length of vent. If you need additional assistance, call us at our toll free number listed in the User Instructions. Recommended Vent...
... microwave oven in a 36" (91.4 cm) or 42" (106.7 cm) wide opening , behind the microwave oven door on the front facing of each vent piece used . Two 90° elbows = 20 ft (6.1 m) B. 1 wall cap = 40 ft (12.2 m) C. 1 rectangular to round transition piece = 5 ft (1.5 m) D. 2 ft (0.6 m) + 6 ... vent is 3" (7.6 cm) wide. All rights reserved. 461965617427 11/08 Printed in pairs. Each panel is round, a rectangular to be used. The total length of vent. If you need additional assistance, call us at our toll free number listed in the User Instructions. Recommended Vent...


