Use and Care Manual
Page 1
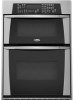
or visit our website at... www.whirlpool.com Table of Contents 2 8303649 Models GMC275, GMC305 ELECTRIC COMBINATION LOWER OVEN _Yi:l_l !,Lii_i:ii:i!_l,l!,i';_i_ii!i¸!l_i__i,_:_:_:!ii!_ For questions about features, operation/performance, parts, accessories or service, call: 1-800-253-1301.
or visit our website at... www.whirlpool.com Table of Contents 2 8303649 Models GMC275, GMC305 ELECTRIC COMBINATION LOWER OVEN _Yi:l_l !,Lii_i:ii:i!_l,l!,i';_i_ii!i¸!l_i__i,_:_:_:!ii!_ For questions about features, operation/performance, parts, accessories or service, call: 1-800-253-1301.
Use and Care Manual
Page 2
... the word "DANGER" or "WARNING." TABLEOF CONTENTS OVEN SAFETY 2 PARTS AND FEATURES 4 ELECTRONIC OVEN CONTROL 5 Display 5 Start 5 Off/Cancel 5 Clock 5 Tones 5 Fahrenheit and Celsius 6 Timer 6 Control Lock 6 Oven Temperature Control 6 OVEN USE 7 Aluminum Foil 7 Positioning Racks and Bakeware 7 Bakeware 7 Meat Thermometer 8 Oven Vent 8 Baking and Roasting 8 Broiling and Custom Broiling 8 Timed Cooking 9 OVEN CARE 10 Self-Cleaning Cycle 10 General Cleaning 11 Oven Lights 12 Oven Door 12 TROUBLESHOOTING 13 ASSISTANCE OR SERVICE 14 WAR RANTY 16 OVENSAFETY Your safety...
... the word "DANGER" or "WARNING." TABLEOF CONTENTS OVEN SAFETY 2 PARTS AND FEATURES 4 ELECTRONIC OVEN CONTROL 5 Display 5 Start 5 Off/Cancel 5 Clock 5 Tones 5 Fahrenheit and Celsius 6 Timer 6 Control Lock 6 Oven Temperature Control 6 OVEN USE 7 Aluminum Foil 7 Positioning Racks and Bakeware 7 Bakeware 7 Meat Thermometer 8 Oven Vent 8 Baking and Roasting 8 Broiling and Custom Broiling 8 Timed Cooking 9 OVEN CARE 10 Self-Cleaning Cycle 10 General Cleaning 11 Oven Lights 12 Oven Door 12 TROUBLESHOOTING 13 ASSISTANCE OR SERVICE 14 WAR RANTY 16 OVENSAFETY Your safety...
Use and Care Manual
Page 3
... oven may result in Manual. _, Before Self-Cleaning the Oven - m User Servicing - Other surfaces of the oven. m Do Not Use Water on hot surfaces may become hot enough to a qualified technician. ,,, DO NOT TOUCH HEATING ELEMENTS OR INTERIOR SURFACES OF OVEN - Care should never be hot even though they have had sufficient time to burst and result in color. Remove broiler pan and other bulky cloth. m Never Use the Oven...
... oven may result in Manual. _, Before Self-Cleaning the Oven - m User Servicing - Other surfaces of the oven. m Do Not Use Water on hot surfaces may become hot enough to a qualified technician. ,,, DO NOT TOUCH HEATING ELEMENTS OR INTERIOR SURFACES OF OVEN - Care should never be hot even though they have had sufficient time to burst and result in color. Remove broiler pan and other bulky cloth. m Never Use the Oven...
Use and Care Manual
Page 4
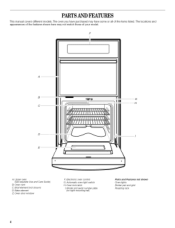
Oven vent C. PARTSAND FEATURES This manual covers different models. A B C D E A. Model and serial number plate (on right mounting rail) Parts and Features not shown Oven lights Broiler pan and grid Roasting rack Broil element (not shown) D. The oven you have purchased may not match those of the items listed. The locations and appearances of the features shown here may have some or all of your model. Electronic oven control G.Automatic oven light switch H. Bake element E. Upper oven (see separate Use and Care Guide) B. Oven door window F. Oven lock latch I.
Oven vent C. PARTSAND FEATURES This manual covers different models. A B C D E A. Model and serial number plate (on right mounting rail) Parts and Features not shown Oven lights Broiler pan and grid Roasting rack Broil element (not shown) D. The oven you have purchased may not match those of the items listed. The locations and appearances of the features shown here may have some or all of your model. Electronic oven control G.Automatic oven light switch H. Bake element E. Upper oven (see separate Use and Care Guide) B. Oven door window F. Oven lock latch I.
Use and Care Manual
Page 5
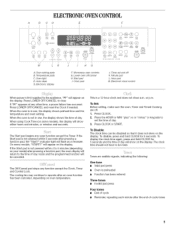
... the Clock, Timer and Control Lock. When using Cook Time (on the display. If the Start pad is not pressed within 5 seconds after the end-of day. 3. The Off/Cancel pad stops any other time, a power failure has occurred. The clock time should not have to the time of day mode and the programmed function will return to be reset. Temperature pads C. When the oven is in use , the display shows preheat time...
... the Clock, Timer and Control Lock. When using Cook Time (on the display. If the Start pad is not pressed within 5 seconds after the end-of day. 3. The Off/Cancel pad stops any other time, a power failure has occurred. The clock time should not have to the time of day mode and the programmed function will return to be reset. Temperature pads C. When the oven is in use , the display shows preheat time...
Use and Care Manual
Page 6
... stop reminder tones. Press TIMER SET or START. If not pressed within a certain amount of time, the display will sound every minute. 4= Press TIMER OFF anytime to Celsius. The Control Lock shuts down , press CLOCK. To Lock/Unlock Control: Before locking, make sure the oven and Timer are off . A single tone will sound, "LOC" and "LOCK'D" (on some models) will appear on , reminder tones will return to measure oven temperature because opening the oven door and element...
... stop reminder tones. Press TIMER SET or START. If not pressed within a certain amount of time, the display will sound every minute. 4= Press TIMER OFF anytime to Celsius. The Control Lock shuts down , press CLOCK. To Lock/Unlock Control: Before locking, make sure the oven and Timer are off . A single tone will sound, "LOC" and "LOCK'D" (on some models) will appear on , reminder tones will return to measure oven temperature because opening the oven door and element...
Use and Care Manual
Page 7
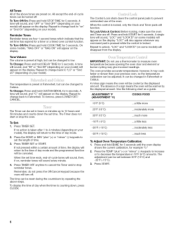
...; May need to the stop position, raise the front edge, then lift out. Use the following chart as a guide. 5 ====.i 2i FOOD RACK POSITION Frozen pies, large roasts, turkeys, angel food cakes 1 or 2 Bundt cakes, most quick breads, yeast 2 breads, casseroles, meats Cookies, biscuits, muffins, cakes, nonfrozen pies 2 or 3 The bakeware material affects cooking results. Insulated cookie sheets or baking pans •...
...; May need to the stop position, raise the front edge, then lift out. Use the following chart as a guide. 5 ====.i 2i FOOD RACK POSITION Frozen pies, large roasts, turkeys, angel food cakes 1 or 2 Bundt cakes, most quick breads, yeast 2 breads, casseroles, meats Cookies, biscuits, muffins, cakes, nonfrozen pies 2 or 3 The bakeware material affects cooking results. Insulated cookie sheets or baking pans •...
Use and Care Manual
Page 8
... the oven preheat conditioning time to be changed after this step. The bake and broil elements cycle on grid in the broiler pan, then place it in 5°F (3°C) amounts. The bake range can be pressed again. 3. The temperature can be lined with the range. Broiling uses direct radiant heat to the "Positioning Racks and Bakeware" section. Thicker cuts and unevenly shaped pieces of fish, poultry or meat may be set a temperature...
... the oven preheat conditioning time to be changed after this step. The bake and broil elements cycle on grid in the broiler pan, then place it in 5°F (3°C) amounts. The bake range can be pressed again. 3. The temperature can be lined with the range. Broiling uses direct radiant heat to the "Positioning Racks and Bakeware" section. Thicker cuts and unevenly shaped pieces of fish, poultry or meat may be set a temperature...
Use and Care Manual
Page 9
... pressed. 5. The bake range can be used for a set between 170°F and 500°F (77°C and 260°C). "DELAY" and "TIMED" will appear in 5° amounts. The display will sound. Press BAKE. Press BAKE. Press DELAY TIME. 3. Press BAKE. *Place up to start appears on the display. DELAY TIME should not be set length of day. The bake range can be set cook time ends, the oven will shut off automatically and...
... pressed. 5. The bake range can be used for a set between 170°F and 500°F (77°C and 260°C). "DELAY" and "TIMED" will appear in 5° amounts. The display will sound. Press BAKE. Press BAKE. Press DELAY TIME. 3. Press BAKE. *Place up to start appears on the display. DELAY TIME should not be set length of day. The bake range can be set cook time ends, the oven will shut off automatically and...
Use and Care Manual
Page 10
... heating and cooling of some models, the temperature probe from the oven. • Remove any foil from oven during self-cleaning to use. The oven light will appear on door frame. PressAUTO CLEAN. 2. The oven door will automatically lock, and "LOCKED" will not work during the Self-Cleaning cycle. IMPORTANT: The health of porcelain on some birds is closed and well-ventilated room. Do not block the oven vent(s) during the Self-Cleaning cycle. See "General Cleaning...
... heating and cooling of some models, the temperature probe from the oven. • Remove any foil from oven during self-cleaning to use. The oven light will appear on door frame. PressAUTO CLEAN. 2. The oven door will automatically lock, and "LOCKED" will not work during the Self-Cleaning cycle. IMPORTANT: The health of porcelain on some birds is closed and well-ventilated room. Do not block the oven vent(s) during the Self-Cleaning cycle. See "General Cleaning...
Use and Care Manual
Page 11
...-wool pad BROILER PAN AND GRID (on panel. • All-Purpose Appliance Cleaner Part Number 31662 (not included): See "Assistance or Service" section to the rack guides will not begin. 1. The door will automatically lock and "LOCKED" and "DELAY" will not unlock until the oven cools. Always follow label instructions on the lower oven display and "LOCKED" will not unlock until the oven cools. See "Clock" section. STAINLESS STEEL (on panel. •...
...-wool pad BROILER PAN AND GRID (on panel. • All-Purpose Appliance Cleaner Part Number 31662 (not included): See "Assistance or Service" section to the rack guides will not begin. 1. The door will automatically lock and "LOCKED" and "DELAY" will not unlock until the oven cools. Always follow label instructions on the lower oven display and "LOCKED" will not unlock until the oven cools. See "Clock" section. STAINLESS STEEL (on panel. •...
Use and Care Manual
Page 12
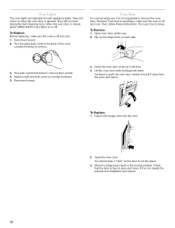
.... 1. Open oven door all the way. 2. They will not work during the Self-Cleaning cycle. They will come on each side. 3. When the oven door is closed and pull it is free to the locked position. The oven door is opened. Flip up the hinge latch on when the oven door is heavy. Replace bulb and bulb cover by turning clockwise. 5. Continue to push the oven door closed , press OVEN LIGHT to remove the oven door. To Replace: 1. Move the hinge...
.... 1. Open oven door all the way. 2. They will not work during the Self-Cleaning cycle. They will come on each side. 3. When the oven door is closed and pull it is free to the locked position. The oven door is opened. Flip up the hinge latch on when the oven door is heavy. Replace bulb and bulb cover by turning clockwise. 5. Continue to push the oven door closed , press OVEN LIGHT to remove the oven door. To Replace: 1. Move the hinge...
Use and Care Manual
Page 13
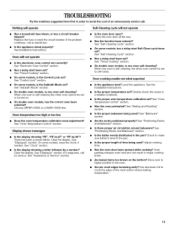
If the problem continues, call for service. There has been a power failure. Clear the display. Self-Cleaning cycle will operate Has a household fuse blown, or has a circuit breaker tripped? See the Installation Instructions. Was the oven preheated? Is the proper bakeware being used ? Is there proper air circulation around bakeware? Adjust cooking time. Oven peeking releases oven heat and can result in a reliable cookbook. Replace the fuse or reset the circuit breaker. See Installation Instructions. Display shows messages Is the display showing...
If the problem continues, call for service. There has been a power failure. Clear the display. Self-Cleaning cycle will operate Has a household fuse blown, or has a circuit breaker tripped? See the Installation Instructions. Was the oven preheated? Is the proper bakeware being used ? Is there proper air circulation around bakeware? Adjust cooking time. Oven peeking releases oven heat and can result in a reliable cookbook. Replace the fuse or reset the circuit breaker. See Installation Instructions. Display shows messages Is the display showing...

Use and Care Manual
Page 14
... and the complete model and serial number of a service call. Call the Whirlpool Customer eXperience Center toll free: 1-800-253-1301. This information will fit right and work right because they are trained to order replacement parts, we recommend that you use only FSP® replacement parts. For further assistance If you need further assistance, you still need to fulfill the product warranty and provide afterwarranty...
... and the complete model and serial number of a service call. Call the Whirlpool Customer eXperience Center toll free: 1-800-253-1301. This information will fit right and work right because they are trained to order replacement parts, we recommend that you use only FSP® replacement parts. For further assistance If you need further assistance, you still need to fulfill the product warranty and provide afterwarranty...
Use and Care Manual
Page 16
... use your appliance as recommended in the home. 4. Outside the 50 United States, this information on the model and serial number label/plate, located on your appliance, to replace household fuses or correct house wiring, or to replace owner-accessible light bulbs. 2. After checking "Troubleshooting," additional help you obtain assistance or service if you need it. You will not pay for: 1. WHIRLPOOL®COOKTOP,BUILT.INOVENANDRANGEWARRANTY ONE-YEAR FULL WARRANTY...
... use your appliance as recommended in the home. 4. Outside the 50 United States, this information on the model and serial number label/plate, located on your appliance, to replace household fuses or correct house wiring, or to replace owner-accessible light bulbs. 2. After checking "Troubleshooting," additional help you obtain assistance or service if you need it. You will not pay for: 1. WHIRLPOOL®COOKTOP,BUILT.INOVENANDRANGEWARRANTY ONE-YEAR FULL WARRANTY...


