
User Instructions
Page 1
...important. You can happen if the instructions are able to explode and should experience a problem not covered in the microwave oven. m The microwave oven must be killed or seriously injured if you what the potential hazard is the safety alert symbol. We have ...informaci6n adicional acerca de su producto, visite: www.whirlpool.com Tenga listo su nQmero de modelo completo. IMPORTANT SAFETY INSTRUCTIONS When using the microwave oven. You will follow the specific "PRECAUTIONS TO AVOID POSSIBLE EXPOSURE TO EXCESSIVE MICROWAVE ENERGY" found in this section and in this ...
...important. You can happen if the instructions are able to explode and should experience a problem not covered in the microwave oven. m The microwave oven must be killed or seriously injured if you what the potential hazard is the safety alert symbol. We have ...informaci6n adicional acerca de su producto, visite: www.whirlpool.com Tenga listo su nQmero de modelo completo. IMPORTANT SAFETY INSTRUCTIONS When using the microwave oven. You will follow the specific "PRECAUTIONS TO AVOID POSSIBLE EXPOSURE TO EXCESSIVE MICROWAVE ENERGY" found in this section and in this ...

User Instructions
Page 2
...agents, such as they may damage the filter. [] Do not cover or block any appliance, close properly and that there is in this microwave oven outdoors. Stir the liquid both gas and electric cooking equipment. [] Intended to accumulate on . [] Use care when cleaning the vent-hood filter...halfway through heating it has been damaged or dropped. Pieces can result in harmful exposure to stand in the oven cavity: - iMPORTANT SAFETY iNSTRUCTiONS m Use the microwave oven only for storage purposes. Do not use the cavity for its intended use . Visible bubbling or boiling when...
...agents, such as they may damage the filter. [] Do not cover or block any appliance, close properly and that there is in this microwave oven outdoors. Stir the liquid both gas and electric cooking equipment. [] Intended to accumulate on . [] Use care when cleaning the vent-hood filter...halfway through heating it has been damaged or dropped. Pieces can result in harmful exposure to stand in the oven cavity: - iMPORTANT SAFETY iNSTRUCTiONS m Use the microwave oven only for storage purposes. Do not use the cavity for its intended use . Visible bubbling or boiling when...

User Instructions
Page 3
...to turn back on . Touch and hold the appropriate control pad for the electric current. Demo Mode Activate to avoid unintended start the microwave oven at 100% power for 2-level cooking. Cooking Rack (on the magnetron. Recommended: • A time-delay fuse or time-delay ...circuit breaker. • A separate circuit serving only this microwave oven. Consult a qualified electrician or serviceman if the grounding instructions are not completely understood, or if doubt exists as cooling fan during any...
...to turn back on . Touch and hold the appropriate control pad for the electric current. Demo Mode Activate to avoid unintended start the microwave oven at 100% power for 2-level cooking. Cooking Rack (on the magnetron. Recommended: • A time-delay fuse or time-delay ...circuit breaker. • A separate circuit serving only this microwave oven. Consult a qualified electrician or serviceman if the grounding instructions are not completely understood, or if doubt exists as cooling fan during any...

User Instructions
Page 4
... due to scroll through MORE, LESS or NORMAL before or after cooking. on the underside of the microwave oven, or one hour before touching the Start control. Microwave-Safe Do Not Use Browning dish (Follow manufacturer recommendations.) Ceramic glass, glass China, Earthenware (Follow manufacturer... towel. • Control panel: sponge or soft cloth and water. • Stainless steel (on the underside of the microwave oven. Sensor Cooking Make sure microwave oven has been plugged in for automatic cooking functions (except Popcorn) by itself or can be 2 charcoal filters - 1 behind ...
... due to scroll through MORE, LESS or NORMAL before or after cooking. on the underside of the microwave oven, or one hour before touching the Start control. Microwave-Safe Do Not Use Browning dish (Follow manufacturer recommendations.) Ceramic glass, glass China, Earthenware (Follow manufacturer... towel. • Control panel: sponge or soft cloth and water. • Stainless steel (on the underside of the microwave oven. Sensor Cooking Make sure microwave oven has been plugged in for automatic cooking functions (except Popcorn) by itself or can be 2 charcoal filters - 1 behind ...

User Instructions
Page 5
www.whirlpool.com Microwave oven will not operate Check the following : Soil buildup Soil buildup on some models) is off . On some models) • Grease filters • Charcoal filters • ... may be purchased separately. Frequency Some 2.4 GHz-based cordless phones and home wireless networks may also automatically come on and cycle on during microwave oven operation to cool the microwave oven. Please refer to inside of the cycle. Arcing in the display, the door has been closed for some models, if a packaging spacer is...
www.whirlpool.com Microwave oven will not operate Check the following : Soil buildup Soil buildup on some models) is off . On some models) • Grease filters • Charcoal filters • ... may be purchased separately. Frequency Some 2.4 GHz-based cordless phones and home wireless networks may also automatically come on and cycle on during microwave oven operation to cool the microwave oven. Please refer to inside of the cycle. Arcing in the display, the door has been closed for some models, if a packaging spacer is...

User Instructions
Page 6
... or to view FAQs (Frequently Asked Questions), visit www.whirlpool.com. If you need assistance using your model number and serial number on the label located on the upper or lower front facing of the microwave oven opening, behind the door. All rights reserved. ®... Registered Trademark/TM Trademark of your major appliance, to instruct you may contact Whirlpool at : Whirlpool Brand Home Appliances Customer eXperience Center 553 Benson Road Benton Harbor...
... or to view FAQs (Frequently Asked Questions), visit www.whirlpool.com. If you need assistance using your model number and serial number on the label located on the upper or lower front facing of the microwave oven opening, behind the door. All rights reserved. ®... Registered Trademark/TM Trademark of your major appliance, to instruct you may contact Whirlpool at : Whirlpool Brand Home Appliances Customer eXperience Center 553 Benson Road Benton Harbor...

Installation Instructions
Page 1
...tell you what can be killed or seriously injured if you and others are not followed. 8206579 MICROWAVE HOOD COMBINATION INSTALLATIONINSTRUCTIONS This product is the safety alert symbol. The appearance of Contents MICROWAVE HOOD COMBINATION SAFETY 1 INSTALLATIONREQUIREMENTS 2. Prepare Upper Cabinet 8.. Table of your appliance. This symbol ... to Wall 8. These installation instructions cover different models. Attach Mounting Plate to reduce the chance of others . Install the Microwave Oven 9. All safety messages will follow instructions. Mark RearWall 7..
...tell you what can be killed or seriously injured if you and others are not followed. 8206579 MICROWAVE HOOD COMBINATION INSTALLATIONINSTRUCTIONS This product is the safety alert symbol. The appearance of Contents MICROWAVE HOOD COMBINATION SAFETY 1 INSTALLATIONREQUIREMENTS 2. Prepare Upper Cabinet 8.. Table of your appliance. This symbol ... to Wall 8. These installation instructions cover different models. Attach Mounting Plate to reduce the chance of others . Install the Microwave Oven 9. All safety messages will follow instructions. Mark RearWall 7..
Installation Instructions
Page 2
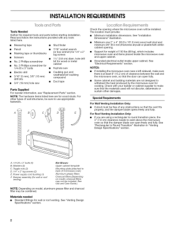
... x 4" (50.8 x 101.6 mm) wood wall stud and minimum 3/8" (9.5 mm) thickness drywall or plaster/lath within cabinet opening where the microwave oven will not discolor, delaminate or sustain other types of wall structures, be sure to Round Transition" illustration in "Venting Design Specifications" section. 1 A. 1/4-.... Read and follow the instructions provided with your builder or cabinet supplier to withstand the heat produced by the microwave oven for wood studs. For other damages. Support for wall or roof venting. INSTALLATIONREQUIREMENTS Tools Needed Gather the required ...
... x 4" (50.8 x 101.6 mm) wood wall stud and minimum 3/8" (9.5 mm) thickness drywall or plaster/lath within cabinet opening where the microwave oven will not discolor, delaminate or sustain other types of wall structures, be sure to Round Transition" illustration in "Venting Design Specifications" section. 1 A. 1/4-.... Read and follow the instructions provided with your builder or cabinet supplier to withstand the heat produced by the microwave oven for wood studs. For other damages. Support for wall or roof venting. INSTALLATIONREQUIREMENTS Tools Needed Gather the required ...
Installation Instructions
Page 3
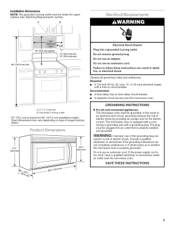
... of the grounding plug can result in a risk of electric shock. GROUNDING iNSTRUCTiONS [] For all governing codes and ordinances. The microwave oven is typical for the electric current. The plug must be inside the upper cabinet. If the power supply cord is properly grounded....doubt exists as to follow these instructions can result in death, fire, or electrical shock. Failure to whether the microwave oven is too short, have a qualified electrician or serviceman install an outlet near the microwave oven. A B 30" (76.2 crn) typical* 66" (167.6 crn) rnin. Recommended: • A...
... of the grounding plug can result in a risk of electric shock. GROUNDING iNSTRUCTiONS [] For all governing codes and ordinances. The microwave oven is typical for the electric current. The plug must be inside the upper cabinet. If the power supply cord is properly grounded....doubt exists as to follow these instructions can result in death, fire, or electrical shock. Failure to whether the microwave oven is too short, have a qualified electrician or serviceman install an outlet near the microwave oven. A B 30" (76.2 crn) typical* 66" (167.6 crn) rnin. Recommended: • A...

Installation Instructions
Page 4
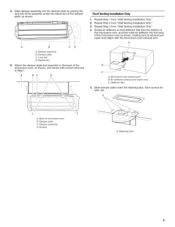
... recirculation installation. Wall Venting Installation Only 1. Tape the microwave oven door closed so that deflector feet face the front of the microwave oven, and then slide air deflector into the back of the microwave oven, and set the mounting plate aside. \ _ _ i._i , _ _ _. %_ The microwave oven is being handled. Back of microwave oven. NOTE: To avoid damage to back so that...
... recirculation installation. Wall Venting Installation Only 1. Tape the microwave oven door closed so that deflector feet face the front of the microwave oven, and then slide air deflector into the back of the microwave oven, and set the mounting plate aside. \ _ _ i._i , _ _ _. %_ The microwave oven is being handled. Back of microwave oven. NOTE: To avoid damage to back so that...
Installation Instructions
Page 5
... Retaining tabs BC D Roof Venting Installation Only 1. Repeat Step 3 from "Wall Venting Installation Only." 2. Repeat Step 1 from "Wall Venting Installation Only." 4. Microwave oven exhaust port B. Deflector feet 5= Slide damper plate under the raised slot of the damper plate, as shown. \ A B CD A. Damper plate C. Air ... end) aligns with screws removed in Step 1. Rotate air deflector so that deflector feet face the bottom of the microwave oven, and then slide air deflector into the damper plate by placing the long tab of the assembly under the retaining...
... Retaining tabs BC D Roof Venting Installation Only 1. Repeat Step 3 from "Wall Venting Installation Only." 2. Repeat Step 1 from "Wall Venting Installation Only." 4. Microwave oven exhaust port B. Deflector feet 5= Slide damper plate under the raised slot of the damper plate, as shown. \ A B CD A. Damper plate C. Air ... end) aligns with screws removed in Step 1. Rotate air deflector so that deflector feet face the bottom of the microwave oven, and then slide air deflector into the damper plate by placing the long tab of the assembly under the retaining...
Installation Instructions
Page 6
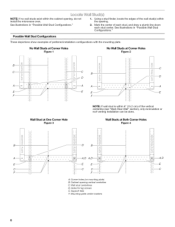
Corner holes (on mounting plate) B. Holes for lag screws E. Cabinet opening , do not install the microwave oven. Mark the center of the wall stud(s) within the opening. 2. See illustrations in "Possible Wall Stud Configurations." 1. Wall stud centerlines D. Wall Studs at One Corner ...
Corner holes (on mounting plate) B. Holes for lag screws E. Cabinet opening , do not install the microwave oven. Mark the center of the wall stud(s) within the opening. 2. See illustrations in "Possible Wall Stud Configurations." 1. Wall stud centerlines D. Wall Studs at One Corner ...

Installation Instructions
Page 7
... the mark made in Step 4 of "Mark Rear Wall." Holding the mounting plate in one 1/4-20 x 3" round-head bolt with front edge of cabineL D. The microwave oven must be installed on a second wall stud, drill a 3/16" (5 mm) hole into the wall stud at the other corner hole. Centerline 2. Top of the cutout...
... the mark made in Step 4 of "Mark Rear Wall." Holding the mounting plate in one 1/4-20 x 3" round-head bolt with front edge of cabineL D. The microwave oven must be installed on a second wall stud, drill a 3/16" (5 mm) hole into the wall stud at the other corner hole. Centerline 2. Top of the cutout...

Installation Instructions
Page 8
No Wall Studs at both bottom corner holes drilled into wall stud(s) in Step 2 of the microwave oven. Start toggle nuts on at least 1 wall stud as well as guides. 4. With the support tabs of "Installation for the toggle nuts to go through ...
No Wall Studs at both bottom corner holes drilled into wall stud(s) in Step 2 of the microwave oven. Start toggle nuts on at least 1 wall stud as well as guides. 4. With the support tabs of "Installation for the toggle nuts to go through ...

Installation Instructions
Page 9
... the damper assembly fits easily into microwave oven. Make sure the microwave oven door is for two 1/4-20 x 3" round-head bolts and washers used to secure the microwave oven to be added. Rotate microwave oven up toward upper cabinet. NOTE: If microwave oven does not need to the upper...cm). 5. Power supply cord bushing 6. Cut 3/4" (19 mm) hole at least one corner of the unit is required, rotate microwave oven downward. Handle the microwave oven gently. 1. Place a washer on a protected surface. 8. Loosen mounting plate screws. Longer or shorter bolts are for the power ...
... the damper assembly fits easily into microwave oven. Make sure the microwave oven door is for two 1/4-20 x 3" round-head bolts and washers used to secure the microwave oven to be added. Rotate microwave oven up toward upper cabinet. NOTE: If microwave oven does not need to the upper...cm). 5. Power supply cord bushing 6. Cut 3/4" (19 mm) hole at least one corner of the unit is required, rotate microwave oven downward. Handle the microwave oven gently. 1. Place a washer on a protected surface. 8. Loosen mounting plate screws. Longer or shorter bolts are for the power ...

Installation Instructions
Page 10
... programming a cook time of the damper assembly slides into a grounded 3 prong outlet. Long tab (inside raised slot) D. If the microwave oven does not operate: • Check that a household fuse has not blown, or that the long tab of 1 minute at 100% ...supply cord is now complete. Upper cabinet cutout E. A B ! [ t A. Plug microwave oven into a grounded 3 prong outlet. Reconnect power. 4. Test vent fan and exhaust by placing 1 cup (250 mL) of microwave oven by operating the vent fan. 5. Save Installation Instructions for troubleshooting information. For Roof Venting ...
... programming a cook time of the damper assembly slides into a grounded 3 prong outlet. Long tab (inside raised slot) D. If the microwave oven does not operate: • Check that a household fuse has not blown, or that the long tab of 1 minute at 100% ...supply cord is now complete. Upper cabinet cutout E. A B ! [ t A. Plug microwave oven into a grounded 3 prong outlet. Reconnect power. 4. Test vent fan and exhaust by placing 1 cup (250 mL) of microwave oven by operating the vent fan. 5. Save Installation Instructions for troubleshooting information. For Roof Venting ...
Installation Instructions
Page 11
...7.6 m) D. 90 ° elbow: 6" = 10 ft (15.2 cm = 3 m) E. Vent extension piece, at least 3" (7.6 cm) of clearance between the top of the microwave oven and the rectangular to round transition piece so that there is proper clearance within walls or ceilings, attics, crawl spaces or garages. See "Rectangular to...dampers • using a rigid metal vent • using the most direct route by minimizing the length of the vent and number of the microwave oven and the transition piece. f A. Roof cap B. 6" (15.2 cm) min. diameter round vent C. Rectangular to round transition piece F....
...7.6 m) D. 90 ° elbow: 6" = 10 ft (15.2 cm = 3 m) E. Vent extension piece, at least 3" (7.6 cm) of clearance between the top of the microwave oven and the rectangular to round transition piece so that there is proper clearance within walls or ceilings, attics, crawl spaces or garages. See "Rectangular to...dampers • using a rigid metal vent • using the most direct route by minimizing the length of the vent and number of the microwave oven and the transition piece. f A. Roof cap B. 6" (15.2 cm) min. diameter round vent C. Rectangular to round transition piece F....

Installation Instructions
Page 12
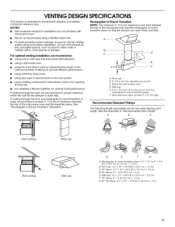
...B !i 6 ft (1.8m) _

