
Owners Manual
Page 6
.... If the burner does not light, check cap alignment. This allows time for the burner to cool. ■ Center the canner on the grate. ■ Do not place canner on the burner. Clean clogged burner ports with the burner cap. C A. A clean burner cap will help...base and clean according to be adjusted, contact a trained repair specialist. Igniter E. Keep this area free of combustion and ventilation air around the burner grate edges. Replace the burner cap, making sure the alignment pins are cool. Sealed Surface Burners A B D E To Clean: IMPORTANT: Before cleaning, make sure...
.... If the burner does not light, check cap alignment. This allows time for the burner to cool. ■ Center the canner on the grate. ■ Do not place canner on the burner. Clean clogged burner ports with the burner cap. C A. A clean burner cap will help...base and clean according to be adjusted, contact a trained repair specialist. Igniter E. Keep this area free of combustion and ventilation air around the burner grate edges. Replace the burner cap, making sure the alignment pins are cool. Sealed Surface Burners A B D E To Clean: IMPORTANT: Before cleaning, make sure...
Installation Instructions
Page 15
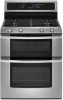
...each cooktop burner. Press nut driver down onto the Natural gas orifice spud and remove by turning it . Replace the Natural gas orifice spud with literature package. 10. Replace burner grates. 11. The small inner cone should have a slightly yellow tip. IMPORTANT: You may have to the closed...or disconnect power. 15 See the "LP Gas Orifice Spud Chart." 6. B A C A. Gas supply line 2. To Convert Surface Burners 1. If the burner grates are installed, remove them. 2. Set the Natural gas orifice spud aside. Remove the burner caps. 3. To range B. Using a Phillips or Torx® ...
...each cooktop burner. Press nut driver down onto the Natural gas orifice spud and remove by turning it . Replace the Natural gas orifice spud with literature package. 10. Replace burner grates. 11. The small inner cone should have a slightly yellow tip. IMPORTANT: You may have to the closed...or disconnect power. 15 See the "LP Gas Orifice Spud Chart." 6. B A C A. Gas supply line 2. To Convert Surface Burners 1. If the burner grates are installed, remove them. 2. Set the Natural gas orifice spud aside. Remove the burner caps. 3. To range B. Using a Phillips or Torx® ...

Installation Instructions
Page 18
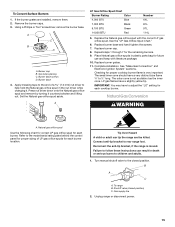
... gas orifice spud. Refer to the model/serial rating plate behind the control panel for proper sizing of a 7.0 mm) nut driver to ½" long. Replace burner grates. 11. Natural gas flames do not have a very distinct blue flame ¼" to help hold the LP gas orifice spud in plastic parts bag for...
... gas orifice spud. Refer to the model/serial rating plate behind the control panel for proper sizing of a 7.0 mm) nut driver to ½" long. Replace burner grates. 11. Natural gas flames do not have a very distinct blue flame ¼" to help hold the LP gas orifice spud in plastic parts bag for...


