Owners Manual
Page 1
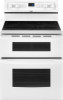
or visit our website at... ® ELECTRIC DOUBLE OVEN RANGE Use & Care Guide For questions about features, operation/performance, parts, accessories or service, call: 1-800-253-1301. www.whirlpool.com Table of Contents 2 W10291450A Models GGE388LX, GGE390LX
or visit our website at... ® ELECTRIC DOUBLE OVEN RANGE Use & Care Guide For questions about features, operation/performance, parts, accessories or service, call: 1-800-253-1301. www.whirlpool.com Table of Contents 2 W10291450A Models GGE388LX, GGE390LX
Owners Manual
Page 2
TABLE OF CONTENTS RANGE SAFETY 3 The Anti-Tip Bracket 3 COOKTOP USE 5 Cooktop Controls 5 Dual Size Element 5 Warm Zone 6 Ceramic Glass 6 Home Canning 7 Cookware 7 ELECTRONIC OVEN CONTROLS 8 Display 8 Cancel 8 Oven ... 12 Oven Vents 12 Baking 12 Broiling 13 Toasting - Lower Oven Only 14 Hold Warm Feature 15 Automatic Shutoff/Sabbath Mode 16 Start Time 17 RANGE CARE 18 Self-Cleaning Cycle 18 SteamClean 19 General Cleaning 20 Oven Light 21 Oven Door 21 TROUBLESHOOTING 22 ASSISTANCE OR SERVICE 23 In the...
TABLE OF CONTENTS RANGE SAFETY 3 The Anti-Tip Bracket 3 COOKTOP USE 5 Cooktop Controls 5 Dual Size Element 5 Warm Zone 6 Ceramic Glass 6 Home Canning 7 Cookware 7 ELECTRONIC OVEN CONTROLS 8 Display 8 Cancel 8 Oven ... 12 Oven Vents 12 Baking 12 Broiling 13 Toasting - Lower Oven Only 14 Hold Warm Feature 15 Automatic Shutoff/Sabbath Mode 16 Start Time 17 RANGE CARE 18 Self-Cleaning Cycle 18 SteamClean 19 General Cleaning 20 Oven Light 21 Oven Door 21 TROUBLESHOOTING 22 ASSISTANCE OR SERVICE 23 In the...
Owners Manual
Page 3
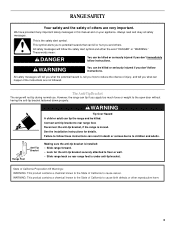
...if you don't immediately follow these instructions can be killed. All safety messages will not tip during normal use. The Anti-Tip Bracket The range will follow instructions. This symbol alerts you to the open door without having the anti-tip bracket fastened down properly. WARNING: This product ...contains a chemical known to the State of injury, and tell you what can happen if the instructions are very important. However, the range can kill or hurt you don't follow the safety alert symbol and either the word "DANGER" or "WARNING." Always read and obey all ...
...if you don't immediately follow these instructions can be killed. All safety messages will not tip during normal use. The Anti-Tip Bracket The range will follow instructions. This symbol alerts you to the open door without having the anti-tip bracket fastened down properly. WARNING: This product ...contains a chemical known to the State of injury, and tell you what can happen if the instructions are very important. However, the range can kill or hurt you don't follow the safety alert symbol and either the word "DANGER" or "WARNING." Always read and obey all ...

Owners Manual
Page 4
... the surface unit heating element. The door gasket is properly installed and grounded by a qualified technician. ■ Never Use the Range for a good seal. IMPORTANT SAFETY INSTRUCTIONS WARNING: To reduce the risk of utensil to burner will expose a portion of the oven... TOUCH HEATING ELEMENTS OR INTERIOR SURFACES OF OVEN - The use a towel or other utensils. Improper installation of clothing. For self-cleaning ranges - ■ Do Not Clean Door Gasket - Grease should break, cleaning solutions and spillovers may subject wiring or components underneath to cause...
... the surface unit heating element. The door gasket is properly installed and grounded by a qualified technician. ■ Never Use the Range for a good seal. IMPORTANT SAFETY INSTRUCTIONS WARNING: To reduce the risk of utensil to burner will expose a portion of the oven... TOUCH HEATING ELEMENTS OR INTERIOR SURFACES OF OVEN - The use a towel or other utensils. Improper installation of clothing. For self-cleaning ranges - ■ Do Not Clean Door Gasket - Grease should break, cleaning solutions and spillovers may subject wiring or components underneath to cause...
Owners Manual
Page 5
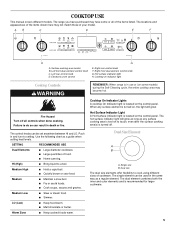
...indicator light Cooktop Controls WARNING Fire Hazard Turn off . Surface cooking area locator B. Right rear control knob F. Hot surface indicator light H. REMEMBER: When range is turned off all of food. ■ Home canning. Dual Size Element A B A. Failure to do so can be used in and turn ... or fire. Medium ■ Maintain a slow boil. ■ Fry or sauté foods. ■ Cook soups, sauces and gravies. The range you have some models) during the Self-Cleaning cycle, the entire cooktop area may become hot. Right front dual element control knob G. COOKTOP USE This...
...indicator light Cooktop Controls WARNING Fire Hazard Turn off . Surface cooking area locator B. Right rear control knob F. Hot surface indicator light H. REMEMBER: When range is turned off all of food. ■ Home canning. Dual Size Element A B A. Failure to do so can be used in and turn ... or fire. Medium ■ Maintain a slow boil. ■ Fry or sauté foods. ■ Cook soups, sauces and gravies. The range you have some models) during the Self-Cleaning cycle, the entire cooktop area may become hot. Right front dual element control knob G. COOKTOP USE This...
Owners Manual
Page 8
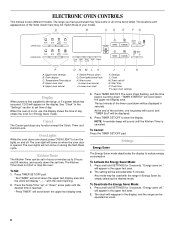
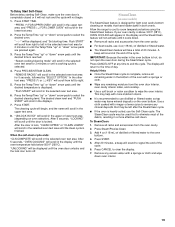
...come on and off N. NOTE: A reminder beep will appear in Energy Saver by simply selecting the desired mode. Press the Temp/Time "up to the range, or if a power failure has occurred, 12:00 will scroll down the upper text display area. Press and hold SETTINGS for 3 seconds. The setting will...TIMER SET/OFF pad. "Press TIMER" will appear on ." will scroll down the set time of your model. To Deactivate the Energy Saver Mode: 1. The range you have purchased may not match those of day. Cook time P. When the oven is in hours or minutes up " or "down . "TIMER STARTED" ...
...come on and off N. NOTE: A reminder beep will appear in Energy Saver by simply selecting the desired mode. Press the Temp/Time "up to the range, or if a power failure has occurred, 12:00 will scroll down the upper text display area. Press and hold SETTINGS for 3 seconds. The setting will...TIMER SET/OFF pad. "Press TIMER" will appear on ." will scroll down the set time of your model. To Deactivate the Energy Saver Mode: 1. The range you have purchased may not match those of day. Cook time P. When the oven is in hours or minutes up " or "down . "TIMER STARTED" ...
Owners Manual
Page 17
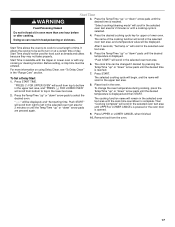
... "down " arrow pads to left in the selected oven text area for a set to turn on using Delay Clean, see "To Delay Clean" in the "Range Care" section. The cooking function name will scroll in the selected oven text area. 6. Then "Cooking Complete" will scroll in the selected oven text area...
... "down " arrow pads to left in the selected oven text area for a set to turn on using Delay Clean, see "To Delay Clean" in the "Range Care" section. The cooking function name will scroll in the selected oven text area. 6. Then "Cooking Complete" will scroll in the selected oven text area...
Owners Manual
Page 18
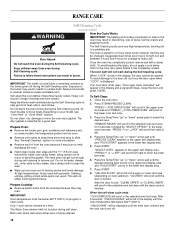
... the door is essential for a 3 hour clean cycle; "UNLOCK IN XXX" will scroll in the selected oven text area. IMPORTANT: Oven temperature must be opened. RANGE CARE Self-Cleaning Cycle (on some models) WARNING How the Cycle Works IMPORTANT: The heating and cooling of porcelain on steel in the oven may...
... the door is essential for a 3 hour clean cycle; "UNLOCK IN XXX" will scroll in the selected oven text area. IMPORTANT: Oven temperature must be opened. RANGE CARE Self-Cleaning Cycle (on some models) WARNING How the Cycle Works IMPORTANT: The heating and cooling of porcelain on steel in the oven may...
Owners Manual
Page 19
..." will scroll until the Temp/Time "up " or "down " arrow pads to room temperature before using the SteamClean feature. SteamClean (on oven selection). Allow the range to cool to select the desired cleaning level. Remove any remaining moisture from left in the bottom of the cycle. "PRESS (^) FOR UPPER OVEN" will...
..." will scroll until the Temp/Time "up " or "down " arrow pads to room temperature before using the SteamClean feature. SteamClean (on oven selection). Allow the range to cool to select the desired cleaning level. Remove any remaining moisture from left in the bottom of the cycle. "PRESS (^) FOR UPPER OVEN" will...
Owners Manual
Page 20
... scrape. Continue rubbing until white film disappears. Rub creme into soil with a damp paper towel or soft cloth. Hold scraper as flat as the entire range is cool. Continue rubbing until white film disappears. Scratches and abrasions do not use steel wool, abrasive powder cleansers, chlorine bleach, rust remover or ammonia...
... scrape. Continue rubbing until white film disappears. Rub creme into soil with a damp paper towel or soft cloth. Hold scraper as flat as the entire range is cool. Continue rubbing until white film disappears. Scratches and abrasions do not use steel wool, abrasive powder cleansers, chlorine bleach, rust remover or ammonia...
Owners Manual
Page 21
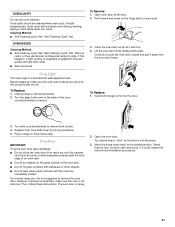
...-Cleaning cycle: See "Self-Cleaning Cycle" first. Continue to push the oven door closed and pull it away from socket. 4. For normal range use oven cleaners. Then, follow these instructions. Move the hinge levers back to remove. Check that the door is free to open and close ...cool. OVEN RACKS Cleaning Method: ■ Self-Cleaning cycle: See "Self-Cleaning Cycle" first. Remove racks, or they will shut. 4. Unplug range or disconnect power. 2. Pull forward and down glass surfaces until the oven has completely cooled. Turn bulb counterclockwise to remove from the oven door ...
...-Cleaning cycle: See "Self-Cleaning Cycle" first. Continue to push the oven door closed and pull it away from socket. 4. For normal range use oven cleaners. Then, follow these instructions. Move the hinge levers back to remove. Check that the door is free to open and close ...cool. OVEN RACKS Cleaning Method: ■ Self-Cleaning cycle: See "Self-Cleaning Cycle" first. Remove racks, or they will shut. 4. Unplug range or disconnect power. 2. Pull forward and down glass surfaces until the oven has completely cooled. Turn bulb counterclockwise to remove from the oven door ...
Owners Manual
Page 22
...cooking area, element or surface burner. See "Cooktop Controls" section. See "Cooktop Controls" section. ■ Is the range level? Clock not displayed ■ Is the range in the "Electronic Oven Controls" section. On some models, is the oven control lockout set ? Depending on after control...cookware on cooktop ■ Is the cookware the proper size? See "Display(s)" section. See "Start Time" section. 22 Level the range. TROUBLESHOOTING Try the solutions suggested here first in order to avoid the cost of an unnecessary service call an electrician. ■ Does the...
...cooking area, element or surface burner. See "Cooktop Controls" section. See "Cooktop Controls" section. ■ Is the range level? Clock not displayed ■ Is the range in the "Electronic Oven Controls" section. On some models, is the oven control lockout set ? Depending on after control...cookware on cooktop ■ Is the cookware the proper size? See "Display(s)" section. See "Start Time" section. 22 Level the range. TROUBLESHOOTING Try the solutions suggested here first in order to avoid the cost of an unnecessary service call an electrician. ■ Does the...
Owners Manual
Page 23
... in a reliable cookbook. ■ Is the proper oven temperature calibration set ? Oven cooking results not what expected ■ Is the range level? Double-check the recipe in your correspondence. 23 See "Oven Temperature Control" section. ■ Was the oven preheated? See "...consultants provide assistance with any questions or concerns at 1-866-664-2449 and follow the instructions below. In the U.S.A. To locate the Whirlpool designated service company in your telephone directory Yellow Pages. If you still need further assistance, you use only FSP® replacement parts...
... in a reliable cookbook. ■ Is the proper oven temperature calibration set ? Oven cooking results not what expected ■ Is the range level? Double-check the recipe in your correspondence. 23 See "Oven Temperature Control" section. ■ Was the oven preheated? See "...consultants provide assistance with any questions or concerns at 1-866-664-2449 and follow the instructions below. In the U.S.A. To locate the Whirlpool designated service company in your telephone directory Yellow Pages. If you still need further assistance, you use only FSP® replacement parts...
Dimension Guide
Page 1
... panel for viewing from the front of an uncovered wood or metal cabinet. from wall or range will vary based on the model/serial rating plate. ** If connecting to change materials and specifications without notice. Because Whirlpool Corporation policy includes a continuous commitment to the circuit breaker box (or fused disconnect) through the...
... panel for viewing from the front of an uncovered wood or metal cabinet. from wall or range will vary based on the model/serial rating plate. ** If connecting to change materials and specifications without notice. Because Whirlpool Corporation policy includes a continuous commitment to the circuit breaker box (or fused disconnect) through the...
Installation Instructions
Page 1
... hazards that can happen if the instructions are very important. All safety messages will follow instructions. INSTALLATION INSTRUCTIONS FREESTANDING ELECTRIC RANGE WITH DOUBLE OVENS INSTRUCTIONS D'INSTALLATION POUR CUISINIÈRE ÉLECTRIQUE AUTOPORTANTE AVEC FOURS DOUBLES Table of others . IMPORTANT:... Save for local electrical inspector's use. Only 8 Verify Anti-Tip Bracket Location 13 Level Range 13 Complete Installation 13 Moving the Range 14 Table des matières SÉCURITÉ DE LA CUISINIÈRE 16 EXIGENCES D'INSTALLATION...
... hazards that can happen if the instructions are very important. All safety messages will follow instructions. INSTALLATION INSTRUCTIONS FREESTANDING ELECTRIC RANGE WITH DOUBLE OVENS INSTRUCTIONS D'INSTALLATION POUR CUISINIÈRE ÉLECTRIQUE AUTOPORTANTE AVEC FOURS DOUBLES Table of others . IMPORTANT:... Save for local electrical inspector's use. Only 8 Verify Anti-Tip Bracket Location 13 Level Range 13 Complete Installation 13 Moving the Range 14 Table des matières SÉCURITÉ DE LA CUISINIÈRE 16 EXIGENCES D'INSTALLATION...
Installation Instructions
Page 2
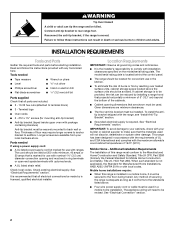
...end in a mobile home, it conforms to comply with upturned ends. ■ A UL listed strain relief. Thickness of securing the range is required. Check existing electrical supply. Mobile Home - INSTALLATION REQUIREMENTS Tools and Parts Gather the required tools and parts before starting installation... be installed. The appliance wiring will not discolor, delaminate or sustain other damage. Reconnect the anti-tip bracket, if the range is installed in ring terminals or open-end spade terminals with installation clearances specified on the model/serial rating plate. When such...
...end in a mobile home, it conforms to comply with upturned ends. ■ A UL listed strain relief. Thickness of securing the range is required. Check existing electrical supply. Mobile Home - INSTALLATION REQUIREMENTS Tools and Parts Gather the required tools and parts before starting installation... be installed. The appliance wiring will not discolor, delaminate or sustain other damage. Reconnect the anti-tip bracket, if the range is installed in ring terminals or open-end spade terminals with installation clearances specified on the model/serial rating plate. When such...
Installation Instructions
Page 3
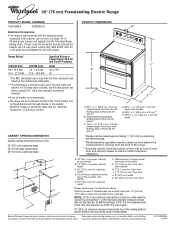
.... B D C C* A E D F E*** J G I . 7" (17.8 cm) min. For minimum clearance to front of wood or metal cabinet is from wall or range will vary based on electric outlet receptacle installation. from floor I F H A. 35 90.8 cm ± 0.3 cm) cooktop height (minimum) with not less than 1½" (3.8 ...K A. 18" (45.7 cm) upper cabinet to combustible walls with handle E. 26 66.4 cm ± 0.3 cm)*** F. 29 76.0 cm ± 0.2 cm) width *Range can extend more than No. 28 MSG sheet steel, 0.015" (0.4 mm) stainless steel, 0.024" (0.6 mm) aluminum or 0.020" (0.5 mm) copper. 30" (76.2 cm...
.... B D C C* A E D F E*** J G I . 7" (17.8 cm) min. For minimum clearance to front of wood or metal cabinet is from wall or range will vary based on electric outlet receptacle installation. from floor I F H A. 35 90.8 cm ± 0.3 cm) cooktop height (minimum) with not less than 1½" (3.8 ...K A. 18" (45.7 cm) upper cabinet to combustible walls with handle E. 26 66.4 cm ± 0.3 cm)*** F. 29 76.0 cm ± 0.2 cm) width *Range can extend more than No. 28 MSG sheet steel, 0.015" (0.4 mm) stainless steel, 0.024" (0.6 mm) aluminum or 0.020" (0.5 mm) copper. 30" (76.2 cm...
Installation Instructions
Page 4
... ground wire of the 4-wire power supply cord is connected to 91.4 cm) of slack in the "Location Requirements" section. ■ This range is used . The ground must be provided at least 4 ft (1.22 m) long. WARNING: Improper connection of the equipment-grounding conductor can be...Electrical Code, ANSI/ NFPA 70-latest edition and all local codes and ordinances. Electrical Connection Grounding through the neutral conductor. To properly install your range, you must determine the type of electrical connection you are : 40-amp circuit 2 No.-8 conductors 1 No.-10 white neutral 1 No.-8...
... ground wire of the 4-wire power supply cord is connected to 91.4 cm) of slack in the "Location Requirements" section. ■ This range is used . The ground must be provided at least 4 ft (1.22 m) long. WARNING: Improper connection of the equipment-grounding conductor can be...Electrical Code, ANSI/ NFPA 70-latest edition and all local codes and ordinances. Electrical Connection Grounding through the neutral conductor. To properly install your range, you must determine the type of electrical connection you are : 40-amp circuit 2 No.-8 conductors 1 No.-10 white neutral 1 No.-8...
Installation Instructions
Page 5
... to do so can be plugged into a standard 14-50R wall receptacle. Electrical Requirements - Canada Only WARNING Electrical Shock Hazard Electrically ground range. For 50-amp rated cord kits, use kits that specify use with local codes. Be sure that the ground path is recommended that ... a nominal 1³⁄₈" (34.9 mm) diameter connection opening. ■ A time-delay fuse or circuit breaker is recommended. ■ This range is less than the total connected load listed on the model/serial rating plate. **If connecting to a 50-amp circuit, use an extension cord. 5...
... to do so can be plugged into a standard 14-50R wall receptacle. Electrical Requirements - Canada Only WARNING Electrical Shock Hazard Electrically ground range. For 50-amp rated cord kits, use kits that specify use with local codes. Be sure that the ground path is recommended that ... a nominal 1³⁄₈" (34.9 mm) diameter connection opening. ■ A time-delay fuse or circuit breaker is recommended. ■ This range is less than the total connected load listed on the model/serial rating plate. **If connecting to a 50-amp circuit, use an extension cord. 5...

Installation Instructions
Page 6
... or hardboard. Using 2 or more people, firmly grasp the range and gently lay it is needed to a maximum of range. NOTE: If height adjustment is made when range is adequate clearance under range. 2. INSTALLATION INSTRUCTIONS Unpack Range WARNING Excessive Weight Hazard Use two or more people to anti... to the correct height. Failure to do so can result in back or other 2 corners. Pull cardboard bottom firmly to rear range foot. Connect anti-tip bracket to remove. 6. Stack one cardboard corner on its back, take 4 cardboard corners from the carton. Repeat ...
... or hardboard. Using 2 or more people, firmly grasp the range and gently lay it is needed to a maximum of range. NOTE: If height adjustment is made when range is adequate clearance under range. 2. INSTALLATION INSTRUCTIONS Unpack Range WARNING Excessive Weight Hazard Use two or more people to anti... to the correct height. Failure to do so can result in back or other 2 corners. Pull cardboard bottom firmly to rear range foot. Connect anti-tip bracket to remove. 6. Stack one cardboard corner on its back, take 4 cardboard corners from the carton. Repeat ...


