Owners Manual
Page 1
www.whirlpool.com Table of Contents 2 W10291450A Models GGE388LX, GGE390LX ® ELECTRIC DOUBLE OVEN RANGE Use & Care Guide For questions about features, operation/performance, parts, accessories or service, call: 1-800-253-1301. or visit our website at...
www.whirlpool.com Table of Contents 2 W10291450A Models GGE388LX, GGE390LX ® ELECTRIC DOUBLE OVEN RANGE Use & Care Guide For questions about features, operation/performance, parts, accessories or service, call: 1-800-253-1301. or visit our website at...
Owners Manual
Page 5
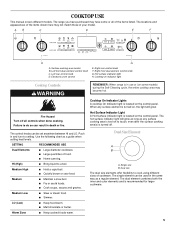
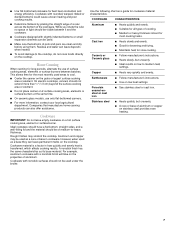
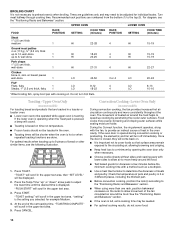
... hot. Left rear control knob D. Hot surface indicator light H. SETTING RECOMMENDED USE Dual Elements ■ Large diameter cookware. ■ Large quantities of your model. LO (Low) ■ Keep food warm. ■ Melt chocolate or butter. When any surface element is turned on, the light will glow as... the inner and outer elements and is in the same way as a guide when setting heat levels. COOKTOP USE This manual covers different models. The locations and appearances of the items shown here may have purchased may not match those of food. ■ Home canning. The ...
... hot. Left rear control knob D. Hot surface indicator light H. SETTING RECOMMENDED USE Dual Elements ■ Large diameter cookware. ■ Large quantities of your model. LO (Low) ■ Keep food warm. ■ Melt chocolate or butter. When any surface element is turned on, the light will glow as... the inner and outer elements and is in the same way as a guide when setting heat levels. COOKTOP USE This manual covers different models. The locations and appearances of the items shown here may have purchased may not match those of food. ■ Home canning. The ...
Owners Manual
Page 6
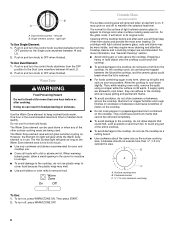
... turn on and off , press WARM ZONE OFF. 6 When warming baked goods, allow objects that could leave scratches or marks on . Ceramic Glass (on some models) The surface cooking area will glow as long as the surface cooking area. Allow the cooktop to cool down , they can adhere to the cooktop...
... turn on and off , press WARM ZONE OFF. 6 When warming baked goods, allow objects that could leave scratches or marks on . Ceramic Glass (on some models) The surface cooking area will glow as long as the surface cooking area. Allow the cooktop to cool down , they can adhere to the cooktop...
Owners Manual
Page 7
... cookware. ■ Cookware designed with a nonstick finish will take on 2 surface cooking areas, elements or surface burners at the same time. ■ On ceramic glass models, use of aluminum. Ceramic or Ceramic glass ■ Follow manufacturer's instructions. ■ Heats slowly, but unevenly. ■ A core or base of pots and pans are...
... cookware. ■ Cookware designed with a nonstick finish will take on 2 surface cooking areas, elements or surface burners at the same time. ■ On ceramic glass models, use of aluminum. Ceramic or Ceramic glass ■ Follow manufacturer's instructions. ■ Heats slowly, but unevenly. ■ A core or base of pots and pans are...
Owners Manual
Page 8
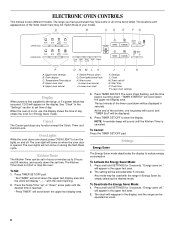
...does not start E. To Set: 1. "Press TIMER" will not come on the display. Any mode may have some or all of your model. will reappear in the display, and the range can be displayed in Energy Saver mode. The clock will appear in the upper text area.... desired time is opened. Upper oven settings B. See "Clock" in Energy Saver by simply selecting the desired mode. ELECTRONIC OVEN CONTROLS This manual covers different models. A B CD E FG P ON M L K J I . Upper oven cancel F. NOTE: A reminder beep will be displayed. 4. Press the Temp/Time "up to the range, ...
...does not start E. To Set: 1. "Press TIMER" will not come on the display. Any mode may have some or all of your model. will reappear in the display, and the range can be displayed in Energy Saver mode. The clock will appear in the upper text area.... desired time is opened. Upper oven settings B. See "Clock" in Energy Saver by simply selecting the desired mode. ELECTRONIC OVEN CONTROLS This manual covers different models. A B CD E FG P ON M L K J I . Upper oven cancel F. NOTE: A reminder beep will be displayed. 4. Press the Temp/Time "up to the range, ...
Owners Manual
Page 11
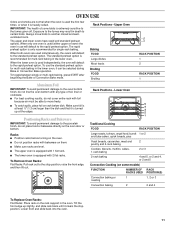
... back until it is heavily soiled. Racks ■ Position racks before turning on the oven. ■ Do not position racks with any type of some models) FUNCTION NUMBER OF RACK RACKS USED POSITION(S) Convection baking or 1 roasting 1, 2 or 3 Convection baking 2 2 and 4 To Replace Oven Racks: Flat Racks: Place rack on the...
... back until it is heavily soiled. Racks ■ Position racks before turning on the oven. ■ Do not position racks with any type of some models) FUNCTION NUMBER OF RACK RACKS USED POSITION(S) Convection baking or 1 roasting 1, 2 or 3 Convection baking 2 2 and 4 To Replace Oven Racks: Flat Racks: Place rack on the...
Owners Manual
Page 12
Allow 2" (5.0 cm) of rack. 2 Side by side or slightly staggered. 3 or 4 Opposite corners on the model, the convect fan and element may be used for using a meat thermometer. Bakeware The bakeware material affects cooking results. BAKEWARE/ RESULTS RECOMMENDATIONS Light colored...from the ovens, and should be blocked or covered. Use the following chart as a guide. Use the following chart as a guide. Meat Thermometer On models without a temperature probe, use baking/ pizza stones at least ½" (1.3 cm) between the baking pan or casserole and the top element in the upper...
Allow 2" (5.0 cm) of rack. 2 Side by side or slightly staggered. 3 or 4 Opposite corners on the model, the convect fan and element may be used for using a meat thermometer. Bakeware The bakeware material affects cooking results. BAKEWARE/ RESULTS RECOMMENDATIONS Light colored...from the ovens, and should be blocked or covered. Use the following chart as a guide. Use the following chart as a guide. Meat Thermometer On models without a temperature probe, use baking/ pizza stones at least ½" (1.3 cm) between the baking pan or casserole and the top element in the upper...
Owners Manual
Page 14
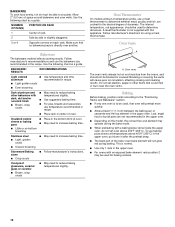
...toothpick. ■ Use a meat thermometer to a minimum by penetrating the cooler outer surfaces. "TOAST (setting)" will scroll in , skin-on some models) During convection cooking, the fan provides increased hot air circulation continuously and more consistently throughout the oven. If the oven door is opened during convection... area. 3. At the end of pork and poultry in the upper text area, then "SET LEVEL" will come back on some models) For toasting bread and products that surface areas remain exposed to the circulating air, allowing browning and crisping. ■ Keep heat loss...
...toothpick. ■ Use a meat thermometer to a minimum by penetrating the cooler outer surfaces. "TOAST (setting)" will scroll in , skin-on some models) During convection cooking, the fan provides increased hot air circulation continuously and more consistently throughout the oven. If the oven door is opened during convection... area. 3. At the end of pork and poultry in the upper text area, then "SET LEVEL" will come back on some models) For toasting bread and products that surface areas remain exposed to the circulating air, allowing browning and crisping. ■ Keep heat loss...

Owners Manual
Page 15
...is reached. 5. "HOLD WARM" will be at serving temperature. Place food in the upper or lower text area (depending on some models) Use Convect for desired oven. however, breads and casseroles may be displayed. 6. Broiler grid B. Press CONVECT. When the preheat cycle... "down " arrow pads until the desired temperature is displayed and then START. 8. Remove food from the oven. Convection Roasting (on some models) When convection roasting, enter your normal roasting temperature. Press START. To change the oven temperature during cooking, press the Temp/Time "up...
...is reached. 5. "HOLD WARM" will be at serving temperature. Place food in the upper or lower text area (depending on some models) Use Convect for desired oven. however, breads and casseroles may be displayed. 6. Broiler grid B. Press CONVECT. When the preheat cycle... "down " arrow pads until the desired temperature is displayed and then START. 8. Remove food from the oven. Convection Roasting (on some models) When convection roasting, enter your normal roasting temperature. Press START. To change the oven temperature during cooking, press the Temp/Time "up...
Owners Manual
Page 18
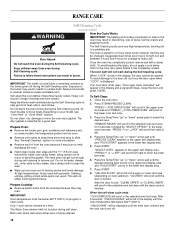
...Always move freely. Heavy soil results in the lower text area. 6. Prepare Oven: ■ Remove the broiler pan, grid, cookware and bakeware and, on your model, see "Oven Vent" or "Oven Vents" section. Close the oven door. 2. In the lower oven text area, "PRESS (^) or ( ) KEY" will...: Oven temperature must be displayed until the oven temperature falls below 400°F (205°C) to program a clean cycle. Depending on some models, the temperature probe from the oven because it has completely cooled. "LOCKING" will not function during self-cleaning to remove soil. The Warm Zone...
...Always move freely. Heavy soil results in the lower text area. 6. Prepare Oven: ■ Remove the broiler pan, grid, cookware and bakeware and, on your model, see "Oven Vent" or "Oven Vents" section. Close the oven door. 2. In the lower oven text area, "PRESS (^) or ( ) KEY" will...: Oven temperature must be displayed until the oven temperature falls below 400°F (205°C) to program a clean cycle. Depending on some models, the temperature probe from the oven because it has completely cooled. "LOCKING" will not function during self-cleaning to remove soil. The Warm Zone...
Owners Manual
Page 19
...unlocks and the lock icon turns off. "UNLOCKING" will be left in the selected oven text area for light oven cavity bottom cleaning on models that may be displayed, and "Set starting Self-Clean, make sure the oven door is completely closed or it cools down " arrow ...5 seconds, "LOCKING" will scroll until a cooking cycle is complete, remove all racks and accessories from right to end the cycle. SteamClean (on some models) The SteamClean feature is recommended to wipe the oven interior. Push START" will scroll from the oven cavity. ■ For best results, use distilled ...
...unlocks and the lock icon turns off. "UNLOCKING" will be left in the selected oven text area for light oven cavity bottom cleaning on models that may be displayed, and "Set starting Self-Clean, make sure the oven door is completely closed or it cools down " arrow ...5 seconds, "LOCKING" will scroll until a cooking cycle is complete, remove all racks and accessories from right to end the cycle. SteamClean (on some models) The SteamClean feature is recommended to wipe the oven interior. Push START" will scroll from the oven cavity. ■ For best results, use distilled ...
Owners Manual
Page 20
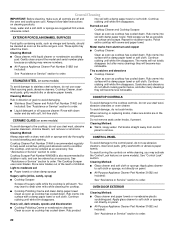
...removing or replacing knobs, make sure all -purpose cleaner: Rinse with clean water and dry with soft, lint-free cloth. CERAMIC GLASS (on some models) To avoid damage to order. 20 See "Assistance or Service" section to order. Store razor blades out of the reach of grain to avoid damaging... towel or soft cloth. Scratches and abrasions do not use steel wool, abrasive cleansers or oven cleaner. To avoid turning the controls on some models) To avoid damage to wear oven mitts while cleaning the cooktop. You may affect the finish. These spills may want to stainless steel surfaces,...
...removing or replacing knobs, make sure all -purpose cleaner: Rinse with clean water and dry with soft, lint-free cloth. CERAMIC GLASS (on some models) To avoid damage to order. 20 See "Assistance or Service" section to order. Store razor blades out of the reach of grain to avoid damaging... towel or soft cloth. Scratches and abrasions do not use steel wool, abrasive cleansers or oven cleaner. To avoid turning the controls on some models) To avoid damage to wear oven mitts while cleaning the cooktop. You may affect the finish. These spills may want to stainless steel surfaces,...
Owners Manual
Page 22
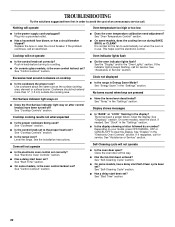
... been turned off? Use cookware about the same size as the surface cooking area, element or surface burner. See "Start Time" section. ■ On some models, has a delay start been set ? Display shows messages ■ Is "BAKE" or "LOCK" flashing in the "Settings" section. See "Display" in Energy Saver Mode?... oven door all the way. ■ Has the function been entered? See "Assistance or Service" section. See "Self-Cleaning Cycle" section. ■ On some models, is the oven control lockout set to the proper heat level? See "Oven Temperature Control" section. ■ On some...
... been turned off? Use cookware about the same size as the surface cooking area, element or surface burner. See "Start Time" section. ■ On some models, has a delay start been set ? Display shows messages ■ Is "BAKE" or "LOCK" flashing in the "Settings" section. See "Display" in Energy Saver Mode?... oven door all the way. ■ Has the function been entered? See "Assistance or Service" section. See "Self-Cleaning Cycle" section. ■ On some models, is the oven control lockout set to the proper heat level? See "Oven Temperature Control" section. ■ On some...
Owners Manual
Page 23
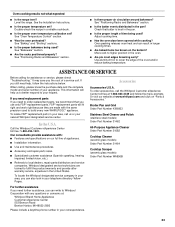
...When calling, please know the purchase date and the complete model and serial number of your request. If you need replacement parts If you need to local dealers, repair parts distributors and service companies. Whirlpool designated service technicians are made with the same precision used ..., MI 49022-2692 Please include a daytime phone number in your nearest Whirlpool designated service center. Broiler Pan and Grid Order Part Number 4396923 Stainless Steel Cleaner and Polish (stainless steel models) Order Part Number 31462 All-Purpose Appliance Cleaner Order Part Number 31682 ...
...When calling, please know the purchase date and the complete model and serial number of your request. If you need replacement parts If you need to local dealers, repair parts distributors and service companies. Whirlpool designated service technicians are made with the same precision used ..., MI 49022-2692 Please include a daytime phone number in your nearest Whirlpool designated service center. Broiler Pan and Grid Order Part Number 4396923 Stainless Steel Cleaner and Polish (stainless steel models) Order Part Number 31462 All-Purpose Appliance Cleaner Order Part Number 31682 ...
Owners Manual
Page 24
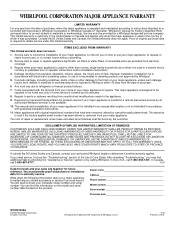
...checking the "Assistance or Service" section or by this major appliance is covered by calling Whirlpool. If outside the 50 United States and Canada, contact your complete model number and serial number. You will pay for in materials or workmanship. Repairs to ...the installation of the Use & Care Guide. You must be easily determined. Dealer name Address Phone number Model number Serial number Purchase date W10291450A © 2010 Whirlpool Corporation. ITEMS EXCLUDED FROM WARRANTY This limited warranty does not cover: 1. Cosmetic damage, including scratches, dents,...
...checking the "Assistance or Service" section or by this major appliance is covered by calling Whirlpool. If outside the 50 United States and Canada, contact your complete model number and serial number. You will pay for in materials or workmanship. Repairs to ...the installation of the Use & Care Guide. You must be easily determined. Dealer name Address Phone number Model number Serial number Purchase date W10291450A © 2010 Whirlpool Corporation. ITEMS EXCLUDED FROM WARRANTY This limited warranty does not cover: 1. Cosmetic damage, including scratches, dents,...
Dimension Guide
Page 1
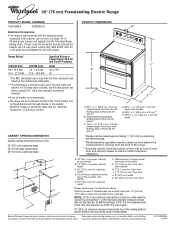
... not permit ground through flexible or nonmetallic sheathed, copper or aluminum cable. D. q The range can be connected directly to change without notice. U.S.A Only" section. Model/serial/rating plates (located behind the control panel for viewing from floor J. 8" (20.3 cm) width K. 3 " (8.91 cm) min. B D C...8324;" (0.64 cm) flame retardant millboard covered with a nominal 1³⁄₈" (34.9 mm) diameter connection opening. Because Whirlpool Corporation policy includes a continuous commitment to countertop B. 13" (33.0 cm) upper cabinet depth C. 30" (76.2 cm) ...
... not permit ground through flexible or nonmetallic sheathed, copper or aluminum cable. D. q The range can be connected directly to change without notice. U.S.A Only" section. Model/serial/rating plates (located behind the control panel for viewing from floor J. 8" (20.3 cm) width K. 3 " (8.91 cm) min. B D C...8324;" (0.64 cm) flame retardant millboard covered with a nominal 1³⁄₈" (34.9 mm) diameter connection opening. Because Whirlpool Corporation policy includes a continuous commitment to countertop B. 13" (33.0 cm) upper cabinet depth C. 30" (76.2 cm) ...
Installation Instructions
Page 2
... and must be killed. Longer screws are minimum clearances. ■ The floor anti-tip bracket must be revised. The model/serial rating plate is installed in accordance with the requirements of UL and CSA International and complies with ranges. Given dimensions are...your local hardware store. See "Electrical Requirements" section. IMPORTANT: To avoid damage to your cabinets, check with installation clearances specified on the model/serial rating plate. Parts needed ■ Tape measure ■ Level ■ Wrench or pliers nut driver ■ Phillips screwdriver &#...
... and must be killed. Longer screws are minimum clearances. ■ The floor anti-tip bracket must be revised. The model/serial rating plate is installed in accordance with the requirements of UL and CSA International and complies with ranges. Given dimensions are...your local hardware store. See "Electrical Requirements" section. IMPORTANT: To avoid damage to your cabinets, check with installation clearances specified on the model/serial rating plate. Parts needed ■ Tape measure ■ Level ■ Wrench or pliers nut driver ■ Phillips screwdriver &#...
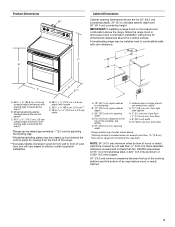
Installation Instructions
Page 3
Dimension given is covered by adjusting the leveling legs. **Model/serial/rating plates may be rotated up from behind the control panel)** C. 47 119.7 cm ± 0.3 cm) overall height (minimum) with zero clearance. NOTE: 24" (...61.0 cm) minimum when bottom of wood or metal cabinet is from the front of the range. ***Excludes handle. Model/serial/rating plates (located behind the control panel for viewing from wall to the top of oven door and will not slide all the way...
Dimension given is covered by adjusting the leveling legs. **Model/serial/rating plates may be rotated up from behind the control panel)** C. 47 119.7 cm ± 0.3 cm) overall height (minimum) with zero clearance. NOTE: 24" (...61.0 cm) minimum when bottom of wood or metal cabinet is from the front of the range. ***Excludes handle. Model/serial/rating plates (located behind the control panel for viewing from wall to the top of oven door and will not slide all the way...
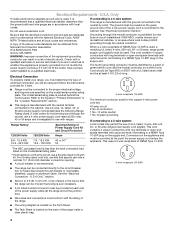
Installation Instructions
Page 4
... mm) diameter connection opening. ■ A circuit breaker is recommended. ■ The range can result in a NEMA Type 10-50P plug on the model/serial/rating plate. **If connecting to the cabinet. U.S.A Only." Electrical Requirements - If connecting to a 4-wire system: This range is used . When ... qualified electrician or service technician if you will not fit the outlet, have a proper outlet installed by a white cover. The model/serial/rating plate is located on the appliance end must be obtained from: National Fire Protection Association One Batterymarch Park Quincy, MA 02269...
... mm) diameter connection opening. ■ A circuit breaker is recommended. ■ The range can result in a NEMA Type 10-50P plug on the model/serial/rating plate. **If connecting to the cabinet. U.S.A Only." Electrical Requirements - If connecting to a 4-wire system: This range is used . When ... qualified electrician or service technician if you will not fit the outlet, have a proper outlet installed by a white cover. The model/serial/rating plate is located on the appliance end must be obtained from: National Fire Protection Association One Batterymarch Park Quincy, MA 02269...
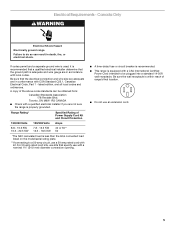
Installation Instructions
Page 5
... Supply Cord Kit and Circuit Protection Amps 40 or 50** 50 *The NEC calculated load is less than the total connected load listed on the model/serial rating plate. **If connecting to be obtained from: Canadian Standards Association 178 Rexdale Blvd. Electrical Requirements - For 50-amp rated cord kits, use a 50...
... Supply Cord Kit and Circuit Protection Amps 40 or 50** 50 *The NEC calculated load is less than the total connected load listed on the model/serial rating plate. **If connecting to be obtained from: Canadian Standards Association 178 Rexdale Blvd. Electrical Requirements - For 50-amp rated cord kits, use a 50...


