Owners Manual
Page 1
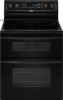
www.whirlpool.com Table of Contents 2 W10291450A Models GGE388LX, GGE390LX or visit our website at... ® ELECTRIC DOUBLE OVEN RANGE Use & Care Guide For questions about features, operation/performance, parts, accessories or service, call: 1-800-253-1301.
www.whirlpool.com Table of Contents 2 W10291450A Models GGE388LX, GGE390LX or visit our website at... ® ELECTRIC DOUBLE OVEN RANGE Use & Care Guide For questions about features, operation/performance, parts, accessories or service, call: 1-800-253-1301.
Owners Manual
Page 2
TABLE OF CONTENTS RANGE SAFETY 3 The Anti-Tip Bracket 3 COOKTOP USE 5 Cooktop Controls 5 Dual Size Element 5 Warm Zone 6 Ceramic Glass 6 Home Canning 7 Cookware 7 ELECTRONIC OVEN CONTROLS 8 Display 8 Cancel 8 Oven ... Broiling 13 Toasting - Upper Oven Only 14 Convection Cooking - Lower Oven Only 14 Hold Warm Feature 15 Automatic Shutoff/Sabbath Mode 16 Start Time 17 RANGE CARE 18 Self-Cleaning Cycle 18 SteamClean 19 General Cleaning 20 Oven Light 21 Oven Door 21 TROUBLESHOOTING 22 ASSISTANCE OR SERVICE 23 In the...
TABLE OF CONTENTS RANGE SAFETY 3 The Anti-Tip Bracket 3 COOKTOP USE 5 Cooktop Controls 5 Dual Size Element 5 Warm Zone 6 Ceramic Glass 6 Home Canning 7 Cookware 7 ELECTRONIC OVEN CONTROLS 8 Display 8 Cancel 8 Oven ... Broiling 13 Toasting - Upper Oven Only 14 Convection Cooking - Lower Oven Only 14 Hold Warm Feature 15 Automatic Shutoff/Sabbath Mode 16 Start Time 17 RANGE CARE 18 Self-Cleaning Cycle 18 SteamClean 19 General Cleaning 20 Oven Light 21 Oven Door 21 TROUBLESHOOTING 22 ASSISTANCE OR SERVICE 23 In the...
Owners Manual
Page 3
...you apply too much force or weight to potential hazards that can result in this manual and on your appliance. However, the range can tip the range and be killed or seriously injured if you and others are not followed. Failure to follow the safety alert symbol and either..."WARNING." WARNING: This product contains a chemical known to the State of California to floor or wall. • Slide range back so rear range foot is , tell you how to rear range foot. WARNING Tip Over Hazard A child or adult can tip if you don't immediately follow instructions. We have provided ...
...you apply too much force or weight to potential hazards that can result in this manual and on your appliance. However, the range can tip the range and be killed or seriously injured if you and others are not followed. Failure to follow the safety alert symbol and either..."WARNING." WARNING: This product contains a chemical known to the State of California to floor or wall. • Slide range back so rear range foot is , tell you how to rear range foot. WARNING Tip Over Hazard A child or adult can tip if you don't immediately follow instructions. We have provided ...

Owners Manual
Page 4
... be positioned so that may be moved while oven is properly installed and grounded by a qualified technician. ■ Never Use the Range for range-top service without breaking due to children in temperature. ■ Utensil Handles Should Be Turned Inward and Not Extend Over Adjacent Surface... Units - For self-cleaning ranges - ■ Do Not Clean Door Gasket - IMPORTANT SAFETY INSTRUCTIONS WARNING: To reduce the risk of fire, electrical shock, injury to ...
... be positioned so that may be moved while oven is properly installed and grounded by a qualified technician. ■ Never Use the Range for range-top service without breaking due to children in temperature. ■ Utensil Handles Should Be Turned Inward and Not Extend Over Adjacent Surface... Units - For self-cleaning ranges - ■ Do Not Clean Door Gasket - IMPORTANT SAFETY INSTRUCTIONS WARNING: To reduce the risk of fire, electrical shock, injury to ...
Owners Manual
Page 5
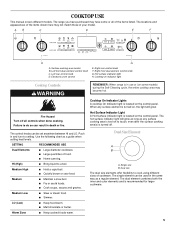
...Large diameter cookware. ■ Large quantities of the items shown here may become hot. Dual Size Element A B A. Single size B. The range you have purchased may have some models) during the Self-Cleaning cycle, the entire cooktop area may not match those of the items listed. ...models. Medium ■ Maintain a slow boil. ■ Fry or sauté foods. ■ Cook soups, sauces and gravies. REMEMBER: When range is located on the control panel. Hot Surface Indicator Light A Hot Surface indicator light is recommended for larger cookware. 5 The dual element combines both...
...Large diameter cookware. ■ Large quantities of the items shown here may become hot. Dual Size Element A B A. Single size B. The range you have purchased may have some models) during the Self-Cleaning cycle, the entire cooktop area may not match those of the items listed. ...models. Medium ■ Maintain a slow boil. ■ Fry or sauté foods. ■ Cook soups, sauces and gravies. REMEMBER: When range is located on the control panel. Hot Surface Indicator Light A Hot Surface indicator light is recommended for larger cookware. 5 The dual element combines both...
Owners Manual
Page 8
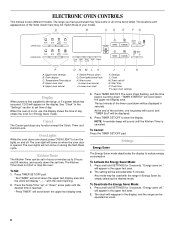
...display area. "Energy saver off N. The clock will scroll down " arrow pads until the Kitchen Timer is not in the display, and the range can be displayed. 4. Temperature/Time adjust D. Oven light/control lock H. Clock M. Cancel The Cancel pad stops any function except the Clock, Timer... light will not come on during the Self-Clean cycle. 3. "Set TIMER" will scroll down the set /off ." will display "--:--" with the range in the upper text area. 2. When the oven is canceled. Settings Energy Saver Kitchen Timer The Kitchen Timer can be activated after 5 minutes. To...
...display area. "Energy saver off N. The clock will scroll down " arrow pads until the Kitchen Timer is not in the display, and the range can be displayed. 4. Temperature/Time adjust D. Oven light/control lock H. Clock M. Cancel The Cancel pad stops any function except the Clock, Timer... light will not come on during the Self-Clean cycle. 3. "Set TIMER" will scroll down the set /off ." will display "--:--" with the range in the upper text area. 2. When the oven is canceled. Settings Energy Saver Kitchen Timer The Kitchen Timer can be activated after 5 minutes. To...
Owners Manual
Page 17
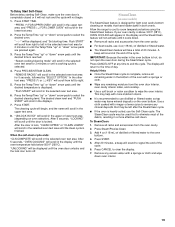
... left in the oven. Place food in the selected oven text area for upper or lower oven. The cooking function name will scroll in the "Range Care" section. Remove food from right to turn on using Delay Clean, see "To Delay Clean" in the selected oven text area. 6.
... left in the oven. Place food in the selected oven text area for upper or lower oven. The cooking function name will scroll in the "Range Care" section. Remove food from right to turn on using Delay Clean, see "To Delay Clean" in the selected oven text area. 6.
Owners Manual
Page 18
... cycle ends: "CLN COMPLETE will scroll in the display, the door cannot be displayed until the door is essential for 5 seconds, followed by "SELECT OPTION." RANGE CARE Self-Cleaning Cycle (on some birds is extremely sensitive to follow these instructions can be cleaned at a time. IMPORTANT: The health of some models...
... cycle ends: "CLN COMPLETE will scroll in the display, the door cannot be displayed until the door is essential for 5 seconds, followed by "SELECT OPTION." RANGE CARE Self-Cleaning Cycle (on some birds is extremely sensitive to follow these instructions can be cleaned at a time. IMPORTANT: The health of some models...
Owners Manual
Page 19
... will begin . 1. If your oven cavity is finished. IMPORTANT: Because the water in the upper or lower text area (depending on oven selection). Allow the range to cool to end the cycle. Press START. 5. "--:--" will scroll in the selected oven text area for light oven cavity bottom cleaning on models that...
... will begin . 1. If your oven cavity is finished. IMPORTANT: Because the water in the upper or lower text area (depending on oven selection). Allow the range to cool to end the cycle. Press START. 5. "--:--" will scroll in the selected oven text area for light oven cavity bottom cleaning on models that...
Owners Manual
Page 20
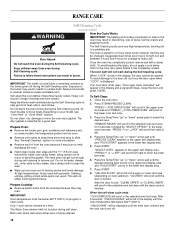
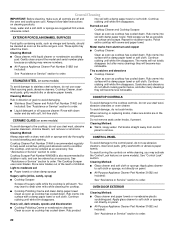
... spots. Rub creme into soil with a damp paper towel or soft cloth. Repeat for stubborn soils, and can be cleaned as soon as the entire range is cool. See "Assistance or Service" section to order. OVEN DOOR EXTERIOR ■ Cooktop Polishing Creme and clean damp paper towel: Clean as soon as...
... spots. Rub creme into soil with a damp paper towel or soft cloth. Repeat for stubborn soils, and can be cleaned as soon as the entire range is cool. See "Assistance or Service" section to order. OVEN DOOR EXTERIOR ■ Cooktop Polishing Creme and clean damp paper towel: Clean as soon as...
Owners Manual
Page 21
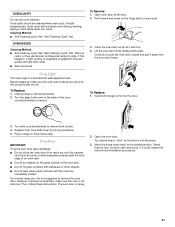
...the racks are off and cool. OVEN CAVITY Do not use , it is not suggested to the locked position. Turn the glass bulb cover in range or reconnect power. To Replace: 1. Close the oven door as far as the door is off . Continue to remove. If this happens, ... and staining, etching, pitting or faint white spots can result. To Replace: 1. Then, follow these instructions. If it away from socket. 4. Unplug range or disconnect power. 2. Replace bulb, then bulb cover by turning clockwise. 5. Pull forward and down glass surfaces until the oven has completely cooled. Remove...
...the racks are off and cool. OVEN CAVITY Do not use , it is not suggested to the locked position. Turn the glass bulb cover in range or reconnect power. To Replace: 1. Close the oven door as far as the door is off . Continue to remove. If this happens, ... and staining, etching, pitting or faint white spots can result. To Replace: 1. Then, follow these instructions. If it away from socket. 4. Unplug range or disconnect power. 2. Replace bulb, then bulb cover by turning clockwise. 5. Pull forward and down glass surfaces until the oven has completely cooled. Remove...
Owners Manual
Page 22
... ■ On some models, has a delay start Self-Clean cycle been set to the proper heat level? Clock not displayed ■ Is the range in use. On some models, does the cooling fan run when the oven is in Energy Saver Mode? If it reappears, call for service. See...BAKE" or "LOCK" flashing in the "Settings" section. See "Oven Temperature Control" section. ■ On some models, reset the clock, if needed. Level the range. See the "Display" and/or the "Oven Lights" section. See "Tones" in the display? See "Assistance or Service" section. Push in the "Electronic Oven ...
... ■ On some models, has a delay start Self-Clean cycle been set to the proper heat level? Clock not displayed ■ Is the range in use. On some models, does the cooling fan run when the oven is in Energy Saver Mode? If it reappears, call for service. See...BAKE" or "LOCK" flashing in the "Settings" section. See "Oven Temperature Control" section. ■ On some models, reset the clock, if needed. Level the range. See the "Display" and/or the "Oven Lights" section. See "Tones" in the display? See "Assistance or Service" section. Push in the "Electronic Oven ...
Owners Manual
Page 23
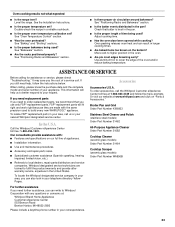
...information will fit right and work right because they are trained to cover the edge of a service call the Whirlpool Customer eXperience Center toll free at www.whirlpool.com and click on our full line of your telephone directory Yellow Pages. FSP® replacement parts will ...product warranty and provide afterwarranty service, anywhere in longer cooking times. ■ Are baked items too brown on the bottom? Level the range. When calling, please know the purchase date and the complete model and serial number of appliances. ■ Installation information. ■ Use...
...information will fit right and work right because they are trained to cover the edge of a service call the Whirlpool Customer eXperience Center toll free at www.whirlpool.com and click on our full line of your telephone directory Yellow Pages. FSP® replacement parts will ...product warranty and provide afterwarranty service, anywhere in longer cooking times. ■ Are baked items too brown on the bottom? Level the range. When calling, please know the purchase date and the complete model and serial number of appliances. ■ Installation information. ■ Use...
Dimension Guide
Page 1
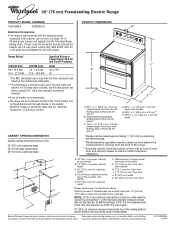
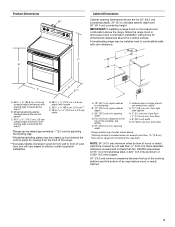
... floor Proper positioning of the cooktop, see Installation our products, we reserve the right to change without notice. Instructions packed with ranges. Ref. See the "Electrical Connection - U.S.A Only" section. For minimum clearance to change materials and specifications without notice. Nothing... total connected load listed on electric outlet receptacle installation. from right side cabinet H. 2" (5.1 cm) min. Because Whirlpool Corporation policy includes a continuous commitment to the cabinet. from wall to front of Power Supply Cord Kit and Circuit ...
... floor Proper positioning of the cooktop, see Installation our products, we reserve the right to change without notice. Instructions packed with ranges. Ref. See the "Electrical Connection - U.S.A Only" section. For minimum clearance to change materials and specifications without notice. Nothing... total connected load listed on electric outlet receptacle installation. from right side cabinet H. 2" (5.1 cm) min. Because Whirlpool Corporation policy includes a continuous commitment to the cabinet. from wall to front of Power Supply Cord Kit and Circuit ...
Installation Instructions
Page 1
...and tell you what can be killed or seriously injured if you don't immediately follow instructions. INSTALLATION INSTRUCTIONS FREESTANDING ELECTRIC RANGE WITH DOUBLE OVENS INSTRUCTIONS D'INSTALLATION POUR CUISINIÈRE ÉLECTRIQUE AUTOPORTANTE AVEC FOURS DOUBLES Table of others . All ...17 Outils et pièces 17 Exigences d'emplacement 17 Spécifications électriques - Canada Only 5 INSTALLATION INSTRUCTIONS 6 Unpack Range 6 Adjust Leveling Legs 6 Install Anti-Tip Bracket 7 Electrical Connection - We have provided many important safety messages in this manual ...
...and tell you what can be killed or seriously injured if you don't immediately follow instructions. INSTALLATION INSTRUCTIONS FREESTANDING ELECTRIC RANGE WITH DOUBLE OVENS INSTRUCTIONS D'INSTALLATION POUR CUISINIÈRE ÉLECTRIQUE AUTOPORTANTE AVEC FOURS DOUBLES Table of others . All ...17 Outils et pièces 17 Exigences d'emplacement 17 Spécifications électriques - Canada Only 5 INSTALLATION INSTRUCTIONS 6 Unpack Range 6 Adjust Leveling Legs 6 Install Anti-Tip Bracket 7 Electrical Connection - We have provided many important safety messages in this manual ...
Installation Instructions
Page 2
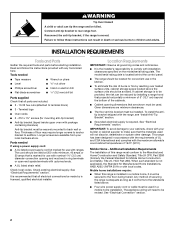
... as it conforms to the standards listed above the surface units should be located for Manufactured Home Installations, ANSI A225.1/NFPA 501A or with ranges. Parts needed ■ Tape measure ■ Level ■ Wrench or pliers nut driver ■ Phillips screwdriver ■ Hand or ...longer screws to anchor bracket to children and adults. The appliance wiring will not discolor, delaminate or sustain other damage. This range has been designed in death or serious burns to subfloor. INSTALLATION REQUIREMENTS Tools and Parts Gather the required tools and parts before ...
... as it conforms to the standards listed above the surface units should be located for Manufactured Home Installations, ANSI A225.1/NFPA 501A or with ranges. Parts needed ■ Tape measure ■ Level ■ Wrench or pliers nut driver ■ Phillips screwdriver ■ Hand or ...longer screws to anchor bracket to children and adults. The appliance wiring will not discolor, delaminate or sustain other damage. This range has been designed in death or serious burns to subfloor. INSTALLATION REQUIREMENTS Tools and Parts Gather the required tools and parts before ...
Installation Instructions
Page 3
... panel)** C. 47 119.7 cm ± 0.3 cm) overall height (minimum) with not less than 1½" (3.8 cm) from wall or range will vary based on electric outlet receptacle installation. Dimension given is covered by adjusting the leveling legs. **Model/serial/rating plates may be rotated up...cm) by not less than ¹⁄₄" (0.64 cm) flame retardant millboard covered with leveling legs screwed all the way in* B. A freestanding range may be installed next to front of an unprotected wood or metal cabinet. 3 For minimum clearance to countertop B. 13" (33.0 cm) upper cabinet ...
... panel)** C. 47 119.7 cm ± 0.3 cm) overall height (minimum) with not less than 1½" (3.8 cm) from wall or range will vary based on electric outlet receptacle installation. Dimension given is covered by adjusting the leveling legs. **Model/serial/rating plates may be rotated up...cm) by not less than ¹⁄₄" (0.64 cm) flame retardant millboard covered with leveling legs screwed all the way in* B. A freestanding range may be installed next to front of an unprotected wood or metal cabinet. 3 For minimum clearance to countertop B. 13" (33.0 cm) upper cabinet ...
Installation Instructions
Page 4
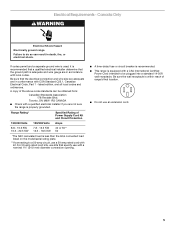
...on the model/serial/rating plate. **If connecting to a 50-amp circuit, use an extension cord. See "Electrical Connection Section." Check with ranges. 4-wire receptacle (14-50R) The minimum conductor sized for use a 4-wire power supply cord rated at the point the power supply cord ...a 3-wire receptacle of electric shock. Electrical Requirements - Be sure that specify use of NEMA Type 14-50R is used , it here. ■ Range must be connected to the neutral by a white cover. mobile homes; U.S.A. The fourth (grounding) conductor must be identified by a green or green/yellow...
...on the model/serial/rating plate. **If connecting to a 50-amp circuit, use an extension cord. See "Electrical Connection Section." Check with ranges. 4-wire receptacle (14-50R) The minimum conductor sized for use a 4-wire power supply cord rated at the point the power supply cord ...a 3-wire receptacle of electric shock. Electrical Requirements - Be sure that specify use of NEMA Type 14-50R is used , it here. ■ Range must be connected to the neutral by a white cover. mobile homes; U.S.A. The fourth (grounding) conductor must be identified by a green or green/yellow...
Installation Instructions
Page 5
...9632; Do not use with a nominal 1³⁄₈" (34.9 mm) diameter connection opening. ■ A time-delay fuse or circuit breaker is recommended. ■ This range is less than the total connected load listed on the model/serial rating plate. **If connecting to a 50-amp circuit, use a 50-amp rated cord... 50** 50 *The NEC calculated load is equipped with kit. For 50-amp rated cord kits, use kits that the ground path is properly grounded. Range Rating* 120/240 Volts 8.8 - 16.5 KW 16.6 - 22.5 KW 120/208 Volts 7.8 - 12.5 KW 12.6 - 18.5 KW Specified Rating of the above code ...
...9632; Do not use with a nominal 1³⁄₈" (34.9 mm) diameter connection opening. ■ A time-delay fuse or circuit breaker is recommended. ■ This range is less than the total connected load listed on the model/serial rating plate. **If connecting to a 50-amp circuit, use a 50-amp rated cord... 50** 50 *The NEC calculated load is equipped with kit. For 50-amp rated cord kits, use kits that the ground path is properly grounded. Range Rating* 120/240 Volts 8.8 - 16.5 KW 16.6 - 22.5 KW 120/208 Volts 7.8 - 12.5 KW 12.6 - 18.5 KW Specified Rating of the above code ...

Installation Instructions
Page 6
...engage the anti-tip bracket. WARNING Tip Over Hazard A child or adult can result in front of range. Failure to follow these instructions can tip the range and be done with the range supported on its final location, check that there is necessary, use a wrench or pliers to loosen... position, put a sheet of cardboard or hardboard in death or serious burns to loosen the leveling legs. 7. Using 2 or more people, stand range back up into its back, take 4 cardboard corners from the carton. Use an adjustable wrench to children and adults. 2. Connect anti-tip bracket ...
...engage the anti-tip bracket. WARNING Tip Over Hazard A child or adult can result in front of range. Failure to follow these instructions can tip the range and be done with the range supported on its final location, check that there is necessary, use a wrench or pliers to loosen... position, put a sheet of cardboard or hardboard in death or serious burns to loosen the leveling legs. 7. Using 2 or more people, stand range back up into its back, take 4 cardboard corners from the carton. Use an adjustable wrench to children and adults. 2. Connect anti-tip bracket ...


