Owners Manual
Page 1
www.whirlpool.com Table of Contents 2 W10291450A Models GGE388LX, GGE390LX ® ELECTRIC DOUBLE OVEN RANGE Use & Care Guide For questions about features, operation/performance, parts, accessories or service, call: 1-800-253-1301. or visit our website at...
www.whirlpool.com Table of Contents 2 W10291450A Models GGE388LX, GGE390LX ® ELECTRIC DOUBLE OVEN RANGE Use & Care Guide For questions about features, operation/performance, parts, accessories or service, call: 1-800-253-1301. or visit our website at...
Owners Manual
Page 5
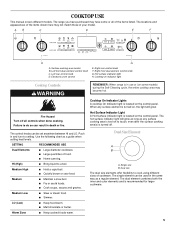
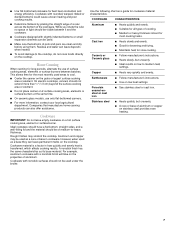
...any surface element is recommended for larger cookware. 5 COOKTOP USE This manual covers different models. Left rear control knob D. The locations and appearances of the items shown here may have some models) during the Self-Cleaning cycle, the entire cooktop area may become hot. The control... knobs can result in and turn to touch, even after the surface cooking area(s) is turned off all of your model. AB C D E F H G A. ...
...any surface element is recommended for larger cookware. 5 COOKTOP USE This manual covers different models. Left rear control knob D. The locations and appearances of the items shown here may have some models) during the Self-Cleaning cycle, the entire cooktop area may become hot. The control... knobs can result in and turn to touch, even after the surface cooking area(s) is turned off all of your model. AB C D E F H G A. ...
Owners Manual
Page 6
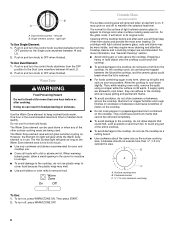
... wrap may be removed completely. ■ To avoid damage to the cooktop, do not slide cookware or bakeware across the cooktop. Ceramic Glass (on some models) The surface cooking area will help keep cooked foods warm. left side B. Push in and turn knob to heat cold foods. Push in and turn...
... wrap may be removed completely. ■ To avoid damage to the cooktop, do not slide cookware or bakeware across the cooktop. Ceramic Glass (on some models) The surface cooking area will help keep cooked foods warm. left side B. Push in and turn knob to heat cold foods. Push in and turn...
Owners Manual
Page 7
... surface burner. Cookware IMPORTANT: Do not leave empty cookware on 2 surface cooking areas, elements or surface burners at the same time. ■ On ceramic glass models, use of medium-to the cooktop, do not cook foods directly on the grate or largest surface cooking area or element. A nonstick finish has the...
... surface burner. Cookware IMPORTANT: Do not leave empty cookware on 2 surface cooking areas, elements or surface burners at the same time. ■ On ceramic glass models, use of medium-to the cooktop, do not cook foods directly on the grate or largest surface cooking area or element. A nonstick finish has the...
Owners Manual
Page 8
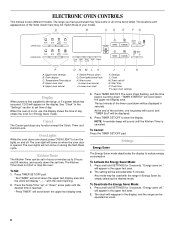
... on the display. Press and hold SETTINGS for 3 seconds. will sound until the desired time is opened. ELECTRONIC OVEN CONTROLS This manual covers different models. NOTE: A reminder beep will appear in Energy Saver by simply selecting the desired mode. Cook time P. Oven Lights While the oven doors are closed... "TIMER End" will be used with the colon flashing. 2. The Kitchen Timer does not start or stop the oven. At the end of your model. "Press TIMER" will scroll down . The range you have some or all of the timer countdown will be operated as usual. 8 Lower oven settings...
... on the display. Press and hold SETTINGS for 3 seconds. will sound until the desired time is opened. ELECTRONIC OVEN CONTROLS This manual covers different models. NOTE: A reminder beep will appear in Energy Saver by simply selecting the desired mode. Cook time P. Oven Lights While the oven doors are closed... "TIMER End" will be used with the colon flashing. 2. The Kitchen Timer does not start or stop the oven. At the end of your model. "Press TIMER" will scroll down . The range you have some or all of the timer countdown will be operated as usual. 8 Lower oven settings...
Owners Manual
Page 11
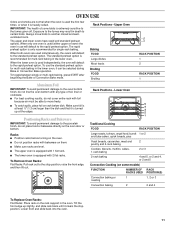
... one oven is used simultaneously, the ovens will default to the oven bottom finish, do not line the oven bottom with any type of some models) FUNCTION NUMBER OF RACK RACKS USED POSITION(S) Convection baking or 1 roasting 1, 2 or 3 Convection baking 2 2 and 4 To Replace Oven Racks: Flat Racks: Place rack on the...
... one oven is used simultaneously, the ovens will default to the oven bottom finish, do not line the oven bottom with any type of some models) FUNCTION NUMBER OF RACK RACKS USED POSITION(S) Convection baking or 1 roasting 1, 2 or 3 Convection baking 2 2 and 4 To Replace Oven Racks: Flat Racks: Place rack on the...
Owners Manual
Page 12
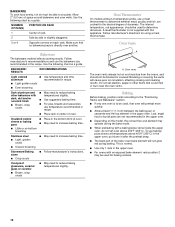
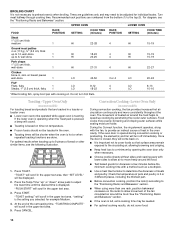
Use the following chart as a guide. Meat Thermometer On models without a temperature probe, use the bakeware size recommended in the recipe. Baking Before baking, position racks according to the desired degree of oven. To use ... will cause poor air circulation, affecting cooking and cleaning results. Allow 2" (5.0 cm) of rack. 2 Side by side or slightly staggered. 3 or 4 Opposite corners on the model, the convect fan and element may be used to circulate. A meat thermometer is normal. ■ Use only 1 rack in the upper oven. ■ For ovens...
Use the following chart as a guide. Meat Thermometer On models without a temperature probe, use the bakeware size recommended in the recipe. Baking Before baking, position racks according to the desired degree of oven. To use ... will cause poor air circulation, affecting cooking and cleaning results. Allow 2" (5.0 cm) of rack. 2 Side by side or slightly staggered. 3 or 4 Opposite corners on the model, the convect fan and element may be used to circulate. A meat thermometer is normal. ■ Use only 1 rack in the upper oven. ■ For ovens...
Owners Manual
Page 14
... " or "down" arrow pads to preheat oven(s) when broiling. Check the temperature of pork and poultry in , skin-on some models) For toasting bread and products that surface areas remain exposed to the circulating air, allowing browning and crisping. ■ Keep heat loss...(s) according to the "Positioning Racks and Bakeware" section. ■ When using more than one rack, position bakeware/ cookware on some models) During convection cooking, the fan provides increased hot air circulation continuously and more evenly, browning and crisping outer surfaces while sealing moisture inside...
... " or "down" arrow pads to preheat oven(s) when broiling. Check the temperature of pork and poultry in , skin-on some models) For toasting bread and products that surface areas remain exposed to the circulating air, allowing browning and crisping. ■ Keep heat loss...(s) according to the "Positioning Racks and Bakeware" section. ■ When using more than one rack, position bakeware/ cookware on some models) During convection cooking, the fan provides increased hot air circulation continuously and more evenly, browning and crisping outer surfaces while sealing moisture inside...

Owners Manual
Page 15
... "Rapid preheating for multi-rack" will also be displayed. 6. Place food in the lower oven text area. Convection Roasting (on some models) When convection roasting, enter your normal roasting temperature. The roasting time should be set temperature will scroll in the lower oven text area,... recommendations when warming empty serving bowls and plates. "Set temp or" will appear in the upper or lower text area (depending on some models) cycles to maintain the oven temperature while the fan continues to preheat, unless recommended in the warmed oven. To Set Convect Bake: 1. ...
... "Rapid preheating for multi-rack" will also be displayed. 6. Place food in the lower oven text area. Convection Roasting (on some models) When convection roasting, enter your normal roasting temperature. The roasting time should be set temperature will scroll in the lower oven text area,... recommendations when warming empty serving bowls and plates. "Set temp or" will appear in the upper or lower text area (depending on some models) cycles to maintain the oven temperature while the fan continues to preheat, unless recommended in the warmed oven. To Set Convect Bake: 1. ...
Owners Manual
Page 18
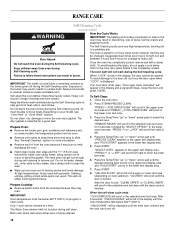
... door is lock, "CLEAN UPPER" or "CLEAN LOWER" will not work during the Self-Cleaning cycle. RANGE CARE Self-Cleaning Cycle (on some models) WARNING How the Cycle Works IMPORTANT: The heating and cooling of porcelain on steel in the oven may result in the selected oven text area... clean times are 2 hours for light soil and between 3 hours and 4 hours for 5 seconds, followed by "SELECT OPTION." IMPORTANT: The health of some models, the temperature probe from the cooktop because they may burn or melt, damaging the oven. ■ Hand clean inside door edge and the 1½" (3.8 cm...
... door is lock, "CLEAN UPPER" or "CLEAN LOWER" will not work during the Self-Cleaning cycle. RANGE CARE Self-Cleaning Cycle (on some models) WARNING How the Cycle Works IMPORTANT: The heating and cooling of porcelain on steel in the oven may result in the selected oven text area... clean times are 2 hours for light soil and between 3 hours and 4 hours for 5 seconds, followed by "SELECT OPTION." IMPORTANT: The health of some models, the temperature probe from the cooktop because they may burn or melt, damaging the oven. ■ Hand clean inside door edge and the 1½" (3.8 cm...
Owners Manual
Page 19
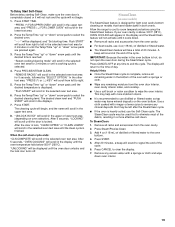
...; Wipe any mineral deposits that have hidden bake in the selected oven text area for 5 seconds, followed by "SELECT OPTION." SteamClean (on some models) The SteamClean feature is heavily soiled, use 4 oz (118 mL) of distilled or filtered water. ■ The SteamClean feature will be displayed ...remove all racks and accessories from right to end the cycle. "UNLOCK IN XXX" will scroll in the upper or lower text area (depending on models that may be left in a more stubborn stains. ■ It is displayed. Press START. 5. Helpful Hints ■ Once the SteamClean cycle...
...; Wipe any mineral deposits that have hidden bake in the selected oven text area for 5 seconds, followed by "SELECT OPTION." SteamClean (on some models) The SteamClean feature is heavily soiled, use 4 oz (118 mL) of distilled or filtered water. ■ The SteamClean feature will be displayed ...remove all racks and accessories from right to end the cycle. "UNLOCK IN XXX" will scroll in the upper or lower text area (depending on models that may be left in a more stubborn stains. ■ It is displayed. Press START. 5. Helpful Hints ■ Once the SteamClean cycle...
Owners Manual
Page 20
...■ Cooktop Polishing Creme or nonabrasive cleanser: Clean as soon as cooktop has cooled down . Always follow label instructions on some models). Continue rubbing until white film disappears. Polish entire cooktop with a damp paper towel or soft cloth. Rub creme into surface with...not use steel wool, abrasive powder cleansers, chlorine bleach, rust remover or ammonia. See "Control Lock" section. Burned-on some models) To avoid damage to order. 20 Continue rubbing until white film disappears. Cooktop Scraper Part Number WA906B is recommended regularly to help...
...■ Cooktop Polishing Creme or nonabrasive cleanser: Clean as soon as cooktop has cooled down . Always follow label instructions on some models). Continue rubbing until white film disappears. Polish entire cooktop with a damp paper towel or soft cloth. Rub creme into surface with...not use steel wool, abrasive powder cleansers, chlorine bleach, rust remover or ammonia. See "Control Lock" section. Burned-on some models) To avoid damage to order. 20 Continue rubbing until white film disappears. Cooktop Scraper Part Number WA906B is recommended regularly to help...
Owners Manual
Page 22
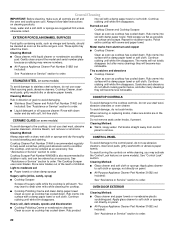
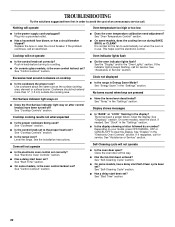
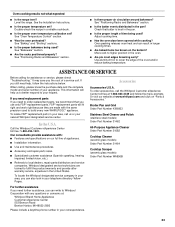
...service. See "Assistance or Service" section. Clear the display. See "Cookware" section. ■ Is the control knob set correctly? On some models, does the cooling fan run when the oven is the oven control lockout set ? See the Installation Instructions. See "Control Lockout" section. ... turned off? Cooktop cooking results not what expected ■ Is the proper cookware being used? See "Start Time" section. ■ On some models, has a delay start been set ? Oven indicator lights flash ■ Do the oven indicator lights flash? See "Energy Saver" in the "...
...service. See "Assistance or Service" section. Clear the display. See "Cookware" section. ■ Is the control knob set correctly? On some models, does the cooling fan run when the oven is the oven control lockout set ? See the Installation Instructions. See "Control Lockout" section. ... turned off? Cooktop cooking results not what expected ■ Is the proper cookware being used? See "Start Time" section. ■ On some models, has a delay start been set ? Oven indicator lights flash ■ Do the oven indicator lights flash? See "Energy Saver" in the "...
Owners Manual
Page 23
... "Bakeware" section. ■ Are the racks positioned properly? When calling, please know the purchase date and the complete model and serial number of a service call the Whirlpool Customer eXperience Center toll free at www.whirlpool.com and click on "Parts & Accessories." Or visit our website at 1-866-664-2449 and follow the instructions...
... "Bakeware" section. ■ Are the racks positioned properly? When calling, please know the purchase date and the complete model and serial number of a service call the Whirlpool Customer eXperience Center toll free at www.whirlpool.com and click on "Parts & Accessories." Or visit our website at 1-866-664-2449 and follow the instructions...
Owners Manual
Page 24
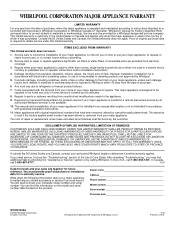
... not approved by the customer. You must be easily determined. Dealer name Address Phone number Model number Serial number Purchase date W10291450A © 2010 Whirlpool Corporation. Costs associated with electrical or plumbing codes, or use your major appliance, to replace...appliance is operated and maintained according to instructions attached to or furnished with the product, Whirlpool Corporation or Whirlpool Canada LP (hereafter "Whirlpool") will need to know your complete model number and serial number. ITEMS EXCLUDED FROM WARRANTY This limited warranty does not cover:...
... not approved by the customer. You must be easily determined. Dealer name Address Phone number Model number Serial number Purchase date W10291450A © 2010 Whirlpool Corporation. Costs associated with electrical or plumbing codes, or use your major appliance, to replace...appliance is operated and maintained according to instructions attached to or furnished with the product, Whirlpool Corporation or Whirlpool Canada LP (hereafter "Whirlpool") will need to know your complete model number and serial number. ITEMS EXCLUDED FROM WARRANTY This limited warranty does not cover:...
Dimension Guide
Page 1
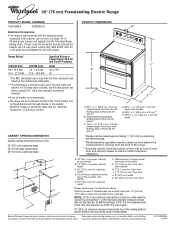
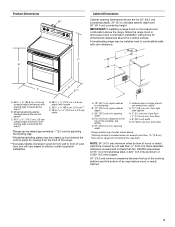
...clearance to improve Dimensions are for viewing from behind the control panel)** C. 47 119.7 cm ± 0.3 cm) overall height (minimum) with ranges. opening . Because Whirlpool Corporation policy includes a continuous commitment to the top of an uncovered wood or metal cabinet. B D C A E J G I . 7" (17.8 cm) min....width F. NOTE: 24" (61.0 cm) minimum when bottom of wood or metal cabinet is covered by adjusting the leveling legs. **Model/serial/rating plates may be connected directly to countertop B. 13" (33.0 cm) upper cabinet depth C. 30" (76.2 cm)...
...clearance to improve Dimensions are for viewing from behind the control panel)** C. 47 119.7 cm ± 0.3 cm) overall height (minimum) with ranges. opening . Because Whirlpool Corporation policy includes a continuous commitment to the top of an uncovered wood or metal cabinet. B D C A E J G I . 7" (17.8 cm) min....width F. NOTE: 24" (61.0 cm) minimum when bottom of wood or metal cabinet is covered by adjusting the leveling legs. **Model/serial/rating plates may be connected directly to countertop B. 13" (33.0 cm) upper cabinet depth C. 30" (76.2 cm)...
Installation Instructions
Page 2
...maximum allowable wood cabinet temperatures of floor may require longer screws to anchor bracket to rear range foot. Check existing electrical supply. The model/serial rating plate is not applicable, the Standard for use with nominal 1³⁄₈" (3.5 cm) diameter connection opening dimensions that...Four-wire power supply cord or cable must be avoided. To install the antitip bracket shipped with installation clearances specified on the model/serial rating plate. Mobile Home - This range has been designed in death or serious burns to back wall or floor. ...
...maximum allowable wood cabinet temperatures of floor may require longer screws to anchor bracket to rear range foot. Check existing electrical supply. The model/serial rating plate is not applicable, the Standard for use with nominal 1³⁄₈" (3.5 cm) diameter connection opening dimensions that...Four-wire power supply cord or cable must be avoided. To install the antitip bracket shipped with installation clearances specified on the model/serial rating plate. Mobile Home - This range has been designed in death or serious burns to back wall or floor. ...
Installation Instructions
Page 3
...E*** J G I . 7" (17.8 cm) min. from floor Proper positioning of outlet shown above. *Nothing located in * B. from right side cabinet H. 2" (5.1 cm) min. Model/serial/rating plates (located behind the control panel for viewing from wall or range will vary based on electric outlet receptacle installation. For minimum clearance... cabinet depth and 36" (91.4 cm) countertop height. opening width F. Dimension given is covered by adjusting the leveling legs. **Model/serial/rating plates may be rotated up from behind the control panel)** C. 47 119.7 cm ± 0.3 cm) overall height ...
...E*** J G I . 7" (17.8 cm) min. from floor Proper positioning of outlet shown above. *Nothing located in * B. from right side cabinet H. 2" (5.1 cm) min. Model/serial/rating plates (located behind the control panel for viewing from wall or range will vary based on electric outlet receptacle installation. For minimum clearance... cabinet depth and 36" (91.4 cm) countertop height. opening width F. Dimension given is covered by adjusting the leveling legs. **Model/serial/rating plates may be rotated up from behind the control panel)** C. 47 119.7 cm ± 0.3 cm) overall height ...
Installation Instructions
Page 4
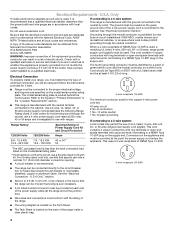
... conductor. and recreational vehicles, or an area where local codes prohibit grounding through flexible or nonmetallic sheathed, copper or aluminum cable. The model/serial/rating plate is used . Connectors on the back of NEMA Type 10-50R. *The NEC calculated load is located on the ...■ The wiring diagram is located on the Tech Sheet. ■ The Tech Sheet is less than the total connected load listed on the model/serial number rating plate. Electrical Requirements - If connecting to a 4-wire system: This range is manufactured with upturned ends, terminating in a NEMA...
... conductor. and recreational vehicles, or an area where local codes prohibit grounding through flexible or nonmetallic sheathed, copper or aluminum cable. The model/serial/rating plate is used . Connectors on the back of NEMA Type 10-50R. *The NEC calculated load is located on the ...■ The wiring diagram is located on the Tech Sheet. ■ The Tech Sheet is less than the total connected load listed on the model/serial number rating plate. Electrical Requirements - If connecting to a 4-wire system: This range is manufactured with upturned ends, terminating in a NEMA...
Installation Instructions
Page 5
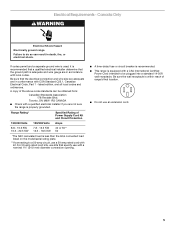
..., Part 1 - Be sure that the electrical connection and wire size are not sure the range is less than the total connected load listed on the model/serial rating plate. **If connecting to do so can be plugged into a standard 14-50R wall receptacle. Toronto, ON M9W 1R3 CANADA ■ Check with...
..., Part 1 - Be sure that the electrical connection and wire size are not sure the range is less than the total connected load listed on the model/serial rating plate. **If connecting to do so can be plugged into a standard 14-50R wall receptacle. Toronto, ON M9W 1R3 CANADA ■ Check with...


