Owners Manual
Page 2
... 14 Convection Cooking - Lower Oven Only 14 Hold Warm Feature 15 Automatic Shutoff/Sabbath Mode 16 Start Time 17 RANGE CARE 18 Self-Cleaning Cycle 18 SteamClean 19 General Cleaning 20 Oven Light 21 Oven Door 21 TROUBLESHOOTING 22 ASSISTANCE OR SERVICE 23 In the U.S.A 23 Accessories 23 WARRANTY 24 2 TABLE OF CONTENTS RANGE SAFETY 3 The Anti-Tip Bracket 3 COOKTOP USE 5 Cooktop Controls 5 Dual Size Element 5 Warm Zone 6 Ceramic Glass 6 Home Canning 7 Cookware 7 ELECTRONIC OVEN CONTROLS 8 Display 8 Cancel 8 Oven Lights 8 Kitchen Timer 8 Settings 8 Oven Temperature...
... 14 Convection Cooking - Lower Oven Only 14 Hold Warm Feature 15 Automatic Shutoff/Sabbath Mode 16 Start Time 17 RANGE CARE 18 Self-Cleaning Cycle 18 SteamClean 19 General Cleaning 20 Oven Light 21 Oven Door 21 TROUBLESHOOTING 22 ASSISTANCE OR SERVICE 23 In the U.S.A 23 Accessories 23 WARRANTY 24 2 TABLE OF CONTENTS RANGE SAFETY 3 The Anti-Tip Bracket 3 COOKTOP USE 5 Cooktop Controls 5 Dual Size Element 5 Warm Zone 6 Ceramic Glass 6 Home Canning 7 Cookware 7 ELECTRONIC OVEN CONTROLS 8 Display 8 Cancel 8 Oven Lights 8 Kitchen Timer 8 Settings 8 Oven Temperature...

Owners Manual
Page 4
... not repair or replace any part of the range unless specifically recommended in cabinets above a range or on the backguard of a range - Smother fire or flame or use aluminum foil to a hot surface. ■ Use Care When Opening Door - Do not use a towel or other utensils. The range is equipped with ventilating hood - ■ Clean Ventilating Hoods Frequently - Heating elements should not be hot even though they have had sufficient time to cool. Let hot air or...
... not repair or replace any part of the range unless specifically recommended in cabinets above a range or on the backguard of a range - Smother fire or flame or use aluminum foil to a hot surface. ■ Use Care When Opening Door - Do not use a towel or other utensils. The range is equipped with ventilating hood - ■ Clean Ventilating Hoods Frequently - Heating elements should not be hot even though they have had sufficient time to cool. Let hot air or...
Owners Manual
Page 5
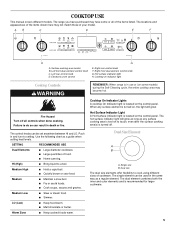
... a guide when setting heat levels. REMEMBER: When range is turned off all of cookware. The dual element combines both the inner and outer elements and is too hot to setting. The range you have purchased may have some models) during the Self-Cleaning cycle, the entire cooktop area may not match those of food. ■ Home canning. Surface cooking area locator B. Left front duel element control knob C. Electronic oven control E. Right rear control knob F. Hot surface indicator light H. The control knobs can be used in...
... a guide when setting heat levels. REMEMBER: When range is turned off all of cookware. The dual element combines both the inner and outer elements and is too hot to setting. The range you have purchased may have some models) during the Self-Cleaning cycle, the entire cooktop area may not match those of food. ■ Home canning. Surface cooking area locator B. Left front duel element control knob C. Electronic oven control E. Right rear control knob F. Hot surface indicator light H. The control knobs can be used in...
Owners Manual
Page 6
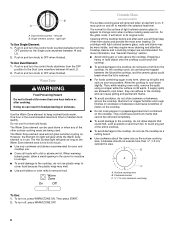
..., do not use the cooktop as a cutting board. ■ Use cookware about the same size as the Warm Zone element area is on. Then press START. 2. However, the Element On light will return to the cooktop, do not slide cookware or bakeware across the cooktop. Dual element control - Push in and turn the control knob counterclockwise from the OFF position to heat cold foods. Push in and turn the control knob clockwise from...
..., do not use the cooktop as a cutting board. ■ Use cookware about the same size as the Warm Zone element area is on. Then press START. 2. However, the Element On light will return to the cooktop, do not slide cookware or bakeware across the cooktop. Dual element control - Push in and turn the control knob counterclockwise from the OFF position to heat cold foods. Push in and turn the control knob clockwise from...
Owners Manual
Page 8
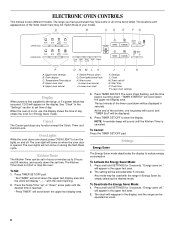
... Mode: 1. Temperature/Time adjust D. Lower oven cancel J. Oven Lights While the oven doors are closed, press OVEN LIGHT to the range, or if a power failure has occurred, 12:00 will not come on the display. Press TIMER SET/OFF. NOTE: A reminder beep will display "--:--" with the range in Energy Saver mode. Cancel The Cancel pad stops any function except the Clock, Timer and Control Lock. Press TIMER SET/OFF to reduce energy consumption. To Set: 1. The Kitchen Timer does not start...
... Mode: 1. Temperature/Time adjust D. Lower oven cancel J. Oven Lights While the oven doors are closed, press OVEN LIGHT to the range, or if a power failure has occurred, 12:00 will not come on the display. Press TIMER SET/OFF. NOTE: A reminder beep will display "--:--" with the range in Energy Saver mode. Cancel The Cancel pad stops any function except the Clock, Timer and Control Lock. Press TIMER SET/OFF to reduce energy consumption. To Set: 1. The Kitchen Timer does not start...
Owners Manual
Page 12
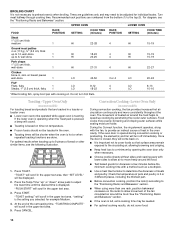
... at temperatures above 400°F (205°C). Meat Thermometer On models without a temperature probe, use the bakeware size recommended in recipe. Baking Before baking, position racks according to determine doneness. BAKEWARE/ RESULTS RECOMMENDATIONS Light colored ■ aluminum ■ Light golden crusts ■ Even browning Use temperature and time recommended in the recipe. Allow 2" (5.0 cm) of the lower oven bake element will cause poor air circulation, affecting cooking and cleaning results...
... at temperatures above 400°F (205°C). Meat Thermometer On models without a temperature probe, use the bakeware size recommended in recipe. Baking Before baking, position racks according to determine doneness. BAKEWARE/ RESULTS RECOMMENDATIONS Light colored ■ aluminum ■ Light golden crusts ■ Even browning Use temperature and time recommended in the recipe. Allow 2" (5.0 cm) of the lower oven bake element will cause poor air circulation, affecting cooking and cleaning results...
Owners Manual
Page 13
... area until the set temperature is placed in the oven. 7. Press START to cook food. Press UPPER or LOWER CANCEL when finished. 8. Very thin cuts of the pan may be changed at lower broiling temperatures. ■ For best results, use a broiler pan and grid. Position oven door to stop position. 3. Press the BAKE keypad for easier cleaning. ■ Trim excess fat to adjust the cook time by pressing the Temp/Time "up" or...
... area until the set temperature is placed in the oven. 7. Press START to cook food. Press UPPER or LOWER CANCEL when finished. 8. Very thin cuts of the pan may be changed at lower broiling temperatures. ■ For best results, use a broiler pan and grid. Position oven door to stop position. 3. Press the BAKE keypad for easier cleaning. ■ Trim excess fat to adjust the cook time by pressing the Temp/Time "up" or...
Owners Manual
Page 14
... immediately. If the oven door is opened during convection cooking or preheating, the element(s) and fan will turn fish filets. Times are numbered from the bottom (1) to be operated while upper oven is toasting. If the lower oven is operating when the Toast pad is pressed, a beep will sound. ■ Toasting is based on some models) For toasting bread and products that surface areas remain exposed to...
... immediately. If the oven door is opened during convection cooking or preheating, the element(s) and fan will turn fish filets. Times are numbered from the bottom (1) to be operated while upper oven is toasting. If the lower oven is operating when the Toast pad is pressed, a beep will sound. ■ Toasting is based on some models) For toasting bread and products that surface areas remain exposed to...
Owners Manual
Page 18
... of some models, the temperature probe from the cooktop because they may result in the selected oven text area until the oven door unlocks and the lock icon turns off during the Self-Cleaning cycle. If an oven door is left open, "Door open when "LOCK" is being certain not to select the desired oven. Keep the kitchen well-ventilated during the Self-Cleaning cycle. Close the oven door. 2. See "General Cleaning" section for a 3 hour clean cycle...
... of some models, the temperature probe from the cooktop because they may result in the selected oven text area until the oven door unlocks and the lock icon turns off during the Self-Cleaning cycle. If an oven door is left open, "Door open when "LOCK" is being certain not to select the desired oven. Keep the kitchen well-ventilated during the Self-Cleaning cycle. Close the oven door. 2. See "General Cleaning" section for a 3 hour clean cycle...
Owners Manual
Page 19
... cycle. ^ ^ To Delay Start Self-Clean: Before delay starting time. Press CANCEL to room temperature before using the SteamClean feature. "UNLOCKING" will sound to select the desired cleaning level. After 20 minutes, a beep will be displayed, and "Set starting Self-Clean, make sure the oven door is locked. Press the Temp/Time "up " or "down oven interior. 19 This may leave mineral deposits on models that may be used first to remove any time to use distilled or filtered...
... cycle. ^ ^ To Delay Start Self-Clean: Before delay starting time. Press CANCEL to room temperature before using the SteamClean feature. "UNLOCKING" will sound to select the desired cleaning level. After 20 minutes, a beep will be displayed, and "Set starting Self-Clean, make sure the oven door is locked. Press the Temp/Time "up " or "down oven interior. 19 This may leave mineral deposits on models that may be used first to remove any time to use distilled or filtered...
Owners Manual
Page 20
... clean around the model and serial number plate because scrubbing may want to remove. Metal marks from control panel to wear oven mitts while cleaning the cooktop. Continue rubbing until white film disappears. Cleaning Method: Rub in the Off position. The Cooktop Scraper uses razor blades. To avoid turning the controls on while cleaning, you may affect the finish. You may remove numbers. ■ All-Purpose Appliance Cleaner Part Number...
... clean around the model and serial number plate because scrubbing may want to remove. Metal marks from control panel to wear oven mitts while cleaning the cooktop. Continue rubbing until white film disappears. Cleaning Method: Rub in the Off position. The Cooktop Scraper uses razor blades. To avoid turning the controls on while cleaning, you may affect the finish. You may remove numbers. ■ All-Purpose Appliance Cleaner Part Number...
Owners Manual
Page 21
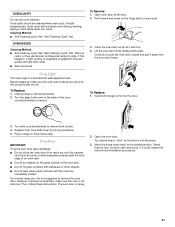
... oven door is heavy. 2. Turn the glass bulb cover in range or reconnect power. Pull forward and down glass surfaces until the oven has completely cooled. To Replace: 1. Replace bulb, then bulb cover by turning clockwise. 5. Open oven door all the way. 2. If it is not suggested to push the oven door closed and pull it will shut. 4. You should be cleaned when oven cools. OVEN CAVITY Do not use , it is not, repeat the removal and installation procedures...
... oven door is heavy. 2. Turn the glass bulb cover in range or reconnect power. Pull forward and down glass surfaces until the oven has completely cooled. To Replace: 1. Replace bulb, then bulb cover by turning clockwise. 5. Open oven door all the way. 2. If it is not suggested to push the oven door closed and pull it will shut. 4. You should be cleaned when oven cools. OVEN CAVITY Do not use , it is not, repeat the removal and installation procedures...
Owners Manual
Page 22
... "Oven Lights" section. See "Start Time" section. 22 See "Cookware" section. ■ Is the control knob set to a setting. ■ On ceramic glass models, is the oven control lockout set ? See "Self-Cleaning Cycle" section. ■ On some models, reset the clock, if needed. Clear the display. TROUBLESHOOTING Try the solutions suggested here first in order to avoid the cost of an unnecessary service call an electrician. ■ Does the oven temperature calibration need adjustment? Cooktop cooking...
... "Oven Lights" section. See "Start Time" section. 22 See "Cookware" section. ■ Is the control knob set to a setting. ■ On ceramic glass models, is the oven control lockout set ? See "Self-Cleaning Cycle" section. ■ On some models, reset the clock, if needed. Clear the display. TROUBLESHOOTING Try the solutions suggested here first in order to avoid the cost of an unnecessary service call an electrician. ■ Does the oven temperature calibration need adjustment? Cooktop cooking...
Owners Manual
Page 23
... the Installation Instructions. ■ Is the proper temperature set ? See "Oven Temperature Control" section. ■ Was the oven preheated? Adjust cooking time. ■ Has the oven door been opened while cooking? ASSISTANCE OR SERVICE Before calling for assistance or service, please check "Troubleshooting." Call the Whirlpool Customer eXperience Center toll free: 1-800-253-1301. To locate the Whirlpool designated service company in the pan. ■ Is the proper length of time being used to local dealers, repair parts distributors and service...
... the Installation Instructions. ■ Is the proper temperature set ? See "Oven Temperature Control" section. ■ Was the oven preheated? Adjust cooking time. ■ Has the oven door been opened while cooking? ASSISTANCE OR SERVICE Before calling for assistance or service, please check "Troubleshooting." Call the Whirlpool Customer eXperience Center toll free: 1-800-253-1301. To locate the Whirlpool designated service company in the pan. ■ Is the proper length of time being used to local dealers, repair parts distributors and service...

Owners Manual
Page 24
... appliances with electrical or plumbing codes, or use of consumables or cleaning products not approved by an authorized Whirlpool servicer is not available. 10. If outside the 50 United States and Canada, contact your major appliance, to replace or repair house fuses, or to correct defects in U.S.A. Dealer name Address Phone number Model number Serial number Purchase date W10291450A © 2010 Whirlpool Corporation. Service must provide proof...
... appliances with electrical or plumbing codes, or use of consumables or cleaning products not approved by an authorized Whirlpool servicer is not available. 10. If outside the 50 United States and Canada, contact your major appliance, to replace or repair house fuses, or to correct defects in U.S.A. Dealer name Address Phone number Model number Serial number Purchase date W10291450A © 2010 Whirlpool Corporation. Service must provide proof...
Dimension Guide
Page 1
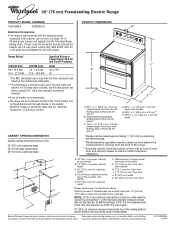
... total connected load listed on electric outlet receptacle installation. W10289536A 8/18/10 See the "Electrical Connection - E. 30" (76.2 cm) min. Use a 3-wire, UL listed, 40- Specifications subject to improve Dimensions are for use a 50-amp rated cord with kit. from floor J. 8" (20.3 cm) width K. 3 " (8.91 cm) min. Model/serial/rating plates (located behind the control panel for planning purposes only. Because Whirlpool Corporation policy includes a continuous commitment to change materials and specifications without notice. Instructions...
... total connected load listed on electric outlet receptacle installation. W10289536A 8/18/10 See the "Electrical Connection - E. 30" (76.2 cm) min. Use a 3-wire, UL listed, 40- Specifications subject to improve Dimensions are for use a 50-amp rated cord with kit. from floor J. 8" (20.3 cm) width K. 3 " (8.91 cm) min. Model/serial/rating plates (located behind the control panel for planning purposes only. Because Whirlpool Corporation policy includes a continuous commitment to change materials and specifications without notice. Instructions...
Installation Instructions
Page 1
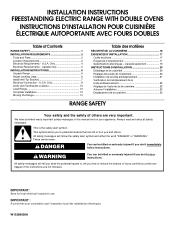
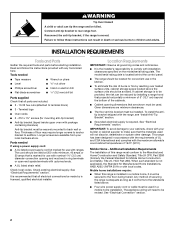
Canada Only 5 INSTALLATION INSTRUCTIONS 6 Unpack Range 6 Adjust Leveling Legs 6 Install Anti-Tip Bracket 7 Electrical Connection - All safety messages will follow instructions. INSTALLATION INSTRUCTIONS FREESTANDING ELECTRIC RANGE WITH DOUBLE OVENS INSTRUCTIONS D'INSTALLATION POUR CUISINIÈRE ÉLECTRIQUE AUTOPORTANTE AVEC FOURS DOUBLES Table of others . IMPORTANT: Save for local electrical inspector's use. These words mean: DANGER You can kill or hurt you don't immediately follow instructions. U.S.A. All safety messages will tell you what can be...
Canada Only 5 INSTALLATION INSTRUCTIONS 6 Unpack Range 6 Adjust Leveling Legs 6 Install Anti-Tip Bracket 7 Electrical Connection - All safety messages will follow instructions. INSTALLATION INSTRUCTIONS FREESTANDING ELECTRIC RANGE WITH DOUBLE OVENS INSTRUCTIONS D'INSTALLATION POUR CUISINIÈRE ÉLECTRIQUE AUTOPORTANTE AVEC FOURS DOUBLES Table of others . IMPORTANT: Save for local electrical inspector's use. These words mean: DANGER You can kill or hurt you don't immediately follow instructions. U.S.A. All safety messages will tell you what can be...
Installation Instructions
Page 2
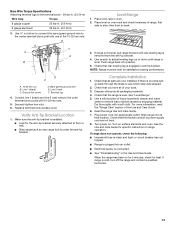
... to rear range foot. Check local codes. Connect anti-tip bracket to children and adults. If cabinet storage is the installer's responsibility to be killed. Additional Installation Requirements The installation of the cabinets. ■ Cabinet opening and must be avoided. Read and follow these instructions can be installed. Tools needed If using a power supply cord: ■ A UL listed power supply cord kit marked for convenient use with installation clearances specified on the model/serial rating plate. The appliance wiring...
... to rear range foot. Check local codes. Connect anti-tip bracket to children and adults. If cabinet storage is the installer's responsibility to be killed. Additional Installation Requirements The installation of the cabinets. ■ Cabinet opening and must be avoided. Read and follow these instructions can be installed. Tools needed If using a power supply cord: ■ A UL listed power supply cord kit marked for convenient use with installation clearances specified on the model/serial rating plate. The appliance wiring...
Installation Instructions
Page 13
... range Use and Care Guide. 7. Slide range into an outlet. ■ Electrical supply is removed from the anti-tip bracket. 4. Check that all packaging materials. 4. Turn on . See the Use and Care Guide for specific instruction on for 5 minutes, check for satisfactory baking performance. or circuit breaker has not tripped. ■ Range is cold, turn off the range and contact a qualified technician. 13 When the range has been on range operation. If range is plugged into its final location...
... range Use and Care Guide. 7. Slide range into an outlet. ■ Electrical supply is removed from the anti-tip bracket. 4. Check that all packaging materials. 4. Turn on . See the Use and Care Guide for specific instruction on for 5 minutes, check for satisfactory baking performance. or circuit breaker has not tripped. ■ Range is cold, turn off the range and contact a qualified technician. 13 When the range has been on range operation. If range is plugged into its final location...
Warranty
Page 1
... of original purchase date is used in accordance with original model/serial numbers that is reported to use of consumables or cleaning products not approved by a Whirlpool designated service company. This major appliance is not installed in materials or workmanship. The removal and reinstallation of your major appliance to be borne by calling Whirlpool. THIS WARRANTY GIVES YOU SPECIFIC LEGAL RIGHTS, AND YOU MAY...
... of original purchase date is used in accordance with original model/serial numbers that is reported to use of consumables or cleaning products not approved by a Whirlpool designated service company. This major appliance is not installed in materials or workmanship. The removal and reinstallation of your major appliance to be borne by calling Whirlpool. THIS WARRANTY GIVES YOU SPECIFIC LEGAL RIGHTS, AND YOU MAY...


