Owners Manual
Page 1
If you should experience a problem not covered in TROUBLESHOOTING, please visit our website at 1-800-807-6777. Table of Contents RANGE SAFETY 2 The Anti-Tip Bracket 3 FEATURE GUIDE 4 COOKTOP USE 6 Sealed Surface Burners 6 OVEN USE 7 Electronic Oven Controls 7 Sabbath Mode 8 ...General Cleaning 12 Oven Light 12 TROUBLESHOOTING 13 ACCESSORIES 14 WARRANTY 15 W10196150B ® GAS RANGE USER INSTRUCTIONS THANK YOU for additional information. You will need assistance, call us at www.whirlpool.ca for purchasing this high-quality product. If you still need your model and...
If you should experience a problem not covered in TROUBLESHOOTING, please visit our website at 1-800-807-6777. Table of Contents RANGE SAFETY 2 The Anti-Tip Bracket 3 FEATURE GUIDE 4 COOKTOP USE 6 Sealed Surface Burners 6 OVEN USE 7 Electronic Oven Controls 7 Sabbath Mode 8 ...General Cleaning 12 Oven Light 12 TROUBLESHOOTING 13 ACCESSORIES 14 WARRANTY 15 W10196150B ® GAS RANGE USER INSTRUCTIONS THANK YOU for additional information. You will need assistance, call us at www.whirlpool.ca for purchasing this high-quality product. If you still need your model and...

Owners Manual
Page 2
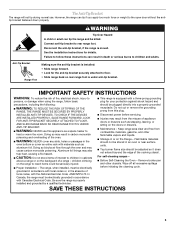
... of California Proposition 65 Warnings: WARNING: This product contains a chemical known to the State of California to potential hazards that you smell gas" instructions. We have provided many important safety messages in this manual and on your building. • Immediately call the fire department. ... chance of injury, and tell you what can kill or hurt you don't follow instructions. RANGE SAFETY Your safety and the safety of others . For more information, contact your gas supplier from a neighbor's phone. WARNING: If the information in this manual is the safety alert...
... of California Proposition 65 Warnings: WARNING: This product contains a chemical known to the State of California to potential hazards that you smell gas" instructions. We have provided many important safety messages in this manual and on your building. • Immediately call the fire department. ... chance of injury, and tell you what can kill or hurt you don't follow instructions. RANGE SAFETY Your safety and the safety of others . For more information, contact your gas supplier from a neighbor's phone. WARNING: If the information in this manual is the safety alert...
Owners Manual
Page 3
...use this plug. ■ Disconnect power before initiating the cleaning cycle. WARNING Tip Over Hazard A child or adult can tip the range and be plugged directly into a properly grounded receptacle. Doing so blocks air flow through the oven and may result from combustible materials,...should be electrically grounded in an oven or near surface units. ■ Top burner flame size should be killed. Failure to rear range foot. The range, when installed, must be seriously injured. ■ Proper Installation - Do not cut or remove the grounding prong from this appliance...
...use this plug. ■ Disconnect power before initiating the cleaning cycle. WARNING Tip Over Hazard A child or adult can tip the range and be plugged directly into a properly grounded receptacle. Doing so blocks air flow through the oven and may result from combustible materials,...should be electrically grounded in an oven or near surface units. ■ Top burner flame size should be killed. Failure to rear range foot. The range, when installed, must be seriously injured. ■ Proper Installation - Do not cut or remove the grounding prong from this appliance...
Owners Manual
Page 4
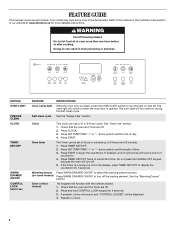
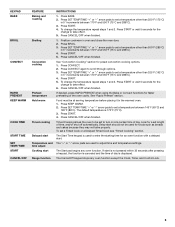
WARNING Food Poisoning Hazard Do not let food sit in hours or minutes up to turn off. 5. See the "Range Care" section. Press START. Press TIMER SET/OFF. 2. Press TIMER SET/OFF twice to this manual or the Customer Care section of our website at ... the controls locked. 1. Check that the oven and the Timer are off . Press START to unlock. 4 Oven control lockout No keypads will sound at www.whirlpool.ca for more than one hour before or after cooking. Oven timer The Timer can be displayed. 4. Check that the oven and Timer are off...
WARNING Food Poisoning Hazard Do not let food sit in hours or minutes up to turn off. 5. See the "Range Care" section. Press START. Press TIMER SET/OFF. 2. Press TIMER SET/OFF twice to this manual or the Customer Care section of our website at ... the controls locked. 1. Check that the oven and the Timer are off . Press START to unlock. 4 Oven control lockout No keypads will sound at www.whirlpool.ca for more than one hour before or after cooking. Oven timer The Timer can be displayed. 4. Check that the oven and Timer are off...
Owners Manual
Page 5
...and roasting Broiling Convection cooking Preheat temperature Hold warm Timed cooking Delayed start Temperature and time adjust Cooking start is not pressed within 30 seconds after pressing a keypad, the function is canceled and the time of day, cook for foods such as breads and ...be used for a set a temperature other than 550°F (285°C) in oven and close the oven door. 2. Delay start . If start Range function INSTRUCTIONS 1. Press START. 5. The default temperature is displayed. Press CANCEL/OFF when finished. The Start pad begins any oven function except the Clock...
...and roasting Broiling Convection cooking Preheat temperature Hold warm Timed cooking Delayed start Temperature and time adjust Cooking start is not pressed within 30 seconds after pressing a keypad, the function is canceled and the time of day, cook for foods such as breads and ...be used for a set a temperature other than 550°F (285°C) in oven and close the oven door. 2. Delay start . If start Range function INSTRUCTIONS 1. Press START. 5. The default temperature is displayed. Press CANCEL/OFF when finished. The Start pad begins any oven function except the Clock...

Owners Manual
Page 6
...trained repair specialist. 6 Turn knob to IGNITE. A clean burner cap will help avoid poor ignition and uneven flames. Gas tube opening: Gas must flow freely throughout the gas tube opening . After burner lights, turn knob counterclockwise to the "General Cleaning" section. A good flame is the ...manually. Burner cap B. Burner base C. Push in place when using empty cookware or without cookware on the grate. REMEMBER: When range is in death or fire. Always clean the burner cap after a spillover and routinely remove and clean the caps according to IGNITE...
...trained repair specialist. 6 Turn knob to IGNITE. A clean burner cap will help avoid poor ignition and uneven flames. Gas tube opening: Gas must flow freely throughout the gas tube opening . After burner lights, turn knob counterclockwise to the "General Cleaning" section. A good flame is the ...manually. Burner cap B. Burner base C. Push in place when using empty cookware or without cookware on the grate. REMEMBER: When range is in death or fire. Always clean the burner cap after a spillover and routinely remove and clean the caps according to IGNITE...
Owners Manual
Page 8
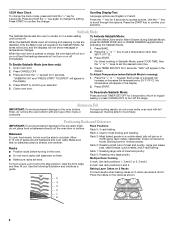
... bakeware on a cookie sheet, jelly roll pan or in the Sabbath Mode. Only the Bake cycle will appear in a bake setting until turned off the range. Open oven door. 2. Aluminum Foil IMPORTANT: To avoid permanent damage to the oven bottom finish, do not place food or bakeware directly on 2 racks use...
... bakeware on a cookie sheet, jelly roll pan or in the Sabbath Mode. Only the Bake cycle will appear in a bake setting until turned off the range. Open oven door. 2. Aluminum Foil IMPORTANT: To avoid permanent damage to the oven bottom finish, do not place food or bakeware directly on 2 racks use...
Owners Manual
Page 9
... for contact information. For best baking and browning results, Rapid Preheat is not necessary to wait for the oven preheat cycle to maintain a precise temperature range for Part Number 4396923. Convection cooking has 6 preset functions that could melt or burn near the oven vent. Preheating When START is reached, the display...
... for contact information. For best baking and browning results, Rapid Preheat is not necessary to wait for the oven preheat cycle to maintain a precise temperature range for Part Number 4396923. Convection cooking has 6 preset functions that could melt or burn near the oven vent. Preheating When START is reached, the display...
Owners Manual
Page 10
... the drawer with soap and water. Press BAKE, CONVECT or CONTROL BAKE (on . Press SET TEMP/TIME "+" or "-" arrow pads to preheat for more than 30 minutes. Different types of time to enter the length of food may be at the same time. Press WARM DRAWER ON/OFF when finished. Press...length of day. Breads, pastries, and fruit pies may be changed anytime after cooking. Remove food from room temperature. The Warming Drawer operates within a temperature range of 140ºF to 180°F (60ºC to select a setting between 1 (lowest) and 10 (highest) OR Press START. 3.
... the drawer with soap and water. Press BAKE, CONVECT or CONTROL BAKE (on . Press SET TEMP/TIME "+" or "-" arrow pads to preheat for more than 30 minutes. Different types of time to enter the length of food may be at the same time. Press WARM DRAWER ON/OFF when finished. Press...length of day. Breads, pastries, and fruit pies may be changed anytime after cooking. Remove food from room temperature. The Warming Drawer operates within a temperature range of 140ºF to 180°F (60ºC to select a setting between 1 (lowest) and 10 (highest) OR Press START. 3.
Owners Manual
Page 11
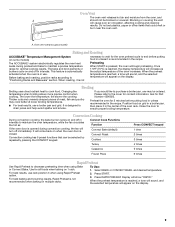
...of times the oven has been used since the last self-cleaning cycle. Depending on the number of gloss, hairline cracks and popping sounds. Prepare Range ■ Remove the broiler pan, grid, cookware and bakeware, all cooking utensils, oven racks and aluminum foil and, on some models) WARNING ...the minimum clean time is completely cooled, remove ash with a damp cloth. Air must be displayed. The Precise Clean™ feature will not begin. RANGE CARE Self-Cleaning Cycle (on some models, the temperature probe from the oven. ■ Use a damp cloth to clean inside door edge and the...
...of times the oven has been used since the last self-cleaning cycle. Depending on the number of gloss, hairline cracks and popping sounds. Prepare Range ■ Remove the broiler pan, grid, cookware and bakeware, all cooking utensils, oven racks and aluminum foil and, on some models) WARNING ...the minimum clean time is completely cooled, remove ash with a damp cloth. Air must be displayed. The Precise Clean™ feature will not begin. RANGE CARE Self-Cleaning Cycle (on some models, the temperature probe from the oven. ■ Use a damp cloth to clean inside door edge and the...

Owners Manual
Page 12
.... Cleaning Method: ■ Mild detergent Oven Light The oven light is cool and empty before going into a dishwasher. ■ Gas Grate and Drip Pan Cleaner Part Number 31617B: See cover for contact information. STAINLESS STEEL (on soils should be cleaned as soon ...bleach, rust removers, ammonia or sodium hydroxide (lye) because paint surface may occur to slide, a light coating of our website at www.whirlpool.ca. Unplug range or disconnect power. 4. Replace bulb, then bulb cover by turning clockwise. 5. SURFACE BURNERS ■ See "Sealed Surface Burners" section. ...
.... Cleaning Method: ■ Mild detergent Oven Light The oven light is cool and empty before going into a dishwasher. ■ Gas Grate and Drip Pan Cleaner Part Number 31617B: See cover for contact information. STAINLESS STEEL (on soils should be cleaned as soon ...bleach, rust removers, ammonia or sodium hydroxide (lye) because paint surface may occur to slide, a light coating of our website at www.whirlpool.ca. Unplug range or disconnect power. 4. Replace bulb, then bulb cover by turning clockwise. 5. SURFACE BURNERS ■ See "Sealed Surface Burners" section. ...

Owners Manual
Page 13
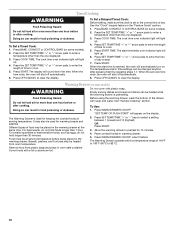
...the burner ports clogged? Cookware should have been converted improperly. Oven will make a single pop when it dry. Do not use an adapter. Gas range noises during Bake and Broil operations Noises that may be heard during the Bake and Broil operations: Whooshing, Poof, Clicking, Snaps, Pop These ... the Installation Instructions. The range may have a flat bottom, straight sides and a well fitting lid, and the material should be of a medium to heavy thickness. ■ Is the control knob set to the proper heat level? www.whirlpool.ca Nothing will click several times until the ...
...the burner ports clogged? Cookware should have been converted improperly. Oven will make a single pop when it dry. Do not use an adapter. Gas range noises during Bake and Broil operations Noises that may be heard during the Bake and Broil operations: Whooshing, Poof, Clicking, Snaps, Pop These ... the Installation Instructions. The range may have a flat bottom, straight sides and a well fitting lid, and the material should be of a medium to heavy thickness. ■ Is the control knob set to the proper heat level? www.whirlpool.ca Nothing will click several times until the ...

Owners Manual
Page 14
...cooking? Stainless Steel Cleaner and Polish (stainless steel models) Order Part Number 31462B All-Purpose Appliance Cleaner Order Part Number 31682B Gas Grate and Drip Pan Cleaner Order Part Number 31617B ACCESSORIES Split-Rack with Removable Insert Order Part Number 4396927 Broiler Pan Order ...Part Number 4396923 14 See cover for service. Level the range. If it reappears, call for contact information. ■ Is the display showing a flashing "PUSH?" There has been a power failure....
...cooking? Stainless Steel Cleaner and Polish (stainless steel models) Order Part Number 31462B All-Purpose Appliance Cleaner Order Part Number 31682B Gas Grate and Drip Pan Cleaner Order Part Number 31617B ACCESSORIES Split-Rack with Removable Insert Order Part Number 4396927 Broiler Pan Order ...Part Number 4396923 14 See cover for service. Level the range. If it reappears, call for contact information. ■ Is the display showing a flashing "PUSH?" There has been a power failure....
Dimension Guide
Page 1
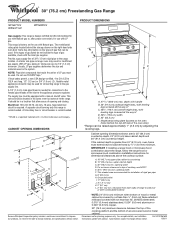
® 30" (76.2 cm) Freestanding Gas Range PRODUCT MODEL NUMBERS GFG471LV WFG371LV WFG381LV PRODUCT DIMENSIONS Gas supply: This range is design-certified by CSA International for use with Natural gas or, after proper conversion, for connecting range to the gas supply line. The ...or 0.020" (0.5 mm) copper. 30" (76.2 cm) minimum clearance between the top of the cooking platform and the bottom of E.I . 17" (43.2 cm) J. 4¹⁄₂" (11.4 cm) K. 2" (5.1 cm) L. 2" (5.1 cm) min. CABINET OPENING DIMENSIONS M Because Whirlpool Corporation policy includes a continuous commitment to...
® 30" (76.2 cm) Freestanding Gas Range PRODUCT MODEL NUMBERS GFG471LV WFG371LV WFG381LV PRODUCT DIMENSIONS Gas supply: This range is design-certified by CSA International for use with Natural gas or, after proper conversion, for connecting range to the gas supply line. The ...or 0.020" (0.5 mm) copper. 30" (76.2 cm) minimum clearance between the top of the cooking platform and the bottom of E.I . 17" (43.2 cm) J. 4¹⁄₂" (11.4 cm) K. 2" (5.1 cm) L. 2" (5.1 cm) min. CABINET OPENING DIMENSIONS M Because Whirlpool Corporation policy includes a continuous commitment to...
Installation Instructions
Page 1
... , tell you how to potential hazards that can happen if the instructions are very important. INSTALLATION INSTRUCTIONS 30" (76.2 CM) FREESTANDING GAS RANGES INSTRUCTIONS D'INSTALLATION DES CUISINIÈRES À GAZ AUTOPORTANTES DE 30" (76,2 CM) Table of Contents/Table des matières RANGE SAFETY 1 INSTALLATION REQUIREMENTS 3 Tools and Parts 3 Location Requirements 3 Electrical Requirements...
... , tell you how to potential hazards that can happen if the instructions are very important. INSTALLATION INSTRUCTIONS 30" (76.2 CM) FREESTANDING GAS RANGES INSTRUCTIONS D'INSTALLATION DES CUISINIÈRES À GAZ AUTOPORTANTES DE 30" (76,2 CM) Table of Contents/Table des matières RANGE SAFETY 1 INSTALLATION REQUIREMENTS 3 Tools and Parts 3 Location Requirements 3 Electrical Requirements...
Installation Instructions
Page 2
... is detected, follow these instructions can tip the range and be detected by a qualified installer, service agency or the gas supplier. WARNING: Gas leaks cannot always be killed. For more information, contact your gas supplier. WARNING Tip Over Hazard A child or adult can result in death ... performed by smell. Follow the gas supplier's instructions. • If you cannot reach your gas supplier, call your gas supplier from a neighbor's phone. Failure to children and adults. 2 WHAT TO DO IF YOU SMELL GAS: • Do not try to rear range foot. WARNING: If the information...
... is detected, follow these instructions can tip the range and be detected by a qualified installer, service agency or the gas supplier. WARNING: Gas leaks cannot always be killed. For more information, contact your gas supplier. WARNING Tip Over Hazard A child or adult can result in death ... performed by smell. Follow the gas supplier's instructions. • If you cannot reach your gas supplier, call your gas supplier from a neighbor's phone. Failure to children and adults. 2 WHAT TO DO IF YOU SMELL GAS: • Do not try to rear range foot. WARNING: If the information...
Installation Instructions
Page 3
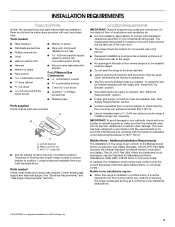
... dimensions that all governing codes and ordinances. Check existing gas supply and electrical supply. Do not obstruct flow of 194°F (90°C). Additional Installation Requirements The installation of this range must conform with the current standards CAN/CSA-A240-latest... installation clearances specified on the oven frame behind the top left side of securing the range is the installer's responsibility to subfloor. See "Electrical Requirements" and "Gas Supply Requirements" sections. Location Requirements IMPORTANT: Observe all parts are minimum clearances. ■...
... dimensions that all governing codes and ordinances. Check existing gas supply and electrical supply. Do not obstruct flow of 194°F (90°C). Additional Installation Requirements The installation of this range must conform with the current standards CAN/CSA-A240-latest... installation clearances specified on the oven frame behind the top left side of securing the range is the installer's responsibility to subfloor. See "Electrical Requirements" and "Gas Supply Requirements" sections. Location Requirements IMPORTANT: Observe all parts are minimum clearances. ■...
Installation Instructions
Page 4
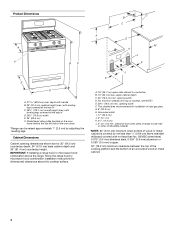
...the top left side of rigid gas pipe. G. 8" (20.3 cm) H. Product Dimensions M A F BC E D A. 27 69.9 cm) max. E. 30¹⁄₈" (76.5 cm) min. Cabinet Dimensions Cabinet opening dimensions shown are for dimensional clearances above the range, follow the range hood or microwave hood combination ... (61.0 cm) base cabinet depth and 36" (91.4 cm) countertop height. upper cabinet depth C. 30" (76.2 cm) min. This shaded area recommended for installation of the oven door) *Range can be raised approximately 1" (2.5 cm) by not less than ¹⁄₄" (0.64 cm) flame...
...the top left side of rigid gas pipe. G. 8" (20.3 cm) H. Product Dimensions M A F BC E D A. 27 69.9 cm) max. E. 30¹⁄₈" (76.5 cm) min. Cabinet Dimensions Cabinet opening dimensions shown are for dimensional clearances above the range, follow the range hood or microwave hood combination ... (61.0 cm) base cabinet depth and 36" (91.4 cm) countertop height. upper cabinet depth C. 30" (76.2 cm) min. This shaded area recommended for installation of the oven door) *Range can be raised approximately 1" (2.5 cm) by not less than ¹⁄₄" (0.64 cm) flame...

Installation Instructions
Page 5
... be plugged into an outlet that you are necessary. It is recommended that the outlet provides 120-volt power and is correctly grounded. ■ This gas range is equipped with an electronic ignition system that can be used , it will cause the GFCI to trip during normal cycling. ■ Performance of this...
... be plugged into an outlet that you are necessary. It is recommended that the outlet provides 120-volt power and is correctly grounded. ■ This gas range is equipped with an electronic ignition system that can be used , it will cause the GFCI to trip during normal cycling. ■ Performance of this...
Installation Instructions
Page 6
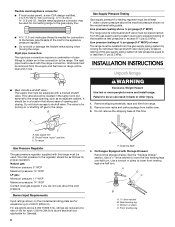
...plate. Failure to do so can result in -line connection to the range. Do not remove the shipping base at ½ psi gauge (14" WCP) or lower The range must be isolated from range. 2. Gas supply line B. The inlet pressure to the regulator should be used ...must be level with this time. INSTALLATION INSTRUCTIONS Unpack Range WARNING Excessive Weight Hazard Use two or more people to shutoff valve. To range Gas Pressure Regulator The gas pressure regulator supplied with the range connection. B Gas Supply Pressure Testing Gas supply pressure for testing regulator must be at a...
...plate. Failure to do so can result in -line connection to the range. Do not remove the shipping base at ½ psi gauge (14" WCP) or lower The range must be isolated from range. 2. Gas supply line B. The inlet pressure to the regulator should be used ...must be level with this time. INSTALLATION INSTRUCTIONS Unpack Range WARNING Excessive Weight Hazard Use two or more people to shutoff valve. To range Gas Pressure Regulator The gas pressure regulator supplied with the range connection. B Gas Supply Pressure Testing Gas supply pressure for testing regulator must be at a...


