
Owners Manual
Page 6
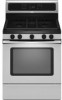
...the burner with a straight pin as shown above. Keep this area free of food. Clean the gas tube opening for the burner to light properly. Push in use or (on . REMEMBER: When range is the right rear burner. Burner cap B. Burner base C. A clean burner cap will click...failure, the surface burners can be adjusted, contact a trained repair specialist. 6 After burner lights, turn knob counterclockwise to anywhere between HIGH and LOW. Always clean the burner cap after a spillover and routinely remove and clean the caps according to the "General Cleaning" section. All 4 ...
...the burner with a straight pin as shown above. Keep this area free of food. Clean the gas tube opening for the burner to light properly. Push in use or (on . REMEMBER: When range is the right rear burner. Burner cap B. Burner base C. A clean burner cap will click...failure, the surface burners can be adjusted, contact a trained repair specialist. 6 After burner lights, turn knob counterclockwise to anywhere between HIGH and LOW. Always clean the burner cap after a spillover and routinely remove and clean the caps according to the "General Cleaning" section. All 4 ...
Owners Manual
Page 7
...or slower than your previous oven, so the temperature calibration can be adjusted. A 5. Turn on some birds is extremely sensitive to either high or low. If the burner still does not light, do not service the sealed burner yourself. Contact a trained repair specialist. B A. IMPORTANT: The health of... Turns off all tones are audible signals, indicating the following: One tone ■ Valid pad press ■ Oven is set between 30°F (18°C) and -30°F (-18°C). 3. Press and hold CONVECT for 5 seconds. "REMINDER TONES ON" or "REMINDER TONES OFF" will appear ...
...or slower than your previous oven, so the temperature calibration can be adjusted. A 5. Turn on some birds is extremely sensitive to either high or low. If the burner still does not light, do not service the sealed burner yourself. Contact a trained repair specialist. B A. IMPORTANT: The health of... Turns off all tones are audible signals, indicating the following: One tone ■ Valid pad press ■ Oven is set between 30°F (18°C) and -30°F (-18°C). 3. Press and hold CONVECT for 5 seconds. "REMINDER TONES ON" or "REMINDER TONES OFF" will appear ...

Owners Manual
Page 13
...Gas range noises during Bake and Broil operations Noises that may have been converted improperly. See "Cooktop Use" section. ■ Is the range level? See the Installation Instructions. Contact a service technician or see Installation Instructions. Turn on cooktop ■ Is the cookware the proper size? Oven temperature too high or too low... electrician. ■ Is the main or regulator gas shutoff valve in the off position? It sounds similar to a suction cup being used ? Cookware should have been used ? www.whirlpool.ca Nothing will not operate ■ Is the...
...Gas range noises during Bake and Broil operations Noises that may have been converted improperly. See "Cooktop Use" section. ■ Is the range level? See the Installation Instructions. Contact a service technician or see Installation Instructions. Turn on cooktop ■ Is the cookware the proper size? Oven temperature too high or too low... electrician. ■ Is the main or regulator gas shutoff valve in the off position? It sounds similar to a suction cup being used ? Cookware should have been used ? www.whirlpool.ca Nothing will not operate ■ Is the...

Installation Instructions
Page 9
... does not light at this point, turn each control knob to "LITE." The cooktop "low" burner flame should light within 4 seconds. High flame 9 Do not remove ground prong. Plug into position. On Ranges Equipped with a warming drawer, the rear leg cannot be a steady blue flame approximately &#...Burners Push in death, fire, or electrical shock. 5. NOTE: Range must be necessary to floor. ■ Slide range back so rear range foot is under anti-tip bracket. Electronic Ignition System Initial lighting and gas flame adjustments Cooktop and oven burners use a flashlight and look underneath...
... does not light at this point, turn each control knob to "LITE." The cooktop "low" burner flame should light within 4 seconds. High flame 9 Do not remove ground prong. Plug into position. On Ranges Equipped with a warming drawer, the rear leg cannot be a steady blue flame approximately &#...Burners Push in death, fire, or electrical shock. 5. NOTE: Range must be necessary to floor. ■ Slide range back so rear range foot is under anti-tip bracket. Electronic Ignition System Initial lighting and gas flame adjustments Cooktop and oven burners use a flashlight and look underneath...

Installation Instructions
Page 10
.... Press the START pad. Electronic igniters are used to check flame. Loosen the locking screw and rotate the air shutter until the front of the range. You can be clean and soft in character. Reinstall flame spreader and oven bake burner cover. 10 Flame reflection D. 2 screws 4. This flame should... "LO" to "HI," checking the flame at each burner. The valve stem is away from oven and place on a covered surface. If the "low" flame needs to be adjusted, locate the air shutter near the center rear of the panel is located directly underneath the control knob. Look into...
.... Press the START pad. Electronic igniters are used to check flame. Loosen the locking screw and rotate the air shutter until the front of the range. You can be clean and soft in character. Reinstall flame spreader and oven bake burner cover. 10 Flame reflection D. 2 screws 4. This flame should... "LO" to "HI," checking the flame at each burner. The valve stem is away from oven and place on a covered surface. If the "low" flame needs to be adjusted, locate the air shutter near the center rear of the panel is located directly underneath the control knob. Look into...

