
Owners Manual
Page 1
...la estufa eléctrica" en español, o para obtener información adicional acerca de su producto, visite: www.whirlpool.com Tenga listo su número de modelo completo. If you still need your model and serial number located on the oven frame...8 Aluminum Foil 8 Positioning Racks and Bakeware 8 Oven Vent 8 Baking and Roasting 9 Control Bake 9 Broiling 9 Convection Cooking 9 Rapid Preheat 9 Timed Cooking 10 Warming Drawer 10 RANGE CARE 11 Self-Cleaning Cycle 11 SteamClean 11 General Cleaning 12 Oven Light 12 TROUBLESHOOTING 13 ACCESSORIES 14 WARRANTY 16 W10200354B...
...la estufa eléctrica" en español, o para obtener información adicional acerca de su producto, visite: www.whirlpool.com Tenga listo su número de modelo completo. If you still need your model and serial number located on the oven frame...8 Aluminum Foil 8 Positioning Racks and Bakeware 8 Oven Vent 8 Baking and Roasting 9 Control Bake 9 Broiling 9 Convection Cooking 9 Rapid Preheat 9 Timed Cooking 10 Warming Drawer 10 RANGE CARE 11 Self-Cleaning Cycle 11 SteamClean 11 General Cleaning 12 Oven Light 12 TROUBLESHOOTING 13 ACCESSORIES 14 WARRANTY 16 W10200354B...
Owners Manual
Page 2
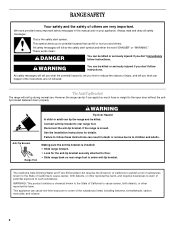
...too much force or weight to potential hazards that can happen if the instructions are very important. Reconnect the anti-tip bracket, if the range is the safety alert symbol. WARNING: This product contains a chemical known to the State of California to some of the substances listed,... including benzene, formaldehyde, carbon monoxide, and toluene. 2 RANGE SAFETY Your safety and the safety of others . This is moved. All safety messages will not tip during normal use. Failure to children and ...
...too much force or weight to potential hazards that can happen if the instructions are very important. Reconnect the anti-tip bracket, if the range is the safety alert symbol. WARNING: This product contains a chemical known to the State of California to some of the substances listed,... including benzene, formaldehyde, carbon monoxide, and toluene. 2 RANGE SAFETY Your safety and the safety of others . This is moved. All safety messages will not tip during normal use. Failure to children and ...

Owners Manual
Page 3
... the cooktop. ■ Use Proper Pan Size - The door gasket is properly installed and grounded by a qualified technician. ■ Never Use the Range for Warming or Heating the Room. ■ Do Not Leave Children Alone - Remove broiler pan and other bulky cloth. ■ DO NOT TOUCH ... Make Sure Reflector Pans or Drip Bowls Are in or on hot surfaces may penetrate the broken cooktop and create a risk of glass, glass/ceramic, ceramic, earthenware, or other servicing should not be taken not to the sudden change in burns from steam. SAVE THESE INSTRUCTIONS 3 Only certain types ...
... the cooktop. ■ Use Proper Pan Size - The door gasket is properly installed and grounded by a qualified technician. ■ Never Use the Range for Warming or Heating the Room. ■ Do Not Leave Children Alone - Remove broiler pan and other bulky cloth. ■ DO NOT TOUCH ... Make Sure Reflector Pans or Drip Bowls Are in or on hot surfaces may penetrate the broken cooktop and create a risk of glass, glass/ceramic, ceramic, earthenware, or other servicing should not be taken not to the sudden change in burns from steam. SAVE THESE INSTRUCTIONS 3 Only certain types ...
Owners Manual
Page 4
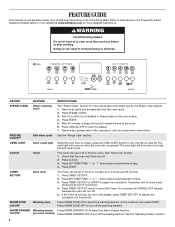
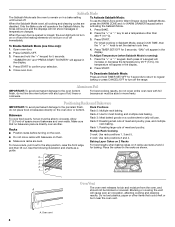
.... WARM DRAWER Warming drawer Press WARM DRAWER ON to cancel the Timer. Remove all of day. 4. PRECISE CLEAN™ Self-clean cycle See the "Range Care" section. The oven light will turn off the heating element. Check that the oven and Timer are off . Press TIMER SET/OFF twice to...for more than one hour before or after cooking. Add 10 oz (300 mL) of the cycle. 6. After 20 minutes, a beep will sound at www.whirlpool.com for the Steam Clean feature. 1. Remove any excess water with a sponge or cloth and wipe down oven interior. OVEN LIGHT Oven cavity light While...
.... WARM DRAWER Warming drawer Press WARM DRAWER ON to cancel the Timer. Remove all of day. 4. PRECISE CLEAN™ Self-clean cycle See the "Range Care" section. The oven light will turn off the heating element. Check that the oven and Timer are off . Press TIMER SET/OFF twice to...for more than one hour before or after cooking. Add 10 oz (300 mL) of the cycle. 6. After 20 minutes, a beep will sound at www.whirlpool.com for the Steam Clean feature. 1. Remove any excess water with a sponge or cloth and wipe down oven interior. OVEN LIGHT Oven cavity light While...
Owners Manual
Page 5
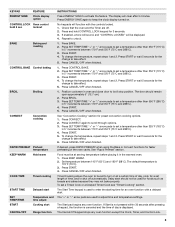
...be displayed. 4. To change the temperature, repeat steps 1 and 2. See "Convection Cooking" section for faster preheating of day, cook for a set a temperature other...desired, press RAPID PREHEAT when using the Bake or Convect functions for preset convection cooking options. 1. Press START or wait 5 seconds... roasting CONTROL BAKE Control baking BROIL Broiling CONVECT Convection cooking RAPID PREHEAT Preheat temperature KEEP WARM Hold...steps 1 and 2. Press CONVECT. 2. Press CANCEL/OFF when finished. Press CONVECT again to unlock. 1. Position cookware in...
...be displayed. 4. To change the temperature, repeat steps 1 and 2. See "Convection Cooking" section for faster preheating of day, cook for a set a temperature other...desired, press RAPID PREHEAT when using the Bake or Convect functions for preset convection cooking options. 1. Press START or wait 5 seconds... roasting CONTROL BAKE Control baking BROIL Broiling CONVECT Convection cooking RAPID PREHEAT Preheat temperature KEEP WARM Hold...steps 1 and 2. Press CONVECT. 2. Press CANCEL/OFF when finished. Press CONVECT again to unlock. 1. Position cookware in...
Owners Manual
Page 6
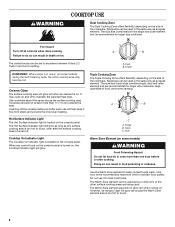
...Cooktop Indicator light will glow as long as the surface cooking area. Cleaning off . The Hot Surface indicator light will glow. Single B. Ceramic Glass The surface cooking area will glow red when an element is turned on the size of the other surface cooking areas are recommended for... larger size cookware. Single size can be used in and turn to heat cold foods. Single REMEMBER: When range is recommended for larger size cookware, large quantities of the cookware. The dual size combines both the single and outer element and is...
...Cooktop Indicator light will glow as long as the surface cooking area. Cleaning off . The Hot Surface indicator light will glow. Single B. Ceramic Glass The surface cooking area will glow red when an element is turned on the size of the other surface cooking areas are recommended for... larger size cookware. Single size can be used in and turn to heat cold foods. Single REMEMBER: When range is recommended for larger size cookware, large quantities of the cookware. The dual size combines both the single and outer element and is...
Owners Manual
Page 8
Sabbath Mode The Sabbath Mode sets the oven to remain on in a bake setting until turned off the range. For timed cooking in Sabbath Mode, press COOK TIME, then the "+" or "-" keys to set , all cooking and cleaning cycles are level. Press TIMER SET/...
Sabbath Mode The Sabbath Mode sets the oven to remain on in a bake setting until turned off the range. For timed cooking in Sabbath Mode, press COOK TIME, then the "+" or "-" keys to set , all cooking and cleaning cycles are level. Press TIMER SET/...

Owners Manual
Page 9
... It is reached, a tone will sound, and the selected temperature will appear on the display. 9 Convect Cook Functions Function Convect Bake (default) Convect Roast Convect Cook Cookies Turkey Casserole Frozen Pizza Press CONVECT keypad 1 time 2 times 3 times 4 times 5 times 6 times 7 times Rapid Preheat Use Rapid ... slower the cooking. Preheat the oven for 2 minutes before putting food in unless it is designed to maintain a precise temperature range for optimal cooking results. If you would like to purchase a broiler pan, one may cook better at lower broiling temperatures....
... It is reached, a tone will sound, and the selected temperature will appear on the display. 9 Convect Cook Functions Function Convect Bake (default) Convect Roast Convect Cook Cookies Turkey Casserole Frozen Pizza Press CONVECT keypad 1 time 2 times 3 times 4 times 5 times 6 times 7 times Rapid Preheat Use Rapid ... slower the cooking. Preheat the oven for 2 minutes before putting food in unless it is designed to maintain a precise temperature range for optimal cooking results. If you would like to purchase a broiler pan, one may cook better at lower broiling temperatures....
Owners Manual
Page 10
... cooked food(s) in the warming drawer. Press WARM DRAWER ON/OFF when finished. The Warming Drawer operates within a temperature range of time to enter the length of day. Press BAKE, CONVECT or CONTROL BAKE (on some models). 2. Press SET TEMP/TIME "+" or "-" arrow pads to cook. 5. Press ... COOK TIME. The start . 7. The temperature and/or time settings can be placed in the "Feature Guide" section. 1. Press BAKE, CONVECT or CONTROL BAKE (on some models) WARNING Food Poisoning Hazard Do not let food sit for keeping hot cooked foods at serving temperature. Press START...
... cooked food(s) in the warming drawer. Press WARM DRAWER ON/OFF when finished. The Warming Drawer operates within a temperature range of time to enter the length of day. Press BAKE, CONVECT or CONTROL BAKE (on some models). 2. Press SET TEMP/TIME "+" or "-" arrow pads to cook. 5. Press ... COOK TIME. The start . 7. The temperature and/or time settings can be placed in the "Feature Guide" section. 1. Press BAKE, CONVECT or CONTROL BAKE (on some models) WARNING Food Poisoning Hazard Do not let food sit for keeping hot cooked foods at serving temperature. Press START...
Owners Manual
Page 11
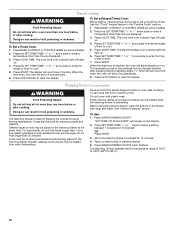
...in death to the fumes may result in burns. Exposure to certain birds. Depending on your oven cavity is recommended to end the cycle. Prepare Range ■ Remove the broiler pan, grid, cookware and bakeware, all cooking utensils, oven racks and aluminum foil and, on some models, the ...) of distilled or filtered water. ■ The Steam Clean feature will appear in the display. 2. Press CANCEL/OFF at anytime, press CANCEL/OFF. RANGE CARE Self-Cleaning Cycle (on some models) WARNING Burn Hazard Do not touch the oven during the Self-Cleaning cycle. IMPORTANT: The health of gloss...
...in death to the fumes may result in burns. Exposure to certain birds. Depending on your oven cavity is recommended to end the cycle. Prepare Range ■ Remove the broiler pan, grid, cookware and bakeware, all cooking utensils, oven racks and aluminum foil and, on some models, the ...) of distilled or filtered water. ■ The Steam Clean feature will appear in the display. 2. Press CANCEL/OFF at anytime, press CANCEL/OFF. RANGE CARE Self-Cleaning Cycle (on some models) WARNING Burn Hazard Do not touch the oven during the Self-Cleaning cycle. IMPORTANT: The health of gloss...

Owners Manual
Page 12
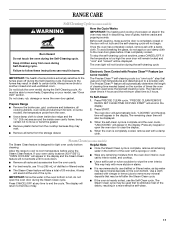
...finish. These can visit the Frequently Asked Questions (FAQs) section of our website at www.whirlpool.com. Cleaning Method: ■ Glass cleaner, mild liquid cleaner or nonabrasive scrubbing pad: ...is cool. Cleaning Method: ■ Soap and water: Pull knobs straight away from socket. CERAMIC GLASS (on some models, do not affect cooking performance, and after many cleanings they will ...) Food spills containing acids, such as vinegar and tomato, should be ordered as the entire range is still warm. STORAGE DRAWER OR WARMING DRAWER (on some models) Check that have discolored ...
...finish. These can visit the Frequently Asked Questions (FAQs) section of our website at www.whirlpool.com. Cleaning Method: ■ Glass cleaner, mild liquid cleaner or nonabrasive scrubbing pad: ...is cool. Cleaning Method: ■ Soap and water: Pull knobs straight away from socket. CERAMIC GLASS (on some models, do not affect cooking performance, and after many cleanings they will ...) Food spills containing acids, such as vinegar and tomato, should be ordered as the entire range is still warm. STORAGE DRAWER OR WARMING DRAWER (on some models) Check that have discolored ...
Owners Manual
Page 13
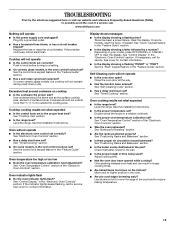
...Oven Controls" section. ■ Has a delay start been set to clear the display. On some ceramic glass models, the cooktop will not operate during a self-clean cycle. See cover for contact information. ...FAQs) to cover the edge of the crust and/or reduce baking temperature. 13 www.whirlpool.com Nothing will not operate ■ Is the oven door open? If the problem ... display showing a flashing "PUSH?" If it reappears, call . See "Timed Cooking" section. Level the range. See "Positioning Racks and Bakeware" section. ■ Is there proper air circulation around cookware on your...
...Oven Controls" section. ■ Has a delay start been set to clear the display. On some ceramic glass models, the cooktop will not operate during a self-clean cycle. See cover for contact information. ...FAQs) to cover the edge of the crust and/or reduce baking temperature. 13 www.whirlpool.com Nothing will not operate ■ Is the oven door open? If the problem ... display showing a flashing "PUSH?" If it reappears, call . See "Timed Cooking" section. Level the range. See "Positioning Racks and Bakeware" section. ■ Is there proper air circulation around cookware on your...

Installation Instructions
Page 1
...local electrical inspector's use. Always read and obey all safety messages. Reconnect the anti-tip bracket, if the range is the safety alert symbol. This symbol alerts you to rear range foot. WARNING Tip Over Hazard A child or adult can kill or hurt you don't follow the safety alert... symbol and either the word "DANGER" or "WARNING." Connect anti-tip bracket to potential hazards that can tip the range and be killed or seriously injured if you and others are not followed. W10196158B INSTALLATION INSTRUCTIONS 30" (76 CM) FREESTANDING ELECTRIC...
...local electrical inspector's use. Always read and obey all safety messages. Reconnect the anti-tip bracket, if the range is the safety alert symbol. This symbol alerts you to rear range foot. WARNING Tip Over Hazard A child or adult can kill or hurt you don't follow the safety alert... symbol and either the word "DANGER" or "WARNING." Connect anti-tip bracket to potential hazards that can tip the range and be killed or seriously injured if you and others are not followed. W10196158B INSTALLATION INSTRUCTIONS 30" (76 CM) FREESTANDING ELECTRIC...

Installation Instructions
Page 2
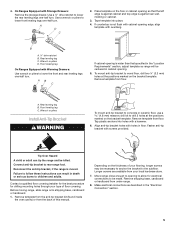
.... A B C A. It is required. See "Electrical Requirements" section. Longer screws are available from your cabinets, check with the range, see "Install Anti-Tip Bracket" section. ■ Grounded electrical supply is recommended that all parts are included. Location Requirements IMPORTANT: ...Observe all governing codes and ordinances. ■ It is marked for concrete/ceramic floors) ■ Masking tape Parts supplied Check that projects horizontally a minimum of 5" (12.7 cm) beyond the bottom of ...
.... A B C A. It is required. See "Electrical Requirements" section. Longer screws are available from your cabinets, check with the range, see "Install Anti-Tip Bracket" section. ■ Grounded electrical supply is recommended that all parts are included. Location Requirements IMPORTANT: ...Observe all governing codes and ordinances. ■ It is marked for concrete/ceramic floors) ■ Masking tape Parts supplied Check that projects horizontally a minimum of 5" (12.7 cm) beyond the bottom of ...

Installation Instructions
Page 3
... cm) min. from floor F 2.2 cm) min. Do not use an extension cord. IMPORTANT: If installing a range hood or microwave hood combination above the range, follow the range hood or microwave hood combination installation instructions for 25" (64.0 cm) countertop depth, 24" (61.0 cm) base...) countertop height. U.S.A. Model/serial rating plate (located on the left side frame behind storage drawer panel) *Range can result in accordance with zero clearance. A freestanding range may be raised approximately 1" (2.5 cm) by a qualified electrician. 3 Be sure that the ground path and...
... cm) min. from floor F 2.2 cm) min. Do not use an extension cord. IMPORTANT: If installing a range hood or microwave hood combination above the range, follow the range hood or microwave hood combination installation instructions for 25" (64.0 cm) countertop depth, 24" (61.0 cm) base...) countertop height. U.S.A. Model/serial rating plate (located on the left side frame behind storage drawer panel) *Range can result in accordance with zero clearance. A freestanding range may be raised approximately 1" (2.5 cm) by a qualified electrician. 3 Be sure that the ground path and...

Installation Instructions
Page 4
...cm) of slack in a clear plastic bag. This cord contains 4 copper conductors with ring terminals or open -end spade terminals with the rating of the range. ■ The wiring diagram is ever necessary. ■ A UL listed conduit connector must be identified by a green or green/yellow cover and the.... Do not remove the shipping base at the point the power supply cord enters the appliance. or 50-amp power supply cord (pigtail) (see Range Rating chart below). Range Rating* 120/240 Volts 8.8 - 16.5 KW 16.6 - 22.5 KW 120/208 Volts 7.8 - 12.5 KW 12.6 - 18.5 KW Specified Rating of...
...cm) of slack in a clear plastic bag. This cord contains 4 copper conductors with ring terminals or open -end spade terminals with the rating of the range. ■ The wiring diagram is ever necessary. ■ A UL listed conduit connector must be identified by a green or green/yellow cover and the.... Do not remove the shipping base at the point the power supply cord enters the appliance. or 50-amp power supply cord (pigtail) (see Range Rating chart below). Range Rating* 120/240 Volts 8.8 - 16.5 KW 16.6 - 22.5 KW 120/208 Volts 7.8 - 12.5 KW 12.6 - 18.5 KW Specified Rating of...
Installation Instructions
Page 5
...the back of this manual. Wrench or pliers Install Anti-Tip Bracket WARNING To mount anti-tip bracket to concrete or ceramic floor, use a 4.8 mm) masonry drill bit to rear range foot. Fasten anti-tip bracket with a hammer. 6. Tip Over Hazard A child or adult can result in death ...or serious burns to lower front leveling legs one-half turn . Before moving range, slide range onto shipping base, cardboard or hardboard. 1. Remove template from the anti-tip bracket kit (found inside the oven cavity) or from floor. 4. Use...
...the back of this manual. Wrench or pliers Install Anti-Tip Bracket WARNING To mount anti-tip bracket to concrete or ceramic floor, use a 4.8 mm) masonry drill bit to rear range foot. Fasten anti-tip bracket with a hammer. 6. Tip Over Hazard A child or adult can result in death ...or serious burns to lower front leveling legs one-half turn . Before moving range, slide range onto shipping base, cardboard or hardboard. 1. Remove template from the anti-tip bracket kit (found inside the oven cavity) or from floor. 4. Use...
Installation Instructions
Page 6
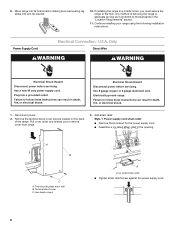
...Two mounting tabs each side B. 9. Any method of the range. Plug into anti-tip bracket. 10. Add strain relief. Electrically ground range. Remove the terminal block cover screws located on the back of securing the range is adequate as long as it conforms to follow these instructions... can result in death, fire, or electrical shock. A B C A. Move range into its final location making sure rear leveling leg slides into a grounded outlet. If installing the range in the opening. Power Supply Cord Electrical Connection - U.S.A. Use a new 40 amp power supply...
...Two mounting tabs each side B. 9. Any method of the range. Plug into anti-tip bracket. 10. Add strain relief. Electrically ground range. Remove the terminal block cover screws located on the back of securing the range is adequate as long as it conforms to follow these instructions... can result in death, fire, or electrical shock. A B C A. Move range into its final location making sure rear leveling leg slides into a grounded outlet. If installing the range in the opening. Power Supply Cord Electrical Connection - U.S.A. Use a new 40 amp power supply...
Installation Instructions
Page 7
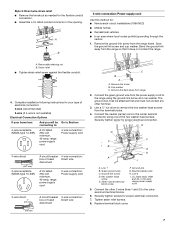
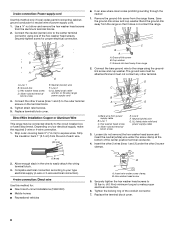
... relief ■ Remove the knockout as needed for your type of the hex washer head screws. Bend the ground-link away from the range frame. Ground-link screw B. Cup washer C. Securely tighten screw for proper electrical connection. 7. Hex washer head screw E. Line 1 B....3-wire receptacle (NEMA type 10-50R) A circuit breaker 4-wire connection: box or fused Direct wire disconnect A UL listed, 250-volt minimum, 40-amp, range power supply cord 3-wire connection: Power supply cord 3-wire direct 1" (2.5 cm) 3" (7.6 cm) A circuit breaker 3-wire connection: box or fused Direct...
... relief ■ Remove the knockout as needed for your type of the hex washer head screws. Bend the ground-link away from the range frame. Ground-link screw B. Cup washer C. Securely tighten screw for proper electrical connection. 7. Hex washer head screw E. Line 1 B....3-wire receptacle (NEMA type 10-50R) A circuit breaker 4-wire connection: box or fused Direct wire disconnect A UL listed, 250-volt minimum, 40-amp, range power supply cord 3-wire connection: Power supply cord 3-wire direct 1" (2.5 cm) 3" (7.6 cm) A circuit breaker 3-wire connection: box or fused Direct...
Installation Instructions
Page 8
...screws to 35 lbs-in the wire to neutral wire of the hex washer head screws. Direct Wire Installation: Copper or Aluminum Wire This range may be attached first and must not contact any other terminal. Remove the ground-link screw from power supply cable B. C B A A....Line 2 F. Neutral (white) wire G. 3-wire connection: Power supply cord Use this method for proper electrical connection. Connect the neutral (center) wire to the range using one of power supply cord. 1. Insert the other 2 wires (lines 1 and 2) under screw clamp. Replace the terminal block cover. 8 Connect the ...
...screws to 35 lbs-in the wire to neutral wire of the hex washer head screws. Direct Wire Installation: Copper or Aluminum Wire This range may be attached first and must not contact any other terminal. Remove the ground-link screw from power supply cable B. C B A A....Line 2 F. Neutral (white) wire G. 3-wire connection: Power supply cord Use this method for proper electrical connection. Connect the neutral (center) wire to the range using one of power supply cord. 1. Insert the other 2 wires (lines 1 and 2) under screw clamp. Replace the terminal block cover. 8 Connect the ...


