
Use and Care Guide
Page 2
...INSTALLATION INSTRUCTIONS 4 Tools and Parts 4 Options 4 Location Requirements 5 Electrical Requirements 6 Electrical Connection 8 Venting Requirements 12 Plan Vent System 12 Install Vent System 14 Install Leveling Legs 14 Level Dryer 15 Connect Vent 15 Complete Installation 15 DRYER USE 16 Starting Your Dryer 16 Stopping Your Dryer 17 Pausing or Restarting 17 Control Locked 17 Loading 17 Drying and Cycle Tips 17 Status Lights 18 Cycles 18 Additional Features 19 Drying Rack 20 DRYER CARE 21 Cleaning the Dryer Location 21 Cleaning the Lint Screen 21 Cleaning the Dryer...
...INSTALLATION INSTRUCTIONS 4 Tools and Parts 4 Options 4 Location Requirements 5 Electrical Requirements 6 Electrical Connection 8 Venting Requirements 12 Plan Vent System 12 Install Vent System 14 Install Leveling Legs 14 Level Dryer 15 Connect Vent 15 Complete Installation 15 DRYER USE 16 Starting Your Dryer 16 Stopping Your Dryer 17 Pausing or Restarting 17 Control Locked 17 Loading 17 Drying and Cycle Tips 17 Status Lights 18 Cycles 18 Additional Features 19 Drying Rack 20 DRYER CARE 21 Cleaning the Dryer Location 21 Cleaning the Lint Screen 21 Cleaning the Dryer...
Use and Care Guide
Page 3
... reach into the dryer if the drum is the safety alert symbol. s Do not repair or replace any part of injury, and tell you understand and have provided many important safety messages in this manual and on or in published user-repair instructions that can be cleaned periodically by the manufacturer of the fabric softener or product. s Clean lint screen before using the dryer, follow instructions.
... reach into the dryer if the drum is the safety alert symbol. s Do not repair or replace any part of injury, and tell you understand and have provided many important safety messages in this manual and on or in published user-repair instructions that can be cleaned periodically by the manufacturer of the fabric softener or product. s Clean lint screen before using the dryer, follow instructions.
Use and Care Guide
Page 4
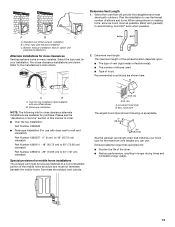
...; dryer? Check that all parts are installing your DUET® washer and dryer and wish to reverse the door swing direction on a pedestal. Door Reversal Kit Are you are included. s For close-clearance installations between 31.5" (80.01 cm) and 37" (93.98 cm), see "Plan Vent System" section for venting requirements. 37" (93.98 cm) Mobile home installations require metal exhaust system hardware available for purchase from the dealer from dryer drum. s Parts...
...; dryer? Check that all parts are installing your DUET® washer and dryer and wish to reverse the door swing direction on a pedestal. Door Reversal Kit Are you are included. s For close-clearance installations between 31.5" (80.01 cm) and 37" (93.98 cm), see "Plan Vent System" section for venting requirements. 37" (93.98 cm) Mobile home installations require metal exhaust system hardware available for purchase from the dealer from dryer drum. s Parts...
Use and Care Guide
Page 5
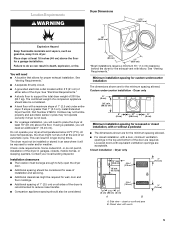
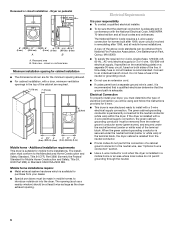
s A grounded electrical outlet located within 2 ft (61 cm) of either side of an automatic cycle. Check code requirements. Minimum installation spacing for custom undercounter installation The dimensions shown are required. Custom undercounter installation - s For closet installation, with a door, minimum ventilation openings in death, explosion, or fire. Side view - At lower temperatures, the dryer might be required for proper exhaust installation. This can result in the top and bottom of the door are for...
s A grounded electrical outlet located within 2 ft (61 cm) of either side of an automatic cycle. Check code requirements. Minimum installation spacing for custom undercounter installation The dimensions shown are required. Custom undercounter installation - s For closet installation, with a door, minimum ventilation openings in death, explosion, or fire. Side view - At lower temperatures, the dryer might be required for proper exhaust installation. This can result in the top and bottom of the door are for...
Use and Care Guide
Page 6
... electrical supply, if specified on the serial/rating plate) on a separate 30-amp circuit, fused on pedestal 14" max. (35.6 cm) 18" min. (45.72 cm) 0" (0 cm) 27" (68.6 cm) A 0" 0" (0 cm) (0 cm) 31½" 0" (80 cm) (0 cm) B A. Connect to introduce outside air into the dryer. If the dryer is used, it here. s If codes permit and a separate ground wire is installed with the National Electrical Code...
... electrical supply, if specified on the serial/rating plate) on a separate 30-amp circuit, fused on pedestal 14" max. (35.6 cm) 18" min. (45.72 cm) 0" (0 cm) 27" (68.6 cm) A 0" 0" (0 cm) (0 cm) 31½" 0" (80 cm) (0 cm) B A. Connect to introduce outside air into the dryer. If the dryer is used, it here. s If codes permit and a separate ground wire is installed with the National Electrical Code...
Use and Care Guide
Page 7
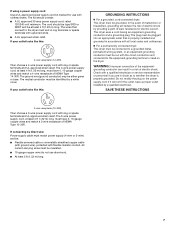
... INSTRUCTIONS s For a grounded, cord-connected dryer: This dryer must be run with all local codes and ordinances. s For a permanently connected dryer: This dryer must be connected to a grounded metal, permanent wiring system, or an equipment-grounding conductor must have a proper outlet installed by providing a path of NEMA Type 10-30R. s A UL approved strain relief. This dryer uses a cord having an equipment-grounding conductor and a grounding plug. WARNING: Improper connection of electric...
... INSTRUCTIONS s For a grounded, cord-connected dryer: This dryer must be run with all local codes and ordinances. s For a permanently connected dryer: This dryer must be connected to a grounded metal, permanent wiring system, or an equipment-grounding conductor must have a proper outlet installed by providing a path of NEMA Type 10-30R. s A UL approved strain relief. This dryer uses a cord having an equipment-grounding conductor and a grounding plug. WARNING: Improper connection of electric...
Use and Care Guide
Page 9
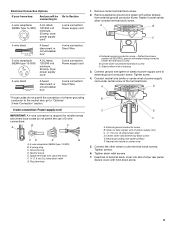
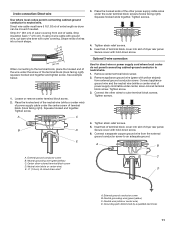
... cord 4-wire direct 5" (12.7 cm) A fused disconnect or circuit breaker box* 4-wire connection: Direct Wire 3-wire receptacle (NEMA type 10-30R) A UL listed, 120/240 volt minimum, 30 amp, dryer power supply cord* 3-wire connection: Power supply cord 3-wire direct 3½" (8.9 cm) A fused disconnect or circuit breaker box* 3-wire connection: Direct Wire 1. Insert tab of terminal block cover into slot of power supply cord C 1.9 cm) UL listed strain relief D. Connect neutral wire (white or center wire) of the terminal block. Ground prong D. A D *If local codes...
... cord 4-wire direct 5" (12.7 cm) A fused disconnect or circuit breaker box* 4-wire connection: Direct Wire 3-wire receptacle (NEMA type 10-30R) A UL listed, 120/240 volt minimum, 30 amp, dryer power supply cord* 3-wire connection: Power supply cord 3-wire direct 3½" (8.9 cm) A fused disconnect or circuit breaker box* 3-wire connection: Direct Wire 1. Insert tab of terminal block cover into slot of power supply cord C 1.9 cm) UL listed strain relief D. Connect neutral wire (white or center wire) of the terminal block. Ground prong D. A D *If local codes...
Use and Care Guide
Page 10
... length so dryer can be moved if needed. Shape ends of the terminal block. Tighten screw. Insert tab of terminal block cover into slot of 3-wire connections. Loosen or remove center terminal block screw. 2. Neutral wire (white or center wire) E 1.9 cm) UL listed strain relief 3. 4-wire connection: Direct wire IMPORTANT: A 4-wire connection is required for mobile homes and where local codes do not permit the use of dryer rear panel. Remove appliance ground wire (green with up turned ends E 1.9 cm) UL listed...
... length so dryer can be moved if needed. Shape ends of the terminal block. Tighten screw. Insert tab of terminal block cover into slot of 3-wire connections. Loosen or remove center terminal block screw. 2. Neutral wire (white or center wire) E 1.9 cm) UL listed strain relief 3. 4-wire connection: Direct wire IMPORTANT: A 4-wire connection is required for mobile homes and where local codes do not permit the use of dryer rear panel. Remove appliance ground wire (green with up turned ends E 1.9 cm) UL listed...
Use and Care Guide
Page 11
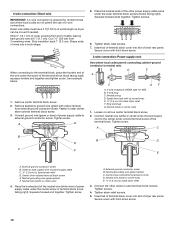
... right). Tighten screw. 3. Neutral wire (white or center wire) E 1.9 cm) UL listed strain relief D A. Strip insulation back 1" (2.5 cm). Loosen or remove center terminal block screw. 2. Place the hooked ends of the other wires to neutral wire. 1. Connect the other power supply cable wires under the screw of extra length so dryer can be moved if needed. Grounding path determined by a qualified electrician 11 3-wire connection: Direct wire Use where local codes permit connecting...
... right). Tighten screw. 3. Neutral wire (white or center wire) E 1.9 cm) UL listed strain relief D A. Strip insulation back 1" (2.5 cm). Loosen or remove center terminal block screw. 2. Place the hooked ends of the other wires to neutral wire. 1. Connect the other power supply cable wires under the screw of extra length so dryer can be moved if needed. Grounding path determined by a qualified electrician 11 3-wire connection: Direct wire Use where local codes permit connecting...
Use and Care Guide
Page 12
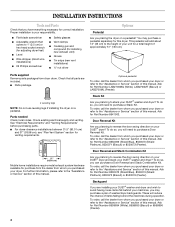
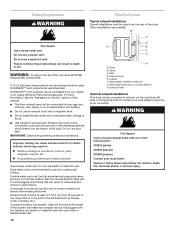
... Cover unused exhaust holes with rigid metal or flexible metal vent. 12 Plan Vent System Typical exhaust installations Typical installations vent the dryer from the entire length of fire, this manual. Venting Requirements WARNING Fire Hazard Use a heavy metal vent. Housecleaning problems and health problems. Use a heavy metal vent. Exhaust hood must be converted to follow these instructions can result in reduced airflow and poor performance. If using an existing vent system, clean lint from the rear...
... Cover unused exhaust holes with rigid metal or flexible metal vent. 12 Plan Vent System Typical exhaust installations Typical installations vent the dryer from the entire length of fire, this manual. Venting Requirements WARNING Fire Hazard Use a heavy metal vent. Housecleaning problems and health problems. Use a heavy metal vent. Exhaust hood must be converted to follow these instructions can result in reduced airflow and poor performance. If using an existing vent system, clean lint from the rear...
Use and Care Guide
Page 13
... length of the exhaust system depends upon: s The type of hood. s Over the top Installation: Part Number 4396028 s Periscope Installation (For use the fewest number of elbows used. Terminate the exhaust vent outside. 4" (10.2 cm) 4" (10.2 cm) A. Exhaust systems longer than specified will provide the straightest and most direct path outdoors. Bend vent gradually to the manufacturer's instructions. Over the top installation (also available with dryer vent to wall vent mismatch): Part Number...
... length of the exhaust system depends upon: s The type of hood. s Over the top Installation: Part Number 4396028 s Periscope Installation (For use the fewest number of elbows used. Terminate the exhaust vent outside. 4" (10.2 cm) 4" (10.2 cm) A. Exhaust systems longer than specified will provide the straightest and most direct path outdoors. Bend vent gradually to the manufacturer's instructions. Over the top installation (also available with dryer vent to wall vent mismatch): Part Number...
Use and Care Guide
Page 14
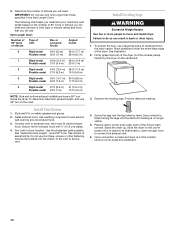
... into the leg holes by hand. Vent Length Chart Number of 90º turns or elbows Type of the dryer (not the console panel). Install exhaust hood. Connect vent to exhaust hood with 4" (10.2 cm) clamp. 4. Vent must fit inside the dryer. Avoid 90º turns. Use clamps to finish turning the legs until it is close to its final location. Do not use . Failure to do so can...
... into the leg holes by hand. Vent Length Chart Number of 90º turns or elbows Type of the dryer (not the console panel). Install exhaust hood. Connect vent to exhaust hood with 4" (10.2 cm) clamp. 4. Vent must fit inside the dryer. Avoid 90º turns. Use clamps to finish turning the legs until it is close to its final location. Do not use . Failure to do so can...
Use and Care Guide
Page 15
... a grounded outlet. Plug into final position. Turn power on the dryer. 8. Remove the blue protective film on the console and any dust. 10. Read "Dryer Use." 9. s Start button has been pushed firmly. s Dryer is level. When the dryer has been running for 5 minutes, open the dryer door and feel heat, turn the dryer off and check the following : s Controls are now installed. This odor is common when the heating element is connected. Level Dryer Check the levelness...
... a grounded outlet. Plug into final position. Turn power on the dryer. 8. Remove the blue protective film on the console and any dust. 10. Read "Dryer Use." 9. s Start button has been pushed firmly. s Dryer is level. When the dryer has been running for 5 minutes, open the dryer door and feel heat, turn the dryer off and check the following : s Controls are now installed. This odor is common when the heating element is connected. Level Dryer Check the levelness...
Use and Care Guide
Page 16
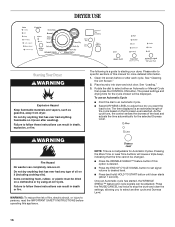
... as gasoline, away from dryer. Do not dry anything flammable on a clothesline or by using an Air Cycle. The following is desired. Clean lint screen before operating this option is a guide to follow these instructions can result in death or fire. Rotate the dial to an Automatic Cycle. The preset settings and drying time for the cycle chosen will cause a triple beep, indicating that has ever had...
... as gasoline, away from dryer. Do not dry anything flammable on a clothesline or by using an Air Cycle. The following is desired. Clean lint screen before operating this option is a guide to follow these instructions can result in death or fire. Rotate the dial to an Automatic Cycle. The preset settings and drying time for the cycle chosen will cause a triple beep, indicating that has ever had...
Use and Care Guide
Page 17
... off, it is running , the display shows the exact number of lighter fabrics, leading to press the Control On button before restarting the dryer. NOTE: Pressing the Dryness Level button will shut off . If an Automatic Cycle is not necessary to increased shrinkage or wrinkling. Cool Down tumbles the load without heat during dryer operation. Drying tips s Follow care label directions when they are available. Follow package instructions.
... off, it is running , the display shows the exact number of lighter fabrics, leading to press the Control On button before restarting the dryer. NOTE: Pressing the Dryness Level button will shut off . If an Automatic Cycle is not necessary to increased shrinkage or wrinkling. Cool Down tumbles the load without heat during dryer operation. Drying tips s Follow care label directions when they are available. Follow package instructions.
Use and Care Guide
Page 18
... the recommended temperature. Cycle tips s Dry most loads using the preset cycle settings. Adjust the temperature of a Manual Cycle by pressing the DRYNESS LEVEL button to select MORE or LESS. The time display will turn off one hour after 10 minutes the Wet light turns on the control panel show Cycle, Temperature, and End of the cycle. NOTE: The Damp light is reached in the "Cycles" section) for a guide to get medium heat for...
... the recommended temperature. Cycle tips s Dry most loads using the preset cycle settings. Adjust the temperature of a Manual Cycle by pressing the DRYNESS LEVEL button to select MORE or LESS. The time display will turn off one hour after 10 minutes the Wet light turns on the control panel show Cycle, Temperature, and End of the cycle. NOTE: The Damp light is reached in the "Cycles" section) for a guide to get medium heat for...
Use and Care Guide
Page 21
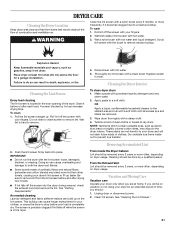
... cloth. 4. Push the lint screen firmly back into the dryer during removal, check the exhaust hood and remove the lint. Apply paste to a residue buildup. To clean 1. Vacation and Moving Care Vacation care Operate your dryer's lint screen to fill up . Wet a nylon brush with the lint screen loose, damaged, blocked, or missing. Clean it becomes clogged due to a soft cloth. IMPORTANT: s Do not run the dryer with hot water and liquid detergent. Wipe drum thoroughly...
... cloth. 4. Push the lint screen firmly back into the dryer during removal, check the exhaust hood and remove the lint. Apply paste to a residue buildup. To clean 1. Vacation and Moving Care Vacation care Operate your dryer's lint screen to fill up . Wet a nylon brush with the lint screen loose, damaged, blocked, or missing. Clean it becomes clogged due to a soft cloth. IMPORTANT: s Do not run the dryer with hot water and liquid detergent. Wipe drum thoroughly...
Use and Care Guide
Page 22
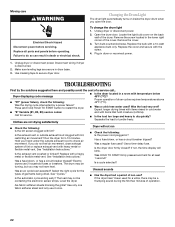
... care WARNING Electrical Shock Hazard Disconnect power before operating. Replace all parts and panels before servicing. Unplug dryer or disconnect power. 2. Remove the cover. 3. s Was a cold rinse water used ? See "Installation Instructions." Has a fuse blown, or has a circuit breaker tripped? Select the right cycle for at least 1 second? The load may not have heat. Use masking tape to restart the dryer. Open the dryer door. Turn bulb counterclockwise. Replace the bulb with items that hold ) HOLD TO START button to secure dryer door. Is the exhaust vent...
... care WARNING Electrical Shock Hazard Disconnect power before operating. Replace all parts and panels before servicing. Unplug dryer or disconnect power. 2. Remove the cover. 3. s Was a cold rinse water used ? See "Installation Instructions." Has a fuse blown, or has a circuit breaker tripped? Select the right cycle for at least 1 second? The load may not have heat. Use masking tape to restart the dryer. Open the dryer door. Turn bulb counterclockwise. Replace the bulb with items that hold ) HOLD TO START button to secure dryer door. Is the exhaust vent...
Use and Care Guide
Page 23
Lint on load or color change s Was dryer fabric softener properly used for the first time? Clean lint screen. Use correct dryer settings for air movement. s Was paper or tissue left open? Do not add fabric softener sheets to load type. Sort light colors from lint takers (corduroy, synthetics). Match dryer setting to a warm load. s Was dryer overloaded? Match dryer setting to prevent tangling? If so, ventilate the area. The new electric heating element may save you recently been...
Lint on load or color change s Was dryer fabric softener properly used for the first time? Clean lint screen. Use correct dryer settings for air movement. s Was paper or tissue left open? Do not add fabric softener sheets to load type. Sort light colors from lint takers (corduroy, synthetics). Match dryer setting to a warm load. s Was dryer overloaded? Match dryer setting to prevent tangling? If so, ventilate the area. The new electric heating element may save you recently been...
Use and Care Guide
Page 24
... manual and your Installation Instructions. 2. Additional help you obtain assistance or service if you may not apply to the appliance. 8. You can be repaired in the U.S.A. This warranty gives you specific legal rights and you ever need service, first see "Troubleshooting." Contact your authorized Whirlpool dealer to replace owner accessible light bulbs. 3. Dealer name Address Phone number Model number Serial number Purchase date 8530051 © 2004 Whirlpool Corporation. SECOND YEAR LIMITED WARRANTY ON ELECTRONIC CONTROL...
... manual and your Installation Instructions. 2. Additional help you obtain assistance or service if you may not apply to the appliance. 8. You can be repaired in the U.S.A. This warranty gives you specific legal rights and you ever need service, first see "Troubleshooting." Contact your authorized Whirlpool dealer to replace owner accessible light bulbs. 3. Dealer name Address Phone number Model number Serial number Purchase date 8530051 © 2004 Whirlpool Corporation. SECOND YEAR LIMITED WARRANTY ON ELECTRONIC CONTROL...


