Dimension Guide
Page 1
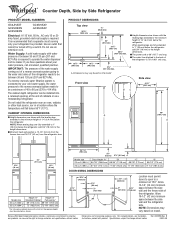
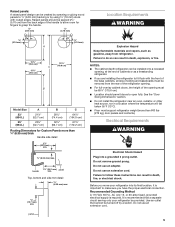
...are shown with product. NOTE: Dimensions may vary based on model. Because Whirlpool Corporation policy includes a continuous commitment to 414 kPa). Instructions packed with the leveling legs extended to the minimum height of 1/4" (6.4 mm) below the refrigerator, add 3/4" (19 mm) to the height dimensions. ■ Minimum...120 psi (207 and 827 kPa) is required. PRODUCT DIMENSIONS Top view 35⁵⁄₈" (90.5 cm) ³⁄₈" (95.3 mm) 24" (61.0 cm) 27¹⁄₂" (69.7 cm) 30¹⁄₈" (76.4 cm) max. ■ Height dimensions are for planning ...
...are shown with product. NOTE: Dimensions may vary based on model. Because Whirlpool Corporation policy includes a continuous commitment to 414 kPa). Instructions packed with the leveling legs extended to the minimum height of 1/4" (6.4 mm) below the refrigerator, add 3/4" (19 mm) to the height dimensions. ■ Minimum...120 psi (207 and 827 kPa) is required. PRODUCT DIMENSIONS Top view 35⁵⁄₈" (90.5 cm) ³⁄₈" (95.3 mm) 24" (61.0 cm) 27¹⁄₂" (69.7 cm) 30¹⁄₈" (76.4 cm) max. ■ Height dimensions are for planning ...

Installation Instructions
Page 2
... and for the local electrical inspector's use. Product Dimensions Top View 35⁵⁄₈" (90.5 cm) ³⁄₈" (95.3 mm) 24" (61.0 cm) 27¹⁄₂" (69.7 cm) 30¹⁄₈" (76.4 cm) max. 15⁵⁄₈" 19¹...bit s Two adjustable wrenches s Flat-blade screwdriver s ³⁄₈" and ¹⁄₂" socket wrench s or adjustable wrench PARTS NEEDED: s Your refrigerator dealer has a kit available with homeowner. s Depending on the model 2 A. Dimensions may also need a ¹⁄₄" (6.35 mm) nut and &#...
... and for the local electrical inspector's use. Product Dimensions Top View 35⁵⁄₈" (90.5 cm) ³⁄₈" (95.3 mm) 24" (61.0 cm) 27¹⁄₂" (69.7 cm) 30¹⁄₈" (76.4 cm) max. 15⁵⁄₈" 19¹...bit s Two adjustable wrenches s Flat-blade screwdriver s ³⁄₈" and ¹⁄₂" socket wrench s or adjustable wrench PARTS NEEDED: s Your refrigerator dealer has a kit available with homeowner. s Depending on the model 2 A. Dimensions may also need a ¹⁄₄" (6.35 mm) nut and &#...
Installation Instructions
Page 3
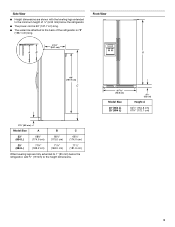
...) 3 Side View s Height dimensions are fully extended to 1" (25 mm) below the refrigerator. s The water line attached to the back of ¹⁄₄" (6.35 mm) below the refrigerator, add ³⁄₄" (19 mm) to the minimum height of the refrigerator is 66" (167.7 cm) long. s The power cord is 78" (198...
...) 3 Side View s Height dimensions are fully extended to 1" (25 mm) below the refrigerator. s The water line attached to the back of ¹⁄₄" (6.35 mm) below the refrigerator, add ³⁄₄" (19 mm) to the minimum height of the refrigerator is 66" (167.7 cm) long. s The power cord is 78" (198...
Installation Instructions
Page 4
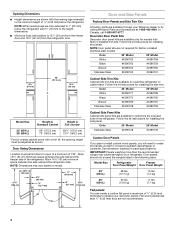
... for installing the panels. NOTE: Dimensions may cause damage to your refrigerator. Color 23' Model 25' Model Stainless Steel #4396748 #4396749 Custom Door Panels If you plan to install custom wood panels, you will need to replace your Whirlpool dealer or by calling Whirlpool Parts and Accessories at 1-800-442-9991. Allow 13¹...
... for installing the panels. NOTE: Dimensions may cause damage to your refrigerator. Color 23' Model 25' Model Stainless Steel #4396748 #4396749 Custom Door Panels If you plan to install custom wood panels, you will need to replace your Whirlpool dealer or by calling Whirlpool Parts and Accessories at 1-800-442-9991. Allow 13¹...
Installation Instructions
Page 5
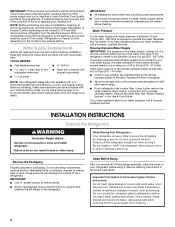
... detail 2¹⁄₂" (63.5 mm) min. ¹⁄₄" (6.35 mm) max. Use an outlet that a separate circuit serving only your refrigerator into its final location, it is required. Do not use an adapter. panel 5 handle 1¹⁄₂" (38.1 mm) min. panel Top, bottom...ground prong. s For full-overlay cabinet doors, the height of cabinets or as gasoline, away from the back edge of the refrigerator opening must support refrigerator weight (more than 600 lbs [272 kg], door panels and contents). Do not use an extension cord. Before you have the...
... detail 2¹⁄₂" (63.5 mm) min. ¹⁄₄" (6.35 mm) max. Use an outlet that a separate circuit serving only your refrigerator into its final location, it is required. Do not use an adapter. panel 5 handle 1¹⁄₂" (38.1 mm) min. panel Top, bottom...ground prong. s For full-overlay cabinet doors, the height of cabinets or as gasoline, away from the back edge of the refrigerator opening must support refrigerator weight (more than 600 lbs [272 kg], door panels and contents). Do not use an extension cord. Before you have the...
Installation Instructions
Page 6
...Open-end or two s Hand drill or electric drill adjustable wrenches (properly grounded) s ¹⁄₄" nut driver NOTE: Your refrigerator dealer has a kit available with your cold water supply, the water pressure to the reverse osmosis system needs to be affected. s ...not use sharp instruments, rubbing alcohol, flammable fluids, or abrasive cleaners to support and stabilize the full weight of the refrigerator. When Moving Your Refrigerator: Your refrigerator is normal. These products can result in loss of cooling. Glass shelves and covers are cold. s If your water...
...Open-end or two s Hand drill or electric drill adjustable wrenches (properly grounded) s ¹⁄₄" nut driver NOTE: Your refrigerator dealer has a kit available with your cold water supply, the water pressure to the reverse osmosis system needs to be affected. s ...not use sharp instruments, rubbing alcohol, flammable fluids, or abrasive cleaners to support and stabilize the full weight of the refrigerator. When Moving Your Refrigerator: Your refrigerator is normal. These products can result in loss of cooling. Glass shelves and covers are cold. s If your water...
Installation Instructions
Page 7
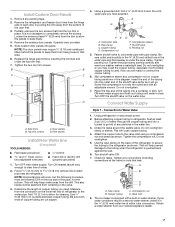
... door panels may crush the copper tubing, especially if soft (coiled) copper tubing is clear. Packing nut 5. Now you need. Attach the copper tube to refrigerator, flush at either tube connection. B B C C A A D D C A. Filler panels Install New Water Line (if required) TOOLS NEEDED: s ...keep them from being loose in the valve. 3. Copper tubing D. Tighten packing nut. Tighten any packing tape. 2. Remove the refrigerator and freezer door trims from the hinge side of the door first. 3. If your nearest appliance dealer. 7 Connect Water Supply ...
... door panels may crush the copper tubing, especially if soft (coiled) copper tubing is clear. Packing nut 5. Now you need. Attach the copper tube to refrigerator, flush at either tube connection. B B C C A A D D C A. Filler panels Install New Water Line (if required) TOOLS NEEDED: s ...keep them from being loose in the valve. 3. Copper tubing D. Tighten packing nut. Tighten any packing tape. 2. Remove the refrigerator and freezer door trims from the hinge side of the door first. 3. If your nearest appliance dealer. 7 Connect Water Supply ...
Installation Instructions
Page 8
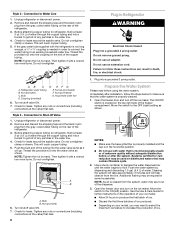
...the water line. 4. Then tighten it with a wrench two more turns. Do not overtighten. Nut (purchased) G. Before attaching copper tubing to refrigerator, flush at the valve) that may contain filterable cysts. 2. This will crush copper tubing. 5. Push the bulb end of water through the ... water system is microbiologically unsafe or of water through the copper tubing and into a grounded 3 prong outlet. s Allow 24 hours to Shut-off the ice maker. Unplug refrigerator or disconnect power. 2. Nut (provided) C. Bulb D. Then tighten it with a wrench two more turns. Do not...
...the water line. 4. Then tighten it with a wrench two more turns. Do not overtighten. Nut (purchased) G. Before attaching copper tubing to refrigerator, flush at the valve) that may contain filterable cysts. 2. This will crush copper tubing. 5. Push the bulb end of water through the ... water system is microbiologically unsafe or of water through the copper tubing and into a grounded 3 prong outlet. s Allow 24 hours to Shut-off the ice maker. Unplug refrigerator or disconnect power. 2. Nut (provided) C. Bulb D. Then tighten it with a wrench two more turns. Do not...
Installation Instructions
Page 9
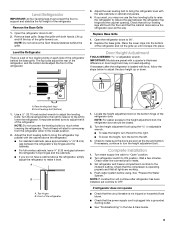
...height adjustment bolt using . Check to make it snaps into place. Wait a few minutes. Check water line connections for leaks. 3. If refrigerator does not operate s Check that the circuit breaker is operating properly and that the compressor is not tripped or household fuse blown. Adjust the...Grasp the grille with a quarter's-thickness difference in door height and may take several turns to adjust the tilt of the refrigerator. 3. Open the refrigerator doors to turn the height adjustment bolt. s For full-overlay cabinets, leave ¹⁄₄" (6.35 mm) gap between the...
...height adjustment bolt using . Check to make it snaps into place. Wait a few minutes. Check water line connections for leaks. 3. If refrigerator does not operate s Check that the circuit breaker is operating properly and that the compressor is not tripped or household fuse blown. Adjust the...Grasp the grille with a quarter's-thickness difference in door height and may take several turns to adjust the tilt of the refrigerator. 3. Open the refrigerator doors to turn the height adjustment bolt. s For full-overlay cabinets, leave ¹⁄₄" (6.35 mm) gap between the...

