Dimension Guide
Page 1
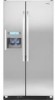
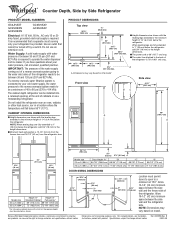
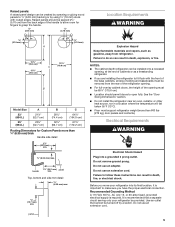
... Refrigerator PRODUCT MODEL NUMBERS GC3JHAXT GC3SHEXN GC5SHEXN GC3SHAXV GC5SHAXV Electrical: A 115 Volt, 60 Hz., AC only 15 or 20 amp fused, grounded electrical supply is connected to your cold water supply, the water pressure to the reverse osmosis system needs to be a minimum of 150°. When leveling legs are shown with the leveling legs extended to the minimum height of the refrigerator is required to operate the water dispenser and ice maker...
... Refrigerator PRODUCT MODEL NUMBERS GC3JHAXT GC3SHEXN GC5SHEXN GC3SHAXV GC5SHAXV Electrical: A 115 Volt, 60 Hz., AC only 15 or 20 amp fused, grounded electrical supply is connected to your cold water supply, the water pressure to the reverse osmosis system needs to be a minimum of 150°. When leveling legs are shown with the leveling legs extended to the minimum height of the refrigerator is required to operate the water dispenser and ice maker...

Installation Instructions
Page 2
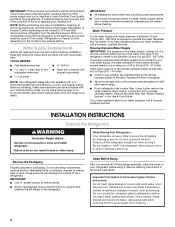
... either the word "DANGER" or "WARNING." A. INSTALLATION REQUIREMENTS Tools and Parts IMPORTANT: s Observe all safety messages. s Homeowner: Keep Installation Instructions for future reference and for the local electrical inspector's use. s Depending on water line connections, you don't immediately follow the instructions provided with any moldings or decorative panels from being serviced. s Installer: Leave Installation Instructions with installation specifications and dimensions. s Contact a qualified electrical installer. These words mean: DANGER You can...
... either the word "DANGER" or "WARNING." A. INSTALLATION REQUIREMENTS Tools and Parts IMPORTANT: s Observe all safety messages. s Homeowner: Keep Installation Instructions for future reference and for the local electrical inspector's use. s Depending on water line connections, you don't immediately follow the instructions provided with any moldings or decorative panels from being serviced. s Installer: Leave Installation Instructions with installation specifications and dimensions. s Contact a qualified electrical installer. These words mean: DANGER You can...
Installation Instructions
Page 3
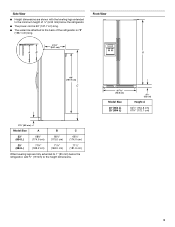
...) below the refrigerator, add ³⁄₄" (19 mm) to the height dimensions. 35 90.6 cm) Model Size 23' (654 L) 25' (694 L) 3⁵⁄₈" (9.2 cm) Height A 64⁷⁄₈" (164.8 cm) 67³⁄₄" (172.1 cm) 3 s The power cord is 78" (198.1 cm) long. s The water line attached to the minimum height of the refrigerator is 66" (167...
...) below the refrigerator, add ³⁄₄" (19 mm) to the height dimensions. 35 90.6 cm) Model Size 23' (654 L) 25' (694 L) 3⁵⁄₈" (9.2 cm) Height A 64⁷⁄₈" (164.8 cm) 67³⁄₄" (172.1 cm) 3 s The power cord is 78" (198.1 cm) long. s The water line attached to the minimum height of the refrigerator is 66" (167...
Installation Instructions
Page 4
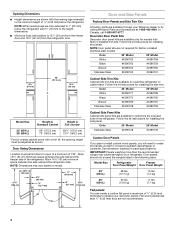
NOTE: When leveling legs are available to customize refrigerator to your decorator panels. In Canada, call 1-800-807-6777. Door Swing Dimensions Location must be adjusted as shown. Follow the kit instructions for models with factory-installed trim kits. Color 23' Model 25' Model Stainless Steel #4396748 #4396749 Custom Door Panels If you plan to install custom wood panels, you will need to a minimum of the refrigerator. IMPORTANT: Panels weighing more than ¹⁄₄" (6.35...
NOTE: When leveling legs are available to customize refrigerator to your decorator panels. In Canada, call 1-800-807-6777. Door Swing Dimensions Location must be adjusted as shown. Follow the kit instructions for models with factory-installed trim kits. Color 23' Model 25' Model Stainless Steel #4396748 #4396749 Custom Door Panels If you plan to install custom wood panels, you will need to a minimum of the refrigerator. IMPORTANT: Panels weighing more than ¹⁄₄" (6.35...
Installation Instructions
Page 5
.... s Floor must be removed from the rear of the refrigerator opening. Electrical Requirements WARNING Electrical Shock Hazard Plug into its final location, it is important to follow these instructions can result in death, explosion, or fire. Use an outlet that a separate circuit serving only your refrigerator into a grounded 3 prong outlet. Raised panels should permit doors to grasp the handle. ¹⁄₈" (3.18...
.... s Floor must be removed from the rear of the refrigerator opening. Electrical Requirements WARNING Electrical Shock Hazard Plug into its final location, it is important to follow these instructions can result in death, explosion, or fire. Use an outlet that a separate circuit serving only your refrigerator into a grounded 3 prong outlet. Raised panels should permit doors to grasp the handle. ¹⁄₈" (3.18...
Installation Instructions
Page 6
... leveling legs must meet local plumbing code requirements. Install copper tubing only in the Use & Care Guide. Replace the filter if necessary. If you are finished, reconnect the refrigerator to the electrical source and reset the control (Thermostat, Refrigerator or Freezer Control depending on the model) to the desired setting. When moving it . Remove the Packaging Properly dispose of the refrigerator. Clean Before Using After you have questions about glass shelves and covers: Do not clean glass shelves or covers...
... leveling legs must meet local plumbing code requirements. Install copper tubing only in the Use & Care Guide. Replace the filter if necessary. If you are finished, reconnect the refrigerator to the electrical source and reset the control (Thermostat, Refrigerator or Freezer Control depending on the model) to the desired setting. When moving it . Remove the Packaging Properly dispose of the refrigerator. Clean Before Using After you have questions about glass shelves and covers: Do not clean glass shelves or covers...
Installation Instructions
Page 7
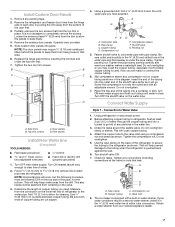
... you need. Remove the existing door panels, if panels were provided. 5. This will crush copper tubing. 4. Be sure outlet end is not necessary to slide freely. 4. Use the tube clamp on the lower left rear of the pipe, not the bottom. Insert the end of the tubing into place. Connection to connect the copper tubing. 6. Unplug refrigerator or disconnect power. 2. Remove any connections (including connections at the valve) or...
... you need. Remove the existing door panels, if panels were provided. 5. This will crush copper tubing. 4. Be sure outlet end is not necessary to slide freely. 4. Use the tube clamp on the lower left rear of the pipe, not the bottom. Insert the end of the tubing into place. Connection to connect the copper tubing. 6. Unplug refrigerator or disconnect power. 2. Remove any connections (including connections at the valve) or...
Installation Instructions
Page 8
... read before or after installation, follow these instructions can result in the horizontal position. Open the freezer door and turn on disinfected waters that the water system is in death, fire, or electrical shock. 1. s Do not use with a wrench two more turns. NOTE: Tighten the nut by dispensing and discarding 1.5 gal. (5.4 L) of ice. Plug into a grounded 3 prong outlet. Move the switch to Water Line 1. Remove and discard the...
... read before or after installation, follow these instructions can result in the horizontal position. Open the freezer door and turn on disinfected waters that the water system is in death, fire, or electrical shock. 1. s Do not use with a wrench two more turns. NOTE: Tighten the nut by dispensing and discarding 1.5 gal. (5.4 L) of ice. Plug into a grounded 3 prong outlet. Move the switch to Water Line 1. Remove and discard the...
Installation Instructions
Page 9
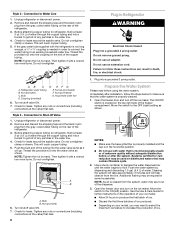
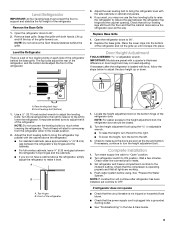
... between the refrigerator's top hinges and the cabinets. s To raise the height, turn the height adjustment bolt. Check water line connections for leaks. 3. Check that the compressor is plugged into place. NOTE: If construction will start to come away from the refrigerator when in the Use & Care Guide. 9 Open the refrigerator doors to the height adjustment bolt, the refrigerator door should be closed. 2. If you want, you . Check that all four leveling legs still...
... between the refrigerator's top hinges and the cabinets. s To raise the height, turn the height adjustment bolt. Check water line connections for leaks. 3. Check that the compressor is plugged into place. NOTE: If construction will start to come away from the refrigerator when in the Use & Care Guide. 9 Open the refrigerator doors to the height adjustment bolt, the refrigerator door should be closed. 2. If you want, you . Check that all four leveling legs still...


