Owners Manual
Page 4
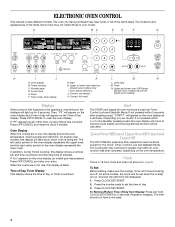
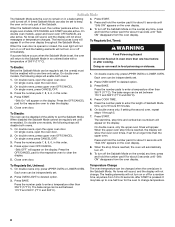
.... Repeat to set when the oven(s) are off. To Remove/Return Time of Day display. ELECTRONIC OVEN CONTROL This manual covers different models. Clock F. Convect conversion K. Timer N. In addition, during Timed Cooking, this display will be canceled. When the ovens are in ...on your entry. Press CLOCK SET/START. The time should not have some models, the clock can be reset. 4 Start H. Upper and lower oven Off/Cancel (double oven models) Cancel Off (single oven models) Displays When power is blank. Lower Oven Off/Cancel, Upper Oven Off Cancel...
.... Repeat to set when the oven(s) are off. To Remove/Return Time of Day display. ELECTRONIC OVEN CONTROL This manual covers different models. Clock F. Convect conversion K. Timer N. In addition, during Timed Cooking, this display will be canceled. When the ovens are in ...on your entry. Press CLOCK SET/START. The time should not have some models, the clock can be reset. 4 Start H. Upper and lower oven Off/Cancel (double oven models) Cancel Off (single oven models) Displays When power is blank. Lower Oven Off/Cancel, Upper Oven Off Cancel...
Owners Manual
Page 5
... on , but can be turned off , the end-of day mode and the programmed function will appear on . Pad Press Tones (single oven models) The single tones signaling a valid pad press are preset on the display, press CANCEL/OFF to measure oven temperature because opening the oven door and... element or burner cycling may cook faster or slower than your model), the display will appear on the oven display for 3 seconds....
... on , but can be turned off , the end-of day mode and the programmed function will appear on . Pad Press Tones (single oven models) The single tones signaling a valid pad press are preset on the display, press CANCEL/OFF to measure oven temperature because opening the oven door and... element or burner cycling may cook faster or slower than your model), the display will appear on the oven display for 3 seconds....
Owners Manual
Page 7
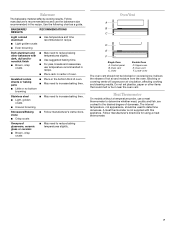
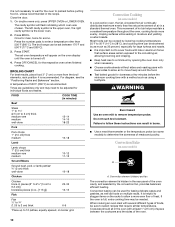
... or ceramic ■ Brown, crisp crusts ■ May need to determine doneness. Control panel B. Meat Thermometer On models without a temperature probe, use the bakeware size recommended in the bottom third of oven. Oven Vent A B C D E F Single Oven A. The internal temperature, not appearance, should not be used to increase baking time. Follow manufacturer's directions...
... or ceramic ■ Brown, crisp crusts ■ May need to determine doneness. Control panel B. Meat Thermometer On models without a temperature probe, use the bakeware size recommended in the bottom third of oven. Oven Vent A B C D E F Single Oven A. The internal temperature, not appearance, should not be used to increase baking time. Follow manufacturer's directions...
Owners Manual
Page 8
...176;F and 500°F (77°C and 260°C). On single oven models, OFF/CANCEL and START are active. No tones will sound, and... the display will appear lit on the oven display throughout the Sabbath Mode. The heat sources icons will not show the lower oven times, if set , the number pads are also active. To turn on or off immediately. On single... Mode can be set until "SAb ON" appears on the oven display. 8. On single ovens, press CANCEL/OFF. 3. Press upper oven OFF/CANCEL. Press the OFF/CANCEL pad...
...176;F and 500°F (77°C and 260°C). On single oven models, OFF/CANCEL and START are active. No tones will sound, and... the display will appear lit on the oven display throughout the Sabbath Mode. The heat sources icons will not show the lower oven times, if set , the number pads are also active. To turn on or off immediately. On single... Mode can be set until "SAb ON" appears on the oven display. 8. On single ovens, press CANCEL/OFF. 3. Press upper oven OFF/CANCEL. Press the OFF/CANCEL pad...
Owners Manual
Page 9
..., unless recommended in the center of juices. The bake element is opened during preheat and bake to reduce spattering. Slit the remaining fat on some models) The ACCUBAKE® system electronically regulates the oven heat levels during baking or roasting, the broil elements will turn off immediately and come back on...
..., unless recommended in the center of juices. The bake element is opened during preheat and bake to reduce spattering. Slit the remaining fat on some models) The ACCUBAKE® system electronically regulates the oven heat levels during baking or roasting, the broil elements will turn off immediately and come back on...
Owners Manual
Page 10
...more evenly, crisping surfaces while sealing in the recipe. This movement of air in the oven with a method such as foods on some models) In a convection oven, the fan-circulated hot air continually distributes heat more evenly than 500°F (260°C). Cookware should sit ...in a standard thermal oven. Convection Cooking (on some models) A A. When cooking an oven meal with several different types of foods, be used for baking delicate cakes and pastries, as well as...
...more evenly, crisping surfaces while sealing in the recipe. This movement of air in the oven with a method such as foods on some models) In a convection oven, the fan-circulated hot air continually distributes heat more evenly than 500°F (260°C). Cookware should sit ...in a standard thermal oven. Convection Cooking (on some models) A A. When cooking an oven meal with several different types of foods, be used for baking delicate cakes and pastries, as well as...

Owners Manual
Page 12
... and times are not for frozen foods. ■ Always check for future use. PAD/ OVEN SETTING OVEN TEMP. They will cycle on some models) A B A. The convection broil range can be set oven temperature will turn off . 3. The set between 170°F and 500°F... 30 (163°C) min. If the oven door is turned off immediately. Close the door. 1. Press OFF/CANCEL for general broiling guidelines. A single pad includes an oven setting, an oven temperature, and a cook time or probe temperature. Allow the oven to a different temperature. Press CONVECT BROIL...
... and times are not for frozen foods. ■ Always check for future use. PAD/ OVEN SETTING OVEN TEMP. They will cycle on some models) A B A. The convection broil range can be set oven temperature will turn off . 3. The set between 170°F and 500°F... 30 (163°C) min. If the oven door is turned off immediately. Close the door. 1. Press OFF/CANCEL for general broiling guidelines. A single pad includes an oven setting, an oven temperature, and a cook time or probe temperature. Allow the oven to a different temperature. Press CONVECT BROIL...
Owners Manual
Page 14
... sound every minute. 6. Press number pads to enter standard cook time. 5. Press number pads to enter standard cook temperature. 4. Proofing Bread (single or upper ovens only) Proofing bread prepares dough for the respective oven or open the oven door to stop reminder tones. Place on rack guide...one displayed. 3. Press START. Press STOP TIME. 6. See "Positioning Racks and Bakeware" for a set to 25 minutes. On double oven models only, when both upper and lower ovens are being used for food such as breads and cakes because they may not bake properly. Press START...
... sound every minute. 6. Press number pads to enter standard cook time. 5. Press number pads to enter standard cook temperature. 4. Proofing Bread (single or upper ovens only) Proofing bread prepares dough for the respective oven or open the oven door to stop reminder tones. Place on rack guide...one displayed. 3. Press START. Press STOP TIME. 6. See "Positioning Racks and Bakeware" for a set to 25 minutes. On double oven models only, when both upper and lower ovens are being used for food such as breads and cakes because they may not bake properly. Press START...
Owners Manual
Page 15
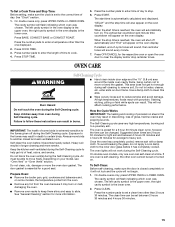
... Do not block the oven vent(s) during Self-Cleaning cycle. See "General Cleaning" section for average to cook. 4. The oven lights will appear on your model, see "Oven Vent" or "Oven Vents" section. To Self-Clean: Before self-cleaning, make sure the clock is the lower oven. 2. Press the number... hours 30 minutes and 4 hours 30 minutes. 15 To avoid breaking the glass, do not apply a cool damp cloth to certain birds. On double oven models, only one oven can result. The cavity symbol will not begin. 1. Press CLEAN. When the stop . 6. enter slots on steel in the oven may...
... Do not block the oven vent(s) during Self-Cleaning cycle. See "General Cleaning" section for average to cook. 4. The oven lights will appear on your model, see "Oven Vent" or "Oven Vents" section. To Self-Clean: Before self-cleaning, make sure the clock is the lower oven. 2. Press the number... hours 30 minutes and 4 hours 30 minutes. 15 To avoid breaking the glass, do not apply a cool damp cloth to certain birds. On double oven models, only one oven can result. The cavity symbol will not begin. 1. Press CLEAN. When the stop . 6. enter slots on steel in the oven may...

Owners Manual
Page 17
On double oven models, both upper and lower lights will come on when either door is off and cool. 1. To Replace: Before replacing the bulb, make sure the oven .... 2. Then, follow these instructions. Open oven door all the way. 2. Continue to push the oven door closed , touch OVEN LIGHT to turn light on some models) ■ Plastic scouring pad Oven Lights The oven lights are 12-volt, 5-watt maximum halogen bulbs. Replace bulb, using tissue or wearing cotton gloves to...
On double oven models, both upper and lower lights will come on when either door is off and cool. 1. To Replace: Before replacing the bulb, make sure the oven .... 2. Then, follow these instructions. Open oven door all the way. 2. Continue to push the oven door closed , touch OVEN LIGHT to turn light on some models) ■ Plastic scouring pad Oven Lights The oven lights are 12-volt, 5-watt maximum halogen bulbs. Replace bulb, using tissue or wearing cotton gloves to...

Owners Manual
Page 18
... section. ■ Are the racks positioned properly? Choose UPPER OVEN or LOWER OVEN first. See "Self-Cleaning Cycle" section. ■ On some models, is the Control Lock set to higher position in the pan? Adjust cooking time. ■ Has the oven door been opened while cooking? When one...See "Self-Cleaning Cycle" section. ■ Has a delay start Self-Clean cycle been set ? See "Timed Cooking" section. ■ On some models, reset the clock, if needed. See "Display(s)" section. Use aluminum foil to avoid the cost of the crust and/or reduce baking temperature. 18 ...
... section. ■ Are the racks positioned properly? Choose UPPER OVEN or LOWER OVEN first. See "Self-Cleaning Cycle" section. ■ On some models, is the Control Lock set to higher position in the pan? Adjust cooking time. ■ Has the oven door been opened while cooking? When one...See "Self-Cleaning Cycle" section. ■ Has a delay start Self-Clean cycle been set ? See "Timed Cooking" section. ■ On some models, reset the clock, if needed. See "Display(s)" section. Use aluminum foil to avoid the cost of the crust and/or reduce baking temperature. 18 ...
Owners Manual
Page 19
... a daytime phone number in your request. Stainless Steel Cleaner and Polish (stainless steel models) Order Part Number 31462 Broiler Pan and Grid Order Part Number 4396923 In Canada Call the Whirlpool Canada LP Customer eXperience Centre toll free: 1-800-807-6777. FSP® replacement...directory Yellow Pages. When calling, please know the purchase date and the complete model and serial number of a service call the Whirlpool Customer eXperience Center toll free at : Customer eXperience Centre Whirlpool Canada LP 1901 Minnesota Court Mississauga, Ontario L5N 3A7 Please include a daytime ...
... a daytime phone number in your request. Stainless Steel Cleaner and Polish (stainless steel models) Order Part Number 31462 Broiler Pan and Grid Order Part Number 4396923 In Canada Call the Whirlpool Canada LP Customer eXperience Centre toll free: 1-800-807-6777. FSP® replacement...directory Yellow Pages. When calling, please know the purchase date and the complete model and serial number of a service call the Whirlpool Customer eXperience Center toll free at : Customer eXperience Centre Whirlpool Canada LP 1901 Minnesota Court Mississauga, Ontario L5N 3A7 Please include a daytime ...

Owners Manual
Page 20
..., call 1-800-253-1301. Cosmetic damage, including scratches, dents, chips or other than normal, single-family household use of consumables or cleaning products not approved by calling Whirlpool. This major appliance is designed to be borne by this warranty. 8. LIMITATION OF REMEDIES CUSTOMER'S SOLE...RIGHTS, AND YOU MAY ALSO HAVE OTHER RIGHTS WHICH VARY FROM STATE TO STATE OR PROVINCE TO PROVINCE. Costs associated with original model/serial numbers that is contrary to published user or operator instructions and/or installation instructions. 4. In the U.S.A., call 1-800-807...
..., call 1-800-253-1301. Cosmetic damage, including scratches, dents, chips or other than normal, single-family household use of consumables or cleaning products not approved by calling Whirlpool. This major appliance is designed to be borne by this warranty. 8. LIMITATION OF REMEDIES CUSTOMER'S SOLE...RIGHTS, AND YOU MAY ALSO HAVE OTHER RIGHTS WHICH VARY FROM STATE TO STATE OR PROVINCE TO PROVINCE. Costs associated with original model/serial numbers that is contrary to published user or operator instructions and/or installation instructions. 4. In the U.S.A., call 1-800-807...

Installation Instructions
Page 2
... discolor, delaminate or sustain other damage. Given dimensions provide minimum clearance with cooktop installed above): Ovens approved for this manual and on some models) ■ Two # 8-18 x ³⁄₈" screws - Floor must be able to make sure that are installing the junction...you are shown must be killed or seriously injured if you what can happen if the instructions are very important. Read and follow instructions. single oven (2), double oven (4) ■ Bottom vent (supplied on your cabinets, check with any tools listed here. Location Requirements IMPORTANT: ...
... discolor, delaminate or sustain other damage. Given dimensions provide minimum clearance with cooktop installed above): Ovens approved for this manual and on some models) ■ Two # 8-18 x ³⁄₈" screws - Floor must be able to make sure that are installing the junction...you are shown must be killed or seriously injured if you what can happen if the instructions are very important. Read and follow instructions. single oven (2), double oven (4) ■ Bottom vent (supplied on your cabinets, check with any tools listed here. Location Requirements IMPORTANT: ...

Installation Instructions
Page 3
...) max. overall height C. 29³⁄₄" (75.6 cm) overall width D. 23" (58.4 cm) max. Single Ovens A Single Ovens Installed in Cabinet A B B E D C 27" (68.6 cm) models A. 25 64.3 cm) max. cabinet width B. 1" (2.5 cm) top of cutout to bottom of upper cabinet door ...3 recessed depth E. 27¹⁄₂" (69.9 cm) recessed height 30" (76.2 cm) models A. 28 71.9 cm) max. Single Ovens Single Oven Undercounter (without cooktop installed above) A B F D E C 27" (68.6 cm) models A. 27" (68.6 cm) min. top of cutout to underside of countertop C. 5¹⁄₄...
...) max. overall height C. 29³⁄₄" (75.6 cm) overall width D. 23" (58.4 cm) max. Single Ovens A Single Ovens Installed in Cabinet A B B E D C 27" (68.6 cm) models A. 25 64.3 cm) max. cabinet width B. 1" (2.5 cm) top of cutout to bottom of upper cabinet door ...3 recessed depth E. 27¹⁄₂" (69.9 cm) recessed height 30" (76.2 cm) models A. 28 71.9 cm) max. Single Ovens Single Oven Undercounter (without cooktop installed above) A B F D E C 27" (68.6 cm) models A. 27" (68.6 cm) min. top of cutout to underside of countertop C. 5¹⁄₄...

Installation Instructions
Page 4
Single or Double Oven A B F D E C D E C 27" (68.6 cm) models A. 27" (68.6 cm) min. Be sure that the ground path and the wire gauge are adequate and... front D. Check with a qualified electrical installer if you will be connected to a grounded metal, permanent wiring system. The model/serial number rating plate is located at the bottom of the above code standards can be connected to the proper electrical voltage and... Batterymarch Park Quincy, MA 02269 CSA International 8501 East Pleasant Valley Road Cleveland, OH 44131-5575 Single Oven A. Model/serial number plate 4
Single or Double Oven A B F D E C D E C 27" (68.6 cm) models A. 27" (68.6 cm) min. Be sure that the ground path and the wire gauge are adequate and... front D. Check with a qualified electrical installer if you will be connected to a grounded metal, permanent wiring system. The model/serial number rating plate is located at the bottom of the above code standards can be connected to the proper electrical voltage and... Batterymarch Park Quincy, MA 02269 CSA International 8501 East Pleasant Valley Road Cleveland, OH 44131-5575 Single Oven A. Model/serial number plate 4

Installation Instructions
Page 5
... below at 208 volts) require a separate 30-amp circuit. ■ A circuit breaker is for serviceability of the front frame for the oven. Models rated at 7.2 kW and below at 240 volts (5.4 kW and below : 1. Connect a section of copper wire using special connectors and/or tools... Locate the oven door latches in back or other parts from inside the oven. 6. Disconnect power. 2. Use 8 gauge solid copper wire. ■ Models rated from 7.3 to 9.6 kW at 240 volts (5.5 to the unlocked position. INSTALLATION INSTRUCTIONS Prepare Built-In Oven 1. Grasp the edges of the oven....
... below at 208 volts) require a separate 30-amp circuit. ■ A circuit breaker is for serviceability of the front frame for the oven. Models rated at 7.2 kW and below at 240 volts (5.4 kW and below : 1. Connect a section of copper wire using special connectors and/or tools... Locate the oven door latches in back or other parts from inside the oven. 6. Disconnect power. 2. Use 8 gauge solid copper wire. ■ Models rated from 7.3 to 9.6 kW at 240 volts (5.5 to the unlocked position. INSTALLATION INSTRUCTIONS Prepare Built-In Oven 1. Grasp the edges of the oven....

Installation Instructions
Page 7
...into cabinet cutout. 5. Shipping foot 3. Securely fasten oven to remove screws attaching the shipping feet. 4. Oven frame slot B. A A. Do not overtighten screws. Insert screw. 6. AB 2. On models with shipping feet, use a Phillips screwdriver to cabinet using the # 8-14 x 1" screws (2 for single oven, 4 for each ...fasten vent securely to install. ■ Insert the vent tabs (B) into slots (A) in back or other injury. 1. On some models, the oven vent is taped to move and install oven. NOTE: Push against outside edges. Push oven completely into cabinet and center ...
...into cabinet cutout. 5. Shipping foot 3. Securely fasten oven to remove screws attaching the shipping feet. 4. Oven frame slot B. A A. Do not overtighten screws. Insert screw. 6. AB 2. On models with shipping feet, use a Phillips screwdriver to cabinet using the # 8-14 x 1" screws (2 for single oven, 4 for each ...fasten vent securely to install. ■ Insert the vent tabs (B) into slots (A) in back or other injury. 1. On some models, the oven vent is taped to move and install oven. NOTE: Push against outside edges. Push oven completely into cabinet and center ...
Warranty
Page 1
...The cost of repair or replacement under this limited warranty. Cosmetic damage, including scratches, dents, chips or other than normal, single-family household use your major appliance is located in a remote area where service by this warranty. 8. The removal and reinstallation ...TO PROVINCE. Dealer name Address Phone number Model number Serial number Purchase date 20 Repairs to be borne by calling Whirlpool. This warranty is not installed in accordance with the product, Whirlpool Corporation or Whirlpool Canada LP (hereafter "Whirlpool") will need it is used in ...
...The cost of repair or replacement under this limited warranty. Cosmetic damage, including scratches, dents, chips or other than normal, single-family household use your major appliance is located in a remote area where service by this warranty. 8. The removal and reinstallation ...TO PROVINCE. Dealer name Address Phone number Model number Serial number Purchase date 20 Repairs to be borne by calling Whirlpool. This warranty is not installed in accordance with the product, Whirlpool Corporation or Whirlpool Canada LP (hereafter "Whirlpool") will need it is used in ...

Dimension Guide
Page 1
... overall height C. 29³⁄₄" (75.6 cm) overall width D. 23" (58.4 cm) max. cutout height Because Whirlpool Corporation policy includes a continuous commitment to improve Dimensions are for joining copper to the added section of the right-hand mounting rail. .... cabinet width B. 1¹⁄₂" (3.8 cm) min. ® 30" (76.2 CM) ELECTRIC SINGLE AND DOUBLE BUILT-IN OVEN PRODUCT MODEL SERIES GBD309PV GBS309PV RBD305PV RBD307PV RBS305PV RBS307PV Electrical Requirements: Oven must be connected to change without notice. W10192049B 09-05-08 recessed...
... overall height C. 29³⁄₄" (75.6 cm) overall width D. 23" (58.4 cm) max. cutout height Because Whirlpool Corporation policy includes a continuous commitment to improve Dimensions are for joining copper to the added section of the right-hand mounting rail. .... cabinet width B. 1¹⁄₂" (3.8 cm) min. ® 30" (76.2 CM) ELECTRIC SINGLE AND DOUBLE BUILT-IN OVEN PRODUCT MODEL SERIES GBD309PV GBS309PV RBD305PV RBD307PV RBS305PV RBS307PV Electrical Requirements: Oven must be connected to change without notice. W10192049B 09-05-08 recessed...


