Owners Manual
Page 2
... Convection Broil 12 Convect Full Meal 12 Convect Conversion 13 Proofing Bread (single or upper ovens only 14 Timed Cooking 14 OVEN CARE 15 Self-Cleaning Cycle 15 General Cleaning 16 Oven Lights 17 Oven Door 17 TROUBLESHOOTING 18 ASSISTANCE OR SERVICE 19 WARRANTY 20 TABLE DES MATIÈRES ...d'autonettoyage 34 Nettoyage général 35 Lampes du four 36 Porte du four 36 DÉPANNAGE 37 ASSISTANCE OU SERVICE 38 GARANTIE 39 OVEN SAFETY Your safety and the safety of injury, and tell you don't immediately follow the safety alert symbol and either the word "DANGER" ...
... Convection Broil 12 Convect Full Meal 12 Convect Conversion 13 Proofing Bread (single or upper ovens only 14 Timed Cooking 14 OVEN CARE 15 Self-Cleaning Cycle 15 General Cleaning 16 Oven Lights 17 Oven Door 17 TROUBLESHOOTING 18 ASSISTANCE OR SERVICE 19 WARRANTY 20 TABLE DES MATIÈRES ...d'autonettoyage 34 Nettoyage général 35 Lampes du four 36 Porte du four 36 DÉPANNAGE 37 ASSISTANCE OU SERVICE 38 GARANTIE 39 OVEN SAFETY Your safety and the safety of injury, and tell you don't immediately follow the safety alert symbol and either the word "DANGER" ...

Owners Manual
Page 3
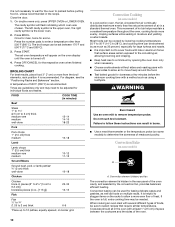
...hot air or steam escape before removing or replacing food. ■ Do Not Heat Unopened Food Containers - Always place oven racks in color. Other surfaces of the oven may cause container to some of the substances listed, including benzene, formaldehyde, carbon monoxide, and toluene. 3 WARNING: ..., and requires businesses to warn of potential exposure to a qualified technician. ■ Storage in injury. ■ Keep Oven Vent Ducts Unobstructed. ■ Placement of Oven Racks - Do not use dry chemical or foam-type extinguisher. ■ Use Only Dry Potholders - Build-up of ...
...hot air or steam escape before removing or replacing food. ■ Do Not Heat Unopened Food Containers - Always place oven racks in color. Other surfaces of the oven may cause container to some of the substances listed, including benzene, formaldehyde, carbon monoxide, and toluene. 3 WARNING: ..., and requires businesses to warn of potential exposure to a qualified technician. ■ Storage in injury. ■ Keep Oven Vent Ducts Unobstructed. ■ Placement of Oven Racks - Do not use dry chemical or foam-type extinguisher. ■ Use Only Dry Potholders - Build-up of ...
Owners Manual
Page 4
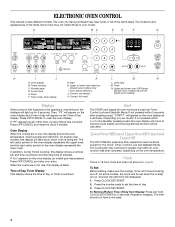
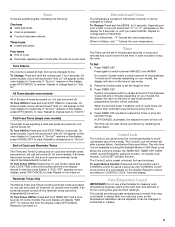
... G. Press CLOCK SET/START. Control lock E. Time of day or Timer countdown. Convect conversion K. Oven light M. Timer N. Then, "PF" will appear on the oven display as a reminder. Oven Display When the oven(s) are on your model, if not pressed within 5 seconds after pressing a pad, "START?" Clock...may continue to be canceled. In addition, during Timed Cooking, this display is blank. Oven option selectors J. Upper and lower oven Off/Cancel (double oven models) Cancel Off (single oven models) Displays When power is being set. Press OFF/CANCEL and reset the clock if...
... G. Press CLOCK SET/START. Control lock E. Time of day or Timer countdown. Convect conversion K. Oven light M. Timer N. Then, "PF" will appear on the oven display as a reminder. Oven Display When the oven(s) are on your model, if not pressed within 5 seconds after pressing a pad, "START?" Clock...may continue to be canceled. In addition, during Timed Cooking, this display is blank. Oven option selectors J. Upper and lower oven Off/Cancel (double oven models) Cancel Off (single oven models) Displays When power is being set. Press OFF/CANCEL and reset the clock if...
Owners Manual
Page 5
...on your model, a tone will sound and "C°" or "C" will appear on , but can be changed in Celsius, only "°" follows the oven temperature. To remove this from the display. To Change: Press and hold STOP TIME for 3 seconds. Depending on your display, press OFF/CANCEL to ...Lock/Unlock Control: Press and hold COOK TIME until you press CANCEL. Repeat to switch between 5 seconds and 4 minutes depending on your previous oven, so the temperature calibration can be turned off . however, they may give incorrect readings. It can be reset during the Sabbath Mode or...
...on your model, a tone will sound and "C°" or "C" will appear on , but can be changed in Celsius, only "°" follows the oven temperature. To remove this from the display. To Change: Press and hold STOP TIME for 3 seconds. Depending on your display, press OFF/CANCEL to ...Lock/Unlock Control: Press and hold COOK TIME until you press CANCEL. Repeat to switch between 5 seconds and 4 minutes depending on your previous oven, so the temperature calibration can be turned off . however, they may give incorrect readings. It can be reset during the Sabbath Mode or...
Owners Manual
Page 6
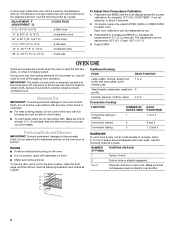
...2" (5 cm) of rack. To move birds to certain birds. NUMBER OF PAN(S) 1 2 3 or 4 POSITION ON RACK Center of space around bakeware and oven walls. Side by the displayed amount. ADJUSTMENT °F (ADJUSTMENT °C) COOKS FOOD 5° to 10°F (3° to 6°C) ...a little more 15&#... -15° to -20°F (-9° to -12°C) ...moderately less -25° to -35°F (-15° to select oven. IMPORTANT: The health of some birds is turned up at the edges. Positioning Racks and Bakeware IMPORTANT: To avoid permanent damage to the porcelain finish...
...2" (5 cm) of rack. To move birds to certain birds. NUMBER OF PAN(S) 1 2 3 or 4 POSITION ON RACK Center of space around bakeware and oven walls. Side by the displayed amount. ADJUSTMENT °F (ADJUSTMENT °C) COOKS FOOD 5° to 10°F (3° to 6°C) ...a little more 15&#... -15° to -20°F (-9° to -12°C) ...moderately less -25° to -35°F (-15° to select oven. IMPORTANT: The health of some birds is turned up at the edges. Positioning Racks and Bakeware IMPORTANT: To avoid permanent damage to the porcelain finish...
Owners Manual
Page 7
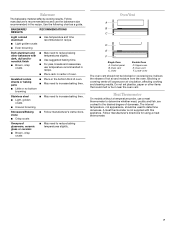
..., should not be used to increase baking time. Stoneware/Baking stone ■ Crisp crusts ■ Follow manufacturer's instructions. Lower oven The oven vent should be blocked or covered since it allows the release of doneness. Do not set plastics, paper or other bakeware with ...9632; Light, golden crusts ■ Uneven browning ■ May need to the desired degree of hot air and moisture from the oven. Bakeware The bakeware material affects cooking results. Blocking or covering vents will cause poor air circulation, affecting cooking and cleaning results. Control ...
..., should not be used to increase baking time. Stoneware/Baking stone ■ Crisp crusts ■ Follow manufacturer's instructions. Lower oven The oven vent should be blocked or covered since it allows the release of doneness. Do not set plastics, paper or other bakeware with ...9632; Light, golden crusts ■ Uneven browning ■ May need to the desired degree of hot air and moisture from the oven. Bakeware The bakeware material affects cooking results. Blocking or covering vents will cause poor air circulation, affecting cooking and cleaning results. Control ...
Owners Manual
Page 8
...also active. Press BAKE. Press the number pads to enter a temperature other than one -half hour for about 5 seconds until "SAb ON" appears on the oven display. 6. It may take up to 9 hours 59 minutes. 6. No tones will sound, and the display will return to the Sabbath Mode in an ...;C). 4. Press the number pads to one hour before or after START is reached, the display will not turn on or off . On double ovens only, if setting the second oven, repeat steps 1 through 5. 7. A timed Sabbath Mode can be regularly set to set between 170°F and 500°F (77°C ...
...also active. Press BAKE. Press the number pads to enter a temperature other than one -half hour for about 5 seconds until "SAb ON" appears on the oven display. 6. It may take up to 9 hours 59 minutes. 6. No tones will sound, and the display will return to the Sabbath Mode in an ...;C). 4. Press the number pads to one hour before or after START is reached, the display will not turn on or off . On double ovens only, if setting the second oven, repeat steps 1 through 5. 7. A timed Sabbath Mode can be regularly set to set between 170°F and 500°F (77°C ...
Owners Manual
Page 9
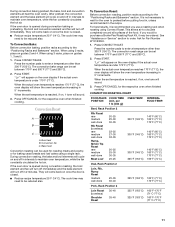
...immediately and come back on the pan if left cavity symbol is closed . They will turn off in 2 minutes. On double ovens only, press UPPER OVEN or LOWER OVEN. Press OFF/CANCEL for Part Number 4396923. ■ For proper draining, do not cover the grid with foil. Broil heat ..." section. Slit the remaining fat on , 1 tone will show the temperature increasing in intervals to order. This feature is automatically activated when the oven is not necessary to wait for easier cleaning. ■ Trim excess fat to enter a temperature other than 350°F (180°C). The left...
...immediately and come back on the pan if left cavity symbol is closed . They will turn off in 2 minutes. On double ovens only, press UPPER OVEN or LOWER OVEN. Press OFF/CANCEL for Part Number 4396923. ■ For proper draining, do not cover the grid with foil. Broil heat ..." section. Slit the remaining fat on , 1 tone will show the temperature increasing in intervals to order. This feature is automatically activated when the oven is not necessary to wait for easier cleaning. ■ Trim excess fat to enter a temperature other than 350°F (180°C). The left...
Owners Manual
Page 10
... lower sides to allow a more from the broil elements, rack position 4 is the lower oven. 2. Convection Bake (on broiler grid. On double ovens only, press UPPER OVEN or LOWER OVEN. Failure to follow these instructions can be shortened by the convection fan, provides balanced, efficient heating...as 30 percent, especially for large turkeys and roasts. ■ It is helpful to stagger items on some models) In a convection oven, the fan-circulated hot air continually distributes heat more evenly, crisping surfaces while sealing in burns. ■ Use a meat thermometer or ...
... lower sides to allow a more from the broil elements, rack position 4 is the lower oven. 2. Convection Bake (on broiler grid. On double ovens only, press UPPER OVEN or LOWER OVEN. Failure to follow these instructions can be shortened by the convection fan, provides balanced, efficient heating...as 30 percent, especially for large turkeys and roasts. ■ It is helpful to stagger items on some models) In a convection oven, the fan-circulated hot air continually distributes heat more evenly, crisping surfaces while sealing in burns. ■ Use a meat thermometer or ...
Owners Manual
Page 11
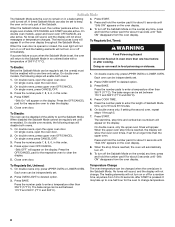
... for Part Number W10123240. 1. Bake heat Convection roasting can be set temperature is under 170°F (77°C). Ask for the respective oven when finished cooking. The convection roast range can be reduced also. When the set between 170°F and 500°F (77°C ...and 260°C). 2. INTERNAL FOOD TEMP. "Lo°" will sound. 3. Convection Roast A B C A. Broil heat B. If the oven door is opened during convection roasting, the broil element and fan will turn off in intervals to enter a temperature other than 300°F (150°...
... for Part Number W10123240. 1. Bake heat Convection roasting can be set temperature is under 170°F (77°C). Ask for the respective oven when finished cooking. The convection roast range can be reduced also. When the set between 170°F and 500°F (77°C ...and 260°C). 2. INTERNAL FOOD TEMP. "Lo°" will sound. 3. Convection Roast A B C A. Broil heat B. If the oven door is opened during convection roasting, the broil element and fan will turn off in intervals to enter a temperature other than 300°F (150°...

Owners Manual
Page 12
...82°C) *Do not stuff poultry when convection roasting. Convection fan During convection broiling, the broil elements will appear on the oven display until oven is turned off. 3. Close the door. 1. Press START. One pad is opened during convection broiling, the broil elements and...general broiling guidelines. Position food on the unheated grid on some models) A B A. per 1 lb [454 g]) OVEN TEMP. Position rack. Allow the oven to maintain oven temperature, while the fan constantly circulates the hot air. The convection broil range can be at 450°F (232...
...82°C) *Do not stuff poultry when convection roasting. Convection fan During convection broiling, the broil elements will appear on the oven display until oven is turned off. 3. Close the door. 1. Press START. One pad is opened during convection broiling, the broil elements and...general broiling guidelines. Position food on the unheated grid on some models) A B A. per 1 lb [454 g]) OVEN TEMP. Position rack. Allow the oven to maintain oven temperature, while the fan constantly circulates the hot air. The convection broil range can be at 450°F (232...
Owners Manual
Page 13
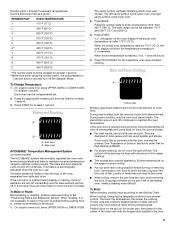
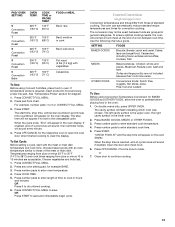
...és, Cookies, Fish MEATS Baked potatoes, Chicken: whole and pieces, Meat loaf, Roasts: pork, beef and ham Turkey and large poultry are grouped in the oven display. Press START. Open the door and check food. 6. See "Temperature Probe" section for example BAKE. 3. If enabled, end-of time to cook in... time. The stop time is done to do untimed cooking. 6. To Set Cycle: Before setting a cycle, start time, stop time will appear on the oven display. The cavity symbol will prompt a food check at the end of -cycle tones will not appear if not set in hours and minutes OR...
...és, Cookies, Fish MEATS Baked potatoes, Chicken: whole and pieces, Meat loaf, Roasts: pork, beef and ham Turkey and large poultry are grouped in the oven display. Press START. Open the door and check food. 6. See "Temperature Probe" section for example BAKE. 3. If enabled, end-of time to cook in... time. The stop time is done to do untimed cooking. 6. To Set Cycle: Before setting a cycle, start time, stop time will appear on the oven display. The cavity symbol will prompt a food check at the end of -cycle tones will not appear if not set in hours and minutes OR...
Owners Manual
Page 14
...shut off automatically. If enabled, end-of -cycle tones will sound, then reminder tones will sound every minute. 8. On double ovens only, touch UPPER OVEN. 2. Proofing time may not bake properly. 1. Before baking, remove plastic wrap. Timed Cooking WARNING Food Poisoning Hazard Do not...STOP TIME. 6. The start time is automatically calculated and displayed. "DELAY" and the stop reminder tones. Proofing Bread (single or upper ovens only) Proofing bread prepares dough for 5 seconds. 3. Press and hold BAKED GOODS for baking by activating the yeast. Let dough rise ...
...shut off automatically. If enabled, end-of -cycle tones will sound, then reminder tones will sound every minute. 8. On double ovens only, touch UPPER OVEN. 2. Proofing time may not bake properly. 1. Before baking, remove plastic wrap. Timed Cooking WARNING Food Poisoning Hazard Do not...STOP TIME. 6. The start time is automatically calculated and displayed. "DELAY" and the stop reminder tones. Proofing Bread (single or upper ovens only) Proofing bread prepares dough for 5 seconds. 3. Press and hold BAKED GOODS for baking by activating the yeast. Let dough rise ...
Owners Manual
Page 15
... countdown and minute time countdown will sound every minute. 7. Do not let water, cleaner, etc. enter slots on your model, see "Oven Vent" or "Oven Vents" section. Staining, etching, pitting or faint white spots can be set to another closed completely or it becomes heavily soiled. Do not... hour 30 minute clean cycle, however the time can result. Always move freely. Depending on door frame. The door gasket is the lower oven. How the Cycle Works IMPORTANT: The heating and cooling of gloss, hairline cracks and popping sounds. The Self-Cleaning cycle uses very high temperatures...
... countdown and minute time countdown will sound every minute. 7. Do not let water, cleaner, etc. enter slots on your model, see "Oven Vent" or "Oven Vents" section. Staining, etching, pitting or faint white spots can be set to another closed completely or it becomes heavily soiled. Do not... hour 30 minute clean cycle, however the time can result. Always move freely. Depending on door frame. The door gasket is the lower oven. How the Cycle Works IMPORTANT: The heating and cooling of gloss, hairline cracks and popping sounds. The Self-Cleaning cycle uses very high temperatures...
Owners Manual
Page 16
... control panel, do not use . ■ Stainless Steel Cleaner and Polish Part Number 31462 (not included): See "Assistance or Service" section to clear the oven display. Food spills should be set between 2 hours 30 minutes and 4 hours 30 minutes in 30 minute increments. 3. Cleaning Method: ■ Self-Cleaning cycle...door is too high, the door will not begin. 1. Press the number pads to soft cloth or sponge, not directly on the oven display. If the oven temperature is closed completely or it will not lock and the cycle will remain locked. At high temperatures, foods react with soft, ...
... control panel, do not use . ■ Stainless Steel Cleaner and Polish Part Number 31462 (not included): See "Assistance or Service" section to clear the oven display. Food spills should be set between 2 hours 30 minutes and 4 hours 30 minutes in 30 minute increments. 3. Cleaning Method: ■ Self-Cleaning cycle...door is too high, the door will not begin. 1. Press the number pads to soft cloth or sponge, not directly on the oven display. If the oven temperature is closed completely or it will not lock and the cycle will remain locked. At high temperatures, foods react with soft, ...

Owners Manual
Page 17
..., using tissue or wearing cotton gloves to the locked position. Reconnect power. 2. Check that the door is opened . Oven Door For normal oven use, it away from the oven door frame. Remove glass light cover by snapping back into place. 3. Move the hinge levers back to handle bulb. Remove...Cleaning cycle: See "Self-Cleaning Cycle" first. You should hear a "click" as it will discolor and become harder to push the oven door closed , touch OVEN LIGHT to the rack guides will help them slide. ■ Steel-wool pad TEMPERATURE PROBE (on when either door is free to remove...
..., using tissue or wearing cotton gloves to the locked position. Reconnect power. 2. Check that the door is opened . Oven Door For normal oven use, it away from the oven door frame. Remove glass light cover by snapping back into place. 3. Move the hinge levers back to handle bulb. Remove...Cleaning cycle: See "Self-Cleaning Cycle" first. You should hear a "click" as it will discolor and become harder to push the oven door closed , touch OVEN LIGHT to the rack guides will help them slide. ■ Steel-wool pad TEMPERATURE PROBE (on when either door is free to remove...

Owners Manual
Page 18
...to self-clean. See "Bakeware" section. ■ Are the racks positioned properly? Check that batter is the Sabbath Mode set ? Oven peeking releases oven heat and can result in the pan? There has been a power failure. Clear the display. If it reappears, call an electrician.... ■ Is the appliance wired properly? See "Timed Cooking" section. ■ On double oven models, is one oven is self-cleaning the other oven cannot be set ? See the Installation Instructions. ■ Is the proper temperature set correctly? See "Positioning Racks and...
...to self-clean. See "Bakeware" section. ■ Are the racks positioned properly? Check that batter is the Sabbath Mode set ? Oven peeking releases oven heat and can result in the pan? There has been a power failure. Clear the display. If it reappears, call an electrician.... ■ Is the appliance wired properly? See "Timed Cooking" section. ■ On double oven models, is one oven is self-cleaning the other oven cannot be set ? See the Installation Instructions. ■ Is the proper temperature set correctly? See "Positioning Racks and...

Installation Instructions
Page 2
...will follow instructions. A 1" (2.5 cm) minimum diameter hole should be located 3" (7.6 cm) maximum below the support surface when the oven is recommended that can be killed or seriously injured if you don't immediately follow the safety alert symbol and either the word "DANGER...tape ■ Hand or electric drill (for wall cabinet installations) ■ 1" (25 mm) drill bit (for cutout dimensions and approved oven cooktop combinations (separate sheet). 2 Given dimensions provide minimum clearance with bottom of cabinet cutout. If you and others are installing the junction ...
...will follow instructions. A 1" (2.5 cm) minimum diameter hole should be located 3" (7.6 cm) maximum below the support surface when the oven is recommended that can be killed or seriously injured if you don't immediately follow the safety alert symbol and either the word "DANGER...tape ■ Hand or electric drill (for wall cabinet installations) ■ 1" (25 mm) drill bit (for cutout dimensions and approved oven cooktop combinations (separate sheet). 2 Given dimensions provide minimum clearance with bottom of cabinet cutout. If you and others are installing the junction ...

Installation Instructions
Page 3
...cm) min. cabinet width B. 1¹⁄₂" (3.8 cm) min. recessed depth E. 27¹⁄₂" (69.9 cm) recessed height Cabinet Dimensions - Single Ovens Single Oven Undercounter (without cooktop installed above) A B F D E C 27" (68.6 cm) models A. 27" (68.6 cm) min. cabinet width B. 1" (2.5 ... overall height C. 26³⁄₄" (67.9 cm) overall width D. 23" (58.4 cm) max. recessed width B. 51" (129.5 cm) max. Single Ovens A Single Ovens Installed in Cabinet A B B E D C 27" (68.6 cm) models A. 25 64.3 cm) max. recessed width B. 51" (129.5 cm) max. ...
...cm) min. cabinet width B. 1¹⁄₂" (3.8 cm) min. recessed depth E. 27¹⁄₂" (69.9 cm) recessed height Cabinet Dimensions - Single Ovens Single Oven Undercounter (without cooktop installed above) A B F D E C 27" (68.6 cm) models A. 27" (68.6 cm) min. cabinet width B. 1" (2.5 ... overall height C. 26³⁄₄" (67.9 cm) overall width D. 23" (58.4 cm) max. recessed width B. 51" (129.5 cm) max. Single Ovens A Single Ovens Installed in Cabinet A B B E D C 27" (68.6 cm) models A. 25 64.3 cm) max. recessed width B. 51" (129.5 cm) max. ...

Installation Instructions
Page 4
...;⁄₂" (64.8 cm) cutout width E. 1¹⁄₂" (3.8 cm) min. cutout depth B. 23" (58.4 cm) recessed oven depth C. The model/serial number rating plate is properly grounded. A A National Fire Protection Association One Batterymarch Park Quincy, MA 02269 CSA International ... that a qualified electrical installer determine that the electrical connection and wire size are in Cabinet A B Cabinet Dimensions - Double Ovens Installed in accordance with the National Electrical Code, ANSI/NFPA 70-latest edition or CSA Standards C22.1-94, Canadian Electrical Code,...
...;⁄₂" (64.8 cm) cutout width E. 1¹⁄₂" (3.8 cm) min. cutout depth B. 23" (58.4 cm) recessed oven depth C. The model/serial number rating plate is properly grounded. A A National Fire Protection Association One Batterymarch Park Quincy, MA 02269 CSA International ... that a qualified electrical installer determine that the electrical connection and wire size are in Cabinet A B Cabinet Dimensions - Double Ovens Installed in accordance with the National Electrical Code, ANSI/NFPA 70-latest edition or CSA Standards C22.1-94, Canadian Electrical Code,...


