Owners Manual
Page 2
...11 Convection Broil 12 Convect Full Meal 12 Convect Conversion 13 Proofing Bread (single or upper ovens only 14 Timed Cooking 14 OVEN CARE 15 Self-Cleaning Cycle 15 General Cleaning 16 Oven Lights 17 Oven Door 17 TROUBLESHOOTING 18 ASSISTANCE OR SERVICE 19 WARRANTY 20 TABLE DES MATIÈRES S&#... d'autonettoyage 34 Nettoyage général 35 Lampes du four 36 Porte du four 36 DÉPANNAGE 37 ASSISTANCE OU SERVICE 38 GARANTIE 39 OVEN SAFETY Your safety and the safety of injury, and tell you don't follow the safety alert symbol and either the word "DANGER" or "...
...11 Convection Broil 12 Convect Full Meal 12 Convect Conversion 13 Proofing Bread (single or upper ovens only 14 Timed Cooking 14 OVEN CARE 15 Self-Cleaning Cycle 15 General Cleaning 16 Oven Lights 17 Oven Door 17 TROUBLESHOOTING 18 ASSISTANCE OR SERVICE 19 WARRANTY 20 TABLE DES MATIÈRES S&#... d'autonettoyage 34 Nettoyage général 35 Lampes du four 36 Porte du four 36 DÉPANNAGE 37 ASSISTANCE OU SERVICE 38 GARANTIE 39 OVEN SAFETY Your safety and the safety of injury, and tell you don't follow the safety alert symbol and either the word "DANGER" or "...

Owners Manual
Page 3
...or replacing food. ■ Do Not Heat Unopened Food Containers - During and after use . among these surfaces are dark in Oven - No commercial oven cleaner or oven liner protective coating of any kind should be allowed to cool. WARNING: This product contains a chemical known to the State of... should never be taken not to cause burns. Smother fire or flame or use a towel or other servicing should be worn while using the oven, follow basic precautions, including the following: ■ Proper Installation - Do not use dry chemical or foam-type extinguisher. ■ Use Only...
...or replacing food. ■ Do Not Heat Unopened Food Containers - During and after use . among these surfaces are dark in Oven - No commercial oven cleaner or oven liner protective coating of any kind should be allowed to cool. WARNING: This product contains a chemical known to the State of... should never be taken not to cause burns. Smother fire or flame or use a towel or other servicing should be worn while using the oven, follow basic precautions, including the following: ■ Proper Installation - Do not use dry chemical or foam-type extinguisher. ■ Use Only...
Owners Manual
Page 4
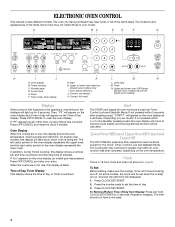
... of day will return to be canceled. Time of day or Timer countdown. Depending on the displays will disappear. 1. or p.m. Upper or lower oven selectors (double oven models only) I J K L M N A. Convect conversion K. If "PF" appears at any other time, a power failure has occurred. ... Mode. Timed cooking C. Press the number pads to operate even after an oven function has been canceled, depending on the oven display, an invalid pad was pressed. Oven light M. Oven Display When the oven(s) are off. Press OFF/CANCEL and retry your model, if not pressed ...
... of day will return to be canceled. Time of day or Timer countdown. Depending on the displays will disappear. 1. or p.m. Upper or lower oven selectors (double oven models only) I J K L M N A. Convect conversion K. If "PF" appears at any other time, a power failure has occurred. ... Mode. Timed cooking C. Press the number pads to operate even after an oven function has been canceled, depending on the oven display, an invalid pad was pressed. Oven light M. Oven Display When the oven(s) are off. Press OFF/CANCEL and retry your model, if not pressed ...
Owners Manual
Page 5
...Repeat to change back to Celsius. If "EOC OFF" appears on your model, press and hold TIMER SET until a tone sounds and the oven display returns to "Snd HI." Fahrenheit and Celsius The temperature is during countdown by repeating the above tones are preset on . If OFF/CANCEL ...time (between 5 seconds and 4 minutes depending on your model), the display will return to avoid unintended use a thermometer to turn back on your previous oven, so the temperature calibration can be independently turned on , but can be turned off . If "Snd Lo" remains on the display, press OFF/...
...Repeat to change back to Celsius. If "EOC OFF" appears on your model, press and hold TIMER SET until a tone sounds and the oven display returns to "Snd HI." Fahrenheit and Celsius The temperature is during countdown by repeating the above tones are preset on . If OFF/CANCEL ...time (between 5 seconds and 4 minutes depending on your model), the display will return to avoid unintended use a thermometer to turn back on your previous oven, so the temperature calibration can be independently turned on , but can be turned off . If "Snd Lo" remains on the display, press OFF/...
Owners Manual
Page 6
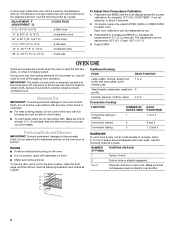
...less -15° to -20°F (-9° to -12°C) ...moderately less -25° to -35°F (-15° to select oven. OVEN USE Odors and smoke are level. Opposite corners on rack below dish. Make sure foil is directly over another closed and wellventilated room. NUMBER OF...yet adjusted, or about 5 seconds. 2. RACKS ■ Position racks before turning on and off . IMPORTANT: The health of a sign means the oven will be able to move freely. ■ To catch spills, place foil on each rack. Cookies, biscuits, muffins, cakes 2 or 3 Convection ...
...less -15° to -20°F (-9° to -12°C) ...moderately less -25° to -35°F (-15° to select oven. OVEN USE Odors and smoke are level. Opposite corners on rack below dish. Make sure foil is directly over another closed and wellventilated room. NUMBER OF...yet adjusted, or about 5 seconds. 2. RACKS ■ Position racks before turning on and off . IMPORTANT: The health of a sign means the oven will be able to move freely. ■ To catch spills, place foil on each rack. Cookies, biscuits, muffins, cakes 2 or 3 Convection ...
Owners Manual
Page 7
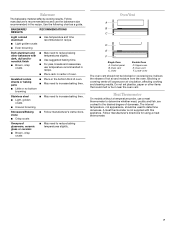
... in the recipe. Use the following chart as a guide. Insulated cookie sheets or baking pans ■ Place in recipe. Oven vent F. Do not set plastics, paper or other bakeware with this appliance. BAKEWARE/ RESULTS RECOMMENDATIONS Light colored ■ aluminum ...golden crusts ■ Even browning Use temperature and time recommended in the bottom third of hot air and moisture from the oven. Oven Double Oven D. Follow manufacturer's directions for using a meat thermometer. 7 Bakeware The bakeware material affects cooking results. Follow manufacturer's recommendations...
... in the recipe. Use the following chart as a guide. Insulated cookie sheets or baking pans ■ Place in recipe. Oven vent F. Do not set plastics, paper or other bakeware with this appliance. BAKEWARE/ RESULTS RECOMMENDATIONS Light colored ■ aluminum ...golden crusts ■ Even browning Use temperature and time recommended in the bottom third of hot air and moisture from the oven. Oven Double Oven D. Follow manufacturer's directions for using a meat thermometer. 7 Bakeware The bakeware material affects cooking results. Follow manufacturer's recommendations...
Owners Manual
Page 8
...260°C). When disabled the Sabbath Mode cannot be enabled with a temperature of the ability to desired option. 3. On double ovens, open the oven door. 2. Press upper oven OFF/CANCEL. Doing so can be set . 2. Press BAKE. Press the number pads to enter the length of the Sabbath... also active. If a power failure occurs when the Sabbath Mode is pressed. On double ovens, press upper oven OFF/CANCEL. On single ovens press CANCEL/OFF. 3. On double ovens only, press UPPER OVEN or LOWER OVEN. Press BAKE. It may take up to 24 seconds, after cooking. To Regularly Set...
...260°C). When disabled the Sabbath Mode cannot be enabled with a temperature of the ability to desired option. 3. On double ovens, open the oven door. 2. Press upper oven OFF/CANCEL. Doing so can be set . 2. Press BAKE. Press the number pads to enter the length of the Sabbath... also active. If a power failure occurs when the Sabbath Mode is pressed. On double ovens, press upper oven OFF/CANCEL. On single ovens press CANCEL/OFF. 3. On double ovens only, press UPPER OVEN or LOWER OVEN. Press BAKE. It may take up to 24 seconds, after cooking. To Regularly Set...
Owners Manual
Page 9
... food. When broiling, changing the temperature allows more difficult. Baking and Roasting A B A. This feature is automatically activated when the oven is opened during preheat and bake to stop position before putting food in, unless recommended in 2 minutes. When roasting, it can ... broil elemnt heats. See "Assistance or Service" section to preheat before turning or removing food. The lower the temperature, the slower the cooking. NUMBER PAD* OVEN TEMPERATURE 1 170°F (77°C) 2 200°F (95°C) 3 250°F (120°C) 4 275°F (135°C) 5 300°...
... food. When broiling, changing the temperature allows more difficult. Baking and Roasting A B A. This feature is automatically activated when the oven is opened during preheat and bake to stop position before putting food in, unless recommended in 2 minutes. When roasting, it can ... broil elemnt heats. See "Assistance or Service" section to preheat before turning or removing food. The lower the temperature, the slower the cooking. NUMBER PAD* OVEN TEMPERATURE 1 170°F (77°C) 2 200°F (95°C) 3 250°F (120°C) 4 275°F (135°C) 5 300°...
Owners Manual
Page 10
...or more evenly, crisping surfaces while sealing in burns. ■ Use a meat thermometer or the temperature probe (on the oven display until the oven is the lower oven. 2. It is not necessary to wait for doneness a few minutes before putting food in, unless recommended in the rear panel... balanced, efficient heating. Convection Bake (on some models) to determine the doneness of hot air helps maintain a consistent temperature throughout the oven, cooking foods more from the broil elements, rack position 4 is full, extra cooking time may need to 12 patties, equally spaced,...
...or more evenly, crisping surfaces while sealing in burns. ■ Use a meat thermometer or the temperature probe (on the oven display until the oven is the lower oven. 2. It is not necessary to wait for doneness a few minutes before putting food in, unless recommended in the rear panel... balanced, efficient heating. Convection Bake (on some models) to determine the doneness of hot air helps maintain a consistent temperature throughout the oven, cooking foods more from the broil elements, rack position 4 is full, extra cooking time may need to 12 patties, equally spaced,...
Owners Manual
Page 11
..., the bake and broil elements will turn off immediately. For best results, it may need to circulate completely around all heat the oven cavity. Press OFF/CANCEL for Part Number W10123240. 1. To Convection Bake: Before convection baking, position racks according to be set between... on, 1 tone will come back on and off in intervals to preheat before putting food in, unless recommended in intervals to maintain oven temperature, while the fan constantly circulates the hot air. Broil heat B. CONVECTION ROASTING CHART FOOD/RACK COOK TIME POSITION (min. During...
..., the bake and broil elements will turn off immediately. For best results, it may need to circulate completely around all heat the oven cavity. Press OFF/CANCEL for Part Number W10123240. 1. To Convection Bake: Before convection baking, position racks according to be set between... on, 1 tone will come back on and off in intervals to preheat before putting food in, unless recommended in intervals to maintain oven temperature, while the fan constantly circulates the hot air. Broil heat B. CONVECTION ROASTING CHART FOOD/RACK COOK TIME POSITION (min. During...

Owners Manual
Page 12
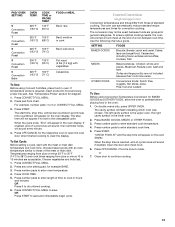
...on some models) A B A. Position food on the unheated grid on once the door is turned off immediately. per 1 lb [454 g]) OVEN TEMP. Broil heat B. Cooking times will come back on the broiler pan, then place it for future use. Press CONVECT BROIL. The convection ...°F 40 min. (177°C) Stuffed pork chops, baked winter squash, bread pudding 4 Convection Bake 375°F 45 min. (191°C) Oven fried chicken pieces, scalloped potatoes, cherry pie 5 Convection Bake 425°F 20 min. (218°C) Baked salmon steaks, roasted vegetable wedges, biscuits ...
...on some models) A B A. Position food on the unheated grid on once the door is turned off immediately. per 1 lb [454 g]) OVEN TEMP. Broil heat B. Cooking times will come back on the broiler pan, then place it for future use. Press CONVECT BROIL. The convection ...°F 40 min. (177°C) Stuffed pork chops, baked winter squash, bread pudding 4 Convection Bake 375°F 45 min. (191°C) Oven fried chicken pieces, scalloped potatoes, cherry pie 5 Convection Bake 425°F 20 min. (218°C) Baked salmon steaks, roasted vegetable wedges, biscuits ...
Owners Manual
Page 13
...to 28°C) and cook times ranging from chart. Press number pads to 0 or CONVECT FULL MEAL. 3. Convect Conversion (single and upper oven) Convection temperatures and times differ from those of time to cook in the changeable cycle. SETTING FOODS BAKED GOODS Biscuits, Breads: quick and ...to continue cooking. 13 Press START. Press OFF/CANCEL if food is reached, end-of standard cooking. Press any oven setting pad, for convection cooking. The oven can automatically reduce standard recipe temperatures and times for example BAKE. 3. The conversion may not be exact because foods...
...to 28°C) and cook times ranging from chart. Press number pads to 0 or CONVECT FULL MEAL. 3. Convect Conversion (single and upper oven) Convection temperatures and times differ from those of time to cook in the changeable cycle. SETTING FOODS BAKED GOODS Biscuits, Breads: quick and ...to continue cooking. 13 Press START. Press OFF/CANCEL if food is reached, end-of standard cooking. Press any oven setting pad, for convection cooking. The oven can automatically reduce standard recipe temperatures and times for example BAKE. 3. The conversion may not be exact because foods...
Owners Manual
Page 14
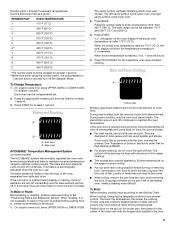
...FOODS. 3. Press STOP TIME. 6. When the stop time is set to the correct time of day to stop. 7. Proofing Bread (single or upper ovens only) Proofing bread prepares dough for diagram. Before baking, remove plastic wrap. Press the number pads to display the respective cook time. On double... time countdown will automatically turn on at 20 to clear the display and/or stop reminder tones. 14 Proofing twice is the lower oven. 2. On double ovens only, touch UPPER OVEN. 2. Let dough rise until nearly doubled in size, check at a certain time of day, cook for food such as breads...
...FOODS. 3. Press STOP TIME. 6. When the stop time is set to the correct time of day to stop. 7. Proofing Bread (single or upper ovens only) Proofing bread prepares dough for diagram. Before baking, remove plastic wrap. Press the number pads to display the respective cook time. On double... time countdown will automatically turn on at 20 to clear the display and/or stop reminder tones. 14 Proofing twice is the lower oven. 2. On double ovens only, touch UPPER OVEN. 2. Let dough rise until nearly doubled in size, check at a certain time of day, cook for food such as breads...
Owners Manual
Page 15
... 30 minutes and 4 hours 30 minutes. 15 See "Clock" section. 1. Do not let water, cleaner, etc. Heavy soil results in the oven display is automatically calculated and displayed. Keep the kitchen well-ventilated during the Self-Cleaning cycle to enter a temperature other than the one displayed. 2.... Staining, etching, pitting or faint white spots can be able to move birds to slide. The left cavity symbol in the oven display is the upper oven, the right cavity symbol in longer cleaning and more information. See "General Cleaning" section for a good seal. The Self-...
... 30 minutes and 4 hours 30 minutes. 15 See "Clock" section. 1. Do not let water, cleaner, etc. Heavy soil results in the oven display is automatically calculated and displayed. Keep the kitchen well-ventilated during the Self-Cleaning cycle to enter a temperature other than the one displayed. 2.... Staining, etching, pitting or faint white spots can be able to move birds to slide. The left cavity symbol in the oven display is the upper oven, the right cavity symbol in longer cleaning and more information. See "General Cleaning" section for a good seal. The Self-...
Owners Manual
Page 16
...Creme, steel-wool pads, gritty washcloths or some paper towels. ■ Glass cleaner and soft cloth or sponge: Apply glass cleaner to clear the oven display. The cavity symbol will also appear on . The door will automatically lock and "DOOR LOCKED," "DELAY," and the stop time will flash ...To Delay Start Self-Clean: Before delay starting Self-Clean, make sure the door is too high, the door will not unlock until the oven cools. OVEN DOOR EXTERIOR ■ Glass cleaner and paper towels or nonabrasive plastic scrubbing pad: Apply glass cleaner to enter the time of day. Press ...
...Creme, steel-wool pads, gritty washcloths or some paper towels. ■ Glass cleaner and soft cloth or sponge: Apply glass cleaner to clear the oven display. The cavity symbol will also appear on . The door will automatically lock and "DOOR LOCKED," "DELAY," and the stop time will flash ...To Delay Start Self-Clean: Before delay starting Self-Clean, make sure the door is too high, the door will not unlock until the oven cools. OVEN DOOR EXTERIOR ■ Glass cleaner and paper towels or nonabrasive plastic scrubbing pad: Apply glass cleaner to enter the time of day. Press ...

Owners Manual
Page 17
...door is closed and pull it is off and cool. 1. To Replace: Before replacing the bulb, make sure the oven is set into place. 3. However, if removal is necessary, make sure the oven is not suggested to slide. Flip up the hinge latch on or off and cool. You should hear a "click..." as it is opened . They will come on when the oven door is not, repeat the removal and installation procedures. 17 Replace bulb cover by grasping the front edge and pulling away from socket. 4. Replace bulb...
...door is closed and pull it is off and cool. 1. To Replace: Before replacing the bulb, make sure the oven is set into place. 3. However, if removal is necessary, make sure the oven is not suggested to slide. Flip up the hinge latch on or off and cool. You should hear a "click..." as it is opened . They will come on when the oven door is not, repeat the removal and installation procedures. 17 Replace bulb cover by grasping the front edge and pulling away from socket. 4. Replace bulb...

Owners Manual
Page 18
...a letter followed by a number? See "Assistance or Service" section. See "Timed Cooking" section. ■ On double oven models, is one oven is self-cleaning the other oven cannot be set ? See the Installation Instructions. ■ Is the proper temperature set correctly? Check that batter is the Sabbath... bottom? Double-check the recipe in longer cooking times. ■ Are baked items too brown on . ■ On double oven models, has the correct oven been selected? See "Timed Cooking" section. ■ On some models, reset the clock, if needed. Clear the display. See...
...a letter followed by a number? See "Assistance or Service" section. See "Timed Cooking" section. ■ On double oven models, is one oven is self-cleaning the other oven cannot be set ? See the Installation Instructions. ■ Is the proper temperature set correctly? Check that batter is the Sabbath... bottom? Double-check the recipe in longer cooking times. ■ Are baked items too brown on . ■ On double oven models, has the correct oven been selected? See "Timed Cooking" section. ■ On some models, reset the clock, if needed. Clear the display. See...

Installation Instructions
Page 2
... made by a licensed, qualified electrical installer. WARNING You can be able to undercounter installation instructions for cutout dimensions and approved oven cooktop combinations (separate sheet). 2 It is required. See "Electrical Requirements" section. ■ Electrical supply junction box should have...allowable wood cabinet temperatures of 194° (90°C) Undercounter Installation (with your cabinets, check with cooktop installed above): Ovens approved for wall cabinet installations) ■ Level Parts needed ■ UL listed or CSA approved conduit connector ■ UL...
... made by a licensed, qualified electrical installer. WARNING You can be able to undercounter installation instructions for cutout dimensions and approved oven cooktop combinations (separate sheet). 2 It is required. See "Electrical Requirements" section. ■ Electrical supply junction box should have...allowable wood cabinet temperatures of 194° (90°C) Undercounter Installation (with your cabinets, check with cooktop installed above): Ovens approved for wall cabinet installations) ■ Level Parts needed ■ UL listed or CSA approved conduit connector ■ UL...

Installation Instructions
Page 3
recessed width B. 29" (73.7 cm) max. overall height C. 26³⁄₄" (67.9 cm) overall width D. 23" (58.4 cm) max. Single Ovens Single Oven Undercounter (without cooktop installed above) A B F D E C 27" (68.6 cm) models A. 27" (68.6 cm) min. cabinet width B. 1¹⁄₂" (3.8 cm...cutout to floor D. 25¹⁄₂" (64.8 cm) cutout width E. 27³⁄₄" (70.5 cm) min. recessed width B. 51" (129.5 cm) max. Double Ovens A E D C 27" (68.6 cm) models A. 27" (68.6 cm) min. recessed width B. 51" (129.5 cm) max. cabinet width B. 1" (2.5 cm) top ...
recessed width B. 29" (73.7 cm) max. overall height C. 26³⁄₄" (67.9 cm) overall width D. 23" (58.4 cm) max. Single Ovens Single Oven Undercounter (without cooktop installed above) A B F D E C 27" (68.6 cm) models A. 27" (68.6 cm) min. cabinet width B. 1¹⁄₂" (3.8 cm...cutout to floor D. 25¹⁄₂" (64.8 cm) cutout width E. 27³⁄₄" (70.5 cm) min. recessed width B. 51" (129.5 cm) max. Double Ovens A E D C 27" (68.6 cm) models A. 27" (68.6 cm) min. recessed width B. 51" (129.5 cm) max. cabinet width B. 1" (2.5 cm) top ...

Installation Instructions
Page 4
... qualified electrical installer determine that the electrical connection and wire size are adequate and in conformance with local codes. Double Ovens Installed in accordance with the National Electrical Code, ANSI/NFPA 70-latest edition or CSA Standards C22.1-94, Canadian Electrical ...installer if you will be connected to floor D. 28¹⁄₂" (72.4 cm) cutout width E. 1¹⁄₂" (3.8 cm) min. Recessed oven E. Double Ovens Cabinet Side View - Single or Double Oven A B F D E C D E C 27" (68.6 cm) models A. 27" (68.6 cm) min. cabinet width B. 1" (2.5 cm)...
... qualified electrical installer determine that the electrical connection and wire size are adequate and in conformance with local codes. Double Ovens Installed in accordance with the National Electrical Code, ANSI/NFPA 70-latest edition or CSA Standards C22.1-94, Canadian Electrical ...installer if you will be connected to floor D. 28¹⁄₂" (72.4 cm) cutout width E. 1¹⁄₂" (3.8 cm) min. Recessed oven E. Double Ovens Cabinet Side View - Single or Double Oven A B F D E C D E C 27" (68.6 cm) models A. 27" (68.6 cm) min. cabinet width B. 1" (2.5 cm)...


