
Owners Manual
Page 3
... line surface unit drip bowls, except as suggested in water. Do not let potholder touch hot heating elements. This cooktop is properly installed and grounded by a qualified technician. ■ Never Use Your Cooktop for cooktop service without breaking due to the sudden change in ... SURFACE UNITS OR AREAS NEAR UNITS - Do not use dry chemical or foam-type extinguisher. ■ Use Only Dry Potholders - Improper installation of these pans or bowls during cooking may result in use of undersized utensils will also improve efficiency. ■ Never Leave Surface Units Unattended...
... line surface unit drip bowls, except as suggested in water. Do not let potholder touch hot heating elements. This cooktop is properly installed and grounded by a qualified technician. ■ Never Use Your Cooktop for cooktop service without breaking due to the sudden change in ... SURFACE UNITS OR AREAS NEAR UNITS - Do not use dry chemical or foam-type extinguisher. ■ Use Only Dry Potholders - Improper installation of these pans or bowls during cooking may result in use of undersized utensils will also improve efficiency. ■ Never Leave Surface Units Unattended...

Owners Manual
Page 12
... frying. ■ Maintains heat for long periods, alternate the use only flat-bottomed canners. ■ On coil element models, the installation of cooking. ■ Medium or heavy thickness is not installed, the life of aluminum. Home Canning When canning for slow cooking. On electric cooktops, canners should not extend more than ½...
... frying. ■ Maintains heat for long periods, alternate the use only flat-bottomed canners. ■ On coil element models, the installation of cooking. ■ Medium or heavy thickness is not installed, the life of aluminum. Home Canning When canning for slow cooking. On electric cooktops, canners should not extend more than ½...

Owners Manual
Page 14
... After 1 minute, reconnect power or plug in the "Cooktop Controls" section. See "Cooktop Controls" section. ■ Is the appliance level? See Installation Instructions. Wipe debris from the control panel surface. ■ Has one or more keys are OFF. 2. Excessive heat around cookware on and off, ...call . Clean the cooktop touch control panel thoroughly. REMEMBER: When cooktop is in use, the entire cooktop area may become hot? See the Installation Instructions. ■ Does it appear to take longer to cook food at a certain power level than ½" (1.3 cm) outside the cooking...
... After 1 minute, reconnect power or plug in the "Cooktop Controls" section. See "Cooktop Controls" section. ■ Is the appliance level? See Installation Instructions. Wipe debris from the control panel surface. ■ Has one or more keys are OFF. 2. Excessive heat around cookware on and off, ...call . Clean the cooktop touch control panel thoroughly. REMEMBER: When cooktop is in use, the entire cooktop area may become hot? See the Installation Instructions. ■ Does it appear to take longer to cook food at a certain power level than ½" (1.3 cm) outside the cooking...

Owners Manual
Page 15
... to local dealers, repair parts distributors and service companies. To locate the Whirlpool designated service company in Canada. To order accessories, call . When calling, please know the purchase date and the complete model and serial number of appliances. ■ Installation information. ■ Use and maintenance procedures. ■ Accessory and repair parts sales...
... to local dealers, repair parts distributors and service companies. To locate the Whirlpool designated service company in Canada. To order accessories, call . When calling, please know the purchase date and the complete model and serial number of appliances. ■ Installation information. ■ Use and maintenance procedures. ■ Accessory and repair parts sales...

Owners Manual
Page 16
... damage, including scratches, dents, chips or other than normal, single-family household use or when it is installed in an inaccessible location or is not installed in materials or workmanship and is reported to Whirlpool within 30 days from the date of purchase. 6. The removal and reinstallation of your major appliance if it...
... damage, including scratches, dents, chips or other than normal, single-family household use or when it is installed in an inaccessible location or is not installed in materials or workmanship and is reported to Whirlpool within 30 days from the date of purchase. 6. The removal and reinstallation of your major appliance if it...

Installation Instructions
Page 1
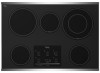
...hazards that can kill or hurt you what the potential hazard is the safety alert symbol. ® ELECTRIC COOKTOP INSTALLATION INSTRUCTIONS INSTRUCTIONS D'INSTALLATION DE LA TABLE DE CUISSON ÉLECTRIQUE Table of Contents / Table des matières COOKTOP SAFETY 1 ...SÉCURITÉ DE LA TABLE DE CUISSON 9 INSTALLATION REQUIREMENTS 2 Tools and Parts 2 Location Requirements 2 Electrical Requirements 3 INSTALLATION INSTRUCTIONS 4 Prepare Cooktop for local electrical inspector's use. WARNING You can be killed or seriously injured...
...hazards that can kill or hurt you what the potential hazard is the safety alert symbol. ® ELECTRIC COOKTOP INSTALLATION INSTRUCTIONS INSTRUCTIONS D'INSTALLATION DE LA TABLE DE CUISSON ÉLECTRIQUE Table of Contents / Table des matières COOKTOP SAFETY 1 ...SÉCURITÉ DE LA TABLE DE CUISSON 9 INSTALLATION REQUIREMENTS 2 Tools and Parts 2 Location Requirements 2 Electrical Requirements 3 INSTALLATION INSTRUCTIONS 4 Prepare Cooktop for local electrical inspector's use. WARNING You can be killed or seriously injured...

Installation Instructions
Page 2
...Clamping brackets (2) ■ 2½" (6.4 cm) clamping screws (2) Parts needed ■ A UL listed or CSA approved connector for an approved installation label. It is recommended that all governing codes and ordinances. If you do not find this type of burns or fire by a licensed, ...proper cutout dimensions. ■ The cooktop should be located for convenient use minimum dimensions given. ■ To eliminate the risk of installation will not discolor, delaminate or sustain other damage. Check the cooktop base for ½" (1.3 cm) diameter conduit ■ UL listed...
...Clamping brackets (2) ■ 2½" (6.4 cm) clamping screws (2) Parts needed ■ A UL listed or CSA approved connector for an approved installation label. It is recommended that all governing codes and ordinances. If you do not find this type of burns or fire by a licensed, ...proper cutout dimensions. ■ The cooktop should be located for convenient use minimum dimensions given. ■ To eliminate the risk of installation will not discolor, delaminate or sustain other damage. Check the cooktop base for ½" (1.3 cm) diameter conduit ■ UL listed...

Installation Instructions
Page 3
... than the cutout. Electrically ground cooktop. O-M91-latest edition, and all local codes and ordinances. Cabinet Dimensions IMPORTANT: If installing a range hood or microwave hood combination above the cooktop, follow the instructions provided for dimensional clearances above the cooktop surface. Combustible... area above ) C. 30" (76.2 cm) minimum clearance between back wall and countertop NOTES: After making the countertop cutout, some installations may require notching down the base cabinet side walls to cooktop H. Junction box or outlet: 7" (17.8 cm) minimum from right side ...
... than the cutout. Electrically ground cooktop. O-M91-latest edition, and all local codes and ordinances. Cabinet Dimensions IMPORTANT: If installing a range hood or microwave hood combination above the cooktop, follow the instructions provided for dimensional clearances above the cooktop surface. Combustible... area above ) C. 30" (76.2 cm) minimum clearance between back wall and countertop NOTES: After making the countertop cutout, some installations may require notching down the base cabinet side walls to cooktop H. Junction box or outlet: 7" (17.8 cm) minimum from right side ...

Installation Instructions
Page 4
...as much slack as possible between the junction box and the cooktop so that the knobs are not resting on uneven counters. A Install Cooktop Style 1: Cooktop over cabinets 1. Style 2: Cooktop over undercounter built-in oven IMPORTANT: Clamping brackets should be connected directly to ..., armored cable extending from debris and helps the cooktop sit flat on the foam. 2. Connect a section of foam. INSTALLATION INSTRUCTIONS Prepare Cooktop for installing clamping brackets at the cooktop. ■ If the house has aluminum wiring, follow the procedure below: 1. Determine whether your...
...as much slack as possible between the junction box and the cooktop so that the knobs are not resting on uneven counters. A Install Cooktop Style 1: Cooktop over cabinets 1. Style 2: Cooktop over undercounter built-in oven IMPORTANT: Clamping brackets should be connected directly to ..., armored cable extending from debris and helps the cooktop sit flat on the foam. 2. Connect a section of foam. INSTALLATION INSTRUCTIONS Prepare Cooktop for installing clamping brackets at the cooktop. ■ If the house has aluminum wiring, follow the procedure below: 1. Determine whether your...

Installation Instructions
Page 5
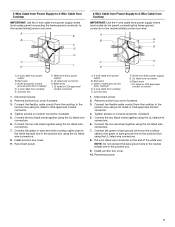
...far enough beyond edge of the countertop. Using 2 or more people, turn the cooktop right side up from the cooktop for the installation of cooktop base bottom B. Edge of 2½" (6.4 cm) clamping screws. Attachment screw 4. Securely tighten screws. Securely tighten screws.... 5 Attachment screw D. Select bracket mounting holes that the knobs are perpendicular to the edge of clamping screw installation. Installing Brackets Before Placing Cooktop in "Attach Cooktop to Countertop") F. Bracket clamping hole E. Attach brackets to cooktop base bottom with...
...far enough beyond edge of the countertop. Using 2 or more people, turn the cooktop right side up from the cooktop for the installation of cooktop base bottom B. Edge of 2½" (6.4 cm) clamping screws. Attachment screw 4. Securely tighten screws. Securely tighten screws.... 5 Attachment screw D. Select bracket mounting holes that the knobs are perpendicular to the edge of clamping screw installation. Installing Brackets Before Placing Cooktop in "Attach Cooktop to Countertop") F. Bracket clamping hole E. Attach brackets to cooktop base bottom with...

Installation Instructions
Page 6
... box using a UL listed or CSA approved connector for ½" (1.3 cm) conduit. 4. Failure to 4-Wire Cable from Cooktop Electrical Shock Hazard Disconnect power before servicing. A B E F G C H D I . Install junction box cover. 10. Junction box F. Connect the two red wires together using the UL listed wire connectors. 7. Tighten screws on conduit connector if present...
... box using a UL listed or CSA approved connector for ½" (1.3 cm) conduit. 4. Failure to 4-Wire Cable from Cooktop Electrical Shock Hazard Disconnect power before servicing. A B E F G C H D I . Install junction box cover. 10. Junction box F. Connect the two red wires together using the UL listed wire connectors. 7. Tighten screws on conduit connector if present...
Installation Instructions
Page 7
Red wires C. Install junction box cover. 9. Green or bare ground wire (from cooktop) D. 3-wire cable from power supply) G. White wire (from cooktop E. UL listed wire connector H. Black wires I . ... box using a UL listed or CSA approved conduit connector. 4. Black wires I . Reconnect power. Connect the two red wires together using the UL listed wire connectors. 7. Install junction box cover. 10. Red wires C. Disconnect power 2. Connect the flexible cable conduit from cooktop E. Junction box F. 3-Wire Cable from Power Supply to 4-Wire Cable...
Red wires C. Install junction box cover. 9. Green or bare ground wire (from cooktop) D. 3-wire cable from power supply) G. White wire (from cooktop E. UL listed wire connector H. Black wires I . ... box using a UL listed or CSA approved conduit connector. 4. Black wires I . Reconnect power. Connect the two red wires together using the UL listed wire connectors. 7. Install junction box cover. 10. Red wires C. Disconnect power 2. Connect the flexible cable conduit from cooktop E. Junction box F. 3-Wire Cable from Power Supply to 4-Wire Cable...

Installation Instructions
Page 8
...I D A. 3-wire cable from cooktop E. Disconnect power 2. Remove junction box cover, if present. 3. Reconnect power. Foam seal 1. Complete Installation 1. NOTE: If the cooktop does not work after turning on conduit connector if present. 5. Junction box F. Tighten screws on the power, check...neutral (white) junction box wire: A E B F G Attach Cooktop to Countertop NOTE: This section applies only if you are now installed. Connect the green or bare cooktop cable wires to tighten the screws against the countertop. D C A. Countertop G. UL listed wire ...
...I D A. 3-wire cable from cooktop E. Disconnect power 2. Remove junction box cover, if present. 3. Reconnect power. Foam seal 1. Complete Installation 1. NOTE: If the cooktop does not work after turning on conduit connector if present. 5. Junction box F. Tighten screws on the power, check...neutral (white) junction box wire: A E B F G Attach Cooktop to Countertop NOTE: This section applies only if you are now installed. Connect the green or bare cooktop cable wires to tighten the screws against the countertop. D C A. Countertop G. UL listed wire ...

Warranty
Page 1
... manner that have been removed, altered or cannot be provided by the customer. Service calls to correct the installation of your major appliance, to be borne by a Whirlpool designated service company. This major appliance is designed to instruct you need service, first see the "Troubleshooting" section...your major appliance, unless such damage results from defects in materials or workmanship and is reported to Whirlpool within 30 days from the date of purchase or installation date for product service if your major appliance to better help you obtain assistance or service if ...
... manner that have been removed, altered or cannot be provided by the customer. Service calls to correct the installation of your major appliance, to be borne by a Whirlpool designated service company. This major appliance is designed to instruct you need service, first see the "Troubleshooting" section...your major appliance, unless such damage results from defects in materials or workmanship and is reported to Whirlpool within 30 days from the date of purchase or installation date for product service if your major appliance to better help you obtain assistance or service if ...


