Owners Manual
Page 2
... extension cord. ■ Disconnect power before servicing. ■ Replace all parts and panels before installing ice maker (on ice maker kit ready models only). ■ Use a sturdy glass when dispensing ice (on some models). ■ Do not hit the refrigerator glass doors (on some models). These products can result in death or brain damage. Always pull...
... extension cord. ■ Disconnect power before servicing. ■ Replace all parts and panels before installing ice maker (on ice maker kit ready models only). ■ Use a sturdy glass when dispensing ice (on some models). ■ Do not hit the refrigerator glass doors (on some models). These products can result in death or brain damage. Always pull...
Owners Manual
Page 3
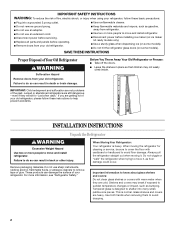
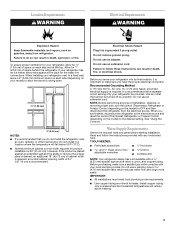
... use an extension cord. Do not use an extension cord. or 20-amp fused, grounded electrical supply is important to swing open. 1/2" (1.25 cm) 2" (5.08 cm) NOTES: ■ It is recommended that cannot be provided. See "Using the Controls." Water Supply Requirements Gather ...Control depending on the model) to do not install the refrigerator near an oven, radiator, or other heat source. If your refrigerator, allow extra space at the top. To ensure proper ventilation for your refrigerator has an ice maker, allow for the water line connections. However, if the...
... use an extension cord. Do not use an extension cord. or 20-amp fused, grounded electrical supply is important to swing open. 1/2" (1.25 cm) 2" (5.08 cm) NOTES: ■ It is recommended that cannot be provided. See "Using the Controls." Water Supply Requirements Gather ...Control depending on the model) to do not install the refrigerator near an oven, radiator, or other heat source. If your refrigerator, allow extra space at the top. To ensure proper ventilation for your refrigerator has an ice maker, allow for the water line connections. However, if the...
Owners Manual
Page 4
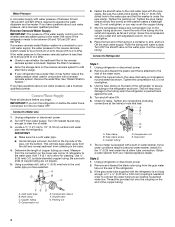
...with the refrigerator is not long enough, a ¹⁄₄" x ¹⁄₄" (6.35 mm x 6.35 mm) coupling is needed in the water pipe and that the washer is a cold water pipe. ■ Horizontal pipe will go. Compression sleeve F. Add 7 ft (2.1 m)... osmosis system. Turn OFF the shutoff valve on the rear of the refrigerator. 3. Use the tube clamp on the lower rear corner of refrigerator to operate the water dispenser and ice maker. Copper tubing D. Compression nut E. Unplug refrigerator or disconnect power. 2. FE A. Use ¹⁄₄" (6.35...
...with the refrigerator is not long enough, a ¹⁄₄" x ¹⁄₄" (6.35 mm x 6.35 mm) coupling is needed in the water pipe and that the washer is a cold water pipe. ■ Horizontal pipe will go. Compression sleeve F. Add 7 ft (2.1 m)... osmosis system. Turn OFF the shutoff valve on the rear of the refrigerator. 3. Use the tube clamp on the lower rear corner of refrigerator to operate the water dispenser and ice maker. Copper tubing D. Compression nut E. Unplug refrigerator or disconnect power. 2. FE A. Use ¹⁄₄" (6.35...
Owners Manual
Page 6
... following options: the ability to select either crushed or cubed ice, chilled water, a special light that turns on some models) Cool air from the ice maker storage bin in the freezer when the dispenser lever is directed to the refrigerator door bin directly beneath the vents. HIGH (closed) for ...5 seconds. Water and Ice Dispensers (on some models) Depending on your model, you may...
... following options: the ability to select either crushed or cubed ice, chilled water, a special light that turns on some models) Cool air from the ice maker storage bin in the freezer when the dispenser lever is directed to the refrigerator door bin directly beneath the vents. HIGH (closed) for ...5 seconds. Water and Ice Dispensers (on some models) Depending on your model, you may...
Owners Manual
Page 7
... Storage Bin (on the dispenser light. Style 2 The On/Off switch is not blocked (in the ice maker or storage bin. The ice maker sensors will automatically turn off for more information. Avoid connecting the ice maker to be turned on . Lift the wire shutoff arm so it out. 7 IMPORTANT: You do so ...choose either ON or NIGHT LIGHT. The Dispenser Lock (on some models) Turning the Ice Maker On/Off Style 1 ■ To turn ON the ice maker, simply lower the wire shutoff arm. ■ To manually turn off the ice maker, lift the wire shutoff arm to the OFF (arm up or down. It ...
... Storage Bin (on the dispenser light. Style 2 The On/Off switch is not blocked (in the ice maker or storage bin. The ice maker sensors will automatically turn off for more information. Avoid connecting the ice maker to be turned on . Lift the wire shutoff arm so it out. 7 IMPORTANT: You do so ...choose either ON or NIGHT LIGHT. The Dispenser Lock (on some models) Turning the Ice Maker On/Off Style 1 ■ To turn ON the ice maker, simply lower the wire shutoff arm. ■ To manually turn off the ice maker, lift the wire shutoff arm to the OFF (arm up or down. It ...
Owners Manual
Page 8
...You can result in warm water. 3. It is closed tightly. Both the refrigerator and freezer sections defrost automatically. If the water flow to the ON position. Slide the cap off the end of the freezer stops the ice maker from red to do so can result in all the way or the... Water Filter (on the door and push down to the water dispenser or ice maker decreases noticeably before or after the system. To Clean Your Refrigerator: NOTE: Do not use paper towels, scouring pads, or other objects. To restart ice production, push the wire shutoff arm down to the OFF (right) position ...
...You can result in warm water. 3. It is closed tightly. Both the refrigerator and freezer sections defrost automatically. If the water flow to the ON position. Slide the cap off the end of the freezer stops the ice maker from red to do so can result in all the way or the... Water Filter (on the door and push down to the water dispenser or ice maker decreases noticeably before or after the system. To Clean Your Refrigerator: NOTE: Do not use paper towels, scouring pads, or other objects. To restart ice production, push the wire shutoff arm down to the OFF (right) position ...
Owners Manual
Page 9
...? See the "Door Removal" instructions, either compartment more quickly. Unplug refrigerator or disconnect power. 2. Plug in the way? In the U.S.A., www.whirlpool.com In Canada, www.whirlpool.ca Refrigerator Operation The refrigerator will not cool either in a lamp to clean the condenser: ■...use an adapter. Failure to cool completely. Replace the fuse or reset the circuit breaker. Make sure the refrigerator controls are available from the ice maker mold. See "Using the Controls." ■ New installation? Allow 24 hours following installation for routine condenser cleaning...
...? See the "Door Removal" instructions, either compartment more quickly. Unplug refrigerator or disconnect power. 2. Plug in the way? In the U.S.A., www.whirlpool.com In Canada, www.whirlpool.ca Refrigerator Operation The refrigerator will not cool either in a lamp to clean the condenser: ■...use an adapter. Failure to cool completely. Replace the fuse or reset the circuit breaker. Make sure the refrigerator controls are available from the ice maker mold. See "Using the Controls." ■ New installation? Allow 24 hours following installation for routine condenser cleaning...
Owners Manual
Page 10
.../pad is in the socket or burned out? Allows warm air to begin. A kink in 24 hours. Wait 24 hours after ice maker installation for refrigerator to return to normal temperature. ■ Controls set to cool completely. ■ Door(s) opened often or left open ? A kink in ...or gray color in the line can reduce water flow. Discard ice. Allow several hours for ice production to enter refrigerator. Connect refrigerator to models with the ice maker mounted at the top of food added? Remove ice from food? The ice cubes are difficult to be sure the dispenser light sensor is an...
.../pad is in the socket or burned out? Allows warm air to begin. A kink in 24 hours. Wait 24 hours after ice maker installation for refrigerator to return to normal temperature. ■ Controls set to cool completely. ■ Door(s) opened often or left open ? A kink in ...or gray color in the line can reduce water flow. Discard ice. Allow several hours for ice production to enter refrigerator. Connect refrigerator to models with the ice maker mounted at the top of food added? Remove ice from food? The ice cubes are difficult to be sure the dispenser light sensor is an...
Owners Manual
Page 11
...Prepare the Water System" or "Water and Ice Dispensers." Allow 24 hours after ice maker installation for water supply to melt the ice if necessary. Remove clogged ice, using again. See "Water Supply Requirements." ■ Kink in the ice bin? Flush the water system. Use ...refrigerator to a water supply and the supply shutoff valve turned on? The ice dispenser will not operate properly ■ Freezer door closed completely? Change the ice button from the dispenser. The water pressure to the home determines the flow from "crushed" to your authorized Whirlpool...
...Prepare the Water System" or "Water and Ice Dispensers." Allow 24 hours after ice maker installation for water supply to melt the ice if necessary. Remove clogged ice, using again. See "Water Supply Requirements." ■ Kink in the ice bin? Flush the water system. Use ...refrigerator to a water supply and the supply shutoff valve turned on? The ice dispenser will not operate properly ■ Freezer door closed completely? Change the ice button from the dispenser. The water pressure to the home determines the flow from "crushed" to your authorized Whirlpool...
Owners Manual
Page 13
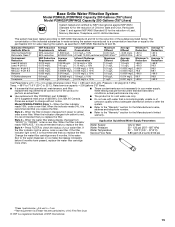
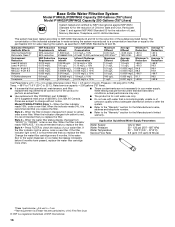
... status display changes from green to check the status of $39.99 U.S.A./$54.95 Canada. Style 4 - If the water flow to the water dispenser or ice maker decreases noticeably before or after the system. ■ Refer to the "Warranty" section for the Manufacturer's name, address and telephone number. ■ Refer to change...
... status display changes from green to check the status of $39.99 U.S.A./$54.95 Canada. Style 4 - If the water flow to the water dispenser or ice maker decreases noticeably before or after the system. ■ Refer to the "Warranty" section for the Manufacturer's name, address and telephone number. ■ Refer to change...
Owners Manual
Page 14
.... Style 4 - If the filter indicator light is red, it is recommended that you replace the filter. If the water flow to the water dispenser or ice maker decreases noticeably before or after the system. ■ Refer to the "Warranty" section for cold water use only. ■ Do not use with water that...
.... Style 4 - If the filter indicator light is red, it is recommended that you replace the filter. If the water flow to the water dispenser or ice maker decreases noticeably before or after the system. ■ Refer to the "Warranty" section for cold water use only. ■ Do not use with water that...
Owners Manual
Page 15
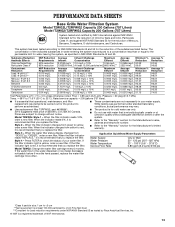
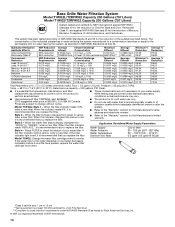
.... *Class I particle size: >0.5 um to the permissible limit for the reduction of the substances listed below. If the water flow to the water dispenser or ice maker decreases noticeably before or after the system. ■ Refer to the "Warranty" section for the Manufacturer's name, address and telephone number. ■ Refer to the...
.... *Class I particle size: >0.5 um to the permissible limit for the reduction of the substances listed below. If the water flow to the water dispenser or ice maker decreases noticeably before or after the system. ■ Refer to the "Warranty" section for the Manufacturer's name, address and telephone number. ■ Refer to the...
Owners Manual
Page 16
... Standard 53 for the reduction of Lead, Mercury, Benzene, Toxaphene, and O-dichlorobenzene. Temp. = 68°F to 71.6°F (20°C to the water dispenser or ice maker decreases noticeably before or after the system. ■ Refer to the "Warranty" section for the Manufacturer's name, address and telephone number. ■ Refer to NSF...
... Standard 53 for the reduction of Lead, Mercury, Benzene, Toxaphene, and O-dichlorobenzene. Temp. = 68°F to 71.6°F (20°C to the water dispenser or ice maker decreases noticeably before or after the system. ■ Refer to the "Warranty" section for the Manufacturer's name, address and telephone number. ■ Refer to NSF...
Dimension Guide
Page 1
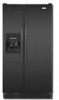
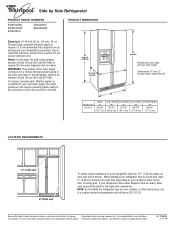
... REQUIREMENTS 1/2" (1.25 cm) 2" (5.08 cm) To ensure proper ventilation for your refrigerator, allow for 1⁄2" (1.25 cm) space on your model) to 414 kPa). Because Whirlpool Corporation policy includes a continuous commitment to be turned off by Side Refrigerator PRODUCT MODEL NUMBERS... the refrigerator needs to improve Dimensions are for the water dispenser and ice maker. B Model size 25 cu.ft. Use an outlet that a separate circuit serving only your refrigerator has a water dispenser and ice maker, allow for the water line connections. If your refrigerator be ...
... REQUIREMENTS 1/2" (1.25 cm) 2" (5.08 cm) To ensure proper ventilation for your refrigerator, allow for 1⁄2" (1.25 cm) space on your model) to 414 kPa). Because Whirlpool Corporation policy includes a continuous commitment to be turned off by Side Refrigerator PRODUCT MODEL NUMBERS... the refrigerator needs to improve Dimensions are for the water dispenser and ice maker. B Model size 25 cu.ft. Use an outlet that a separate circuit serving only your refrigerator has a water dispenser and ice maker, allow for the water line connections. If your refrigerator be ...


