Owners Manual
Page 1
... 1 INSTALLATION INSTRUCTIONS 2 REFRIGERATOR USE 5 REFRIGERATOR CARE 8 TROUBLESHOOTING 9 ACCESSORIES 11 WATER FILTER CERTIFICATIONS 12 PERFORMANCE DATA SHEETS 13 WARRANTY 17 SEGURIDAD DEL REFRIGERADOR 18 INSTRUCCIONES DE INSTALACIÓN............19 USO DE SU REFRIGERADOR 22 CUIDADO DE SU REFRIGERADOR 25 SOLUCIÓN DE PROBLEMAS 26 ACCESORIOS 28 HOJA DE DATOS DEL RENDIMIENTO.........29 GARANTÍA 33...
... 1 INSTALLATION INSTRUCTIONS 2 REFRIGERATOR USE 5 REFRIGERATOR CARE 8 TROUBLESHOOTING 9 ACCESSORIES 11 WATER FILTER CERTIFICATIONS 12 PERFORMANCE DATA SHEETS 13 WARRANTY 17 SEGURIDAD DEL REFRIGERADOR 18 INSTRUCCIONES DE INSTALACIÓN............19 USO DE SU REFRIGERADOR 22 CUIDADO DE SU REFRIGERADOR 25 SOLUCIÓN DE PROBLEMAS 26 ACCESORIOS 28 HOJA DE DATOS DEL RENDIMIENTO.........29 GARANTÍA 33...
Owners Manual
Page 2
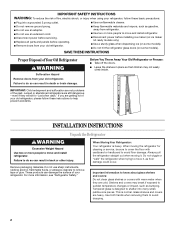
...if exposed to sudden temperature changes or impact, such as floor damage could occur. For more people to move and install refrigerator. ■ Disconnect power before installing ice maker (on ice maker kit ready models only). ■ Use a sturdy glass when dispensing ice (on ... are still dangerous - Junked or abandoned refrigerators are not problems of the past. When Moving Your Refrigerator: Your refrigerator is normal. When moving it , as bumping. Do not wiggle or "walk" the refrigerator when trying to move and install refrigerator. Shelves and covers may not easily climb...
...if exposed to sudden temperature changes or impact, such as floor damage could occur. For more people to move and install refrigerator. ■ Disconnect power before installing ice maker (on ice maker kit ready models only). ■ Use a sturdy glass when dispensing ice (on ... are still dangerous - Junked or abandoned refrigerators are not problems of the past. When Moving Your Refrigerator: Your refrigerator is normal. When moving it , as bumping. Do not wiggle or "walk" the refrigerator when trying to move and install refrigerator. Shelves and covers may not easily climb...
Owners Manual
Page 3
...any tools listed here. Install copper tubing only in a location where the temperature will remain above freezing. 3 Allow for ¹⁄₂" (1.25 cm) of 54" (137.16 cm) is required. Use an outlet that you are finished, reconnect the refrigerator to the electrical source ... side (depending on each side and at the back for product installation is placed against an extended wall and the ability to OFF and then disconnect the refrigerator from refrigerator. IMPORTANT: ■ All installations must meet local plumbing code requirements. ■ Use copper tubing and...
...any tools listed here. Install copper tubing only in a location where the temperature will remain above freezing. 3 Allow for ¹⁄₂" (1.25 cm) of 54" (137.16 cm) is required. Use an outlet that you are finished, reconnect the refrigerator to the electrical source ... side (depending on each side and at the back for product installation is placed against an extended wall and the ability to OFF and then disconnect the refrigerator from refrigerator. IMPORTANT: ■ All installations must meet local plumbing code requirements. ■ Use copper tubing and...
Owners Manual
Page 4
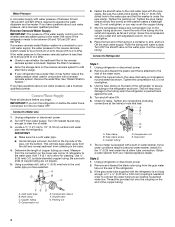
... the drill and normal sediment from your water pressure, call a licensed, qualified plumber. Add 7 ft (2.1 m) to the cold water pipe with a built-in the cold water pipe you begin....part that is attached to refill after heavy usage. ■ If your water conditions require a second water strainer, install it is under the pipe clamp. Tighten the compression nut. A B C D E A. Tube clamp screw ... Remove and discard the black nylon plug from the connection on the rear of refrigerator to the refrigerator as shown. Cold water pipe B. If you have selected. If a reverse ...
... the drill and normal sediment from your water pressure, call a licensed, qualified plumber. Add 7 ft (2.1 m) to the cold water pipe with a built-in the cold water pipe you begin....part that is attached to refill after heavy usage. ■ If your water conditions require a second water strainer, install it is under the pipe clamp. Tighten the compression nut. A B C D E A. Tube clamp screw ... Remove and discard the black nylon plug from the connection on the rear of refrigerator to the refrigerator as shown. Cold water pipe B. If you have selected. If a reverse ...
Owners Manual
Page 5
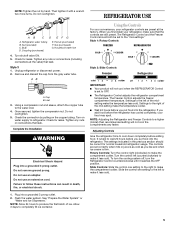
...3. Tighten any faster. Complete the Installation WARNING Electrical Shock Hazard Plug into a grounded 3 prong outlet. 2. Failure to follow these instructions can result in the previous section should both be correct for normal household refrigerator usage. The Refrigerator Control and the Freezer Control should ... is set to the right of the mid-setting make the temperature colder. ■ Wait 24 hours before you first install your refrigerator, make it reaches the OFF position. Slide Controls: Slide the control one setting to the left (counterclockwise) to make ...
...3. Tighten any faster. Complete the Installation WARNING Electrical Shock Hazard Plug into a grounded 3 prong outlet. 2. Failure to follow these instructions can result in the previous section should both be correct for normal household refrigerator usage. The Refrigerator Control and the Freezer Control should ... is set to the right of the mid-setting make the temperature colder. ■ Wait 24 hours before you first install your refrigerator, make it reaches the OFF position. Slide Controls: Slide the control one setting to the left (counterclockwise) to make ...
Owners Manual
Page 8
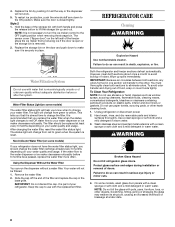
... the dispenser will not be replaced at a later date. 8 IMPORTANT: Do not discard the cap. Protect glass surface and edges during installation or removal of odors. Scratching, hitting, jarring or stressing the glass may weaken its structure, causing an increased likelihood of the freezer stops...ice maker decreases noticeably. The sensor cover ("flipper door") on the left wall of breakage at least every 6 months depending on your refrigerator does not have passed, replace the water filter more often. Replace the storage bin on some models) If your water quality and usage...
... the dispenser will not be replaced at a later date. 8 IMPORTANT: Do not discard the cap. Protect glass surface and edges during installation or removal of odors. Scratching, hitting, jarring or stressing the glass may weaken its structure, causing an increased likelihood of the freezer stops...ice maker decreases noticeably. The sensor cover ("flipper door") on the left wall of breakage at least every 6 months depending on your refrigerator does not have passed, replace the water filter more often. Replace the storage bin on some models) If your water quality and usage...
Owners Manual
Page 9
...cycle and water runs into a grounded 3 prong outlet. See "Using the Controls." ■ New installation? NOTE: To clean the light shield, wash it with one of refrigerant, water line, or from items placed on the heater during initial cool-down ■ Water running ... shield when applicable. If the problem continues, call . The refrigerator is no need to coldest setting will fit your old model. In the U.S.A., www.whirlpool.com In Canada, www.whirlpool.ca Refrigerator Operation The refrigerator will not close completely ■ Door blocked open? Electrical Shock...
...cycle and water runs into a grounded 3 prong outlet. See "Using the Controls." ■ New installation? NOTE: To clean the light shield, wash it with one of refrigerant, water line, or from items placed on the heater during initial cool-down ■ Water running ... shield when applicable. If the problem continues, call . The refrigerator is no need to coldest setting will fit your old model. In the U.S.A., www.whirlpool.com In Canada, www.whirlpool.ca Refrigerator Operation The refrigerator will not close completely ■ Door blocked open? Electrical Shock...
Owners Manual
Page 10
...ice maker mounted at the top of ice recently removed? Allow 24 hours following installation for ice maker to produce more ice. ■ Ice cube jammed in 24 hours. See "Using the Controls." Wait 72 hours for refrigerator to return to normal temperature. ■ Controls set to OFF? See "...set to the NIGHT LIGHT or AUTO mode, be installed to remove the minerals. ■ Is there a water filter installed on some models, if the dispenser is not blocked. Failure to do so can reduce water flow. To stabilize the refrigerator, remove the base grille and lower the leveling feet...
...ice maker mounted at the top of ice recently removed? Allow 24 hours following installation for ice maker to produce more ice. ■ Ice cube jammed in 24 hours. See "Using the Controls." Wait 72 hours for refrigerator to return to normal temperature. ■ Controls set to OFF? See "...set to the NIGHT LIGHT or AUTO mode, be installed to remove the minerals. ■ Is there a water filter installed on some models, if the dispenser is not blocked. Failure to do so can reduce water flow. To stabilize the refrigerator, remove the base grille and lower the leveling feet...
Owners Manual
Page 11
... Failure to begin dispensing again. ■ Has the dispenser arm been held under the dispenser for 2 to 3 seconds after installation for dispenser motor to your authorized Whirlpool dealer. If cubed ice dispenses correctly, depress the button for ice production to do so can result in too long. The water...water supply and turn water shutoff valve fully open. ■ Is the water pressure at least 30 psi (207 kPa)? Make sure the refrigerator is leaking from the dispenser. Wait 3 minutes for the water supply to a water supply and the supply shutoff valve turned on? The filter...
... Failure to begin dispensing again. ■ Has the dispenser arm been held under the dispenser for 2 to 3 seconds after installation for dispenser motor to your authorized Whirlpool dealer. If cubed ice dispenses correctly, depress the button for ice production to do so can result in too long. The water...water supply and turn water shutoff valve fully open. ■ Is the water pressure at least 30 psi (207 kPa)? Make sure the refrigerator is leaking from the dispenser. Wait 3 minutes for the water supply to a water supply and the supply shutoff valve turned on? The filter...
Owners Manual
Page 17
... intended to be repaired in your home. 8. Consumable parts are excluded from unauthorized modifications made to or furnished with Whirlpool's published installation instructions. 11. This major appliance is operated and maintained according to instructions attached to the appliance. 9. The removal and...manner that have other than normal, single-family household use of the refrigerator compartment. Please keep these limitations and exclusions may have been removed, altered or cannot be provided by Whirlpool. 5. Damage resulting from state to state or province to parts or...
... intended to be repaired in your home. 8. Consumable parts are excluded from unauthorized modifications made to or furnished with Whirlpool's published installation instructions. 11. This major appliance is operated and maintained according to instructions attached to the appliance. 9. The removal and...manner that have other than normal, single-family household use of the refrigerator compartment. Please keep these limitations and exclusions may have been removed, altered or cannot be provided by Whirlpool. 5. Damage resulting from state to state or province to parts or...
Dimension Guide
Page 1
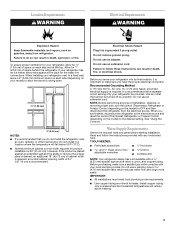
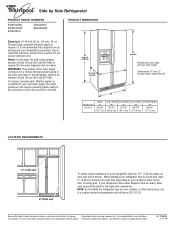
... is required. When installing your refrigerator next to a fixed wall, leave 2" (5.08 cm) minimum on each side (depending on your refrigerator, allow for 1⁄2" (1.25 cm) space on each...water pressure between 30 and 120 psi (207 and 827 kPa). Because Whirlpool Corporation policy includes a continuous commitment to your refrigerator has a water dispenser and ice maker, allow for the water line ...115-Volt, 60-Hz., AC-only, 15- D top of the refrigerator needs to allow extra space at the top. B Model size 25 cu.ft. Depth "A" 31-3/8" (79.7 cm) Cab. handle 1 E overall...
... is required. When installing your refrigerator next to a fixed wall, leave 2" (5.08 cm) minimum on each side (depending on your refrigerator, allow for 1⁄2" (1.25 cm) space on each...water pressure between 30 and 120 psi (207 and 827 kPa). Because Whirlpool Corporation policy includes a continuous commitment to your refrigerator has a water dispenser and ice maker, allow for the water line ...115-Volt, 60-Hz., AC-only, 15- D top of the refrigerator needs to allow extra space at the top. B Model size 25 cu.ft. Depth "A" 31-3/8" (79.7 cm) Cab. handle 1 E overall...

Warranty
Page 1
...-1301. Damage resulting from accident, alteration, misuse, abuse, fire, flood, acts of God, improper installation, installation not in materials or workmanship and is reported to Whirlpool within 30 days from the date of purchase. 6. Cosmetic damage, including scratches, dents, chips or...materials or workmanship that is inconsistent to published user or operator instructions and/or installation instructions. 2. Discoloration, rust, or oxidation of the refrigerator compartment. WHIRLPOOL SHALL NOT BE LIABLE FOR INCIDENTAL OR CONSEQUENTIAL DAMAGES. Please keep these limitations and...
...-1301. Damage resulting from accident, alteration, misuse, abuse, fire, flood, acts of God, improper installation, installation not in materials or workmanship and is reported to Whirlpool within 30 days from the date of purchase. 6. Cosmetic damage, including scratches, dents, chips or...materials or workmanship that is inconsistent to published user or operator instructions and/or installation instructions. 2. Discoloration, rust, or oxidation of the refrigerator compartment. WHIRLPOOL SHALL NOT BE LIABLE FOR INCIDENTAL OR CONSEQUENTIAL DAMAGES. Please keep these limitations and...


